Christmas Poinsettia Crochet Candle Centerpiece Pattern
Advanced
For experienced crocheters who enjoy complex shaping, fine detail, and ambitious construction
Single-Day Project
A satisfying project you can complete in a single afternoon or evening.
Handmade Gift
A beautiful keepsake — free forever. Read online or print at home.
About This Christmas Poinsettia Crochet Candle Centerpiece Pattern
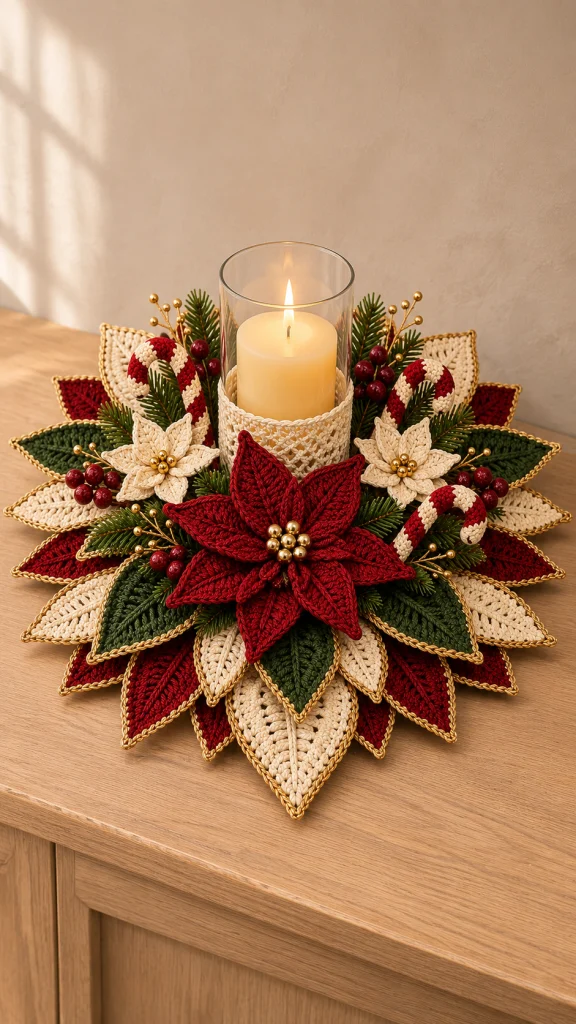
This crochet Christmas centerpiece pattern brings together deep red poinsettias, cream flowers, forest-green leaves, and fine gold edges around a lace-covered glass cylinder. Three striped crochet candy canes and tucked evergreen sprigs give the arrangement the generous, layered shape of a traditional Christmas table decoration.
The centerpiece is built on a flat crochet ring, with individually shaped leaves sewn into three overlapping tiers. A separate lace sleeve fits around the lower part of the glass, while folded flower petals add height at the front. Allow approximately 25–35 hours for the crochet and assembly, with extra time for blocking and drying.
This advanced project suits crocheters comfortable with shaping, surface crochet, working small tubes, and assembling dimensional floral pieces. Use a battery-operated LED pillar inside the glass cylinder so the finished arrangement can be enjoyed without an exposed flame near yarn or foliage.
Materials
- DK cotton yarn: approximately 160 g burgundy red, 140 g cream, and 100 g forest green; estimates assume approximately 110 m per 50 g.
- Fine gold metallic crochet thread, approximately 120 m, for leaf edging.
- 3.0 mm crochet hook for the foundation, leaves, flowers, and sleeve.
- 2.5 mm crochet hook for the candy canes and gold edging.
- Smooth, straight-sided glass cylinder, approximately 12 cm in outside diameter and 22–25 cm tall.
- Battery-operated LED pillar candle sized to fit comfortably inside the cylinder.
- Firm polyester stuffing, approximately 15 g.
- Three lengths of 3 mm cotton cord, each 22 cm long, for the candy-cane cores.
- Gold beads: seven 8 mm beads for the red flower and ten 5–6 mm beads for the cream flowers.
- Artificial evergreen sprigs, approximately 12 pieces measuring 8–12 cm.
- Artificial burgundy berry clusters, approximately six small clusters.
- Optional gold decorative picks, approximately six small sprays.
- Matching sewing thread and a fine sewing needle for beads and decorative sprigs.
- Tapestry needle, stitch markers, scissors, measuring tape, blocking mat, and rustproof pins.
- Water-based fabric stiffener suitable for cotton, used according to its label.
- A washable nonslip mat cut into a ring approximately 18 cm across with a 12.5 cm center opening.
Abbreviations
chchainsl stslip stitchscsingle crochethdchalf double crochetdcdouble crochetsc2togsingle crochet two stitches togetherhdc2toghalf double crochet two stitches togetherdc2togdouble crochet two stitches togetherststitchstsstitchesMRmagic ringFoundation Ring
- With forest green and the 3.0 mm hook, ch 72 loosely. Join with a sl st in the first ch without twisting. The chain should encircle the cylinder with a little clearance; its target circumference is approximately 40 cm.
- Round 1: Ch 1, sc in every ch; join with a sl st in the first sc. Count: 72 sc.
- Round 2: Ch 1, repeat [sc in next 5 sts, 2 sc in next st] 12 times; join. Count: 84 sc.
- Round 3: Ch 1, repeat [sc in next 6 sts, 2 sc in next st] 12 times; join. Count: 96 sc.
- Rounds 4–5: Ch 1, sc in each st; join each round. Count: 96 sc per round. Fasten off.
- Block flat to approximately 18 cm across with a center opening approximately 12.5–13 cm across. Mark 12 equally spaced positions around Round 5, placing a marker every 8 sts. Place the nonslip ring beneath the crochet during final assembly.
Large Pointed Leaves — Make 24
- Make 12 cream and 12 burgundy leaves with the 3.0 mm hook. Work back and forth. Leave a 25 cm starting tail at the narrow base.
- Row 1: Ch 3, dc in the third ch from the hook. Count: 1 dc. Turn.
- Row 2: Ch 2, work 3 dc in the single st. Count: 3 dc. Turn.
- Row 3: Ch 2, 2 dc in first st, dc in next st, 2 dc in last st. Count: 5 dc. Turn.
- Row 4: Ch 2, 2 dc in first st, dc in next 3 sts, 2 dc in last st. Count: 7 dc. Turn.
- Row 5: Ch 2, 2 dc in first st, dc in next 5 sts, 2 dc in last st. Count: 9 dc. Turn.
- Row 6: Ch 2, dc in all 9 sts. Count: 9 dc. Turn.
- Row 7: Ch 2, dc2tog, dc in next 5 sts, dc2tog. Count: 7 dc. Turn.
- Row 8: Ch 2, dc2tog, dc in next 3 sts, dc2tog. Count: 5 dc. Turn.
- Row 9: Ch 2, dc2tog, dc in next st, dc2tog. Count: 3 dc. Turn.
- Row 10: Ch 2, dc2tog over the first 2 sts, dc in last st. Count: 2 dc. Turn.
- Row 11: Ch 2, dc2tog. Count: 1 dc. Do not turn.
- Perimeter round: Ch 1, work 2 sc into each of the 11 row ends down the first side, ch 1 at the base, work 2 sc into each of the 11 row ends up the second side, then work (sc, ch 2, sc) into the Row 11 tip stitch. Join to the first sc. Count: 46 sc, one base ch-1 space, and one tip ch-2 space. Fasten off.
- Gold edge: With the 2.5 mm hook, join gold thread in the base space. Ch 1, sc in that space, sc in each of the next 23 sc, work (sc, ch 2, sc) in the tip space, sc in the remaining 23 sc, and join to the first sc. Count: 49 sc and one ch-2 tip space. Fasten off.
- Center vein: With matching DK yarn and the 3.0 mm hook, surface sl st along the middle from base to tip, placing one stitch at each row junction. Keep the line loose enough for the leaf to lie flat. Secure both ends on the underside.
- Block each leaf to approximately 13 × 5.5 cm. Apply a light coat of stiffener to the underside, preserving the pointed tip and raised vein. Dry fully.
Medium Green Leaves — Make 12
- With forest green and the 3.0 mm hook, work Rows 1–11 of the large leaf, replacing every dc with hdc, every dc2tog with hdc2tog, and every ch-2 turning chain with ch 1. Begin Row 1 with ch 2 and hdc in the second ch. Row counts are 1, 3, 5, 7, 9, 9, 7, 5, 3, 2, and 1.
- Perimeter round: Ch 1, work 1 sc into each of the 11 row ends down one side, ch 1 at the base, work 1 sc into each of the 11 row ends up the other side, then (sc, ch 2, sc) into the tip stitch. Join. Count: 24 sc, one base ch-1 space, and one tip ch-2 space.
- Gold edge: Join gold in the base space, ch 1, sc in that space, sc in next 12 sc, (sc, ch 2, sc) in the tip space, sc in remaining 12 sc; join. Count: 27 sc and one ch-2 space. Fasten off.
- Add a loose surface sl st vein through the center. Block to approximately 9 × 4.5 cm and stiffen lightly on the underside.
Large Red Poinsettia
- Make 10 burgundy petals using Rows 1–11 of the medium green leaf. Leave off the gold edge. Work its 24-sc perimeter round and add the matching center vein.
- Block each petal to approximately 9 × 4.5 cm. Leave these petals flexible rather than stiffening them flat.
- Make the flower backing: With burgundy, work 6 sc in an MR. Join. Round 2: Ch 1, 2 sc in each st; join. Count: 12 sc. Round 3: Ch 1, repeat [sc in next st, 2 sc in next st] 6 times; join. Count: 18 sc. Fasten off with a 50 cm sewing tail.
- Arrange 5 petals evenly around the backing, narrow starting bases toward the center and tips outward. Overlap the bases by approximately 1 cm and sew each base firmly to the backing.
- Place the remaining 5 petals over the gaps in the first layer. Pinch the bottom 1 cm of each upper petal lengthwise and secure the fold with 3 small stitches before sewing it to the backing.
- Sew one 8 mm gold bead at the center and six around it. Pass through each bead at least twice, securing the thread into the backing. Finished flower diameter is approximately 18–20 cm.
Two Cream Poinsettias
- Make 12 cream petals, six per flower, with the 3.0 mm hook. Leave a 20 cm starting tail on each.
- Row 1: Ch 2, sc in second ch. Count: 1 sc. Turn.
- Row 2: Ch 1, 3 sc in the single st. Count: 3 sc. Turn.
- Row 3: Ch 1, 2 sc in first st, sc in next st, 2 sc in last st. Count: 5 sc. Turn.
- Rows 4–5: Ch 1, sc in each st. Count: 5 sc per row. Turn after each row.
- Row 6: Ch 1, sc2tog, sc in next st, sc2tog. Count: 3 sc. Turn.
- Row 7: Ch 1, sc2tog, sc in last st. Count: 2 sc. Turn.
- Row 8: Ch 1, sc2tog. Count: 1 sc. Do not turn.
- Perimeter round: Ch 1, work 1 sc into each of 8 row ends down one side, ch 1 at the base, 1 sc into each of 8 row ends up the other side, then (sc, ch 2, sc) into the tip stitch; join. Count: 18 sc, one base ch-1 space, and one tip ch-2 space. Fasten off.
- Add a loose surface sl st center vein. Block petals to approximately 4 × 2.5 cm.
- For each flower backing, work 6 sc in an MR; join. Ch 1, work 2 sc in each st; join. Count: 12 sc. Fasten off with a sewing tail.
- Sew three petals around each backing, then sew three more over the gaps. Pinch each upper petal slightly at its base. Sew five small gold beads into each center. Each finished flower measures approximately 8 cm across.
Striped Candy Canes — Make Three
- Use the 2.5 mm hook and firm tension. Work joined rounds, carrying the unused color loosely inside. Joining sl sts and starting chains do not count as stitches.
- Round 1: With cream, work 6 sc in an MR. Join to the first sc. Count: 6 sc.
- Rounds 2–3: Ch 1, sc in each st; join each round. Count: 6 sc per round.
- Rounds 4–6: Change to burgundy. Ch 1, sc in each st; join each round. Count: 6 sc per round.
- Rounds 7–30: Repeat the following six-round stripe sequence four times: three rounds cream, then three rounds burgundy. Work 6 sc in every round. The tube now has 30 rounds, forming ten stripes of three rounds each.
- As the tube grows, feed one 22 cm cotton cord through its center and add small wisps of stuffing around it. Trim the cord to fit inside the tube before closing; it must not protrude.
- Round 31: With cream, ch 1, work sc2tog three times; join. Count: 3 sc. Fasten off and draw the tail through all three remaining stitches to close.
- Curve the upper third into a hook. With matching yarn, sew three short concealed tacking stitches between the inner curve surfaces to hold the bend. Aim for an overall height of approximately 12–14 cm. Secure and bury all ends.
Lace Sleeve for the Glass
- With cream and the 3.0 mm hook, ch 64 loosely and join without twisting. Check around the lower part of the glass: the chain should slide on without stretching hard. If necessary, change the foundation by multiples of 4; this changes the mesh count by one for every four chains added or removed.
- Round 1: Ch 1, sc in every ch; join. Default count: 64 sc.
- Round 2: Ch 1, repeat [sc in next st, ch 3, skip next 3 sts] 16 times; join to the first sc. Count: 16 sc and 16 ch-3 spaces.
- Round 3: Sl st into the first ch-3 space, ch 1, sc in that space, ch 3; repeat [sc in next ch-3 space, ch 3] 15 times. Join to the first sc. Count: 16 sc and 16 ch-3 spaces.
- Rounds 4–9: Repeat Round 3 once per round. Count: 16 sc and 16 ch-3 spaces per round.
- Round 10: Sl st into the first ch-3 space, ch 1, work 4 sc in each ch-3 space around; join. Count: 64 sc.
- Round 11: Ch 1, repeat [sc in next st, ch 2, skip next st] 32 times; join. Count: 32 sc and 32 ch-2 spaces. Fasten off and weave in ends.
- Dampen and block the sleeve over a cylinder matching the glass diameter. Allow it to dry completely before fitting it around the glass. Target height is approximately 8–9 cm. Keep its upper edge well below the glass rim.
Layered Centerpiece Assembly
- Set the foundation ring flat and designate one marker as the front center. Imagine the ring as a clock face, with the front at 6 o’clock. Keep the entire center opening clear.
- Outer cream tier: Position one cream large leaf at each of the 12 markers, with its base overlapping the outermost 1 cm of the foundation and its tip pointing outward. Sew each base to the ring with at least four passes. This tier establishes an overall diameter of approximately 44 cm.
- Red tier: Position the 12 large burgundy leaves between the cream leaves. Overlap their bases 2 cm onto the ring so their tips sit slightly inside the cream tips. Sew each base securely and add one concealed tack approximately 2 cm farther along the leaf where it overlaps the cream tier.
- Green tier: Position the 12 medium green leaves above the other tiers, aligned approximately with the cream leaves. Overlap each base 1 cm onto the ring. Sew the bases firmly, keeping the outer portions free.
- Place the large red flower at 6 o’clock, its backing just outside the center opening. Sew the backing to the ring at six evenly spaced points. Check that no petal is pushed beneath the glass.
- Sew one cream flower at approximately 4 o’clock and the other at 8 o’clock. Angle them slightly toward the front, with their tips overlapping neighboring green leaves.
- Position two candy canes at approximately 10 and 2 o’clock, hooks facing inward. Place the third at approximately 4 o’clock beside the cream flower. Sew each cane at its lower end and at a second point farther up against a leaf or the foundation.
- Distribute the evergreen sprigs between the flowers and behind the candy canes. Secure each stem to the foundation at two points using strong sewing thread. Keep stems away from the center opening.
- Add six berry clusters among the greenery and tuck in the optional gold sprays. Sew through the covered stems or their attachment loops. Cover any exposed stem ends with yarn wraps secured beneath the arrangement.
- Place the nonslip ring under the foundation. Fit the dry sleeve onto the glass, then lower the glass directly onto the table through the center opening. Insert the LED pillar and check that the entire arrangement sits level.
Finishing
Turn the arrangement carefully onto a folded towel before inserting the glass. Secure every sewing tail through several stitches on the underside, then trim it. Check each flower, candy cane, and decorative sprig with a gentle tug; add stitches wherever a piece shifts.
Set the centerpiece upright and lift the upper red petals with your fingers to give the flower an open, layered shape. Spread the cream tips evenly around the edge and settle the greenery between them. The glass should lift out freely for cleaning, and the lace sleeve should remain removable.
Dust the finished arrangement with a soft brush. Remove the glass, candle, and detachable decorations before spot-cleaning the crochet. Reblock any damp leaves and let every part dry fully before reassembly.
Tips for Success
- Block matching leaves together against a paper template so the three tiers remain evenly spaced.
- Work the gold edging loosely; tight metallic stitches draw the leaf edges inward and blunt the tips.
- Pin all 36 leaves in position before sewing. Check the silhouette from above as well as from the front.
- Keep stuffing light in the candy-cane bends so the inner-curve tacks can hold a smooth hook.
- Use the actual glass when checking sleeve fit, since cylinder diameters and cotton stretch vary.
Common Mistakes to Avoid
- Counting turning chains as stitches changes the leaf shaping. Count only the stated crochet stitches after each row.
- Sewing leaf bases over the central opening makes the glass unstable. Keep every attachment outside the inner edge.
- Pulling surface veins tight shortens the leaves. Relax each slip stitch before drawing up the next loop.
- Attaching all leaf tiers at the same depth hides the lower layers. Use the different overlaps specified for cream, red, and green.
- Using a flame candle near the yarn introduces heat and ignition risks. Fit a battery-operated LED pillar inside the cylinder.
Ways to Customize This Pattern
- Replace burgundy with cranberry and forest green with blue-green while retaining the cream tier and gold outline.
- For an understated arrangement, omit the candy canes and fill their positions with additional sewn evergreen sprigs.
- Replace bead centers with embroidered gold French knots, working through the flower backing to anchor each knot.
- Adjust sleeve circumference in multiples of four foundation chains and repeat Round 3 to change its height.
- Make the complete crochet portion in a different yarn weight for a different scale, then select the glass only after measuring the blocked foundation opening.
Frequently asked questions
Use a battery-operated LED candle for this design. The yarn sleeve, raised petals, and artificial greenery sit close to the cylinder, so the pattern is designed around a light source without a flame.
There are 59 pieces: one foundation ring, 36 decorative leaves, 22 flower petals, three flower backings, three candy canes, and one sleeve. This totals 66 pieces before assembly; the petals and backings become three finished flowers.
Check the 72, 84, and 96 stitch counts first. If those are correct, wet-block the ring around a circular template. Persistent cupping suggests tight tension; remake the ring with a slightly larger hook and check the glass clearance again.
No. Blocked cotton, a light application of fabric stiffener, overlapping layers, and concealed tacking stitches provide the structure. Let the large outer leaves rest on the tabletop.
This is an original written design developed from the pictured centerpiece concept. It has not been physically sample-tested; check the stated leaf dimensions, sleeve fit, and assembled balance before making the full set.
The finished Christmas Poinsettia Crochet Candle Centerpiece Pattern

