Christmas Poinsettia Crochet Candle Centerpiece – Beautiful Handmade Holiday Table Decoration
There is something magical about a cozy Christmas evening, a beautifully decorated living room, and a handmade centerpiece that brings warmth to the entire space.
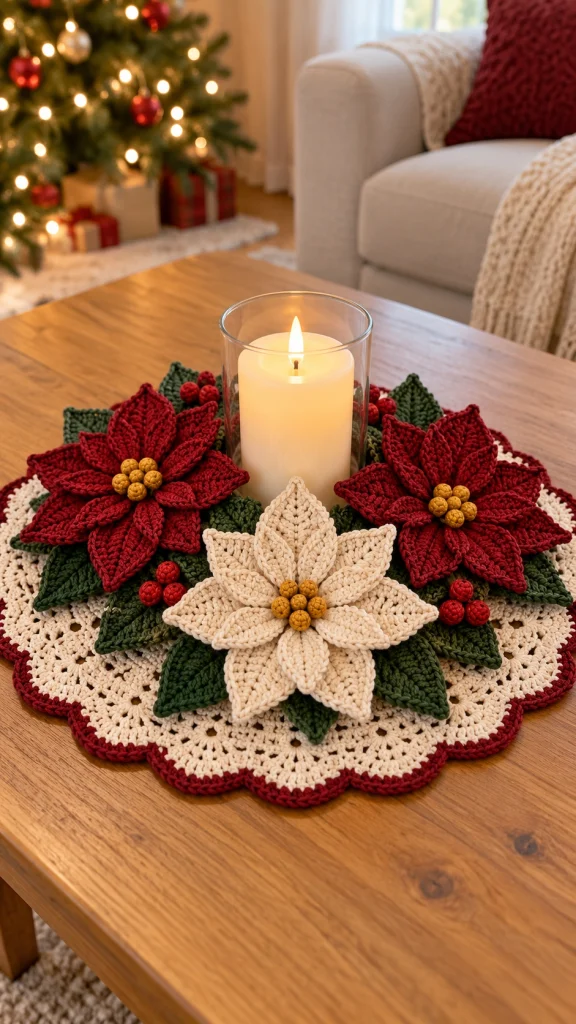
This gorgeous Christmas poinsettia crochet candle centerpiece combines delicate ivory lace, rich burgundy edging, three-dimensional poinsettia flowers, deep green leaves, and cheerful red berries into one elegant holiday decoration.
Inspired by traditional Christmas floral arrangements and vintage crochet doilies, this project makes a stunning addition to a coffee table, dining table, mantel, or holiday display.
The design features a circular crochet lace base with softly scalloped edges, two deep red poinsettias, one creamy white poinsettia, and layers of textured green leaves arranged around a central glass candle holder.
In this tutorial, you’ll learn how to create each crochet component and assemble them into a beautiful handmade Christmas centerpiece.
Project Overview
- Skill Level: Intermediate to Advanced
- Finished Diameter: Approximately 35–40 cm
- Base Shape: Round lace doily
- Flowers: Three layered crochet poinsettias
- Colors: Ivory, burgundy, forest green, and golden yellow
- Yarn: DK-weight cotton yarn
- Hook Size: 3–3.5 mm
- Terminology: US crochet terms
Pattern note: This is an original, image-inspired crochet design, not an exact reconstruction of the photograph. The stitch counts below provide a structured starting pattern; dimensions and flower placement may require adjustment depending on yarn, tension, and your chosen candle holder.
Materials You’ll Need
- Approximately 150 g of ivory cotton yarn
- Approximately 100 g of deep Christmas red or burgundy yarn
- Approximately 80 g of forest green yarn
- Small amount of golden yellow yarn
- Small amount of bright red yarn for berries
- 3 mm crochet hook
- 3.5 mm crochet hook
- Yarn needle
- Scissors
- Stitch markers
- Optional fabric stiffener for decorative flowers
- Glass candle holder
- Battery-operated LED candle, strongly recommended
- Optional nonflammable display tray
Important safety note: Yarn is flammable. Never place a burning candle directly on or near crochet flowers, leaves, or the doily. Use a battery-operated LED candle to recreate the photographed look safely. A glass holder does not make an open flame safe when surrounded by yarn decorations.
Crochet Abbreviations
- ch: Chain
- sc: Single crochet
- hdc: Half double crochet
- dc: Double crochet
- tr: Treble crochet
- sl st: Slip stitch
- st: Stitch
- sts: Stitches
- sp: Space
- MR: Magic ring
- inc: Increase
- FO: Fasten off
Step 1 – Crochet the Round Ivory Lace Base
The foundation of this centerpiece is a beautiful circular crochet doily.
Using ivory cotton yarn and a 3.5 mm hook:
Center Circle
Round 1: Make a MR, ch 3 (counts as first dc), work 11 dc into the ring. Join with sl st. (12 dc)
Round 2: Ch 3, dc in the same stitch, work 2 dc in each remaining stitch. Join. (24 dc)
Round 3: Ch 3, work 2 dc in the next stitch, repeat (dc in next stitch, 2 dc in next stitch) around. Join. (36 dc)
Round 4: Ch 3, dc in next stitch, 2 dc in next stitch. Repeat (dc in next 2 stitches, 2 dc in next stitch) around. Join. (48 dc)
Round 5: Ch 3, dc in next 2 stitches, 2 dc in next stitch. Repeat (dc in next 3 stitches, 2 dc in next stitch) around. Join. (60 dc)
Round 6: Ch 3, dc in next 3 stitches, 2 dc in next stitch. Repeat (dc in next 4 stitches, 2 dc in next stitch) around. Join. (72 dc)
Continue increasing evenly if you would like a larger center circle.
Step 2 – Create the Decorative Lace Pattern
Once the center circle is complete, begin adding the airy openwork that gives the doily its elegant appearance.
Round 7: Ch 4 (counts as dc and ch 1), skip 1 stitch, dc in next stitch, ch 1. Repeat around. Join.
Round 8: Sl st into the first ch-1 space. Ch 3, dc in the same space, ch 2. Work 2 dc in each following ch-1 space, separated by ch 2. Join.
Round 9: Sl st into the first ch-2 space. Ch 3, 2 dc in the same space, ch 2. Work 3 dc in each following ch-2 space, separated by ch 2. Join.
Round 10: Sl st into the first ch-2 space. Ch 3, 3 dc in the same space, ch 2. Work 4 dc in each following ch-2 space, separated by ch 2. Join.
These rounds create a gently expanding lace pattern.
Check regularly that the doily lies flat. If the edge begins to ripple or cup, adjust the chain spaces or stitch groups before continuing.
Step 3 – Crochet the Scalloped Burgundy Border
The deep burgundy border beautifully frames the ivory lace.
Attach burgundy yarn to the outer edge of the doily.
Work one round of sc evenly around the edge.
For the scalloped finish, repeat:
Skip 1 stitch, work 5 dc in the next stitch, skip 1 stitch, sl st in the next stitch.
Continue around the entire doily.
FO and weave in the ends.
Gently shape the scallops with your fingers.
This rich red edging creates a lovely traditional Christmas finish.
Step 4 – Crochet the Poinsettia Flower Petals
The three-dimensional poinsettia flowers are the centerpiece’s most eye-catching feature.
Make two burgundy flowers and one ivory flower.
Each flower consists of two layers of pointed petals.
Individual Poinsettia Petal
Using a 3 mm crochet hook:
Ch 15.
Row 1: Sc in the second chain from the hook, hdc in next stitch, dc in next 3 stitches, tr in next 4 stitches, dc in next 3 stitches, hdc in next stitch, sc in last stitch.
Continue working along the opposite side of the foundation chain.
Repeat the stitch sequence in reverse order.
Sl st to close the petal.
FO, leaving a long tail for sewing.
Make eight large petals for the lower layer of each flower.
Smaller Upper Petals
For the smaller petals, begin with ch 11 instead of ch 15.
Work the same general pointed oval shape, reducing the number of taller stitches proportionally.
Make six smaller petals for each flower.
Tip: Add a row of slip stitches along the outer edge of each petal for a more defined shape.
Step 5 – Assemble the Layered Poinsettias
Arrange the eight large petals in a circular formation.
Overlap the bases slightly so the petals spread outward naturally.
Using matching yarn and a yarn needle, sew the bases together securely.
Position the six smaller petals above the first layer.
Rotate the upper petals so they sit between the larger lower petals.
Sew the upper layer securely into place.
Gently lift the smaller petals to create a dimensional flower.
Repeat to make:
- Two deep red poinsettias
- One ivory poinsettia
Step 6 – Crochet the Golden Flower Centers
The golden yellow centers create a warm, festive contrast.
Using golden yellow yarn and a 3 mm hook:
Round 1: Make a MR and work 6 sc into the ring. (6)
Round 2: Work 2 sc in each stitch. (12)
Round 3: Sc around. (12)
Round 4: Decrease around. (6)
FO, leaving a long tail.
Make six or seven small golden bobbles for each poinsettia.
Arrange them in a cluster at the center of the flower.
Sew them securely into place.
These textured centers resemble the tiny golden buds of a real poinsettia.
Step 7 – Crochet the Forest Green Leaves
The dark green leaves create depth and help frame the flowers.
Using forest green yarn:
Ch 17.
Starting in the second chain from the hook:
Sc in next stitch, hdc in next 2 stitches, dc in next 4 stitches, tr in next 4 stitches, dc in next 3 stitches, hdc in next stitch, sc in last stitch.
Work along the opposite side of the foundation chain using the same sequence in reverse.
Sl st to close.
FO, leaving a long tail.
Make approximately 12–15 leaves.
For a realistic textured appearance, embroider a central vein using matching green yarn.
Arrange the leaves beneath the poinsettias, allowing their pointed ends to extend beyond the flower petals.
Step 8 – Crochet the Red Christmas Berries
Small red berries add beautiful festive detail between the flowers.
Using bright red yarn:
Round 1: 6 sc in MR. (6)
Round 2: 2 sc in each stitch. (12)
Round 3: Sc around. (12)
Round 4: Decrease around. (6)
Lightly stuff if desired.
FO and close the opening.
Make approximately 9–12 berries.
Arrange them in small clusters of three between the flowers and leaves.
Sew each berry securely into place.
Step 9 – Arrange the Floral Centerpiece
Place the finished ivory doily flat on your table.
Position your battery-operated LED candle in a glass holder at the center.
Arrange the three poinsettias around the holder:
- Place one red poinsettia on the left.
- Place one red poinsettia on the right.
- Position the ivory poinsettia toward the front.
Place the forest green leaves beneath and between the flowers.
Add small clusters of red berries to fill the remaining spaces.
Adjust the arrangement until the flowers form a balanced circular display.
Important: Keep all crochet decorations away from real flames. Use an LED candle only.
Step 10 – Secure the Decorations
Once you are satisfied with the arrangement, begin attaching the components.
Using a yarn needle and matching yarn:
- Sew the green leaves onto the lace base.
- Attach the two red poinsettias.
- Position and attach the ivory poinsettia.
- Add the red berry clusters.
- Weave in all loose ends.
- Check that every decoration is firmly attached.
- Place the LED candle holder at the center.
For easier cleaning and storage, leave the candle holder removable rather than sewing it into the centerpiece.
Step 11 – Shape and Finish Your Centerpiece
Gently arrange the poinsettia petals to create a natural layered appearance.
Lift the upper petals slightly to add dimension.
Spread the green leaves outward to create a full floral arrangement.
Smooth the lace base so it lies flat.
If necessary, lightly block the doily before attaching the decorations.
Your handmade Christmas centerpiece is now ready to display!
Beautiful Christmas Color Variations
Classic Christmas Red and Ivory
Deep red poinsettias, ivory lace, dark green leaves, and golden centers.
Elegant Winter White
All-ivory poinsettias, champagne-colored centers, sage green leaves, and cream lace.
Rustic Farmhouse Christmas
Burgundy flowers, oatmeal lace, olive green leaves, and warm mustard centers.
Vintage Christmas Rose
Dusty rose poinsettias, antique ivory lace, muted green leaves, and soft gold accents.
Traditional Holiday Green
Deep forest green lace, bright red poinsettias, ivory accents, and golden centers.
Creative Ways to Display Your Crochet Centerpiece
- Use it as a Christmas coffee table decoration.
- Place it in the center of your dining table.
- Display it on a wooden console table.
- Use it as a festive mantel decoration with an LED candle.
- Create a matching set of Christmas placemats.
- Make a smaller version for a bedside table.
- Give it as a thoughtful handmade Christmas gift.
- Use it as part of a holiday craft fair display.
- Combine it with other handmade crochet Christmas decorations.
- Display it on a decorative tray with artificial greenery.
Helpful Tips for Beautiful Results
- Choose cotton yarn for crisp stitch definition.
- Keep your tension consistent throughout the lace base.
- Block the doily before attaching the flowers.
- Use smaller hooks for firmer flower petals.
- Arrange all decorations before sewing them permanently.
- Use contrasting colors for the flower centers.
- Secure each petal layer carefully.
- Keep the arrangement balanced around the central holder.
- Use a removable LED candle for convenience and safety.
- Store the finished centerpiece flat to protect its shape.
Frequently Asked Questions
Is this Christmas crochet centerpiece beginner-friendly?
The basic doily and berry patterns are approachable for confident beginners, but the layered poinsettias and final assembly make this project better suited for intermediate crocheters.
What yarn works best?
DK-weight cotton yarn is recommended because it provides structure, stitch definition, and a beautiful handmade texture.
Can I make the centerpiece larger?
Yes. Increase the size of the circular base and add more decorative lace rounds before completing the scalloped border.
Can I use different flower colors?
Absolutely! White, blush pink, burgundy, and traditional Christmas red all look beautiful.
How many poinsettias should I make?
The photographed design features three main flowers: two red poinsettias and one ivory poinsettia.
Can I use a real candle?
No. Because the design places flammable yarn close to the candle holder, a battery-operated LED candle is the safe choice.
How do I keep the flowers from curling?
Use consistent tension and gently block the petals. A suitable fabric stiffener may also help maintain their shape.
Can I wash the centerpiece?
If made entirely from washable cotton yarn, the crochet components can generally be gently hand-washed. Follow the yarn label, remove any detachable decorations, and dry flat.
Can I use this design without a candle?
Yes! Replace the candle holder with a small decorative bowl, a miniature Christmas ornament arrangement, or another non-heated centerpiece.
Can I give this as a handmade gift?
Definitely! It makes a thoughtful Christmas present for anyone who loves handmade decorations and cozy holiday interiors.
Final Thoughts
This Christmas Poinsettia Crochet Candle Centerpiece is a beautiful way to bring traditional holiday colors, delicate crochet textures, and handmade charm into your home.
With its intricate ivory lace, rich burgundy poinsettias, creamy white flower, and deep green foliage, it creates a warm and elegant festive display.
Whether you make it for your own Christmas table or give it to someone special, this handmade centerpiece is sure to become a treasured holiday decoration.
Happy crocheting, and may your Christmas be filled with warmth, creativity, and handmade magic! 🎄🧶❤️