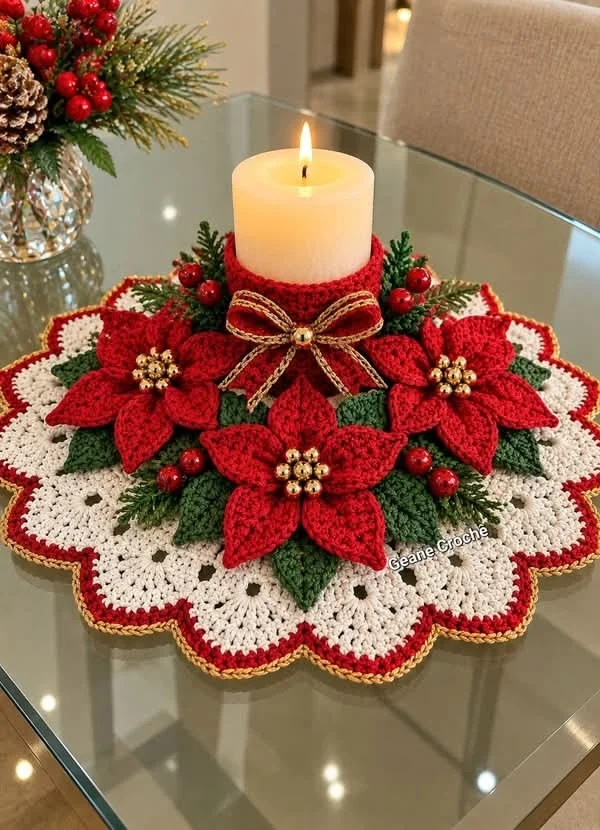
Christmas Poinsettia Crochet Candle Mat Pattern
Beginner Friendly
Perfect for those just starting their crochet journey, with clear instructions and simple techniques
Single-Day Project
A satisfying project you can complete in a single afternoon or evening.
Handmade Gift
A beautiful keepsake — free forever. Read online or print at home.
About This Christmas Poinsettia Crochet Candle Mat Pattern
This Christmas crochet candle mat pattern creates an elegant holiday centerpiece with a large cream scalloped base, dimensional red poinsettias, green leaves and small festive berries surrounding a central candle.
The layered construction gives the piece a beautiful handmade look while keeping the individual flowers and leaves raised from the background. It works beautifully as a Christmas table centerpiece, side-table decoration or handmade holiday gift.
Materials
- DK cotton yarn – cream / ivory 120–150 g
- DK cotton yarn – Christmas red 80–100 g
- DK cotton yarn – dark green 50–70 g
- DK cotton yarn – gold small amount
- DK cotton yarn – berry red small amount
- 3.0–3.5 mm crochet hook 1
- Yarn needle 1
- Scissors 1 pair
- Stitch markers optional
- Small gold beads optional
- Flameless pillar candle recommended
Abbreviations – US Terms
MRmagic ringchchainsl stslip stitchscsingle crochethdchalf double crochetdcdouble crochettrtreble crochetincincreasest(s)stitch(es)spspaceFOfasten offFinished Size
Approximately 40–45 cm / 16–18 in across after blocking.
The center opening/decorative area can be adjusted to fit your candle holder. The example works well with a pillar approximately 7–8 cm / 2.75–3.25 in wide.
Construction Overview
- Crochet the large circular cream base.
- Add the red and gold scalloped edging.
- Make three large poinsettias.
- Make green leaves.
- Make small red berries.
- Create the central candle collar.
- Arrange and sew all decorations securely to the base.
Part 1 – Center of the Mat
With cream yarn, make a MR.
Round 1
Ch 3, work 11 dc into the ring.
Sl st into the top of beginning ch-3.
12 dc.
Round 2
Ch 3, dc in same st.
Work 2 dc in every st around.
Join with sl st.
24 dc.
Round 3
Ch 3, 2 dc in next st.
*Dc in next st, 2 dc in next st.*
Repeat around and join.
36 dc.
Part 2 – Continue Enlarging the Circle
Round 4
*Dc in next 2 sts, 2 dc in next st.* Repeat around.
Round 5
*Dc in next 3 sts, 2 dc in next st.* Repeat around.
Round 6
*Dc in next 4 sts, 2 dc in next st.* Repeat around.
Continue increasing in this manner, adding one additional dc between increases on every round.
Work until the circle measures approximately 25–28 cm / 10–11 in across.
Part 3 – Openwork Lace Round
Ch 4.
*Skip 1 st, dc in next st, ch 1.*
Repeat around.
Join with sl st into the third chain of beginning ch-4.
This creates the small decorative openings visible near the outer portion of the mat.
Part 4 – Solid Cream Round
Ch 3.
Work dc in every dc and every ch-1 sp around.
Join with sl st.
Work another round of dc, increasing evenly if necessary to keep the piece completely flat.
Part 5 – Large Scalloped Border
The outer edge is made from repeating shell sections.
*Skip 2 sts, 7 dc in next st, skip 2 sts, sc in next st.*
Repeat around.
Adjust the skipped stitches slightly near the end if necessary so the final scallops are evenly distributed.
Part 6 – Red Scallop Accent
Join red yarn at the beginning of any scallop.
Work sc evenly across the top edge of each cream shell.
At the lowest point between two scallops, work a sl st.
Continue around the entire mat.
FO.
Part 7 – Gold Final Edging
Join gold yarn.
Work a fine round of sl st or surface crochet along the outside edge.
Keep the tension relaxed so the scallops remain flat.
FO and weave in ends.
Part 8 – Poinsettia Center
With red yarn, make a MR.
Round 1
Work 6 sc into the ring.
Join with sl st.
Part 9 – Inner Poinsettia Petals
Work one petal into each stitch:
Ch 5, sl st in second ch from hook, sc in next ch, hdc in next ch, dc in final ch, sl st into same base st.
Sl st into the next stitch.
Repeat around to create 6 pointed petals.
Part 10 – Outer Poinsettia Petals
Working behind the first petal layer:
*Ch 6, sc behind next inner petal.*
Repeat around to create 6 loops.
Into each loop work:
sc, hdc, dc, 2 tr, dc, hdc, sc.
Repeat around.
FO.
Part 11 – Poinsettia Centers
Using gold yarn, make several tiny French-knot-style crochet bobbles or sew small gold beads into the center.
For crochet bobbles:
Make MR, ch 1, work 5 puff stitches into the ring.
Pull closed tightly.
FO, leaving a long tail for sewing.
Sew one gold cluster into the center of each poinsettia.
Make 3 large poinsettias.
Part 12 – Green Leaves
With dark green yarn:
Ch 11.
Starting in second ch from hook:
sl st, sc, hdc, dc, tr, tr, dc, hdc, sc, sl st.
Ch 1.
Work along the opposite side of the foundation chain:
sl st, sc, hdc, dc, tr, tr, dc, hdc, sc, sl st.
FO leaving a sewing tail.
Part 13 – Leaf Vein
Thread the yarn tail through a needle.
Run it vertically through the center of the leaf using small surface stitches.
Pull very gently to give the leaf a slightly curved dimensional shape.
Make approximately 12–15 leaves.
Part 14 – Crochet Berries
With berry-red yarn, make MR.
Work 6 sc into ring.
Round 2
2 sc in every stitch around. 12 sts.
Round 3
Sc around.
Insert a tiny amount of stuffing if desired.
Round 4
Sc2tog around.
Close remaining opening.
Make approximately 12–18 berries.
Part 15 – Evergreen Sprigs
With dark green yarn, ch 18–24.
Starting near the hook, create tiny branches:
*Ch 4, sl st back down the chain, sl st into main stem.*
Repeat along alternating sides of the foundation chain.
Make several sprigs in different lengths for a more natural arrangement.
Part 16 – Candle Collar
With red yarn, ch enough stitches to fit loosely around the candle holder.
Join to form a ring, making sure the chain is not twisted.
Rounds 1–5
Sc in every stitch around.
Continue until the collar measures approximately 4–5 cm / 1.5–2 in tall.
FO.
Part 17 – Decorative Bow
Using gold yarn or a red-and-gold combination, ch approximately 70–80.
Sl st back across the chain for a firmer cord.
Tie into a small bow.
Sew or tie the bow securely to the front of the red candle collar.
Add a small gold bead or crochet bobble to the center.
Part 18 – Arrangement
Place the candle holder temporarily in the center of the finished mat.
Arrange the three poinsettias evenly around it, forming a triangular composition.
Position green leaves beneath and between the flowers.
Add evergreen sprigs toward the back.
Fill smaller gaps with red berries.
Part 19 – Sew the Decorations
Start with the green leaves and evergreen sprigs.
Sew only through the lower portions so the tips remain slightly raised.
Add the poinsettias next.
Secure each flower firmly through its center and lower petals.
Finish by attaching berry clusters between the leaves.
Part 20 – Create More Dimension
Once everything is attached, gently lift the upper petals of each poinsettia.
Bend the green leaves slightly outward.
Arrange berry clusters so they peek between the flowers rather than sitting directly on top.
The final arrangement should look layered rather than completely flat.
Part 21 – Blocking
Lightly dampen only the cream base.
Pin every scallop into shape on a blocking mat.
Keep the dimensional flowers dry if possible.
Allow the piece to dry completely.
Remove the pins and reshape the poinsettia petals by hand.
Color Variations
Classic Christmas: red, forest green, ivory and antique gold.
Elegant Christmas: burgundy, sage, cream and champagne gold.
Winter White: ivory poinsettias, eucalyptus green and silver.
Vintage Christmas: muted red, olive green, beige and bronze.
Pink Christmas: dusty rose, cream, sage and soft gold.
Ways to Customize It
- Replace the candle with a small Christmas lantern.
- Add miniature crochet pinecones.
- Use pearl beads instead of gold centers.
- Add tiny white crochet snowflakes.
- Make five smaller poinsettias instead of three large ones.
- Use metallic crochet thread for the final edging.
- Add a removable candle collar.
- Make matching placemats using only the scalloped base.
- Create matching poinsettia coasters.
Care Instructions
Remove the candle and any removable decorations before cleaning.
Hand wash gently in cool water.
Do not wring or twist.
Press between clean towels to remove excess water.
Block the mat flat and reshape every scallop.
Allow to air dry completely.
Frequently Asked Questions
Yes. Continue the circular increase sequence before beginning the openwork and scalloped border.
Yes, although cotton gives the mat and flowers better stitch definition and helps the base stay flatter.
A flameless LED candle is recommended. If using a real candle, place it in a stable heat-resistant holder and maintain generous clearance between the flame and all yarn decorations.
Add another layer of larger petals behind the existing layers and lightly shape each petal after sewing the flower in place.
Yes. Use the first rounds of the cream base and finish with a smaller red-and-gold scalloped edge.
Store the centerpiece flat in a dry box. Place tissue paper around the poinsettias so the dimensional petals are not crushed.
The finished Christmas Poinsettia Crochet Candle Mat Pattern

