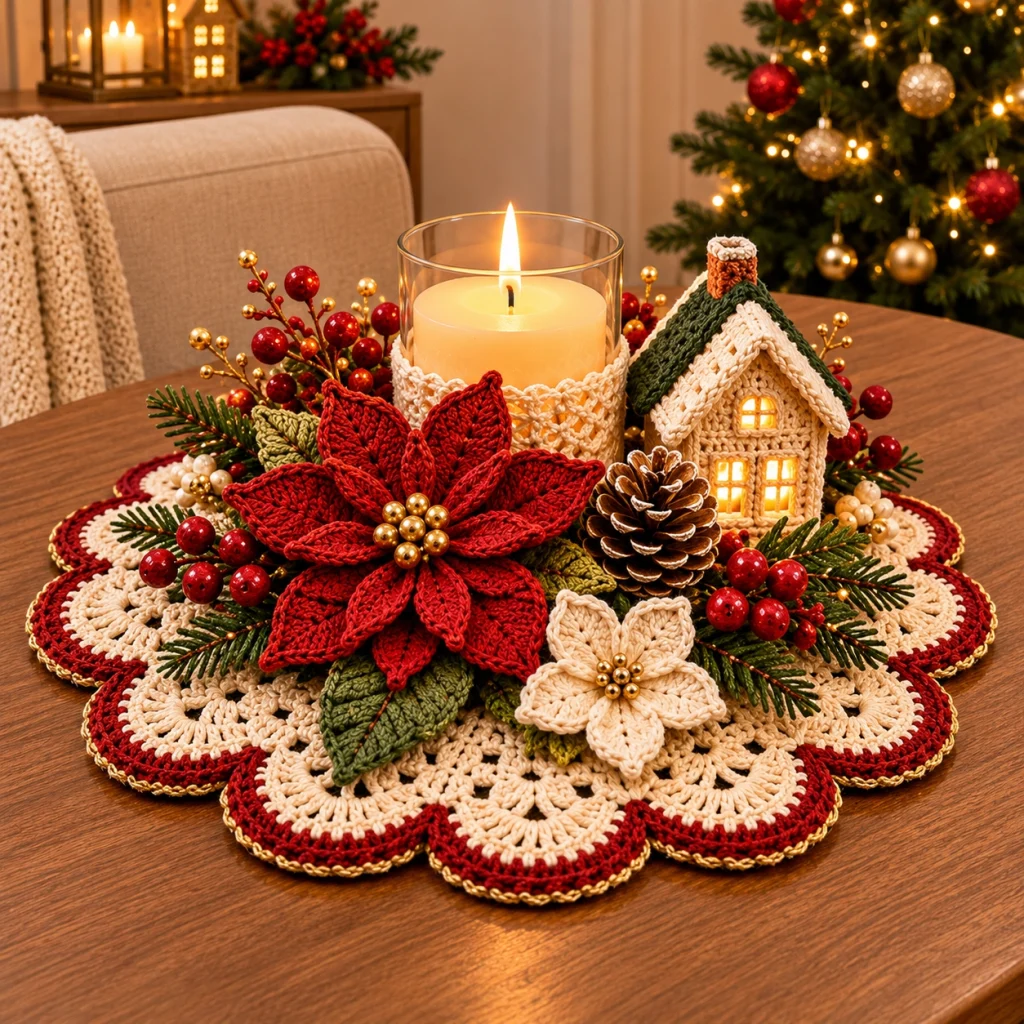
Christmas Poinsettia & Gingerbread Cottage Crochet Centerpiece – Free Advanced Pattern
Bring handmade Christmas magic to your holiday table with this beautiful crochet centerpiece featuring a large red poinsettia, delicate ivory flower, miniature gingerbread cottage, elegant candle holder, evergreen leaves, and a stunning scalloped lace base.
Designed in traditional Christmas colors of deep red, warm ivory, forest green, and gold, this festive arrangement combines intricate crochet techniques with charming decorative details. The layered poinsettia petals, textured leaves, tiny cottage, and decorative lacework create an elegant centerpiece that looks beautiful on a dining table, coffee table, or holiday display.
This advanced crochet project is assembled from multiple individual components, allowing experienced crocheters to explore detailed shaping, textured stitches, floral construction, lacework, and three-dimensional crochet architecture.
Pattern Details
- Skill Level: Advanced
- Finished Diameter: Approximately 40–45 cm
- Finished Height: Approximately 20–24 cm including the candle holder
- Style: Traditional Christmas, elegant farmhouse, festive vintage
- Construction: Multi-piece crochet centerpiece
- Primary Colors: Ivory, Christmas red, forest green, olive green, gingerbread brown, and gold
- Terminology: US crochet terms
- Recommended Candle: Battery-operated LED pillar candle
Materials Needed
- 300–400 g ivory cotton yarn, DK weight
- 150–200 g deep Christmas red cotton yarn
- 100–150 g forest green cotton yarn
- 50 g olive green cotton yarn
- 50 g warm gingerbread brown cotton yarn
- Small amount of gold metallic yarn
- 3 mm crochet hook
- 3.5 mm crochet hook
- Tapestry needle
- Scissors
- Stitch markers
- Polyester stuffing for the cottage
- Small gold decorative beads
- Red decorative berry picks
- Artificial evergreen sprigs
- One small decorative pinecone
- Clear glass candle hurricane
- Battery-operated LED pillar candle
- Optional plastic canvas for cottage support
- Optional fabric stiffener
- Strong sewing thread
Safety Note: Always use a flameless LED candle with this crochet arrangement. Yarn, artificial greenery, and decorative materials are flammable and must not be placed near an open flame.
Crochet Abbreviations
- MR: Magic ring
- ch: Chain
- sc: Single crochet
- hdc: Half double crochet
- dc: Double crochet
- tr: Treble crochet
- sl st: Slip stitch
- st: Stitch
- sp: Space
- sk: Skip
- inc: Increase
- dec: Decrease
- BLO: Back loop only
- FLO: Front loop only
- FO: Fasten off
- RS: Right side
- WS: Wrong side
1. Crochet the Scalloped Lace Centerpiece Base
The centerpiece begins with a large ivory crochet base featuring openwork lace sections and rounded scalloped edges finished in deep red and gold.
Central Foundation
Using ivory yarn and a 3.5 mm crochet hook:
Round 1: Make a magic ring. Ch 3 (counts as dc), work 11 dc into the ring. Join with a sl st. (12 dc)
Round 2: Ch 3, dc in the same stitch. Work 2 dc in each stitch around. Join. (24 dc)
Round 3: Ch 3, dc in the same stitch, dc in the next stitch. *2 dc in the next stitch, dc in the next stitch.* Repeat around. Join. (36 dc)
Round 4: Ch 3, dc in the same stitch, dc in the next 2 stitches. *2 dc in the next stitch, dc in the next 2 stitches.* Repeat around. Join. (48 dc)
Round 5: Ch 3, dc in the same stitch, dc in the next 3 stitches. *2 dc in the next stitch, dc in the next 3 stitches.* Repeat around. Join. (60 dc)
Openwork Lace Section
Round 6: Ch 4, skip 1 stitch, dc in the next stitch. *Ch 1, skip 1 stitch, dc in the next stitch.* Repeat around.
Round 7: Sl st into the first ch-1 space. Ch 3, work 2 dc in the same space. *Ch 1, work 3 dc in the next ch-1 space.* Repeat around.
Round 8: Work a combination of dc clusters and ch-2 spaces to create a decorative lace pattern.
Rounds 9–12: Continue expanding the lace base by working dc groups into chain spaces, increasing evenly to maintain a flat circular shape.
Block the base gently before adding the decorative outer petals.
2. Create the Large Scalloped Border
The reference centerpiece features broad ivory scallops with deep red outer edges and a delicate gold finish.
Divide the outer edge into 12 equal sections using stitch markers.
For each section:
- Attach ivory yarn at the first marker.
- Work a foundation row of dc across the section.
- Turn and work additional dc rows, increasing toward the center of the scallop.
- Shape the outer edge into a rounded petal.
- Decrease toward the opposite side.
- Fasten off and repeat around the centerpiece.
Join deep red yarn along the outside edge.
Work one round of sc around every scallop.
Follow with a decorative round of reverse single crochet or picot edging.
Finish with a thin gold metallic slip-stitch border.
The result should be a wide, flower-shaped crochet mat with elegant red and gold scalloped edges.
3. Crochet the Large Red Poinsettia
The centerpiece features a dramatic layered red poinsettia with pointed petals and a gold bead center.
Use deep Christmas red yarn and a 3 mm hook.
Large Petals – Make 7
Row 1: Ch 16. Sc in the second chain from the hook, hdc in the next 2 stitches, dc in the next 8 stitches, hdc in the next 2 stitches, sc in the final 2 stitches.
Row 2: Ch 1, turn. Work sc in the first stitch, hdc in the next 2 stitches, dc across the central section, hdc in the next 2 stitches, sc in the final stitch.
Row 3: Ch 1, turn. Work evenly across the petal, maintaining the pointed shape.
Edging: Work sc around the entire petal, placing 3 sc at the pointed tip.
Fasten off, leaving a long tail for assembly.
Medium Petals – Make 5
Repeat the large petal instructions using a foundation chain of 13 stitches.
Work fewer central dc stitches to create a slightly shorter petal.
Small Petals – Make 5
Ch 10.
Work sc, hdc, and dc stitches along the chain to create a pointed oval.
Finish with a neat sc border.
Assemble the Poinsettia
- Arrange the seven large petals in a circular formation.
- Overlap the bases slightly.
- Sew securely through the lower ends.
- Position the five medium petals above the first layer.
- Add the five small petals to the center.
- Sew all layers together.
- Attach a cluster of gold decorative beads to the center.
For extra dimension, lightly curve each petal upward before securing it.
4. Crochet the Small Ivory Poinsettia
The smaller ivory flower adds contrast to the deep red poinsettia and balances the arrangement.
Using ivory yarn:
Large Petals: Make 6 using a foundation chain of 11 stitches.
Small Petals: Make 5 using a foundation chain of 8 stitches.
Work each petal using the same pointed oval construction as the red poinsettia.
Arrange the larger petals into a circle.
Place the smaller petals on top.
Sew securely and decorate the center with small gold beads.
5. Crochet the Evergreen Leaves
The arrangement includes several textured green leaves positioned beneath the poinsettias.
Using forest green or olive green yarn:
Foundation: Ch 18.
Round 1: Sc in the second chain, hdc in the next 2 stitches, dc in the next 10 stitches, hdc in the next 2 stitches, sc in the final 2 stitches.
Work around the opposite side of the foundation chain to create an oval leaf.
Round 2: Work sc around the leaf, placing 3 sc at the pointed tip.
Round 3: Work a decorative raised center vein using surface slip stitches.
Fasten off.
Make approximately 8–10 leaves in different shades of green.
For additional texture, embroider diagonal leaf veins using a slightly lighter green yarn.
6. Crochet the Miniature Gingerbread Cottage
The miniature cottage is one of the most charming elements of this centerpiece. It features ivory walls, a forest green pitched roof, white roof trim, a small chimney, and decorative windows.
Finished cottage size: approximately 11 cm tall × 9 cm wide.
Front and Back Walls – Make 2
Using warm ivory yarn and a 3 mm hook:
Row 1: Ch 21. Sc in the second chain from the hook and across. (20 sc)
Rows 2–14: Ch 1, turn. Sc across.
Fasten off.
Side Walls – Make 2
Row 1: Ch 17. Sc in the second chain and across. (16 sc)
Rows 2–14: Ch 1, turn. Sc across.
Fasten off.
Triangular Roof Gables – Make 2
Using ivory yarn:
Row 1: Ch 21. Sc in the second chain and across. (20 sc)
Row 2: Ch 1, turn. Sc2tog, sc across to the last 2 stitches, sc2tog.
Repeat the decrease row until only 2 stitches remain.
Fasten off.
Roof Panels – Make 2
Using forest green yarn:
Row 1: Ch 23. Sc in the second chain and across. (22 sc)
Rows 2–19: Ch 1, turn. Sc across.
Fasten off.
Work an ivory scalloped edging along the lower edge of each roof panel.
Chimney
Using gingerbread brown yarn:
Round 1: Ch 10 and join to form a ring.
Rounds 2–7: Sc evenly around.
Fasten off.
Add a small ivory trim around the chimney opening.
Cottage Assembly
- Sew the front, back, and side walls together.
- Attach the triangular gables.
- Reinforce the walls with plastic canvas if desired.
- Join the two roof panels along their upper edges.
- Position the roof over the cottage.
- Sew the roof securely to the upper walls.
- Attach the chimney.
- Embroider decorative window frames with ivory yarn.
For illuminated windows, place a small battery-operated LED light inside the cottage. Do not use an open flame.
7. Crochet the Candle Holder Sleeve
The central glass candle holder is wrapped in delicate ivory crochet lace.
Measure the circumference of your glass hurricane before beginning.
Using ivory yarn and a 3 mm crochet hook:
Foundation: Chain enough stitches to fit snugly around the glass, using a multiple of 4.
Join carefully without twisting.
Round 1: Sc in each chain around.
Round 2: Ch 3, skip 1 stitch, dc in the next stitch. Repeat around.
Round 3: Work alternating dc groups and chain spaces to create an openwork lace texture.
Rounds 4–8: Repeat the lace pattern until the sleeve reaches the desired height.
Final Round: Work a decorative scalloped edging using groups of 5 dc separated by slip stitches.
Fasten off and weave in the ends.
Slide the sleeve around the lower portion of the glass holder.
Ensure the sleeve stays well below the glass rim and use only a flameless LED candle.
8. Add Decorative Red and Gold Berries
Small crochet berries can be used to complement the artificial berry picks.
Using deep red yarn:
Round 1: Make a magic ring and work 6 sc into the ring. (6)
Round 2: Work 2 sc in each stitch. (12)
Rounds 3–4: Sc around. (12)
Round 5: Work 6 decreases evenly around. (6)
Add a small amount of stuffing.
Close the opening and fasten off.
Make 10–15 berries.
Arrange them in small clusters around the poinsettias and cottage.
Add a few gold beads between the berries for a festive finish.
9. Create the Decorative Evergreen Arrangement
To recreate the lush appearance of the reference design, combine crocheted leaves with artificial evergreen sprigs.
- Place the large red poinsettia slightly to the left of the candle holder.
- Position the ivory poinsettia near the front edge.
- Place the miniature cottage on the right side.
- Arrange the crocheted green leaves beneath the flowers.
- Add artificial evergreen sprigs around the main decorations.
- Position red berry clusters between the leaves.
- Add one decorative pinecone near the cottage.
- Distribute small gold accents evenly.
Keep the arrangement balanced while allowing the scalloped crochet base to remain visible around the outside.
10. Assemble the Christmas Centerpiece
Once all crochet components are complete, assemble the centerpiece carefully.
- Lay the scalloped lace base flat on a clean surface.
- Position the glass candle holder in the center.
- Place the red poinsettia toward the front-left side.
- Arrange the ivory flower near the front.
- Position the miniature cottage on the right.
- Place green crochet leaves beneath the flowers.
- Add the pinecone and decorative berries.
- Fill empty areas with artificial evergreen sprigs.
- Secure lightweight decorative components with discreet stitches or removable ties.
- Check that the arrangement remains stable and symmetrical.
For easier storage, keep the candle holder and cottage removable instead of permanently attaching them to the base.
11. Advanced Crochet Tips
- Use mercerized cotton yarn for crisp stitch definition.
- Block the lace base before attaching decorations.
- Maintain consistent tension across all poinsettia petals.
- Use surface crochet to create raised leaf veins.
- Reinforce the cottage walls for a clean architectural shape.
- Use small amounts of stuffing to prevent distortion.
- Choose a smaller crochet hook for firm decorative components.
- Keep all bead attachments secure.
- Use a battery-operated LED candle for safe illumination.
- Store the decorative pieces separately to preserve their shape.
12. Customization Ideas
- Classic Christmas: Deep red, ivory, forest green, and gold.
- Winter Wonderland: White poinsettias, silver beads, and icy green leaves.
- Rustic Farmhouse: Cream, burgundy, olive green, and natural wooden accents.
- Elegant Gold: Ivory flowers with champagne-gold borders and pearl centers.
- Vintage Christmas: Dark cranberry, antique cream, and muted evergreen.
- Minimalist Holiday: Ivory lace base, one red poinsettia, and simple evergreen accents.
13. Care and Storage Instructions
- Remove the glass candle holder before cleaning.
- Spot-clean crochet pieces gently with cool water.
- Avoid soaking metallic decorations and beads.
- Reshape flowers while slightly damp.
- Allow all components to dry completely.
- Store the cottage in a protective box.
- Keep the lace base flat to prevent creasing.
- Store artificial greenery separately when possible.
Frequently Asked Questions
Is this Christmas crochet centerpiece suitable for beginners?
This is an advanced project because it combines lacework, layered flowers, shaped leaves, miniature cottage construction, and detailed decorative assembly.
How long does this project take?
Depending on your experience, the complete centerpiece may take approximately 20–35 hours.
Can I make the centerpiece without the cottage?
Yes. You can replace the miniature cottage with another poinsettia, a crochet Christmas tree, or additional evergreen leaves.
Can I use a real candle?
No. This centerpiece contains yarn and other flammable decorations. Always use a flameless LED candle.
What yarn is best for the lace base?
DK-weight cotton yarn is recommended because it creates defined stitches and holds decorative scallops beautifully.
Can I make the centerpiece larger?
Yes. Add more rounds to the lace base and increase the number or size of the scallops to suit your table.
Can I use this as a Christmas gift?
Absolutely! This handmade centerpiece makes a thoughtful holiday gift for anyone who loves crochet, traditional Christmas decorations, and festive home styling.
Can I sell finished centerpieces made from this pattern?
Yes, you may sell handmade finished items created using this original pattern. Credit to Cozy Crochet Patterns is appreciated.
Final Thoughts
This Christmas Poinsettia & Gingerbread Cottage Crochet Centerpiece combines elegant lacework, beautiful handmade flowers, charming miniature architecture, and festive greenery into one memorable holiday decoration.
The rich red poinsettia, delicate ivory flower, glowing cottage windows, and scalloped crochet base create a warm and inviting display that captures the magic of Christmas.
Whether displayed on a dining table, coffee table, or holiday mantel, this advanced crochet centerpiece is a beautiful way to celebrate handmade Christmas traditions.
Save this free Christmas Crochet Centerpiece Pattern to Pinterest and share it with your crochet-loving friends!
Designer note: This is an original pattern inspired by the supplied image rather than an exact reconstruction. The instructions are not sample-tested; check stitch counts, gauge, shaping, and component fit before completing the project.

