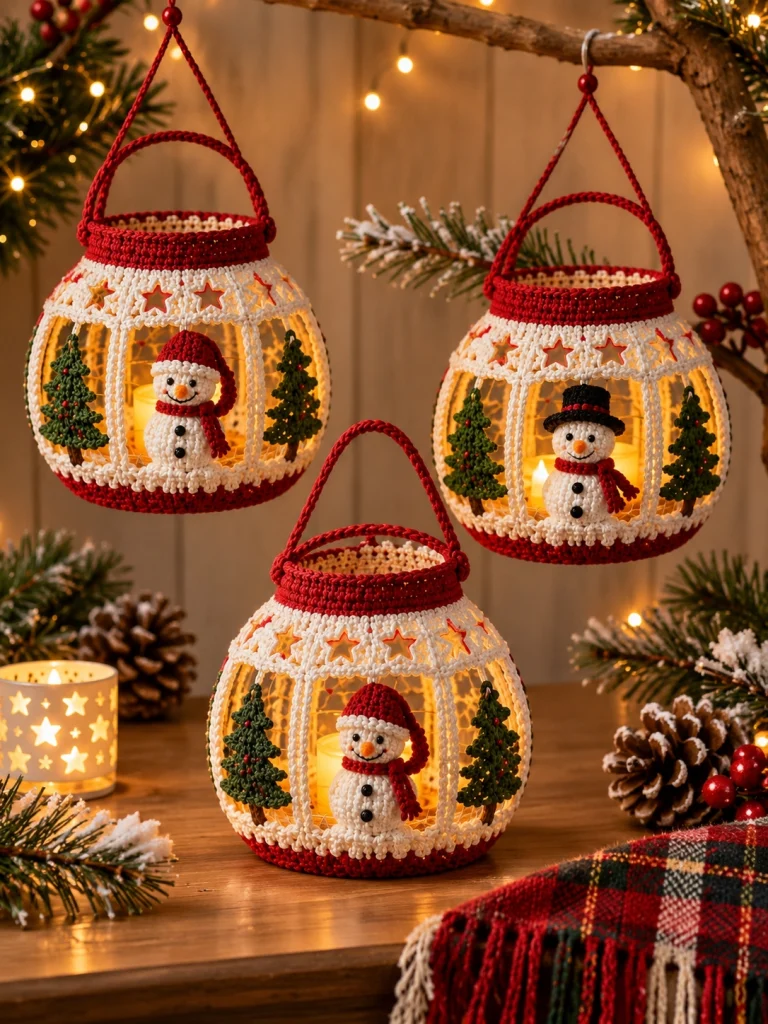
Christmas Reindeer Crochet Lanterns – Free Advanced Crochet Pattern
Bring a magical handmade glow to your Christmas decorations with these adorable Christmas Reindeer Crochet Lanterns! Featuring miniature amigurumi reindeer, delicate white snowflake lace, tiny decorated Christmas trees, and rich red-and-green hanging handles, these festive lantern ornaments are perfect for creating a cozy winter atmosphere.
This advanced crochet project combines detailed amigurumi construction with decorative openwork crochet. Each lantern features a rounded green base, an airy cream-colored exterior, a miniature reindeer wearing a bright red scarf, and two small Christmas trees decorated with golden beads.
Display these beautiful crochet lanterns on a Christmas tree, hang them from decorative branches, or arrange them as a glowing tabletop centerpiece. Their warm illumination and intricate handmade details make them especially charming during the holiday season.
This is an original pattern inspired by the reference image. It recreates the overall appearance using a supported openwork lantern frame and separately crocheted decorations. Some structural details are adapted for practical construction.
Pattern Details
- Skill Level: Advanced
- Finished Height: Approximately 15–18 cm, excluding hanging strap
- Finished Diameter: Approximately 13–15 cm
- Construction: Multiple separate crocheted components
- Yarn Weight: Sport or DK cotton
- Hook Sizes: 2.0 mm, 2.5 mm, and 3.0 mm
- Terminology: US crochet terms
- Colors: Forest green, ivory, Christmas red, caramel brown, dark brown, and white
- Estimated Time: 10–16 hours per lantern
- Lighting: Battery-operated LED tealight only
Materials Needed
- Forest green cotton yarn
- Ivory or cream cotton yarn
- Christmas red cotton yarn
- Caramel brown cotton yarn
- Dark brown cotton yarn
- White cotton yarn
- Small amount of black yarn
- 2.0 mm crochet hook
- 2.5 mm crochet hook
- 3.0 mm crochet hook
- Polyester fiberfill stuffing
- Stitch markers
- Tapestry needle
- Scissors
- Small gold beads
- Two small black safety eyes or embroidered eyes
- Battery-operated LED tealight
- Clear rigid plastic ornament frame or lightweight lantern support
- Optional fabric stiffener
Important Safety Note: Never place a real candle or open flame inside a crochet lantern. Use only a cool-running battery-operated LED light. Keep electrical components accessible and avoid direct contact with delicate yarn decorations.
Crochet Abbreviations
- MR: Magic ring
- ch: Chain
- sc: Single crochet
- hdc: Half double crochet
- dc: Double crochet
- tr: Treble crochet
- sl st: Slip stitch
- inc: Increase
- dec: Invisible decrease
- BLO: Back loop only
- FLO: Front loop only
- FO: Fasten off
- st: Stitch
- rnd: Round
Unless otherwise stated, work amigurumi pieces in continuous rounds. Work decorative lace rounds with a slip stitch join.
1. Crochet the Forest Green Lantern Base
The bottom of the lantern is a firm circular platform that supports the miniature reindeer and Christmas trees.
Using forest green yarn and a 2.5 mm hook:
Rnd 1: 6 sc in MR. (6)
Rnd 2: Inc around. (12)
Rnd 3: (1 sc, inc) x 6. (18)
Rnd 4: (2 sc, inc) x 6. (24)
Rnd 5: (3 sc, inc) x 6. (30)
Rnd 6: (4 sc, inc) x 6. (36)
Rnd 7: (5 sc, inc) x 6. (42)
Rnd 8: (6 sc, inc) x 6. (48)
Rnd 9: (7 sc, inc) x 6. (54)
Rnd 10: (8 sc, inc) x 6. (60)
Rnd 11: (9 sc, inc) x 6. (66)
Rnd 12: (10 sc, inc) x 6. (72)
Rnd 13: (11 sc, inc) x 6. (78)
Rnd 14: (12 sc, inc) x 6. (84)
Rnd 15: (13 sc, inc) x 6. (90)
Rnd 16: BLO sc around. (90)
Rnds 17–20: Sc around. (90)
Fasten off, leaving a long tail.
Insert a lightweight circular plastic support into the bottom to prevent sagging.
2. Crochet the Lower Ivory Border
Using ivory yarn:
Join yarn to the front loops of Round 16.
Rnd 1: Sc around. (90)
Rnd 2: (Sl st, ch 3, skip 2 sts) repeat around.
Rnd 3: Work 3 sc into each chain space around.
Fasten off.
This creates a decorative scalloped trim along the bottom edge of the lantern.
3. Crochet the Openwork Lantern Walls
The lantern walls feature delicate openwork stitches that allow the warm LED light to shine through.
Using ivory yarn and a 2.5 mm hook:
Join yarn to the top of the green base.
Rnd 1: Ch 3 (counts as dc), dc in each stitch around. Join. (90)
Rnd 2: Ch 4 (counts as dc and ch 1), skip 1 stitch, dc in next stitch. Repeat around. Join.
Rnd 3: Ch 3, dc in each dc and chain space around. Join. (90)
Rnd 4: Ch 5, skip 2 stitches, sc in next stitch. Repeat around, adjusting the final repeat to maintain an even circle.
Rnd 5: Sl st into first chain space. Ch 3, work 4 dc into the same space. Work 5 dc into each remaining chain space. Join.
Rnd 6: Ch 1, sc around. Join.
Repeat the decorative mesh and fan sections until the walls reach approximately 9–11 cm in height.
For a rounded lantern silhouette, gradually reduce the circumference near the upper section by working fewer chain spaces evenly around.
Check the fit against the chosen rigid support as you work.
4. Create the Snowflake Lace Band
The upper part of the lantern is decorated with a continuous band of delicate snowflake motifs.
Mini Snowflake Motif – Make 8
Using ivory yarn and a 2.0 mm hook:
Rnd 1: Ch 6 and join with a sl st to form a ring.
Rnd 2: Ch 1, work 12 sc into the ring. Join.
Rnd 3: (Ch 5, skip 1 sc, sl st into next sc) repeat 6 times.
Rnd 4: In each chain-5 loop work (sc, hdc, dc, ch 3, dc, hdc, sc).
Fasten off and weave in the ends.
Block each snowflake gently to open the points.
Arrange the motifs evenly around the upper portion of the lantern and sew them together with invisible stitches.
Attach the completed band to the openwork wall.
5. Crochet the Upper Green Rim
Using forest green yarn:
Rnd 1: Join yarn around the upper opening and sc evenly around.
Rnds 2–5: Sc around without increases.
Rnd 6: Reverse sc around for a firm decorative edge.
Fasten off.
The finished opening should remain wide enough to insert and remove the battery-operated LED light.
6. Crochet the Red Hanging Handle
The bright red hanging handle adds a traditional Christmas accent.
Using Christmas red yarn and a 2.5 mm hook:
Row 1: Ch 65. Sc in the second chain from the hook and across. (64)
Rows 2–3: Ch 1, turn, sc across. (64)
Fasten off, leaving long tails at both ends.
Fold the strap lengthwise and stitch the long edges together for additional strength.
Attach each end securely to opposite sides of the green rim.
Reinforce the attachment points with several passes of yarn.
For hanging displays, use an independent structural cord or support through the handle so the decorative crochet does not carry excessive weight.
7. Crochet the Miniature Reindeer Head
The reindeer is the main decorative character inside the lantern.
Using caramel brown yarn and a 2.0 mm hook:
Rnd 1: 6 sc in MR. (6)
Rnd 2: Inc around. (12)
Rnd 3: (1 sc, inc) x 6. (18)
Rnd 4: (2 sc, inc) x 6. (24)
Rnd 5: (3 sc, inc) x 6. (30)
Rnds 6–10: Sc around. (30)
Rnd 11: (3 sc, dec) x 6. (24)
Rnd 12: (2 sc, dec) x 6. (18)
Insert or embroider the eyes before closing the head.
Stuff firmly.
Rnd 13: (1 sc, dec) x 6. (12)
Rnd 14: Dec around. (6)
Fasten off and close the opening.
8. Crochet the Reindeer’s Muzzle
Using caramel brown yarn:
Rnd 1: 6 sc in MR. (6)
Rnd 2: Inc around. (12)
Rnds 3–4: Sc around. (12)
Stuff lightly.
Fasten off, leaving a long tail.
Sew the muzzle to the lower front of the head.
Red Nose
Using red yarn:
Rnd 1: 6 sc in MR. (6)
Rnd 2: Sc around. (6)
Fasten off and sew the nose to the front of the muzzle.
The bright red nose gives the reindeer its cheerful holiday appearance.
9. Crochet the Reindeer’s Ears
Make two ears using caramel brown yarn.
Rnd 1: 4 sc in MR. (4)
Rnd 2: (1 sc, inc) x 2. (6)
Rnd 3: (2 sc, inc) x 2. (8)
Rnds 4–5: Sc around. (8)
Flatten the opening and fasten off.
Using cream yarn, embroider a small inner-ear detail.
Sew the ears to the sides of the head.
10. Crochet the Reindeer’s Antlers
Make two antlers using dark brown yarn.
Main Antler Stem
Ch 11.
Starting in the second chain from the hook, sl st in each chain across.
Fasten off.
Antler Branches
Attach dark brown yarn to the main stem.
Ch 5, sl st back along the chain, and secure to the stem.
Repeat with a second branch of 4 chains.
Make a matching second antler.
For additional structure, use a small amount of fabric stiffener.
Attach both antlers to the top of the reindeer’s head.
11. Crochet the Reindeer’s Body
Using caramel brown yarn:
Rnd 1: 6 sc in MR. (6)
Rnd 2: Inc around. (12)
Rnd 3: (1 sc, inc) x 6. (18)
Rnd 4: (2 sc, inc) x 6. (24)
Rnds 5–10: Sc around. (24)
Rnd 11: (2 sc, dec) x 6. (18)
Rnds 12–14: Sc around. (18)
Rnd 15: (1 sc, dec) x 6. (12)
Stuff firmly.
Rnd 16: Dec around. (6)
Fasten off and close the opening.
Sew the head securely to the upper front of the body.
12. Crochet the Reindeer’s Legs
Make four legs using caramel brown yarn.
Rnd 1: 6 sc in MR. (6)
Rnds 2–7: Sc around. (6)
Change to dark brown yarn.
Rnds 8–9: Sc around. (6)
Fasten off, leaving a sewing tail.
Stuff lightly if necessary.
Attach two legs toward the front of the body and two toward the back.
Ensure the reindeer can stand securely before final assembly.
13. Crochet the Reindeer’s Tail
Using caramel brown yarn:
Rnd 1: 4 sc in MR. (4)
Rnd 2: (1 sc, inc) x 2. (6)
Rnd 3: Sc around. (6)
Fasten off.
Sew the tail to the back of the body.
14. Crochet the White Chest Patch
Using ivory yarn:
Row 1: Ch 7, sc in second chain and across. (6)
Row 2: Ch 1, turn, sc across. (6)
Row 3: Ch 1, turn, dec, sc 2, dec. (4)
Row 4: Ch 1, turn, sc across. (4)
Row 5: Ch 1, turn, dec twice. (2)
Fasten off.
Sew the patch to the front of the reindeer’s body.
15. Crochet the Red Winter Scarf
Using Christmas red yarn:
Row 1: Ch 36, sc in second chain and across. (35)
Rows 2–4: Ch 1, turn, sc across. (35)
Fasten off.
Add small yarn fringe to both ends.
Wrap the scarf gently around the reindeer’s neck.
Secure with a few hidden stitches so it remains in place.
16. Crochet the Miniature Christmas Trees
Each lantern contains two small dark green Christmas trees.
Make two trees using forest green yarn and a 2.0 mm hook.
Rnd 1: 4 sc in MR. (4)
Rnd 2: Sc around. (4)
Rnd 3: Inc around. (8)
Rnd 4: Sc around. (8)
Rnd 5: (1 sc, inc) x 4. (12)
Rnd 6: Sc around. (12)
Rnd 7: (2 sc, inc) x 4. (16)
Rnd 8: Sc around. (16)
Rnd 9: (3 sc, inc) x 4. (20)
Rnd 10: Sc around. (20)
Rnd 11: (4 sc, inc) x 4. (24)
Rnd 12: Sc around. (24)
Fasten off.
Stuff lightly and shape into a cone.
Tree Trunk – Make 2
Using dark brown yarn:
Rnd 1: 6 sc in MR. (6)
Rnds 2–4: Sc around. (6)
Fasten off and attach beneath the tree.
Decorate the Trees
Sew several tiny gold beads onto each tree to resemble Christmas ornaments.
Arrange the beads evenly without overcrowding the small trees.
Secure each bead carefully and hide the thread ends.
17. Create the Lantern’s Decorative Window Frames
The lantern features open window sections separated by narrow vertical crochet columns.
Using ivory yarn:
Ch 28.
Sc in the second chain from the hook and across. (27)
Repeat for the required number of vertical columns, usually six to eight depending on the lantern’s diameter.
Attach the columns between the lower border and upper snowflake band.
Space them evenly to create large window openings.
Secure each column firmly to the upper and lower sections.
For better stability, attach the crocheted columns to a lightweight transparent ornament frame.
18. Assemble the Lantern Interior
Before closing or decorating the lantern, arrange the miniature pieces inside.
- Place the reindeer at the center of the green base.
- Position one Christmas tree to the left.
- Position the second Christmas tree to the right.
- Check that all three decorations are visible through the front opening.
- Sew the trees securely to the base.
- Attach the reindeer using several hidden stitches.
- Position the battery-operated LED light behind the reindeer.
- Make sure the LED switch remains accessible.
- Adjust the decorations to avoid blocking the light.
- Secure the outer lantern structure to its support.
The warm light should illuminate the reindeer and trees without making direct contact with the crochet decorations.
19. Final Assembly and Finishing
Once all components are complete, carefully inspect the lantern.
- Ensure the green base is flat and stable.
- Check that the lace walls maintain their rounded shape.
- Reinforce the upper rim.
- Secure the hanging handle.
- Block the snowflake motifs if necessary.
- Adjust the reindeer’s head and antlers.
- Make sure the scarf hangs naturally.
- Check that the miniature trees remain upright.
- Hide all yarn tails.
- Test the LED lighting before displaying the lantern.
For a matching set, create three lanterns using the same pattern and vary the size slightly by changing yarn weight and hook size.
20. Optional Decorative Variations
Traditional Red and Green Lantern
- Forest green base and upper rim
- Ivory snowflake lace
- Bright red hanging strap
- Caramel brown reindeer
- Dark green Christmas trees
Elegant Winter White Lantern
- Ivory base and lace
- Champagne gold handle
- Soft beige reindeer
- White Christmas trees
- Warm white LED lighting
Rustic Woodland Lantern
- Deep brown base
- Natural cream lace
- Burgundy hanging strap
- Warm caramel reindeer
- Olive green Christmas trees
21. Care Instructions
- Dust gently with a soft brush.
- Spot-clean with a slightly damp cloth.
- Do not machine wash the assembled lantern.
- Remove the LED light before cleaning.
- Avoid soaking stiffened crochet sections.
- Store in a dry, dust-free box.
- Protect the antlers and snowflakes from crushing.
- Keep away from open flames and excessive heat.
Frequently Asked Questions
Is this crochet lantern pattern suitable for beginners?
This is an advanced crochet project because it combines amigurumi, openwork lace, decorative shaping, and multiple small components.
How large is the finished lantern?
Each lantern measures approximately 15–18 cm tall and 13–15 cm wide, excluding the hanging strap.
Can I use a real candle inside the lantern?
No. Always use a battery-operated LED light. Real candles are a serious fire hazard around yarn and other craft materials.
Can I make the lantern without a reindeer?
Yes. You can replace the reindeer with a miniature snowman, angel, Christmas tree, or another small crochet decoration.
How can I keep the lantern round?
Use a lightweight rigid ornament frame or a suitable transparent support beneath the crochet exterior. Fabric stiffener can help maintain the lace shape but should not be the only structural support for a hanging lantern.
Can I make a set of three lanterns?
Absolutely! Three matching lanterns look beautiful when hung at different heights from a decorative branch or arranged together on a holiday table.
What yarn works best for this pattern?
Firm cotton yarn is recommended because it creates crisp stitches, stable amigurumi shapes, and well-defined lace details.
Can I sell finished lanterns made from this pattern?
Yes. You may sell handmade finished items created from this original pattern. Credit to Cozy Crochet Patterns is appreciated.
Final Thoughts
These Christmas Reindeer Crochet Lanterns combine the charm of handmade amigurumi with the delicate beauty of festive crochet lace. The miniature reindeer, decorated Christmas trees, elegant snowflake details, and warm LED lighting create a magical Christmas decoration.
Whether you make one lantern or an entire matching set, this advanced crochet project is a wonderful way to add a cozy, handcrafted touch to your holiday home.
Experiment with traditional Christmas colors, personalize the miniature decorations, and enjoy creating a beautiful seasonal keepsake.
Save this free Christmas crochet lantern pattern to Pinterest and share it with your crochet-loving friends!
Pattern note: This is an original image-inspired pattern rather than an exact reconstruction of an existing design. It has not been sample-tested. Stitch counts, fit, shaping, and attachment points should be checked against your chosen support frame before final assembly.

