Christmas Robin Crochet Lantern – Free Advanced Pattern
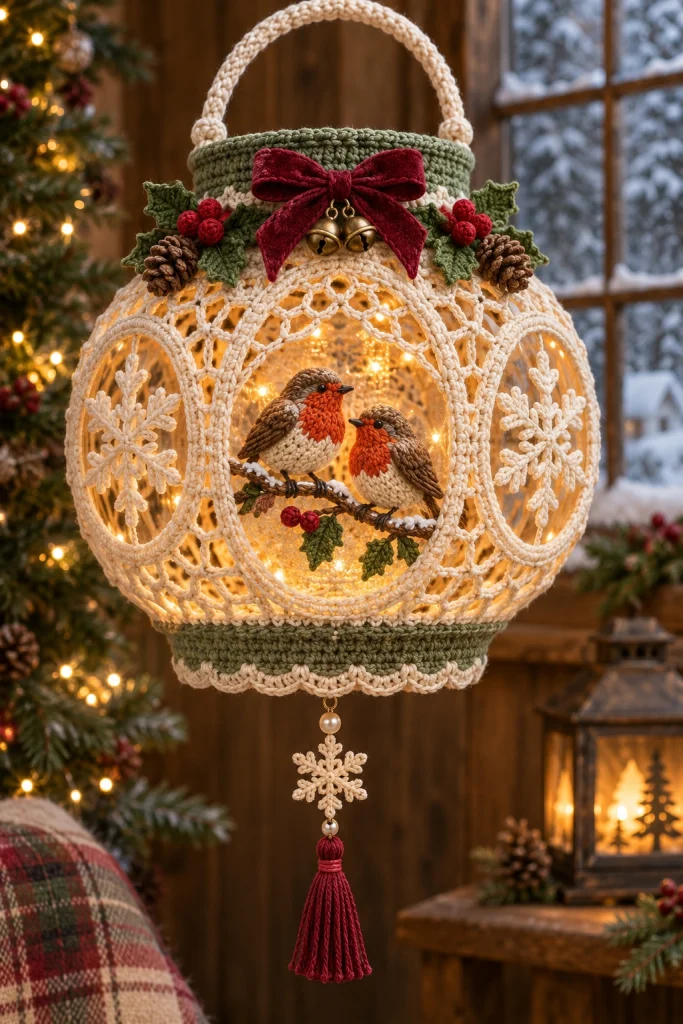
Bring the magic of a snowy winter evening into your home with this beautiful Christmas Robin Crochet Lantern! Featuring two adorable red-breasted robins perched on a delicate branch, intricate ivory lacework, crocheted snowflakes, festive holly leaves, and a luxurious burgundy bow, this handmade lantern is a truly enchanting holiday decoration.
The elegant spherical lantern combines cream-colored openwork crochet with sage green borders, miniature pinecones, bright red berries, golden bells, and a dangling snowflake tassel. Warm LED fairy lights illuminate the delicate details, creating a cozy and magical winter atmosphere.
This advanced crochet project is inspired by the supplied reference image. The instructions below offer an original, practical interpretation of its decorative elements rather than an exact stitch-for-stitch reproduction.
Pattern Details
- Skill Level: Advanced
- Finished Lantern Diameter: Approximately 25–30 cm
- Total Height: Approximately 45–55 cm including handle and tassel
- Construction: Modular crochet with lace panels and amigurumi figures
- Yarn Weight: Sport or DK cotton
- Hook Sizes: 2.0 mm, 2.5 mm, and 3.0 mm
- Terminology: US crochet terms
- Colors: Ivory, sage green, burgundy, rust orange, brown, and gold
- Estimated Time: 20–30 hours
- Lighting: Battery-operated LED fairy lights only
Materials Needed
- Ivory cotton yarn – approximately 200 g
- Sage green cotton yarn – approximately 80 g
- Brown cotton yarn – approximately 50 g
- Rust orange cotton yarn – approximately 30 g
- Cream cotton yarn – approximately 30 g
- Burgundy cotton yarn – approximately 40 g
- Dark green cotton yarn – approximately 30 g
- Small amount of black embroidery thread
- 2.0 mm, 2.5 mm, and 3.0 mm crochet hooks
- Polyester fiberfill
- Two pairs of small black safety eyes or embroidered eyes
- Small gold bells
- Decorative pearl beads
- Battery-operated LED fairy lights
- Lightweight spherical craft frame, approximately 25 cm in diameter
- Thin craft wire for the internal branch
- Fabric stiffener, optional
- Burgundy velvet ribbon
- Tapestry needle
- Stitch markers
- Scissors
Important Safety Note: Use only low-heat, battery-operated LED lights. Never place real candles or mains-powered hot bulbs inside the crochet lantern. Keep the battery compartment outside the lantern and accessible. Cover any sharp wire ends and use a properly rated frame and hanging hook.
Crochet Abbreviations
- MR: Magic ring
- ch: Chain
- sc: Single crochet
- hdc: Half double crochet
- dc: Double crochet
- tr: Treble crochet
- sl st: Slip stitch
- inc: Increase
- dec: Invisible decrease
- BLO: Back loop only
- FO: Fasten off
- st: Stitch
- sp: Space
1. Crochet the Upper Sage Green Lantern Band
Begin by measuring the circumference of the upper opening of your spherical frame.
Using sage green yarn and a 3.0 mm hook:
Foundation: Chain enough stitches to fit around the upper opening, using an even number of stitches.
Join with a slip stitch, ensuring the chain is not twisted.
Rnd 1: Ch 1, sc in each chain around. Join.
Rnd 2: Ch 1, sc in each stitch around. Join.
Rnd 3: Ch 2, hdc in each stitch around. Join.
Rnd 4: Ch 1, sc in BLO around. Join.
Rnds 5–7: Sc in each stitch around.
Fasten off, leaving a long sewing tail.
The completed band should be firm enough to maintain a smooth circular shape around the frame opening.
2. Crochet the Lower Lantern Band
Using sage green yarn, repeat the upper band instructions, adjusting the foundation chain to fit the lower opening of the lantern frame.
For the decorative ivory scalloped edging:
Join ivory yarn to the lower edge.
Edging Round: (Sl st in next stitch, skip 1 stitch, 5 dc in next stitch, skip 1 stitch) repeat around.
Fasten off.
Secure the completed band to the lower part of the spherical frame.
3. Crochet the Ivory Lace Lantern Panels
The lantern features delicate openwork panels that create a beautiful glowing effect when illuminated.
Make six to eight panels, depending on the size of your frame.
Using ivory yarn and a 2.5 mm hook:
Row 1: Ch 19.
Row 2: Dc in the fourth chain from the hook, dc in each remaining chain. Turn. (17 dc including turning chain)
Row 3: Ch 5, skip 2 stitches, dc in next stitch, (ch 2, skip 2 stitches, dc in next stitch) repeat across. Turn.
Row 4: Ch 3, work 2 dc in each chain-2 space and 1 dc into each dc across. Turn.
Row 5: Ch 5, skip 2 stitches, dc in next stitch, repeat the mesh sequence across. Turn.
Row 6: Ch 3, dc in each stitch and chain space across. Turn.
Repeat Rows 3–6 until the panel reaches the required height.
To create the lantern’s rounded silhouette, gradually increase the width of the panels toward the middle and decrease toward the bottom.
Block each panel carefully before assembly.
4. Crochet the Decorative Arched Windows
The reference lantern features three prominent arched windows framed by raised ivory crochet borders.
Using ivory yarn and a 2.5 mm hook:
Step 1: Ch 65, or enough chains to follow the desired window outline.
Step 2: Starting in the second chain from the hook, sc across.
Step 3: Ch 1, turn, sc across.
Step 4: Ch 1, turn, work one row of reverse single crochet for a raised decorative finish.
Fasten off.
Shape the finished strip into a tall rounded arch.
Sew the strip onto the lace panel, forming the window frame.
Repeat to create three large arched windows.
For extra definition, add a second narrow border using surface slip stitches.
5. Crochet the Decorative Snowflakes
Make three large snowflakes and one smaller hanging snowflake.
Using ivory yarn and a 2.0 mm hook:
Rnd 1: Make a magic ring, ch 1, work 12 sc into the ring. Join. (12)
Rnd 2: (Ch 6, sl st into the third chain from the hook, ch 3, sl st into the next stitch of the magic ring) repeat six times.
Rnd 3: Work decorative picots along each snowflake arm.
Fasten off.
Block each snowflake firmly to emphasize its six-pointed shape.
Attach the three large snowflakes to the side window panels.
Reserve the smaller snowflake for the bottom tassel decoration.
6. Crochet the Robin Bodies – Make Two
The two charming robins are the focal point of this lantern.
Use brown yarn and a 2.5 mm hook.
Rnd 1: 6 sc in MR. (6)
Rnd 2: Inc around. (12)
Rnd 3: (1 sc, inc) x 6. (18)
Rnd 4: (2 sc, inc) x 6. (24)
Rnd 5: (3 sc, inc) x 6. (30)
Rnd 6: (4 sc, inc) x 6. (36)
Rnds 7–11: Sc around. (36)
Rnd 12: (4 sc, dec) x 6. (30)
Rnd 13: (3 sc, dec) x 6. (24)
Rnd 14: (2 sc, dec) x 6. (18)
Stuff firmly, shaping the body into a slightly elongated oval.
Rnd 15: (1 sc, dec) x 6. (12)
Rnd 16: Dec around. (6)
Fasten off and close.
Make two identical bodies.
7. Crochet the Robin Heads – Make Two
Using brown yarn:
Rnd 1: 6 sc in MR. (6)
Rnd 2: Inc around. (12)
Rnd 3: (1 sc, inc) x 6. (18)
Rnd 4: (2 sc, inc) x 6. (24)
Rnds 5–8: Sc around. (24)
Rnd 9: (2 sc, dec) x 6. (18)
Rnd 10: (1 sc, dec) x 6. (12)
Insert safety eyes between Rounds 6 and 7, approximately six stitches apart, or embroider the eyes after assembly.
Stuff firmly.
Rnd 11: Dec around. (6)
Fasten off.
Sew each head onto the front upper section of its body.
8. Crochet the Rust Orange Robin Breasts
Make two oval chest patches.
Using rust orange yarn:
Row 1: Ch 9.
Row 2: Starting in the second chain from the hook, sc 2, hdc 4, sc 2.
Work along the opposite side of the foundation chain using the same stitch sequence.
Rnd 3: Sc evenly around, adding one increase at each rounded end.
Rnd 4: Sc around.
Fasten off, leaving a long sewing tail.
Sew each orange breast patch onto the front of a robin, extending from the lower face toward the chest.
Gently stretch the patch into a natural teardrop shape while sewing.
9. Crochet the Cream Robin Bellies
Using cream yarn:
Row 1: Ch 11.
Row 2: Starting in the second chain, sc 2, hdc 6, sc 2.
Repeat along the opposite side of the chain.
Rnd 3: Sc around, increasing at both rounded ends.
Fasten off.
Sew the cream belly beneath the rust orange breast.
Blend the two sections neatly to create the robin’s characteristic coloring.
10. Crochet the Robin Wings – Make Four
Using brown yarn and a 2.0 mm hook:
Row 1: Ch 13.
Row 2: Starting in the second chain, sc 2, hdc 3, dc 4, hdc 2, sc 1.
Work the same sequence along the opposite side of the foundation chain.
Rnd 3: Sc evenly around.
Rnd 4: Work surface slip stitches from the wing base toward the tip to create feather details.
Fasten off.
Attach one wing to each side of both robins.
Angle the wings slightly backward to create a realistic resting position.
11. Crochet the Robin Tails – Make Two
Using dark brown yarn:
Row 1: Ch 11.
Row 2: Starting in the second chain, sc across. (10)
Rows 3–5: Ch 1, turn, sc across. (10)
Fasten off.
Fold the tail slightly lengthwise and sew it to the back of the robin.
Use surface embroidery to add subtle feather lines.
12. Add the Beaks and Feet
Robin Beaks
Using dark brown or black embroidery thread:
Embroider a small pointed beak onto the front of each robin’s face.
For a dimensional beak, make a tiny triangular crochet piece using three chains and decreasing single crochet stitches.
Robin Feet
Using dark brown yarn:
Make six short chains for each robin.
Attach three chains beneath each foot position.
Secure the feet around the crocheted branch so the birds appear naturally perched.
13. Crochet the Internal Branch
The robins sit on a slender brown branch positioned across the center of the lantern.
Using brown yarn and a 2.5 mm hook:
Step 1: Ch 36.
Step 2: Starting in the second chain, sc across. (35)
Rows 3–6: Ch 1, turn, sc across. (35)
Fasten off.
Wrap the crochet strip around a lightweight support wire, folding the edges together.
Sew the edges closed to create a narrow cylindrical branch.
Cover both wire ends securely so no sharp points remain exposed.
Attach the branch horizontally inside the lantern frame.
Position the two robins facing each other, with a small space between their beaks.
14. Crochet the Holly Leaves
Make six to eight decorative holly leaves.
Using dark green yarn and a 2.0 mm hook:
Row 1: Ch 13.
Row 2: Starting in the second chain, sc 2, hdc 2, dc 4, hdc 2, sc 2.
Repeat the same sequence along the opposite side of the chain.
Rnd 3: Work small picots around the leaf edge to create the pointed holly shape.
Fasten off.
Embroider a central vein using a slightly lighter green yarn.
Arrange the leaves around the top of the lantern and beneath the robin branch.
15. Crochet the Red Holly Berries
Make approximately 12–16 berries.
Using burgundy yarn:
Rnd 1: 6 sc in MR. (6)
Rnd 2: Inc around. (12)
Rnds 3–4: Sc around. (12)
Rnd 5: Dec around. (6)
Stuff lightly and close.
Fasten off, leaving a sewing tail.
Arrange the berries in clusters of three or four around the holly leaves.
16. Crochet the Miniature Pinecones
Make two decorative pinecones.
Using brown yarn:
Rnd 1: 6 sc in MR. (6)
Rnd 2: Inc around. (12)
Rnd 3: (1 sc, inc) x 6. (18)
Rnd 4: Sc around. (18)
Rnd 5: Work (sl st, ch 3, sl st) in alternating stitches around.
Rnd 6: Sc around in the unworked back loops.
Rnd 7: Repeat the decorative scale sequence.
Continue alternating scale rounds and single crochet rounds until the pinecone reaches approximately 4 cm in length.
Decrease gradually to close the bottom.
Fasten off.
Attach one pinecone to each side of the upper lantern band.
17. Crochet the Lantern Handle
Using ivory yarn and a 3.0 mm hook:
Row 1: Ch 65.
Row 2: Starting in the second chain, sc across. (64)
Rows 3–6: Ch 1, turn, sc across. (64)
Fasten off.
Fold the strip lengthwise and sew the edges together to create a thick rounded handle.
For a sturdier handle, work an additional row of surface slip stitches along the outside.
Attach both ends to opposite sides of the upper band and secure them to the structural frame.
Important: The internal frame and hanging hardware must support the lantern’s full weight. Do not suspend the lantern by crochet stitches alone.
18. Add the Burgundy Bow and Gold Bells
Cut approximately 35–40 cm of burgundy velvet ribbon.
Form a full decorative bow with two loops and two hanging tails.
Secure the center with matching thread.
Attach the bow to the front of the upper sage green band.
Hang two small gold bells beneath the center of the bow.
Make sure the bells are securely fastened.
19. Crochet the Hanging Snowflake Tassel
Using the small ivory snowflake from Section 5:
Attach one pearl bead above the snowflake.
Add another pearl bead beneath it.
Using burgundy yarn, create a decorative tassel approximately 10–12 cm long.
Wrap the yarn around a small cardboard template approximately 20 times.
Remove the yarn bundle carefully.
Tie the upper section securely.
Wrap a separate strand around the tassel neck.
Trim the lower ends evenly.
Attach the tassel beneath the snowflake.
Secure the entire hanging ornament to the center of the lower lantern band.
20. Assemble the Crochet Lantern
Once all individual components are complete, begin the final assembly.
- Secure the upper sage green band to the spherical frame.
- Attach the lower sage green band.
- Position the ivory lace panels evenly around the frame.
- Sew the panels together to create the rounded lantern body.
- Attach the three arched window borders.
- Secure the decorative snowflakes inside the side windows.
- Install the internal branch across the center.
- Position the two robins facing each other.
- Sew the robins securely to the branch.
- Attach the holly leaves and red berries.
- Add the miniature pinecones to the upper section.
- Attach the ivory handle to the structural frame.
- Secure the burgundy velvet bow and gold bells.
- Attach the hanging snowflake and tassel.
- Arrange the battery-operated LED fairy lights inside the lantern.
Keep the lighting wires discreetly positioned behind the lacework and away from moving decorative parts.
21. Shape and Finish the Lantern
To achieve a professional appearance:
- Check that the lantern maintains a symmetrical spherical shape.
- Adjust the lace panels so the openings are evenly spaced.
- Gently shape the arched window borders.
- Block the snowflakes to define their points.
- Position the robins so both faces are clearly visible.
- Arrange the holly leaves and berries naturally.
- Fluff the burgundy bow and straighten the tassel.
- Ensure the internal branch remains level.
- Test the hanging hardware before displaying the lantern.
If using fabric stiffener, apply it only to the removable crochet lace components and allow them to dry completely before reassembly.
22. Optional Color Variations
Classic Christmas Robin Lantern
- Ivory lace
- Forest green bands
- Burgundy bow
- Rust orange robins
- Gold bells
Winter Wonderland Lantern
- Snow-white lace
- Ice blue bands
- Silver snowflakes
- Soft brown robins
- White satin bow
Rustic Woodland Lantern
- Natural cotton lace
- Olive green bands
- Warm brown birds
- Terracotta berries
- Linen ribbon
23. Tips for a Professional Finish
- Use cotton yarn to achieve crisp lace stitches.
- Maintain consistent tension across all lace panels.
- Block each panel before attaching it to the frame.
- Keep the robin bodies symmetrical in size.
- Embroider delicate feather details for a realistic appearance.
- Use small amounts of stuffing to maintain smooth bird shapes.
- Keep the snowflakes evenly spaced.
- Secure all decorative beads and bells firmly.
- Use a lightweight frame to prevent unnecessary strain on the handle.
- Hide sewing tails inside the crocheted components.
24. Care Instructions
- Remove the battery pack before cleaning.
- Dust the lantern gently with a soft brush.
- Spot-clean using a lightly damp cloth.
- Avoid machine washing the assembled lantern.
- Do not soak stiffened lace components.
- Store in a large protective box.
- Keep the spherical frame protected from crushing.
- Remove batteries before long-term storage.
- Keep away from open flames and direct heat.
Frequently Asked Questions
Is this crochet lantern suitable for beginners?
This is an advanced crochet project because it combines openwork lace, amigurumi birds, shaped motifs, structural assembly, and detailed decorative finishing.
How large is the finished lantern?
The finished lantern measures approximately 25–30 cm in diameter and 45–55 cm in total height, including the handle and tassel.
Can I use real candles inside the lantern?
No. Use only low-heat, battery-operated LED fairy lights. Real flames are unsafe near yarn and decorative materials.
Can I make the lantern without the robins?
Yes. You can replace the robins with crocheted snowflakes, miniature Christmas trees, or a simple decorative branch.
Can I make the lantern in different colors?
Absolutely! White and silver create a winter wonderland look, while ivory and forest green offer a classic Christmas appearance.
How do I keep the lantern round?
Use a lightweight spherical craft frame and carefully block the lace panels before attaching them.
Can I use acrylic yarn?
Cotton is recommended because it provides better stitch definition and holds decorative shapes more effectively. Acrylic yarn may require additional support.
Can I sell finished lanterns made from this pattern?
Yes. You may sell handmade finished items made from this original pattern. Credit to Cozy Crochet Patterns is appreciated.
Final Thoughts
This Christmas Robin Crochet Lantern combines the charm of traditional handmade decorations with intricate crochet craftsmanship. Its delicate ivory lace, warm glowing lights, adorable red-breasted robins, elegant sage green borders, and festive burgundy accents create a truly magical winter display.
Whether hanging beside a window, displayed in a cozy living room, or given as a thoughtful handmade Christmas gift, this beautiful lantern is sure to become a treasured seasonal decoration.
Enjoy bringing this enchanting winter woodland scene to life, one stitch at a time!
Save this free Christmas crochet lantern pattern to Pinterest and share it with your crochet-loving friends!
Pattern note: This original design is inspired by the supplied reference image. The pattern has not been sample-tested. Dimensions, lace-panel shaping, and frame attachment may require adjustments to fit your chosen structure.

