Christmas Sleigh Crochet Centerpiece Pattern
Advanced
For experienced crocheters who enjoy complex shaping, fine detail, and ambitious construction
Weekend Project
A satisfying weekend make — start Friday, finish Sunday, enjoy forever.
Handmade Gift
A beautiful keepsake — free forever. Read online or print at home.
About This Christmas Sleigh Crochet Centerpiece Pattern
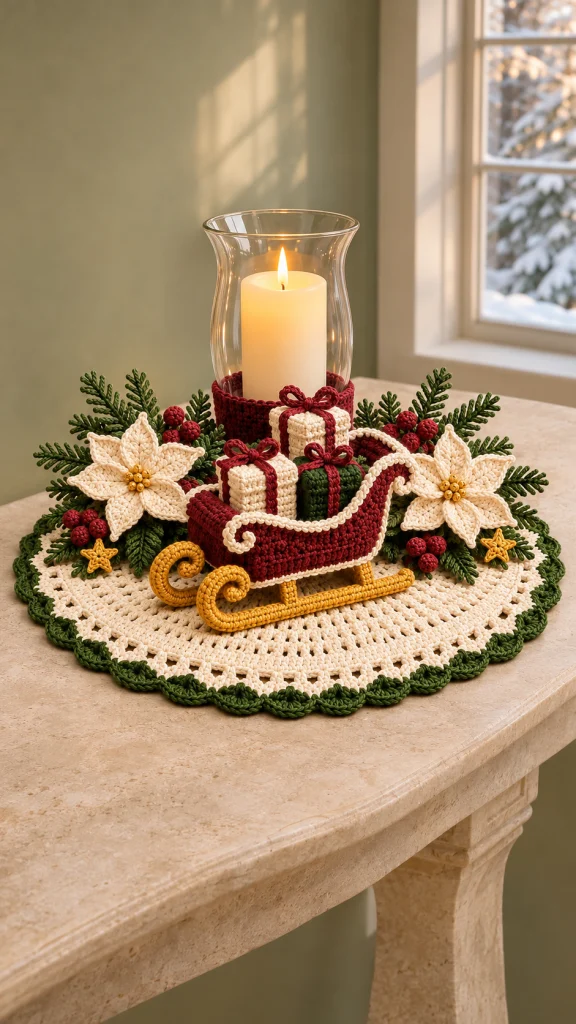
This Christmas sleigh crochet centerpiece pattern brings together a cream circular mat, a burgundy sleigh with golden curled runners, tiny ribbon-wrapped gifts, ivory poinsettias, and textured evergreen sprigs. A removable glass hurricane with a battery-operated candle completes the arrangement. This is a decorative tabletop project, with separately shaped and assembled components.
The raised sleigh sides, contrasting cord trim, layered flower petals, and branched greenery give the centerpiece its detailed finish. The mat provides a generous foundation while the flowers frame the sleigh and the taller glass sits behind it. Deep burgundy, forest green, warm ivory, and antique gold keep the familiar Christmas palette soft and cohesive.
Allow approximately 28–36 hours of crochet and assembly, plus time for blocking and drying. This advanced project suits crocheters comfortable with short rows, small components, surface stitching, fitted construction, and careful structural finishing. The instructions below are an original interpretation of the pictured arrangement; final dimensions depend on gauge and the glass you choose.
Materials
- DK cotton yarn: approximately 220 g ivory, 120 g burgundy, 100 g forest green, and 50 g antique gold; estimates assume approximately 110 m per 50 g.
- 3.0 mm hook for dense structural pieces, flowers, greenery, cords, and gifts.
- 3.5 mm hook for the circular mat.
- Battery-operated LED pillar candle and a stable, broad-based glass hurricane, approximately 12–14 cm across at its lower section.
- 7-count plastic canvas: approximately one 30 × 45 cm sheet for the sleigh and gift inserts.
- Polyester stuffing for the gifts and berries.
- Approximately 2 m of 3 mm cotton cord for reinforcing the two runners.
- Matching sewing thread and a sharp sewing needle for securing canvas and discreet structural stitches.
- Tapestry needle, removable stitch markers, scissors, ruler, and paper for tracing the sleigh side panels.
- Blocking mat and rustproof pins.
- Optional water-based fabric stiffener for flowers, sprigs, stars, and runners; use according to its label.
- Small pieces of felt to cover the underside of the runner supports and protect the mat.
Abbreviations
chchainsl stslip stitchscsingle crochethdchalf double crochetdcdouble crochettrtreble crochetincwork 2 single crochet in one stitchdecsingle crochet 2 stitches togetherMRmagic ringBLOback loop onlyststitchIvory Mat and Green Scalloped Border
- Round 1: With ivory and the 3.5 mm hook, make an MR, ch 3, work 11 dc into the ring, and join with sl st to the top of ch 3. Tighten the ring. 12 dc.
- Round 2: Ch 3, dc in the same stitch, then 2 dc in each remaining stitch. Join. 24 dc.
- Round 3: Ch 3, 2 dc in the next stitch; repeat (dc in the next stitch, 2 dc in the next stitch) 11 times. Join. 36 dc.
- Round 4: Ch 3, dc in the next stitch, 2 dc in the next stitch; repeat (dc in the next 2 stitches, 2 dc in the next stitch) 11 times. Join. 48 dc.
- Rounds 5–14: Work each round separately using this exact rule: on round number n, repeat (dc in the next n − 2 stitches, 2 dc in the next stitch) 12 times. Replace the first dc with ch 3 and join each round. Counts are: Round 5, 60; Round 6, 72; Round 7, 84; Round 8, 96; Round 9, 108; Round 10, 120; Round 11, 132; Round 12, 144; Round 13, 156; Round 14, 168 dc.
- Round 15: Ch 3, ch 1, skip the next stitch; repeat (dc in the next stitch, ch 1, skip the next stitch) 83 times. Join to the top of ch 3. 84 dc and 84 ch-1 spaces.
- Round 16: Ch 1, sc in every dc and every ch-1 space around. Join to the first sc and fasten off ivory. 168 sc.
- Round 17: Join green in any stitch. Repeat (sl st in the next stitch, skip 2 stitches, 5 dc in the next stitch, skip 2 stitches) 28 times. Join to the first sl st and fasten off. 28 scallops, each spanning 6 stitches of Round 16.
- Block the mat flat to approximately 42 cm across, opening the eyelets without pulling the outer scallops into points. Let it dry fully before adding the centerpiece.
Sleigh Floor and Shaped Side Panels
- Floor, Row 1: With burgundy and the 3.0 mm hook, ch 31. Sc in the second chain from the hook and each chain across. Ch 1, turn. 30 sc.
- Floor, Rows 2–16: Sc in each stitch across. Ch 1 and turn after Rows 2–15. Fasten off after Row 16. 30 sc per row; approximately 15 × 7.3 cm.
- Side panels, make 2. Row 1: Ch 31, sc in the second chain from the hook and each chain across. Ch 1, turn. 30 sc.
- Side panels, Rows 2–9: Sc in every stitch across, ch 1, turn. 30 sc per row. After Row 9, mark the right side and fasten off.
- First raised end, Row 10: With the right side facing, join burgundy in the first stitch of Row 9, ch 1, and sc in the first 6 stitches. Leave the remaining 24 stitches unworked. Ch 1, turn. 6 sc.
- First raised end, Rows 11–13: Sc in all 6 stitches, ch 1 and turn after Rows 11–12. Fasten off after Row 13. 6 sc per row.
- Second raised end, Row 10: With the right side facing, join burgundy in stitch 25 of Row 9 and sc in stitches 25–30. Ch 1, turn. 6 sc.
- Second raised end, Rows 11–13: Sc in all 6 stitches, ch 1 and turn after Rows 11–12. Fasten off after Row 13. 6 sc per row. The finished panel has two raised ends and an 18-stitch central dip.
- Make the second side panel identically. Block both to the same shape, approximately 15 cm long, 4.1 cm high at the center, and 5.9 cm high at the ends.
Sleigh End Panels, Reinforcement, and Trim
- End panels, make 2. Row 1: With burgundy, ch 15 and sc in the second chain from the hook and across. Ch 1, turn. 14 sc.
- Rows 2–13: Sc in every stitch across, ch 1 and turn after Rows 2–12. Fasten off after Row 13. 14 sc per row; approximately 7 × 5.9 cm.
- Cut one plastic-canvas floor insert approximately 14.5 × 6.8 cm. Trace each blocked side panel onto paper, then cut a matching canvas insert approximately 3 mm smaller along every edge. Cut two end inserts approximately 6.5 × 5.3 cm. Round all canvas corners.
- Place each insert on the wrong side of its crochet panel. Using matching sewing thread, tack through canvas holes and the backs of crochet stitches at approximately 1 cm intervals. Keep stitches invisible on the right side.
- Place the floor right side down, with its canvas facing upward. Stand the side panels along its long edges with canvas facing inward. Whipstitch each 30-stitch side-panel foundation to one 30-stitch floor edge.
- Fit an end panel across each short floor edge. Distribute its 14 foundation stitches evenly over the 16 floor-row ends, securing the corners first. Sew its upright edges to the raised ends of the side panels, matching all 13 rows.
- Upper trim: With ivory, ch 1 and sc evenly around the complete upper opening, working one sc in each exposed stitch or row end. At each outward corner work 3 sc; at each inward corner work a dec across the adjacent edge stitches. Join and fasten off. The edging count depends on the corner pickups; both long sides must match.
- Lower trim: With ivory, surface sl st around the floor-to-wall seam, placing one stitch per long-edge stitch and spacing 14 stitches along each short edge. 88 surface sl sts. Join and fasten off.
- Decorative scrolls, make 2: With ivory, ch 25 and work 24 sl sts back along the chain. Fasten off with a long tail. Coil approximately 4 cm of one end into a small spiral, stitch the spiral to hold it, and sew one scroll onto the outside of each side panel, following the upper edge near the front raised end.
Golden Runners and Supports
- Runner strips, make 2. Row 1: With gold, ch 61 and sc in the second chain from the hook and across. Ch 1, turn. 60 sc.
- Rows 2–4: Sc in every stitch across, ch 1 and turn after Rows 2–3. Fasten off after Row 4 with a long sewing tail. 60 sc per row.
- Lay a 30 cm length of cotton cord along the wrong side of each strip. Fold the strip lengthwise around it and whipstitch the two long edges together, matching all 60 stitches. Close both ends. Each runner is approximately 30 cm long.
- Mark 8 cm from the front end of each runner. Curl this section upward and inward into a flat spiral approximately 3 cm across. Stitch adjacent turns together. Curve the final 2 cm at the rear slightly upward. Arrange both runners with their curls facing the same direction.
- Support strips, make 4. Row 1: Ch 7 and sc in the second chain from the hook and across. Ch 1, turn. 6 sc.
- Rows 2–4: Sc in all 6 stitches, ch 1 and turn after Rows 2–3. Fasten off with a sewing tail. 6 sc per row.
- Roll each support tightly from one short edge to the other, making a firm cylinder approximately 1.8 cm tall. Sew the outer edge down securely. No stuffing is needed.
- Mark two support positions on the underside of each long floor edge, approximately 3 cm from each end. Sew the four cylinders upright at these marks. Cover their top attachment stitches with a small felt patch inside the sleigh if needed.
- Set the runners parallel beneath the supports, approximately 6 cm apart. Sew each support firmly to its runner with several passes around the cord core. The curled ends extend beyond the front of the sleigh. Add discreet felt pads where the runners contact the mat, and check that all four supports bear weight evenly.
Three Ribbon-Wrapped Gifts
- Make two ivory gifts using a panel width of 8 stitches and one green gift using a panel width of 7 stitches. Each gift requires six square panels.
- Ivory panels, make 12 total. Row 1: Ch 9 and sc in the second chain from the hook and across. Ch 1, turn. 8 sc.
- Ivory panel Rows 2–9: Sc in every stitch across, ch 1 and turn after Rows 2–8. Fasten off after Row 9. 8 sc per row; each panel is approximately 4 cm square.
- Green panels, make 6. Row 1: Ch 8 and sc in the second chain from the hook and across. Ch 1, turn. 7 sc.
- Green panel Rows 2–8: Sc in every stitch across, ch 1 and turn after Rows 2–7. Fasten off after Row 8. 7 sc per row; each panel is approximately 3.5 cm square.
- For each gift, sew four panels into a side-wall ring. Sew one square to the bottom. When a stitch edge meets a row-end edge, distribute the stitches evenly, matching corners first.
- Cut five canvas squares approximately 5 mm smaller than the corresponding gift panels. Insert one in the base and one against each wall. Add a little stuffing to support the shape, then sew on the sixth crochet panel as the lid.
- Make two burgundy ribbon strips per gift. For ivory gifts, ch 35 and work 34 sl sts back. For the green gift, ch 31 and work 30 sl sts back. Fasten off with sewing tails.
- Wrap each pair of strips around its gift at right angles, crossing at the center of the lid and joining underneath. Secure the crossings with small stitches.
- Make one bow per gift: ch 33 and fasten off. Form two loops, cross the tails, and bind the center with a separate 20 cm length of burgundy yarn. Sew the bow over the ribbon crossing.
Layered Ivory Poinsettias
- Make 2 flowers. Each flower needs 6 large petals, 6 small petals, and 5 gold center knots.
- Large petals, make 12. With ivory, ch 11. Beginning in the second chain from the hook, work sc, hdc, dc in the next 2 chains, tr in the next 3 chains, dc, hdc, then 3 sc in the final chain.
- Continue around the unused underside of the foundation chain, working hdc, dc, tr in the next 3 chains, dc in the next 2 chains, hdc, and sc. Join to the first sc. 21 stitches around the petal.
- Large petal edging: Ch 1, sc in each of the first 10 stitches, work (sc, ch 2, sc) in the next stitch at the far tip, then sc in each of the final 10 stitches. Join and fasten off with a sewing tail. 22 sc and one ch-2 point.
- Small petals, make 12. Ch 8. Beginning in the second chain from the hook, work sc, hdc, dc, tr, dc, hdc, then 3 sc in the final chain. Along the underside work hdc, dc, tr, dc, hdc, sc. Join. 15 stitches.
- Small petal edging: Ch 1, sc in each of the first 7 stitches, work (sc, ch 2, sc) in the next stitch, then sc in each of the final 7 stitches. Join and fasten off with a sewing tail. 16 sc and one ch-2 point.
- For each flower, overlap the narrow bases of 6 large petals in a circle and sew them together. Add 6 small petals above them, rotating this layer so the small petals fall between the larger ones.
- Make 5 gold center knots per flower. For each knot, bring the yarn up through the center, wrap it three times around the needle, insert the needle beside the entry point, and draw through while holding the wraps. Secure all knots at the back.
- Shape the petals with a shallow central fold. Block or lightly stiffen them with their points lifted. Each finished flower measures approximately 10–12 cm across.
Evergreen Sprigs and Broad Leaves
- Make 10 evergreen sprigs in green. For each stem, ch 25 and sl st in the second chain from the hook and each chain across. Fasten off, leaving a sewing tail. 24 sl sts.
- First branch, join green around the stem at the fourth foundation-chain position from the lower end. Ch 7, sl st in the second chain from the hook and the next 5 chains, then sl st around the same stem position. Fasten off. One 6-stitch branch.
- Repeat the preceding branch step at stem positions 7 and 10 from the lower end. Three branches, each with 6 sl sts.
- At stem positions 13 and 16, work a branch by ch 6, sl st in the second chain from the hook and the next 4 chains, then sl st around the same stem position. Fasten off each branch. Two branches, each with 5 sl sts.
- At stem positions 19 and 22, work a branch by ch 5, sl st in the second chain from the hook and the next 3 chains, then sl st around the same stem position. Fasten off each branch. Two branches, each with 4 sl sts.
- Turn the stem over and repeat the same seven branch attachments on the opposite side at the same positions. Each completed sprig has 14 branches. Weave the short tails along the stem, leaving only its original assembly tail.
- Broad leaves, make 8. Ch 10. Beginning in the second chain from the hook, work sc, hdc, dc in the next 2 chains, tr in the next 2 chains, dc, hdc, then 3 sc in the final chain. Along the underside work hdc, dc, tr in the next 2 chains, dc in the next 2 chains, hdc, sc. Join and fasten off. 19 stitches.
- Fold each broad leaf lengthwise and sew a loose green running stitch through the center to hold a shallow ridge. Block the evergreen branches outward and the broad leaves into gentle curves. Light stiffening is optional.
Berries and Gold Stars
- Berries, make 18 in burgundy. Round 1: Work 6 sc in an MR. 6 sc.
- Round 2: Repeat (sc in the next stitch, inc) 3 times. 9 sc.
- Round 3: Sc in each stitch around. Add a tiny amount of stuffing. 9 sc.
- Round 4: Repeat (sc in the next stitch, dec) 3 times. 6 sc. Fasten off, thread the tail through the remaining front loops, and draw closed.
- Sew berries into 6 clusters of 3, retaining one long tail per cluster for attachment.
- Stars, make 2 in gold. Round 1: Work 10 sc in an MR and join to the first sc. 10 sc.
- Round 2: Repeat the following 5 times: ch 4; sl st in the second chain from the hook, sc in the next chain, hdc in the next chain; skip the next ring stitch and sl st in the following ring stitch. The final sl st returns to the starting stitch. 5 points, using all 10 ring stitches.
- Fasten off and shape the star points. Block flat or apply a little stiffener, keeping all five points distinct.
Fitted Burgundy Glass Sleeve
- Measure the glass circumference where the sleeve will sit. Multiply this measurement in centimeters by 2, round to the nearest whole number, and subtract 2 stitches for a snug fit. Call the result N. For a 40 cm circumference, N = 78.
- Round 1: With burgundy, ch N loosely, check that the chain is untwisted, and join into a ring. Ch 1 and sc in each chain around. Join to the first sc. N sc.
- Rounds 2–10: Ch 1, sc in every stitch around, and join. N sc per round. The sleeve is approximately 4.5 cm tall.
- Round 11: Ch 1, work sl st in BLO of every stitch around. Join and fasten off. N sl sts.
- Slide the sleeve over the lower glass section and check that it grips without pulling the glass off balance. It must remain below the glass shoulder and clear of the rim. If it slides down or stretches excessively, remake it with an adjusted N based on the actual swatch and glass.
- Keep the glass base bare so it rests directly on a stable surface. The sleeve is decorative and does not provide heat protection.
Finishing and Arrangement
Lay the fully dry mat on the table and set the glass slightly behind its center. Place the sleigh in front, with the runner curls pointing toward the front edge. Leave enough room to lift the glass straight out without catching the flowers or gifts.
Arrange one ivory flower on each side of the sleigh. Let the greenery fan outward and upward, keeping the tallest sprigs behind the flowers. A few broad leaves beneath the petals give the arrangement depth without hiding the golden runners.
- Place 5 evergreen sprigs on each side of the glass, with their lower ends overlapping beneath the flower positions. Sew their lower 2 cm to the mat with matching thread. Keep stitches clear of the area supporting the glass base.
- Add 4 broad leaves to each side, angling their points toward the flowers and outer mat. Stitch only the lower third of each leaf so its tip stays lifted.
- Sew one flower over each group of overlapping stems, passing the needle through petal bases and the mat rather than through petal tips.
- Attach 3 berry clusters per side: one above the flower, one beside it, and one below it. Sew one gold star near the front of each floral group.
- Set the two ivory gifts and the green gift inside the sleigh, placing one ivory gift behind the other two. Secure gifts to one another and to the sleigh floor with a few removable stitches.
- Check the sleigh on the mat. If it shifts, tack the felt pads beneath the runners to the mat with discreet removable stitches. Keep the glass separate and removable.
- Weave in all remaining tails, trim loose fibers, and check for exposed canvas edges. Insert the battery-operated candle and confirm that its switch and battery compartment remain accessible.
Your finished centerpiece should feel balanced from the front, with open space around the candle and a clear view of the sleigh’s cream trim and curled runners. Store it with tissue beneath the petals and around the runner curls to preserve their shape.
Tips for Success
- Block both sleigh side panels together before cutting their canvas inserts; matching outlines make the box much easier to assemble squarely.
- Pin the runner supports in position and stand the empty sleigh on the table before sewing. Adjust the supports until both runners touch evenly.
- Keep flower stitches relaxed enough to curve. A very tight treble stitch can make the petal center buckle.
- Secure all evergreen branch tails along the stem before attaching the sprigs; the many small ends are easier to manage while each sprig is separate.
- Arrange the glass, sleigh, and flowers before making permanent attachment stitches so the glass can still be lifted out comfortably.
Common Mistakes to Avoid
- A mat that cups usually has insufficient stitch width for its round height. Check the dc gauge and block a swatch before committing to the full mat.
- Canvas cut flush with the crochet edge can interfere with seams. Keep every insert approximately 3 mm inside the panel outline and round its corners.
- Loose runner coils can unwind under the sleigh’s weight. Stitch neighboring turns together at several points before attaching the supports.
- Overfilled gifts become rounded. Use the canvas to define the flat faces and add only enough stuffing to support the lid.
- Do not substitute a burning candle for the LED candle. The yarn arrangement and fitted sleeve are designed for a cool, battery-operated light.
Ways to Customize This Pattern
- Use cranberry, pine, cream, and muted brass shades while keeping the same yarn weight and gauge.
- Make red poinsettias with ivory centers; retain both petal layers and their original counts.
- For a larger mat, insert additional solid increase rounds after Round 14 using the stated round-number formula. Each added round contributes 12 stitches and about 2.6 cm in diameter; the final solid-round count remains divisible by 6 for the border.
- For a longer sleigh, add an even number of stitches to the floor and both side-panel foundations. Keep 6 stitches at each raised end, and increase the central unworked section accordingly. Recut the canvas and extend the runners to suit.
- Replace the stars with additional berry clusters, or leave the stars unattached as removable accents.
Frequently asked questions
No. This is a crochet home-decor centerpiece with a structured sleigh, a circular mat, floral pieces, and a removable glass candle display. Small stuffed berries and gift boxes are supporting decorations.
The canvas supports the flat floor and stepped side walls. Without it, the sleigh will soften and may lean under the gifts. For the intended upright shape, use the specified washable plastic canvas and keep all cut edges enclosed.
Measure the exact lower section where the sleeve will sit and calculate N from your sc gauge. Test the first three rounds on the glass before finishing. A strongly tapered glass may need a custom-shaped sleeve; choose a nearly straight lower section for these instructions.
Remove the glass, candle, and detachable gifts first. Spot-clean the assembled display with a damp cloth. A mat that has not been permanently attached to the decorations can be hand-washed separately and blocked flat. Follow the stiffener label for treated pieces.
Use the exact 12-increase formula for each extra solid round, then check the work on a flat surface before adding the eyelet round. If the fabric still cups or ripples after gentle blocking, adjust your hook or dc tension and remake the affected rounds.
The finished Christmas Sleigh Crochet Centerpiece Pattern

