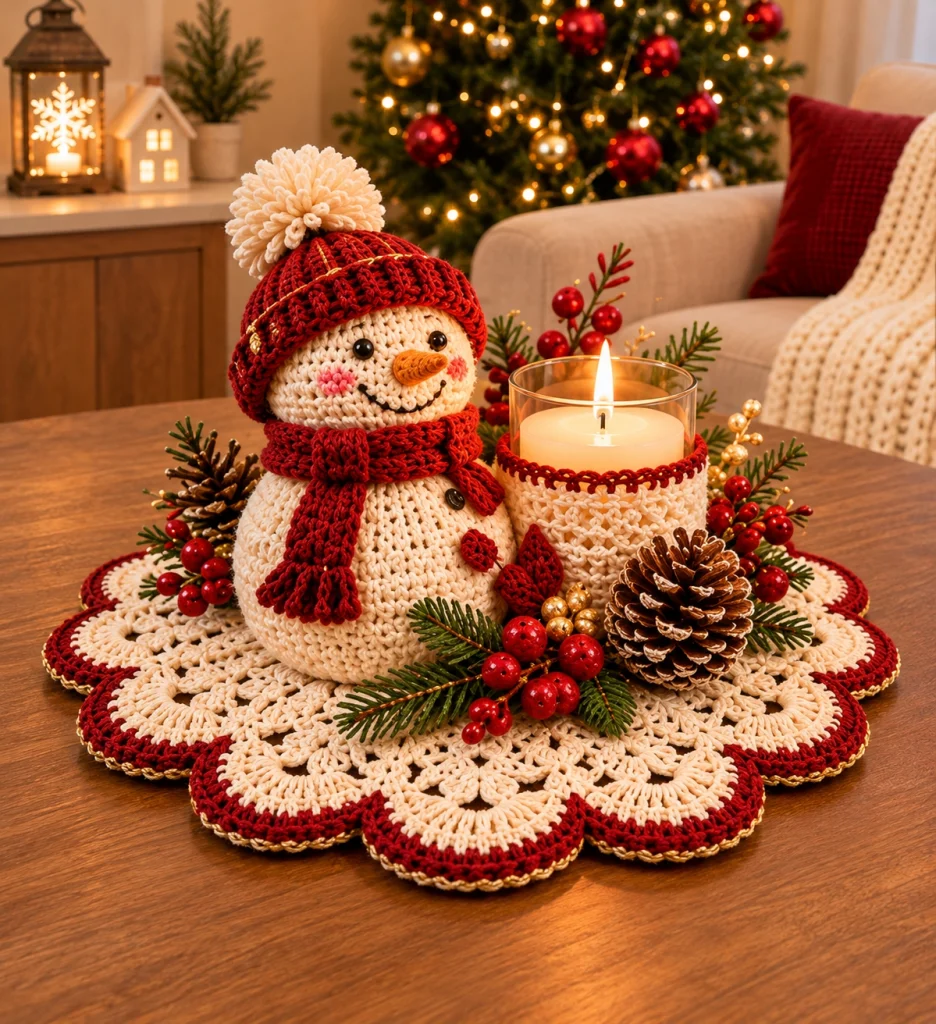
Christmas Snowman Candle Centerpiece – Free Crochet Pattern
Bring cozy handmade charm to your holiday table with this beautiful Christmas Snowman Candle Centerpiece! Featuring an adorable cream-colored crochet snowman wearing a textured red winter hat and scarf, a delicate scalloped crochet mat, and a matching candle sleeve, this festive arrangement makes a stunning Christmas decoration.
This advanced crochet project combines amigurumi shaping, textured crochet, lacework, decorative appliqués, and detailed assembly. The finished centerpiece is perfect for a holiday dining table, mantel, coffee table, or handmade Christmas gift.
Pattern Details
- Skill Level: Advanced
- Finished Size: Approximately 35–40 cm across
- Snowman Height: Approximately 20–23 cm including hat
- Techniques: Amigurumi, ribbed crochet, lace motifs, shaping, embroidery, and assembly
- Colors: Ivory, Christmas red, forest green, gold, orange, and black
- Terminology: US crochet terms
- Lighting: Battery-operated LED candle recommended
Materials Needed
- Ivory cotton yarn, approximately 300–350 g
- Deep Christmas red cotton yarn, approximately 120 g
- Forest green cotton yarn, approximately 30 g
- Small amounts of orange, black, and gold yarn
- 3.5 mm crochet hook
- 2.5 mm crochet hook for decorative details
- Polyester fiberfill
- Two black safety eyes, 8–10 mm, or embroidered eyes
- Two small black buttons
- Tapestry needle
- Stitch markers
- Scissors
- Glass hurricane candle holder
- Battery-operated LED pillar candle
- Gold decorative beads
- Artificial red berries and pine branches
- Small decorative pinecones
- Optional gold metallic crochet thread
Safety Note: The pictured centerpiece shows a flame, but this crochet design should be displayed with a battery-operated LED candle only. Never place a real flame near yarn, fabric, pine branches, or decorative berries.
Crochet Abbreviations
- MR: Magic ring
- ch: Chain
- sc: Single crochet
- hdc: Half double crochet
- dc: Double crochet
- tr: Treble crochet
- sl st: Slip stitch
- inc: Increase (2 sc in one stitch)
- dec: Invisible decrease
- BLO: Back loop only
- FLO: Front loop only
- FPdc: Front post double crochet
- BPdc: Back post double crochet
- FO: Fasten off
1. Crochet the Snowman Body
Using ivory yarn and a 3.5 mm hook, work in continuous rounds.
Round 1: MR, 6 sc. (6)
Round 2: Inc around. (12)
Round 3: (1 sc, inc) × 6. (18)
Round 4: (2 sc, inc) × 6. (24)
Round 5: (3 sc, inc) × 6. (30)
Round 6: (4 sc, inc) × 6. (36)
Round 7: (5 sc, inc) × 6. (42)
Round 8: (6 sc, inc) × 6. (48)
Round 9: (7 sc, inc) × 6. (54)
Round 10: (8 sc, inc) × 6. (60)
Rounds 11–17: Sc around. (60)
Round 18: (8 sc, dec) × 6. (54)
Round 19: Sc around. (54)
Round 20: (7 sc, dec) × 6. (48)
Round 21: Sc around. (48)
Round 22: (6 sc, dec) × 6. (42)
Round 23: (5 sc, dec) × 6. (36)
Round 24: (4 sc, dec) × 6. (30)
Round 25: (3 sc, dec) × 6. (24)
Stuff the body firmly, shaping it into a rounded snowball silhouette.
Round 26: (2 sc, dec) × 6. (18)
Round 27: (1 sc, dec) × 6. (12)
Round 28: Dec around. (6)
Fasten off and close the opening.
2. Crochet the Snowman Head
Using ivory yarn:
Round 1: MR, 6 sc. (6)
Round 2: Inc around. (12)
Round 3: (1 sc, inc) × 6. (18)
Round 4: (2 sc, inc) × 6. (24)
Round 5: (3 sc, inc) × 6. (30)
Round 6: (4 sc, inc) × 6. (36)
Round 7: (5 sc, inc) × 6. (42)
Rounds 8–14: Sc around. (42)
Round 15: (5 sc, dec) × 6. (36)
Round 16: (4 sc, dec) × 6. (30)
Round 17: (3 sc, dec) × 6. (24)
Round 18: (2 sc, dec) × 6. (18)
Insert the safety eyes between rounds 10 and 11, approximately 8 stitches apart.
Stuff the head firmly.
Round 19: (1 sc, dec) × 6. (12)
Round 20: Dec around. (6)
Fasten off, close the opening, and sew the head securely onto the body.
3. Crochet the Carrot Nose
Using orange yarn and a 2.5 mm hook:
Round 1: MR, 4 sc. (4)
Round 2: Sc around. (4)
Round 3: (1 sc, inc) × 2. (6)
Round 4: Sc around. (6)
Round 5: (2 sc, inc) × 2. (8)
Fasten off, leaving a long sewing tail.
Lightly stuff the nose and attach it between the eyes, pointing slightly upward.
Embroider a curved smile with black yarn and add pink blush stitches to both cheeks.
4. Crochet the Red Winter Hat
Using Christmas red yarn:
Round 1: MR, 6 sc. (6)
Round 2: Inc around. (12)
Round 3: (1 sc, inc) × 6. (18)
Round 4: (2 sc, inc) × 6. (24)
Round 5: (3 sc, inc) × 6. (30)
Round 6: (4 sc, inc) × 6. (36)
Round 7: (5 sc, inc) × 6. (42)
Rounds 8–14: Work alternating FPdc and BPdc around to create a ribbed texture, maintaining 42 stitches.
For the folded brim:
Rounds 15–18: Work alternating FPdc and BPdc around.
Fasten off.
Fold the brim upward approximately 2 cm.
Add a few small gold embroidery stitches across the hat for a festive finish.
5. Make the Oversized Ivory Pom-Pom
Wrap ivory yarn around a pom-pom maker or cardboard template approximately 100–120 times.
Tie the center tightly with strong yarn.
Cut the loops and trim into a fluffy rounded pom-pom approximately 6–7 cm across.
Secure firmly to the top of the red hat.
6. Crochet the Red Winter Scarf
Using red yarn:
Row 1: Ch 9.
Row 2: Starting in the second chain, work 8 hdc.
Rows 3–55: Ch 1, turn, work 8 hdc in BLO.
Fasten off.
Cut short strands of red yarn and attach them to both scarf ends to create fringes.
Wrap the scarf around the snowman’s neck and secure with small stitches.
7. Crochet the Scalloped Christmas Base
The centerpiece features a large ivory crochet mat with rounded scalloped petals and a deep red border.
Using ivory yarn and a 3.5 mm hook:
Round 1: MR, 12 dc. Join. (12)
Round 2: 2 dc in each stitch. (24)
Round 3: (1 dc, 2 dc in next stitch) × 12. (36)
Round 4: (2 dc, 2 dc in next stitch) × 12. (48)
Round 5: (3 dc, 2 dc in next stitch) × 12. (60)
Round 6: (4 dc, 2 dc in next stitch) × 12. (72)
Round 7: (5 dc, 2 dc in next stitch) × 12. (84)
Round 8: (6 dc, 2 dc in next stitch) × 12. (96)
Round 9: (7 dc, 2 dc in next stitch) × 12. (108)
Round 10: (8 dc, 2 dc in next stitch) × 12. (120)
For the lace section:
Round 11: *Dc in next stitch, ch 2, skip 1 stitch*; repeat around.
Round 12: Work 2 dc into each ch-2 space.
Round 13: *Dc in next stitch, ch 3, skip 2 stitches*; repeat around.
Round 14: Work 3 dc into each ch-3 space.
Continue working decorative lace rounds until the mat reaches approximately 30–32 cm in diameter.
8. Create the Scalloped Petal Border
Divide the outer edge into 12 equal sections using stitch markers.
For each section:
Row 1: Work 12 dc across the marked section.
Row 2: Ch 3, turn, 2 dc in first stitch, dc across, 2 dc in last stitch.
Row 3: Ch 3, turn, dc across.
Row 4: Ch 3, turn, 2 dc in first stitch, dc across, 2 dc in last stitch.
Row 5: Ch 3, turn, dc across.
Row 6: Ch 3, turn, work 5 dc into each corner section to round the petal.
Fasten off and repeat for all 12 petals.
Attach deep red yarn and work one round of sc around the entire scalloped edge.
For a thicker red border, add a second round of hdc.
Finish with a delicate gold metallic slip-stitch edging.
9. Crochet the Ivory Candle Sleeve
Measure the circumference of your glass candle holder before beginning.
Using ivory yarn:
Foundation: Chain a multiple of 4 to fit snugly around the glass holder. Join into a ring.
Rounds 1–3: Sc around.
Round 4: *Dc, ch 1, skip 1 stitch*; repeat around.
Round 5: Work sc into each stitch and chain space.
Round 6: *FPdc, BPdc*; repeat around.
Rounds 7–10: Repeat rounds 4–6 as needed to create a textured sleeve.
Round 11: Sc around.
Change to red yarn.
Round 12: Sc around.
Round 13: Work a decorative picot edging.
Fasten off.
Slide the sleeve over the lower section of the glass holder, keeping the upper glass completely uncovered.
Use a battery-operated LED pillar candle inside the glass holder.
10. Crochet the Red Decorative Berries
Using red yarn and a 2.5 mm hook:
Round 1: MR, 6 sc. (6)
Round 2: Inc around. (12)
Rounds 3–4: Sc around. (12)
Round 5: Dec around. (6)
Stuff lightly and close.
Make approximately 10–15 berries in varying sizes.
Group them into small clusters and secure them to green crochet leaves or decorative stems.
11. Crochet the Evergreen Leaves
Using forest green yarn:
Row 1: Ch 16.
Starting in the second chain:
Work 1 sc, 2 hdc, 7 dc, 2 hdc, 1 sc.
Work 3 sc into the final chain.
Continue along the opposite side of the foundation chain with matching stitches.
Fasten off.
For a more realistic pine-branch effect, make several narrow green strips and attach small chain loops along both sides.
Make 8–12 leaves or branch pieces.
12. Crochet the Decorative Red Bow
Using red yarn:
Row 1: Ch 13.
Rows 2–8: Work 12 sc across.
Fasten off.
Fold the rectangle into a bow shape.
Wrap red yarn around the center several times and secure at the back.
Make two narrow crochet tails and attach them beneath the bow.
This bow can be added to the candle sleeve or placed beside the snowman.
13. Assemble the Christmas Centerpiece
- Block the scalloped crochet mat to create evenly shaped petals.
- Place the mat flat on the table.
- Position the completed snowman slightly to the left of the center.
- Place the glass candle holder to the right of the snowman.
- Slide the crochet sleeve onto the lower portion of the glass.
- Arrange the green crochet leaves around both decorations.
- Add red crochet berries in small clusters.
- Position decorative pinecones around the candle sleeve.
- Add gold beads or gold embroidery accents.
- Place the battery-operated LED candle inside the glass holder.
Keep the arrangement balanced, with the snowman and candle holder as the two main focal points.
14. Optional Christmas Embellishments
- Embroider small gold stars on the snowman’s red hat.
- Add tiny white snowflakes to the candle sleeve.
- Attach miniature gold bells to the scarf ends.
- Make additional crocheted pinecones.
- Use metallic gold yarn around the scalloped mat.
- Add small crocheted holly leaves.
- Decorate the snowman with embroidered snowflakes.
- Create matching mini snowmen for holiday place settings.
Advanced Crochet Tips
- Maintain consistent tension throughout the amigurumi pieces.
- Stuff the snowman firmly enough to hold its shape without stretching the stitches.
- Use stitch markers to maintain symmetrical increases and decreases.
- Block the crochet mat before attaching decorative elements.
- Keep the candle sleeve fitted to the glass without stretching excessively.
- Secure all decorative berries and leaves with strong stitches.
- Use matching yarn tails for invisible assembly.
- Keep the candle and snowman removable for easy cleaning and storage.
- Use only battery-operated lighting near crochet decorations.
Christmas Color Variations
- Traditional Christmas: Ivory, deep red, forest green, and gold.
- Winter Wonderland: White, icy blue, silver, and pale gray.
- Rustic Farmhouse: Cream, burgundy, olive green, and natural brown.
- Elegant Holiday: Champagne, ivory, sage green, and metallic gold.
- Vintage Christmas: Antique white, cranberry red, and dark pine green.
- Pastel Christmas: Soft pink, ivory, mint green, and rose gold.
Frequently Asked Questions
Is this crochet centerpiece suitable for beginners?
This pattern is intended for advanced crocheters because it includes shaped amigurumi pieces, lacework, ribbed crochet, decorative details, and multi-part assembly.
Can I use a real candle?
No. Use only a battery-operated LED candle. Yarn and decorative greenery are flammable and should never be placed near an open flame.
Can I make the snowman separately?
Yes! The snowman makes an adorable standalone Christmas decoration or handmade gift.
Can I make the crochet mat larger?
Yes. Add additional increase rounds before starting the decorative lace section, keeping the increases evenly distributed to maintain a flat circular shape.
How do I keep the snowman standing upright?
Use firm stuffing and shape the base carefully. A small removable weighted fabric pouch can be placed inside the lower body if extra stability is needed.
Can I wash the finished centerpiece?
The crochet components can be gently hand-washed in cool water. Remove all non-washable decorations and electronics first, then reshape and air-dry completely.
Can I sell finished items made from this pattern?
You may sell your handmade finished items in small quantities. Please credit Cozy Crochet Patterns as the pattern source when possible.
Final Thoughts
This Christmas Snowman Candle Centerpiece is a beautiful way to bring handmade warmth to your holiday decorations. The adorable snowman, rich red winter accessories, intricate ivory crochet mat, and festive greenery create a cozy Christmas display that feels both traditional and elegant.
Whether you make it for your own home or as a thoughtful handmade gift, this crochet centerpiece is sure to become a treasured part of your holiday decor.
Save this free Christmas Snowman Crochet Pattern to Pinterest and share it with your crochet-loving friends!
Designer note: This is an original, untested interpretation of the reference image rather than an exact stitch-for-stitch reproduction. Adjust the mat’s lace repeats, petal shaping, and candle sleeve measurements as needed after making a gauge sample.

