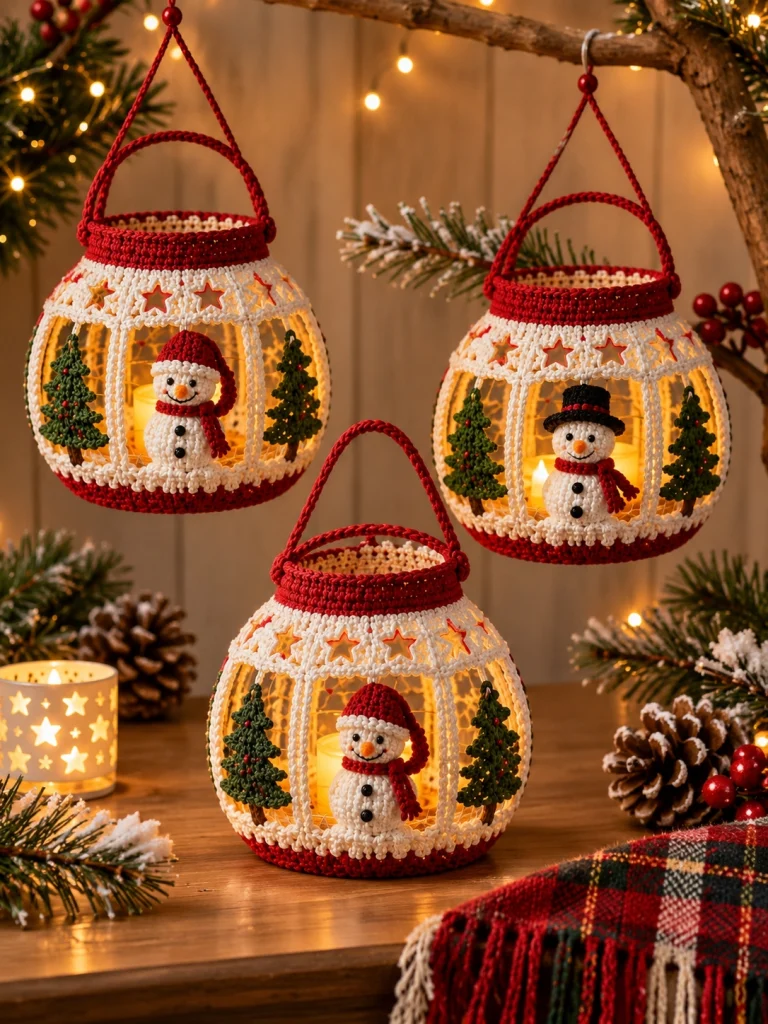
Christmas Snowman Crochet Lanterns – Free Advanced Crochet Pattern
Create a magical holiday atmosphere with these handmade Christmas Snowman Crochet Lanterns! Featuring beautiful red and ivory crochet frames, delicate star-shaped lace, miniature Christmas trees, and adorable snowmen, these decorative lanterns bring warmth and festive charm to your home.
This advanced crochet pattern combines structural crochet, amigurumi snowmen, miniature Christmas tree appliqués, decorative lace panels, and reinforced hanging handles. Make a matching set of three lanterns for your Christmas tree, mantel, windows, or holiday table.
Each lantern is designed to hold a battery-operated LED tealight, creating a beautiful golden glow through the openwork crochet panels.
Pattern Information
- Skill Level: Advanced
- Finished Size: Approximately 15–18 cm tall and 12–14 cm wide
- Construction: Separate base, upper rim, lace panels, snowman, trees, and handle
- Style: Christmas lantern with miniature winter scene
- Techniques: Amigurumi, shaping, openwork crochet, embroidery, appliqué, and assembly
- Terminology: US crochet terms
- Lighting: Battery-operated LED tealight only
Materials Needed
- Sport-weight cotton yarn in Christmas red
- Sport-weight cotton yarn in ivory or snow white
- Dark forest green cotton yarn
- Small amounts of black, orange, and brown yarn
- 2.5 mm crochet hook
- 2.0 mm crochet hook for smaller details
- Polyester fiberfill
- Tapestry needle
- Stitch markers
- Scissors
- Embroidery needle
- Small red beads or crocheted berries
- Flexible plastic canvas or transparent craft support for structure
- Lightweight plastic base insert
- Battery-operated LED tealight
- Optional small wooden beads for hanging decoration
Safety: Never use real candles or open flames inside crochet lanterns. Use only cool-running battery-operated LED lights. Keep the light accessible for switching off and battery replacement.
Crochet Abbreviations
- MR: Magic ring
- ch: Chain
- sc: Single crochet
- hdc: Half double crochet
- dc: Double crochet
- tr: Treble crochet
- sl st: Slip stitch
- inc: Increase (2 sc in one stitch)
- dec: Invisible decrease
- BLO: Back loop only
- FLO: Front loop only
- sp: Space
- FO: Fasten off
- rep: Repeat
1. Crochet the Red Lantern Base
Using red cotton yarn and a 2.5 mm hook:
Round 1: Make a magic ring and work 6 sc into the ring. (6)
Round 2: Inc around. (12)
Round 3: (1 sc, inc) × 6. (18)
Round 4: (2 sc, inc) × 6. (24)
Round 5: (3 sc, inc) × 6. (30)
Round 6: (4 sc, inc) × 6. (36)
Round 7: (5 sc, inc) × 6. (42)
Round 8: (6 sc, inc) × 6. (48)
Round 9: (7 sc, inc) × 6. (54)
Round 10: (8 sc, inc) × 6. (60)
Round 11: (9 sc, inc) × 6. (66)
Round 12: (10 sc, inc) × 6. (72)
Round 13: BLO sc around. (72)
Rounds 14–17: Sc around. (72)
Fasten off and weave in the ends.
Cut a lightweight plastic canvas circle to fit the base. Insert it beneath the decorative interior floor to keep the lantern stable.
2. Crochet the Ivory Snow Border
Attach ivory yarn to the upper edge of the red base.
Round 1: Sc around. (72)
Round 2: *Sl st in next stitch, skip 1 stitch, work 5 dc in next stitch, skip 1 stitch*; repeat around.
This creates a soft scalloped snow border.
Fasten off, leaving a tail for assembly.
3. Crochet the Vertical Lantern Supports
Make six ivory support strips.
Using ivory yarn:
Row 1: Ch 31.
Row 2: Starting in the second chain, work 30 sc.
Row 3: Ch 1, turn, work 30 sc.
Row 4: Ch 1, turn, work 30 sc.
Fasten off.
Repeat until six strips are completed.
Position the supports evenly around the base.
Attach the lower ends to the inside of the red base border.
These supports create the vertical window divisions visible in the finished lantern.
4. Crochet the Red Upper Lantern Rim
Using red yarn:
Round 1: Ch 72, join carefully into a ring without twisting.
Rounds 2–5: Ch 1, work 72 sc around, joining each round.
Round 6: Change to ivory yarn and work sc around.
Fasten off.
Attach the six vertical support strips evenly around the upper rim.
Reinforce the rim with flexible plastic canvas if necessary.
5. Crochet the Star Lace Panels
The upper section of each lantern features decorative ivory lace with small star-shaped openings.
Using ivory yarn:
Foundation: Ch 72, join into a ring.
Round 1: Ch 3, dc in each stitch around. Join.
Round 2: Ch 1, sc in each stitch around. Join.
Round 3: *Sc in next stitch, ch 5, skip 3 stitches*; repeat around.
Round 4: Work 5 sc into each ch-5 space.
Round 5: Work a decorative picot in the center stitch of each group.
Fasten off.
Position the lace beneath the upper red rim and stitch it securely to the vertical supports.
For star-shaped openings like those in the photograph, create small five-point star appliqués and position them around the lace band.
6. Crochet the Miniature Snowman Body
Using ivory yarn and a 2.0 mm hook:
Round 1: MR, 6 sc. (6)
Round 2: Inc around. (12)
Round 3: (1 sc, inc) × 6. (18)
Round 4: (2 sc, inc) × 6. (24)
Rounds 5–9: Sc around. (24)
Round 10: (2 sc, dec) × 6. (18)
Round 11: (1 sc, dec) × 6. (12)
Stuff firmly with polyester fiberfill.
Round 12: Dec around. (6)
Fasten off and close the opening.
7. Crochet the Snowman Head
Using ivory yarn:
Round 1: MR, 6 sc. (6)
Round 2: Inc around. (12)
Round 3: (1 sc, inc) × 6. (18)
Rounds 4–7: Sc around. (18)
Round 8: (1 sc, dec) × 6. (12)
Stuff lightly.
Round 9: Dec around. (6)
Fasten off and close.
Sew the head securely onto the body.
8. Embroider the Snowman Face
Use black embroidery thread to create two small eyes.
Embroider a gentle curved smile.
For the carrot nose, use orange yarn and make a small tapered embroidered triangle.
Add two or three black buttons vertically along the snowman’s body.
Keep the facial features small and symmetrical for a sweet handmade expression.
9. Crochet the Red Santa Hat
Using red yarn:
Round 1: MR, 4 sc. (4)
Round 2: Sc around. (4)
Round 3: (1 sc, inc) × 2. (6)
Round 4: Sc around. (6)
Round 5: (2 sc, inc) × 2. (8)
Round 6: Sc around. (8)
Round 7: (3 sc, inc) × 2. (10)
Round 8: (4 sc, inc) × 2. (12)
Round 9: (1 sc, inc) × 6. (18)
Round 10: Sc around. (18)
Change to ivory yarn.
Rounds 11–12: Sc around. (18)
Fasten off.
Attach a small ivory pom-pom to the pointed tip.
Place the hat slightly to one side of the snowman’s head.
10. Crochet the Snowman Scarf
Using red yarn:
Ch 32.
Starting in the second chain from the hook, work 31 sc.
Fasten off.
Wrap the scarf around the snowman’s neck.
Tie gently at one side and secure with a few stitches.
For the snowman wearing a black hat, replace the Santa hat with a miniature black top hat.
11. Crochet the Black Top Hat Variation
Using black yarn:
Round 1: MR, 6 sc. (6)
Round 2: Inc around. (12)
Round 3: BLO sc around. (12)
Rounds 4–6: Sc around. (12)
Round 7: FLO inc around. (24)
Fasten off.
Embroider a narrow red band around the hat.
Attach securely to the snowman’s head.
12. Crochet the Miniature Christmas Trees
Each lantern features small forest green Christmas trees positioned beside the snowman.
Using dark green yarn:
Row 1: Ch 2, work 2 sc into the second chain.
Row 2: Ch 1, turn, inc twice. (4)
Row 3: Ch 1, turn, sc across. (4)
Row 4: Ch 1, turn, inc, 2 sc, inc. (6)
Row 5: Ch 1, turn, sc across. (6)
Row 6: Ch 1, turn, inc, 4 sc, inc. (8)
Row 7: Ch 1, turn, sc across. (8)
Row 8: Ch 1, turn, inc, 6 sc, inc. (10)
Row 9: Ch 1, turn, sc across. (10)
Fasten off.
Attach brown yarn to the center of the bottom edge.
Work 3 sc across the center stitches for two rows to create the trunk.
Decorate with tiny red French knots or crocheted berries.
Make two miniature trees per lantern.
13. Crochet the Lantern Hanging Handle
Using red yarn:
Ch 65.
Row 1: Starting in the second chain, work 64 sc.
Row 2: Ch 1, turn, work 64 sc.
Row 3: Ch 1, turn, work 64 sc.
Fasten off, leaving long tails.
Fold the strip lengthwise and stitch the edges together to create a rounded handle.
Attach both ends securely to opposite sides of the upper rim.
For a hanging version, crochet an additional chain loop and reinforce the attachment points.
Do not suspend a lantern by the handle until the complete assembly has been checked for stability.
14. Assemble the Christmas Lantern
- Place the red circular base on a flat surface.
- Attach the ivory vertical supports evenly around the base.
- Connect the supports to the red upper rim.
- Secure the decorative star lace beneath the upper rim.
- Position the miniature snowman inside the lantern.
- Sew the snowman to the base so it remains upright.
- Attach one miniature Christmas tree on each side.
- Reinforce the lantern structure with lightweight plastic support.
- Attach the red hanging handle.
- Place a battery-operated LED tealight behind the snowman.
Ensure the lantern remains balanced and that the LED light can be removed easily.
15. Make a Matching Set of Three Lanterns
For a festive arrangement similar to the reference image, create three coordinating lanterns.
- Lantern One: Snowman with a red Santa hat and matching red scarf.
- Lantern Two: Snowman with a black top hat and red scarf.
- Lantern Three: Smaller snowman with a long red Santa hat.
Keep the lantern colors consistent with red bases, ivory lace, green Christmas trees, and warm golden LED lighting.
For the smaller lantern, use a thinner yarn and smaller hook while maintaining the same construction proportions.
16. Optional Decorative Details
- Add tiny crocheted snowflakes to the lace panels.
- Use red wooden beads above the hanging loops.
- Embroider miniature golden stars around the upper rim.
- Add white bobble stitches along the base to resemble snow.
- Use dark green embroidery to create miniature pine branches.
- Add tiny red berries to the Christmas trees.
- Decorate the snowman’s scarf with small fringes.
- Use warm-white LED lights for a cozy holiday glow.
Advanced Crochet Tips
- Use firm cotton yarn to maintain the lantern shape.
- Keep all vertical supports equal in length.
- Block the lace sections before assembly.
- Use removable plastic supports for additional stability.
- Maintain symmetrical spacing between the window panels.
- Embroider facial features before attaching the snowman head.
- Secure miniature decorations with strong stitches.
- Keep the battery compartment accessible.
- Use lightweight embellishments on hanging lanterns.
- Test the structure before displaying the finished piece.
Christmas Lantern Color Variations
- Traditional Christmas: Red, ivory, forest green, and black.
- Winter Wonderland: White, icy blue, and silver.
- Rustic Farmhouse: Burgundy, cream, and pine green.
- Elegant Christmas: Ivory, champagne gold, and sage green.
- Vintage Holiday: Deep red, antique white, and olive green.
- Pastel Christmas: Blush pink, soft white, and mint green.
Frequently Asked Questions
Can beginners make these crochet lanterns?
This pattern is designed for advanced crocheters familiar with amigurumi, shaping, lace crochet, and multi-piece assembly.
Can I use a real candle inside the lantern?
No. Never place real candles or open flames inside crocheted decorations. Use only cool-running battery-operated LED tealights.
How can I make the lantern stand upright?
Use a firm cotton yarn and lightweight plastic canvas supports to reinforce the base, rim, and vertical sections.
Can I hang these lanterns on a Christmas tree?
Yes, provided they are lightweight and securely assembled. Use a strong branch and avoid heavy battery packs.
Can I make the snowmen separately?
Absolutely! The miniature snowmen can also be used as Christmas ornaments, gift toppers, or tabletop decorations.
Can I make larger lanterns?
Yes. Use thicker yarn, a larger hook, and appropriately scaled structural supports. Adjust the snowman and tree sizes to match.
How should I store the finished lanterns?
Remove the batteries and store the lanterns in a dry box with tissue paper to protect the crochet details.
Final Thoughts
These Christmas Snowman Crochet Lanterns combine charming amigurumi characters, delicate lace, miniature Christmas trees, and festive red-and-white crochet details into a beautiful handmade holiday decoration.
Whether displayed on a mantel, arranged on a holiday table, or hung from a decorative branch, these glowing winter lanterns bring a magical handmade touch to your Christmas decor.
Save this free Christmas crochet lantern pattern to Pinterest and share it with your crochet-loving friends!
Designer note: This is an original, untested pattern inspired by the supplied image, not an exact stitch-for-stitch reconstruction. The image contains intricate shaped openings and structural details that may require custom adjustments. Crochet a sample frame and check its dimensions and stability before completing the full set.

