Christmas Star Crochet Candle Centerpiece – Free Advanced Crochet Pattern
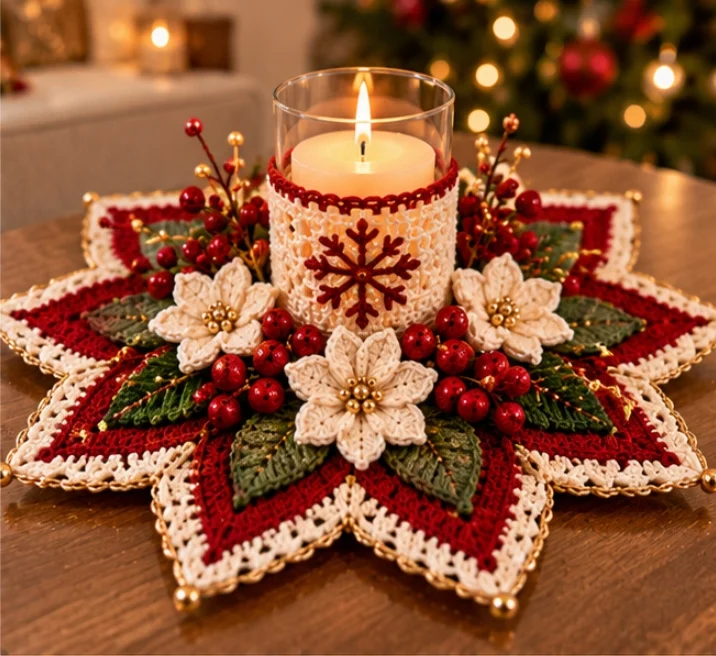
Create a breathtaking handmade holiday decoration with this Christmas Star Crochet Candle Centerpiece. Featuring dramatic burgundy and ivory star points, forest-green leaves, delicate ivory poinsettias, red berry clusters, and a beautifully detailed candle sleeve, this festive centerpiece brings traditional Christmas elegance to your dining table.
The design combines layered crochet lace, dimensional flowers, decorative foliage, and intricate finishing details. Its striking eight-point star arrangement surrounds a central glass candle holder, creating a warm and inviting seasonal display.
This advanced crochet pattern is perfect for experienced crocheters who enjoy detailed holiday projects and beautiful handmade home décor.
Pattern Information
- Skill Level: Advanced
- Finished Diameter: Approximately 42–48 cm
- Center Opening: Approximately 11–13 cm
- Construction: Eight separate star panels, central ring, poinsettias, leaves, berries, and candle sleeve
- Yarn Weight: Sport-weight cotton
- Hook Size: 3 mm
- Terminology: US crochet terms
- Estimated Time: 16–22 hours
Materials Needed
- Sport-weight cotton yarn in deep burgundy – 250 m
- Sport-weight cotton yarn in warm ivory – 200 m
- Sport-weight cotton yarn in forest green – 120 m
- Small amount of dark red yarn for the snowflake
- 3 mm crochet hook
- 2.5 mm crochet hook for fine details
- Tapestry needle
- Scissors
- Stitch markers
- Gold-colored decorative beads
- Red artificial berry picks or crocheted berries
- Optional gold embroidery thread
- Blocking mats and rustproof pins
- Glass candle hurricane and battery-operated LED pillar candle
Safety: Use a battery-operated LED candle. Do not place a burning candle near the yarn, foliage, or decorations. Crochet is flammable.
Crochet Abbreviations
- MR: Magic ring
- ch: Chain
- sc: Single crochet
- hdc: Half double crochet
- dc: Double crochet
- tr: Treble crochet
- dtr: Double treble crochet
- sl st: Slip stitch
- st: Stitch
- sp: Space
- inc: Increase
- dec: Decrease
- FO: Fasten off
Special Techniques
- Filet Crochet: Decorative chain spaces create openwork lace panels.
- Pointed Shaping: Gradual increases and decreases form the elongated star points.
- Surface Crochet: Decorative slip stitches add texture to the snowflake and leaves.
- Layered Poinsettias: Separate petals are assembled into dimensional flowers.
- Invisible Joining: Matching yarn is used to connect panels without prominent seams.
- Picot Edging: Small chain loops create elegant lace borders.
1. Crochet the Central Foundation Ring
Using burgundy yarn and a 3 mm hook, ch 72. Join with a sl st to form a ring, taking care not to twist the chain.
Round 1: Ch 1, sc in each chain around. Join with a sl st. (72 sc)
Round 2: Ch 3 (counts as dc), dc in each remaining stitch. Join. (72 dc)
Round 3: Ch 1, *sc in next 8 stitches, ch 2, skip 1 stitch* repeat around. Join.
Round 4: Work sc evenly around, placing 2 sc into each ch-2 space. Join.
Fasten off and weave in the ends.
This ring provides the foundation for the eight decorative star points.
2. Crochet the Burgundy Star Panels
Make 8 identical burgundy panels.
Foundation: Ch 25.
Row 1: Dc in the fourth chain from the hook and in each remaining chain. Turn. (23 dc, counting the turning chain)
Row 2: Ch 3, dc in the next 3 stitches, *ch 1, skip 1 stitch, dc in the next stitch* repeat until 4 stitches remain. Dc in the final 4 stitches. Turn.
Row 3: Ch 3, dc in each dc and each ch-1 space across. Turn.
Row 4: Ch 3, dc in the next 2 stitches, ch 2, skip 2 stitches, dc in the next 3 stitches. Continue alternating decorative openings across the row. Turn.
Row 5: Work dc evenly across the row, filling each chain space with the corresponding number of stitches.
Shape the Star Point
Begin decreasing the width gradually to form an elongated triangular point.
Row 6: Ch 3, dc2tog over the next 2 stitches, dc across until 3 stitches remain, dc2tog, dc in the final stitch. Turn.
Rows 7–15: Repeat the decrease sequence while maintaining small decorative chain openings near the center of each row.
Continue until the panel narrows to approximately 3 stitches.
Final Row: Ch 1, sc3tog over the remaining stitches.
Fasten off, leaving a long tail for joining.
Block each panel into a sharply pointed triangular shape.
3. Add the Ivory Lace Borders
Join ivory yarn at the base of a burgundy star panel.
Border Round 1: Work sc evenly along both side edges of the panel.
At the pointed tip, work (sc, ch 3, sc) to emphasize the star shape.
Border Round 2: Work *sc, ch 3, skip 2 stitches* along the outer edge.
Border Round 3: Work (sc, hdc, dc, hdc, sc) into alternating chain spaces to create small decorative lace fans.
Fasten off.
Repeat for all 8 panels.
4. Add Decorative Gold Accents
Using fine gold embroidery thread, work a delicate running stitch along the outer ivory border.
For a more elaborate finish, add small gold-colored beads at the pointed ends of the star panels.
Secure each bead carefully with strong thread.
5. Assemble the Eight-Point Star
- Lay the central foundation ring on a flat surface.
- Position the eight burgundy panels evenly around the ring.
- Arrange each panel with its pointed tip facing outward.
- Pin the panel bases to the foundation ring.
- Use burgundy yarn to sew the panels securely into place.
- Join adjacent panel edges near the center to maintain the star arrangement.
- Check that all eight points are evenly spaced.
The completed foundation should resemble a large eight-point Christmas star with ivory lace edging.
6. Crochet the Forest-Green Leaves
Make 12 decorative leaves using forest-green yarn.
Foundation: Ch 17.
Round 1: Sc in the second chain from the hook, hdc in the next 2 chains, dc in the next 4, tr in the next 4, dc in the next 3, sc in the final 2 chains.
Continue around the opposite side of the foundation chain, mirroring the stitch sequence.
Join with a sl st.
Round 2: Work sc around the leaf, adding (sc, ch 2, sc) at the tip.
Round 3: Work surface slip stitches along the center of the leaf to form a raised vein.
Add smaller diagonal veins using embroidery stitches if desired.
Fasten off and block the leaf into an elongated pointed shape.
7. Crochet the Ivory Poinsettia Petals
Make 3 poinsettia flowers, each with 6 large petals and 6 smaller petals.
Large Petal – Make 18
Using ivory yarn, ch 12.
Row 1: Sc in the second chain from the hook, hdc in the next 2 chains, dc in the next 3, tr in the next 3, dc in the next chain, sc in the final chain.
Row 2: Ch 1, turn. Sc in the first stitch, hdc in the next 2, dc in the next 5, hdc in the next 2, sc in the final stitch.
Edging: Work sc around the entire petal, adding a picot at the pointed tip.
Fasten off, leaving a long sewing tail.
Small Petal – Make 18
Ch 9.
Row 1: Sc in the second chain from the hook, hdc in the next 2, dc in the next 3, hdc in the next stitch, sc in the final stitch.
Row 2: Work sc evenly around the petal, adding a picot at the tip.
Fasten off.
8. Assemble the Poinsettia Flowers
- Arrange 6 large petals into a circular flower shape.
- Sew the petal bases together.
- Position 6 smaller petals over the first layer.
- Rotate the upper petals so they sit between the lower petals.
- Sew the layers securely together.
- Attach a small cluster of gold-colored beads to the flower center.
- Repeat to make 3 complete poinsettias.
Shape the petals gently to create a dimensional appearance.
9. Crochet the Red Berry Clusters
Using dark red yarn, make approximately 24 small berries.
Round 1: Work 6 sc into a MR. (6)
Round 2: Work 2 sc in each stitch around. (12)
Rounds 3–4: Sc in each stitch around. (12)
Round 5: Sc2tog around. (6)
Lightly stuff the berry with yarn scraps.
Fasten off and close the opening.
Arrange the berries in small groups of 3 or 4 and stitch them together.
For the appearance of the pictured centerpiece, decorative artificial berry picks may also be used.
10. Crochet the Ivory Candle Sleeve
Measure the circumference of your glass hurricane before beginning.
Using ivory yarn, make a foundation chain long enough to wrap around the glass without stretching tightly.
Join with a sl st to form a ring.
Round 1: Ch 1, sc in each chain around. Join.
Round 2: Ch 3, dc in each stitch around. Join.
Round 3: Ch 4, skip 1 stitch, dc in the next stitch, *ch 1, skip 1 stitch, dc in the next stitch* repeat around.
Round 4: Work dc into each dc and ch-1 space around.
Rounds 5–10: Repeat Rounds 3 and 4 to create the openwork lace sleeve.
Final Round: Work *sc, ch 3, skip 2 stitches* around to create a delicate scalloped upper edge.
Fasten off.
Slide the completed sleeve over the glass hurricane. It should fit securely without distorting the crochet stitches.
11. Crochet the Burgundy Snowflake
Using burgundy yarn and a 2.5 mm hook:
Round 1: Make a MR, ch 3, work 11 dc into the ring. Join. (12 dc)
Round 2: *Ch 6, sl st into the third chain from the hook, ch 3, sl st into the next second stitch of the previous round* repeat 6 times.
Round 3: Work decorative surface slip stitches along each snowflake arm.
Fasten off.
Attach the snowflake to the front of the ivory candle sleeve using matching yarn.
Secure a small gold-colored bead in the center if desired.
12. Add the Burgundy Sleeve Border
Join burgundy yarn along the upper edge of the ivory candle sleeve.
Work one round of sc.
For the final decorative round, repeat:
*Sc in the next stitch, ch 3, skip 2 stitches.*
Join and fasten off.
This burgundy trim creates a beautiful contrast with the ivory lace.
13. Arrange the Green Leaves
Place the completed star foundation on a flat surface.
Arrange the forest-green leaves around the central opening.
Position the leaves so their pointed ends extend toward the burgundy star panels.
Overlap neighboring leaves slightly for a full botanical appearance.
Use matching green yarn to secure the leaves to the star foundation.
14. Attach the Ivory Poinsettias
Position the three poinsettia flowers evenly around the central candle opening.
Place one flower at the front center and the remaining two slightly behind it on opposite sides.
Secure the flowers with matching ivory yarn.
Arrange the petals so they overlap the green leaves naturally.
15. Add the Berry Clusters
Arrange the crocheted red berries between the poinsettia flowers.
Distribute the clusters evenly around the centerpiece.
For additional texture, combine crocheted berries with decorative berry stems.
Secure all decorative elements firmly to prevent loose pieces.
16. Final Assembly and Finishing
- Lay the completed star foundation flat.
- Check the alignment of all eight star points.
- Adjust the green leaves to create balanced coverage.
- Arrange the three ivory poinsettias symmetrically.
- Fill small gaps with red berry clusters.
- Position the glass hurricane in the center opening.
- Fit the ivory crochet sleeve around the hurricane.
- Place a battery-operated LED candle inside the glass holder.
- Weave in all remaining yarn ends.
- Gently shape the lace points and flower petals.
17. Blocking the Centerpiece
For the best results, block the star foundation before attaching the dimensional decorations.
- Lightly dampen the crocheted star.
- Lay it on blocking mats.
- Pin each star point into a symmetrical shape.
- Straighten the ivory lace edging.
- Allow the crochet to dry completely.
- Remove the pins carefully.
Block the leaves and flower petals separately if additional shaping is required.
Advanced Crochet Tips
- Use cotton yarn for crisp lace definition.
- Maintain even tension across all eight star panels.
- Block the star points individually before assembly.
- Use stitch markers to divide the central ring into eight equal sections.
- Arrange decorative elements before sewing them permanently.
- Use matching yarn for invisible seams.
- Keep the candle sleeve separate from the star foundation for easier cleaning.
- Use only LED lighting with this crochet decoration.
Creative Color Variations
- Traditional Christmas: Burgundy, ivory, forest green, and gold.
- Elegant Winter: White, silver gray, sage green, and champagne.
- Rustic Farmhouse: Cranberry, oatmeal, olive green, and natural beige.
- Luxury Holiday: Deep emerald, ivory, burgundy, and metallic gold.
- Soft Vintage: Dusty rose, cream, muted sage, and antique gold.
- Nordic Christmas: Bright red, white, and dark forest green.
Frequently Asked Questions
Is this Christmas crochet centerpiece suitable for beginners?
This is an advanced crochet project because it involves multiple shaped panels, decorative lacework, dimensional flowers, detailed assembly, and careful blocking.
Can I make the centerpiece larger?
Yes. Use a thicker yarn and larger crochet hook, or increase the dimensions of the individual star panels.
What yarn works best for the star points?
Sport-weight cotton yarn is ideal because it provides good stitch definition and helps the pointed lace panels maintain their shape.
Can I use a real candle?
No. A battery-operated LED candle is recommended because yarn and decorative foliage are flammable.
Can I remove the candle holder?
Yes. The glass hurricane and crochet sleeve can be made removable, allowing the centerpiece to be stored more easily.
How do I wash the centerpiece?
Remove the glass holder and detachable decorations before gently hand washing the crochet foundation. Reshape and dry flat.
Can I use artificial berries instead of crocheting them?
Yes. Artificial berry picks can add texture and dimension, provided they are securely attached.
Final Thoughts
The Christmas Star Crochet Candle Centerpiece combines traditional holiday colors with intricate handmade craftsmanship.
Its eight-point burgundy star, ivory lace borders, dimensional poinsettias, textured green leaves, and decorative snowflake sleeve create a beautiful festive display for dining tables, coffee tables, and holiday gatherings.
This detailed crochet project is a wonderful choice for experienced makers who enjoy creating elegant seasonal decorations.
Save this free Christmas crochet centerpiece pattern to Pinterest and share it with your crochet-loving friends!

