Cream Heirloom Lace Square Crochet Bedspread
Advanced
For experienced crocheters who enjoy complex shaping, fine detail, and ambitious construction
Single-Day Project
A satisfying project you can complete in a single afternoon or evening.
Handmade Gift
A beautiful keepsake — free forever. Read online or print at home.
About This Cream Heirloom Lace Square Crochet Bedspread
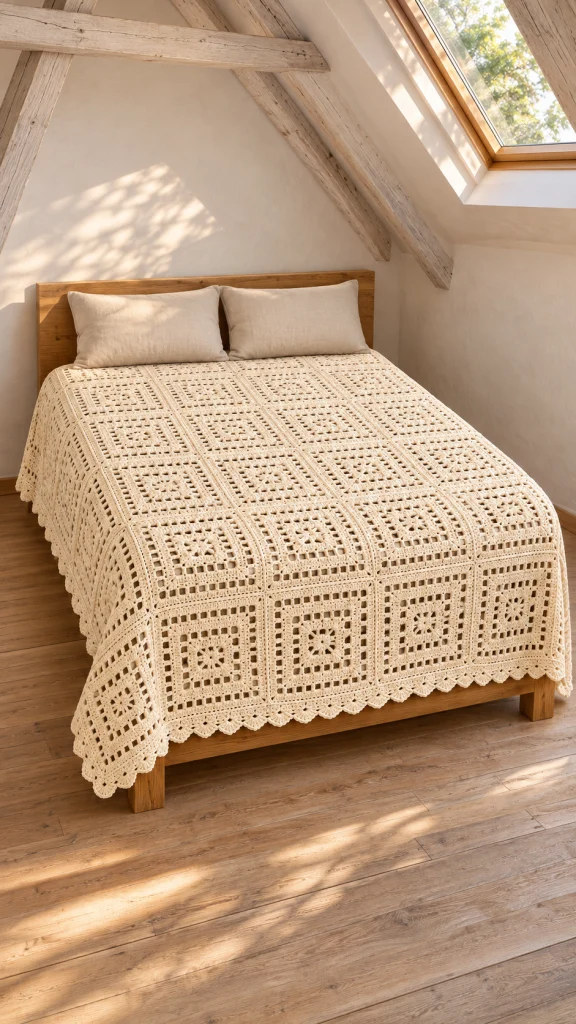
This heirloom crochet bedspread pattern brings cream lace squares and a softly scalloped edge together in a generous cover for a carefully made bed. Each large motif alternates solid bands with open mesh, creating the quiet geometry and airy texture of traditional crochet bedcovers.
The bedspread uses 42 individually blocked squares arranged in six columns and seven rows. Fine sewn joins keep the grid flat, while a continuous border frames the whole piece. Allow approximately 140–200 hours, including blocking and assembly. This advanced project suits crocheters who enjoy precise stitch placement, consistent motif gauge, and patient finishing.
The finished cover measures approximately 75 × 87 inches. Its drape depends on the mattress width and height, so measure your bed before committing to the layout. The instructions cover the bedspread itself; decorative pillows are separate accessories.
Materials
- Approximately 7,500–9,000 m of cream DK cotton yarn; buy the full quantity in one dye lot. Confirm consumption from a complete blocked motif and allow extra for adjustments.
- 4 mm crochet hook, or size needed to achieve motif gauge.
- Large blunt tapestry needle for joining and weaving in ends.
- Removable stitch markers for corners and border increases.
- Scissors.
- Tape measure.
- Blocking mats, rustproof pins, and sufficient space to block large sections.
Abbreviations
chchaindcdouble crochetMRmagic ringscsingle crochetsl stslip stitchststitchUS crochet terminology is used throughout. Instructions in parentheses are worked into the same indicated space. A side count includes the stitches between two corner chain spaces, including the corner stitches that face that side. Chain spaces are counted separately.
Large Lace Square Motif — Make 42
- Round 1: Make an MR. Ch 3, counting as the first dc, then work 15 dc into the ring. Tighten the ring and join with a sl st to the top of the beginning ch 3. Count: 16 dc.
- Round 2: Ch 3, counting as the first dc, and dc in the next 3 st; ch 3. Repeat the following three times: dc in the next 4 st, ch 3. Join to the top of the beginning ch 3. Count: 4 dc per side and four corner ch-3 spaces.
- Round 3: Sl st across to the next corner space. Ch 3, counting as the first dc, then work (1 dc, ch 3, 2 dc) in that space. Dc in the next 4 st. Repeat the following three times: (2 dc, ch 3, 2 dc) in the next corner space, dc in the next 4 st. Join to the top of the beginning ch 3. Count: 8 dc per side; four corner ch-3 spaces.
- Round 4: Move with sl st to the next corner space. Ch 3, counting as the first dc, ch 3, dc in that space. Across the next side, repeat (ch 1, skip 1 st, dc in the next st) four times, then ch 1. At each of the next three corners work (dc, ch 3, dc), followed by the same side sequence. Join to the top of the beginning ch 3. Count per side: 6 dc and five ch-1 spaces; four corner ch-3 spaces.
- Round 5: Move with sl st to the next corner space. Begin with ch 3 and (1 dc, ch 3, 2 dc) in that space; the beginning ch 3 counts as a dc. Dc in every dc and work 2 dc in every ch-1 space across the side. At each remaining corner work (2 dc, ch 3, 2 dc), then work the next side in the same manner. Join to the top of the beginning ch 3. Count: 18 dc per side.
- Round 6: Move to the next corner space. Begin with ch 3 and (1 dc, ch 3, 2 dc) in that space. Dc in each of the next 18 st. At each remaining corner work (2 dc, ch 3, 2 dc), followed by dc in each of the next 18 st. Join. Count: 22 dc per side.
- Round 7: Move to the next corner space. Begin with ch 3, ch 3, dc in that space. Across the side repeat (ch 1, skip 1 st, dc in the next st) eleven times, then ch 1. At each remaining corner work (dc, ch 3, dc), followed by the same side sequence. Join. Count per side: 13 dc and twelve ch-1 spaces.
- Round 8: Move to the next corner space. Begin with ch 3 and (1 dc, ch 3, 2 dc) in that space. Dc in every dc and work 2 dc in every ch-1 space along each side; work (2 dc, ch 3, 2 dc) in each remaining corner. Join. Count: 39 dc per side.
- Round 9: Move to the next corner space. Begin with ch 3 and (1 dc, ch 3, 2 dc) in that space. Dc in each st along every side, working (2 dc, ch 3, 2 dc) in each remaining corner. Join. Count: 43 dc per side.
- Round 10: Move to the next corner space. Ch 1, which does not count as a st, then work (sc, ch 2, sc) in that space. Sc in every dc along each side; work (sc, ch 2, sc) in each remaining corner. Join to the first sc and fasten off. Count: 45 sc per side, 180 sc total, and four corner ch-2 spaces.
- Block: Secure the center tail carefully, weave in the remaining ends, and wet-block the square to 12 × 12 inches. Record its dry weight to estimate yarn requirements for the remaining squares.
Layout and Bed Sizing
- Standard layout: Arrange 42 squares in six columns across the bed and seven rows from head to foot. The unbordered panel measures approximately 72 × 84 inches.
- Check the placement: Orient all squares with the same face upward and rotate them so the beginning-round transitions face consistently. Label the rows before joining.
- Adjust the size: For C columns and R rows, make C × R squares. With 12-inch squares and the planned border, finished width is approximately 12C + 3 inches and length is approximately 12R + 3 inches. Joining tension can slightly change these measurements.
- Calculate mattress coverage: Subtract the mattress width from the finished bedspread width and divide by two to estimate each side drop. Subtract the mattress length from the bedspread length to estimate the foot drop when the top edges are aligned.
Joining the Squares
- Join the first row: Place two squares side by side with right sides facing upward. Using matching yarn, whipstitch through the back loops of the 45 corresponding sc along the adjoining sides. Here, back loop means the loop farther from you when viewing that square from its right side. Keep the seam loose enough to lie flat.
- Secure the endpoints: At both ends of each seam, sew together the corresponding corner ch-2 spaces with two small stitches. Do not pull the corners into knots. Add the remaining squares to complete a row of six.
- Complete all rows: Join six squares into each of seven rows using the same method. Check that each row remains straight and measures approximately 72 inches across.
- Join the rows: Match the 45 edge stitches of each opposing square and sew the rows together. At each four-square intersection, pass the yarn through the adjoining corner spaces to close the small central opening, then continue along the next pair of edges.
- Inspect the perimeter: Confirm that every exposed motif edge still has 45 accessible sc. Leave the four outer corner ch-2 spaces available for the border. Secure and weave in joining tails.
Continuous Scalloped Border
- Round 1 — establish the border: With the right side facing, join yarn immediately after an outer corner ch-2 space. Ch 1, then sc along the 45 sc of the first exposed motif edge, working 2 sc into the 12th, 24th, and 36th st and 1 sc into every other st. This produces 48 sc per motif edge. Repeat this exact distribution over every exposed motif edge. At internal seam junctions, move directly to the first sc of the next motif; do not add stitches in the joined corner spaces. At each of the four outside corners, ch 2 and pass over the motif corner space. Join to the first sc. Count: 288 sc on each short side, 336 sc on each long side, and four corner ch-2 spaces.
- Round 2: Ch 1 and sc in every sc around. In each corner ch-2 space work (sc, ch 2, sc). Join to the first sc. Count: 290 sc per short side and 338 sc per long side; four corner ch-2 spaces.
- Round 3: Ch 1 and sc in every sc around, again working (sc, ch 2, sc) in each corner space. Join to the first sc. Count: 292 sc per short side and 340 sc per long side; four corner ch-2 spaces.
- Round 4 — scallops: Fasten off and rejoin in the first sc immediately after a corner space. Across each side repeat (sl st in the next st, skip 1 st, 5 dc in the next st, skip 1 st) until all side stitches have been used. Work 7 dc into the next corner ch-2 space, then begin the same repeat on the following side. After the fourth corner shell, join to the first sl st and fasten off. Count: 73 five-dc shells on each short side, 85 five-dc shells on each long side, and four seven-dc corner shells.
- Border sizing: After blocking, aim for approximately 1½ inches of border depth on each edge. For an adjusted layout, Round 1 has 48C sc across each horizontal side and 48R sc along each vertical side. Rounds 2 and 3 add two stitches per side per round, giving 48C + 4 and 48R + 4 stitches before the scallops; both counts divide evenly by four.
Finishing
- Check every seam intersection and secure any loose joining stitches. Weave remaining ends through several stitches on the wrong side, changing direction once to help them stay in place.
- Wash or soak according to the yarn label, support the wet fabric fully, and press out water without wringing. Lay the bedspread flat with the seams straight and the motif grid square.
- Shape each scallop gently and allow the bedspread to dry completely. Aim for approximately 75 × 87 inches without forcing the lace beyond its natural shape.
Once dry, spread the cover over the bed and smooth it from the center toward the edges. The cream lace and regular square grid give the finished bedspread its calm, heirloom character.
Tips for Success
- Block the first three squares together to confirm that your gauge stays consistent before making the full set.
- Mark all four corner spaces during the mesh rounds so a side space cannot accidentally become a corner.
- Count 45 edge stitches before joining each square; correcting an individual motif is easier than opening a completed seam.
- Support the bedspread on a table while sewing and bordering so its weight does not stretch the working edge.
- Work the first border round with a relaxed hand, especially when crossing a joined corner junction.
Common Mistakes to Avoid
- Missing the final ch 1 on a mesh side: Rounds 4 and 7 need that chain before the next corner. Without it, the side has one fewer opening and the following round loses stitches.
- Counting the corner space as a stitch: Keep the chain-space count separate from the stated side stitch count.
- Pulling the sewn joins tight: Ease the yarn after every few stitches so adjacent squares stay flat without ridges or puckers.
- Adding border stitches at every seam: Round 1 already provides 48 stitches per motif edge. Extra stitches at junctions will disrupt the scallop repeat.
- Hanging the wet cover: Dry it flat with full support to protect the square proportions and prevent uneven stretching.
Ways to Customize This Pattern
- Use seven columns and eight rows for 56 motifs and an approximate finished size of 87 × 99 inches at the stated gauge.
- Make the solid motif bands in a second neutral color, changing yarn at the beginning of Rounds 5 and 8 and returning to cream for the next rounds.
- Use a finer yarn for a lighter cover, then calculate the layout from the actual blocked square measurement and allow for the sampled border depth.
- For a wider frame, add solid sc rounds before the scallops in pairs. Each pair adds four stitches per side, preserving the four-stitch scallop repeat; measure the new border depth before calculating the finished size.
Frequently asked questions
The stated 75-inch width gives approximately 7½ inches of drop on each side of a 60-inch-wide mattress. For a deeper drape, add a column or choose the 87 × 99-inch layout. Measure your own mattress and desired drop before selecting the motif count.
Weigh a complete dry motif and multiply by 42. Add approximately 20 percent for joining, the border, and a working reserve. Convert that weight to meters using your yarn label. A larger layout needs a new calculation.
First check the side counts, especially after mesh rounds. If the counts are correct, block the sample gently and let it dry. Persistent waves may indicate overly loose chains or a hook that is too large for your yarn and tension.
The written counts and border assume completed, separately blocked squares with sewn joins. A join-as-you-go conversion needs its own sample because it can change the corner structure, seam width, and available perimeter stitches.
The finished Cream Heirloom Lace Square Crochet Bedspread

