Crimson Christmas Crochet Candle Centerpiece
Advanced
For experienced crocheters who enjoy complex shaping, fine detail, and ambitious construction
Weekend Project
A satisfying weekend make — start Friday, finish Sunday, enjoy forever.
Handmade Gift
A beautiful keepsake — free forever. Read online or print at home.
About This Crimson Christmas Crochet Candle Centerpiece
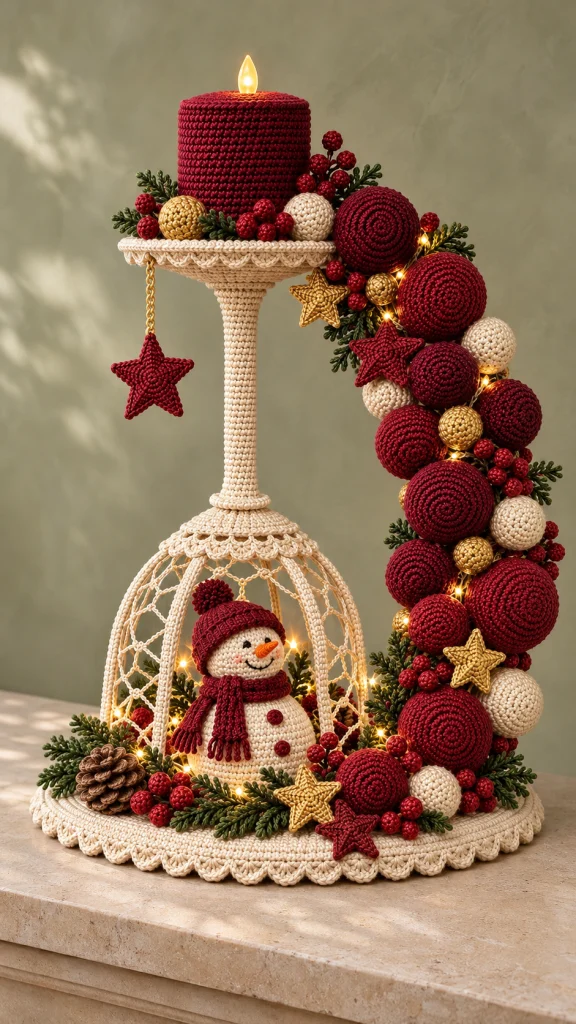
This Christmas crochet centerpiece pattern creates a sculptural holiday display with a cream pedestal, an open snowy cage, and a sweeping cascade of burgundy ornaments. Gold stars, ivory baubles, evergreen sprigs, and a small snowman bring the arrangement together beneath a raised flameless candle.
The finished piece is supported home decor: its height and curved silhouette come from a rigid internal frame, with fitted crochet covers and individually sewn decorations. The snowman is one decorative component within the centerpiece. Allow approximately 45–60 hours for the crochet, frame fitting, and careful assembly.
This advanced project suits crocheters comfortable with counted shaping, surface sewing, fine assembly, and working around a prepared armature. The instructions create an original interpretation of the pictured arrangement; handmade proportions and ornament placement will vary slightly.
Materials
- Worsted cotton yarn: approximately 650 m cream, 450 m burgundy, 120 m forest green, and 70 m gold.
- DK cotton yarn: approximately 15 m orange and 5 m black for the snowman details.
- 3.5 mm crochet hook for main pieces.
- 2.5 mm crochet hook for berries, greenery, nose, and embroidery details.
- Firm polyester stuffing, approximately 200 g.
- One rigid plywood base disk, 30 cm diameter and approximately 12 mm thick.
- One rigid candle tray disk, 13 cm diameter, with a shallow rim or a securely attached candle retaining ring.
- One prepared rigid cage frame: 24 cm diameter at its foot, 25 cm high, with six curved ribs meeting at a small top hub.
- One 20 cm vertical pedestal tube, approximately 18 mm outside diameter, secured between the cage hub and candle tray.
- One rigid crescent support following the right side of the arrangement: approximately 48 cm high, with a 10 cm foot anchored to the base and its upper end braced to the tray.
- Mechanical brackets, screws, washers, and suitable tools for fastening the frame; have a competent maker prepare the frame if necessary.
- Cotton tape for binding frame joints and smooth protective caps for all exposed ends.
- One flameless LED pillar candle, approximately 8 cm diameter × 10 cm high, with an accessible battery compartment.
- One warm-white battery LED light string, approximately 2–3 m long, with an accessible battery box.
- Nonstretch cream sewing thread and strong matching upholstery thread for structural attachment.
- Tapestry needle, sewing needle, stitch markers, scissors, pins, and measuring tape.
- Thin cream felt for the underside of the base.
- Optional small natural pinecone, approximately 5 cm long.
Abbreviations
chchainsl stslip stitchscsingle crochethdchalf double crochetdcdouble crochetinc2 single crochet in one stitchdecsingle crochet 2 stitches togetherMRmagic ringBLOback loop onlyststitchFrame Preparation and Placement
- Mark the center of the 30 cm base. Set the cage center approximately 2 cm left of this mark, leaving room for the ornament cascade on the right.
- Secure all six cage feet to the disk with brackets. The ribs must form a stable dome 25 cm high, with no movement at the feet or hub.
- Secure the 20 cm pedestal tube vertically above the cage hub. Attach the 13 cm candle tray level at its top, approximately 45 cm above the base.
- Anchor the crescent support at the right edge of the base. Curve it upward outside the cage and brace its upper end to the right side of the candle tray. Keep its widest point within approximately 34 cm overall depth.
- Bind joints with cotton tape and cap exposed ends. Test the empty frame on a level table; tighten every fastening before adding crochet.
- Measure each cage rib along its curve. Record the measurement for its fitted cover. Keep structural fastenings accessible until all crochet covers have been fitted.
Cream Base Cover
- Round 1: With cream and the main hook, work 6 sc in MR. (6 st)
- Round 2: Inc in every st. (12 st)
- Round 3: Repeat sc in next st, inc, six times. (18 st)
- Round 4: Repeat sc in next 2 st, inc, six times. (24 st)
- Round 5: Repeat sc in next 3 st, inc, six times. (30 st)
- Round 6: Repeat sc in next 4 st, inc, six times. (36 st)
- Round 7: Repeat sc in next 5 st, inc, six times. (42 st)
- Round 8: Repeat sc in next 6 st, inc, six times. (48 st)
- Round 9: Repeat sc in next 7 st, inc, six times. (54 st)
- Round 10: Repeat sc in next 8 st, inc, six times. (60 st)
- Round 11: Repeat sc in next 9 st, inc, six times. (66 st)
- Round 12: Repeat sc in next 10 st, inc, six times. (72 st)
- Round 13: Repeat sc in next 11 st, inc, six times. (78 st)
- Round 14: Repeat sc in next 12 st, inc, six times. (84 st)
- Round 15: Repeat sc in next 13 st, inc, six times. (90 st)
- Round 16: Repeat sc in next 14 st, inc, six times. (96 st)
- Round 17: Repeat sc in next 15 st, inc, six times. (102 st)
- Round 18: Repeat sc in next 16 st, inc, six times. (108 st)
- Round 19: Repeat sc in next 17 st, inc, six times. (114 st)
- Round 20: Repeat sc in next 18 st, inc, six times. (120 st)
- Round 21: Repeat sc in next 19 st, inc, six times. (126 st)
- Round 22: Repeat sc in next 20 st, inc, six times. (132 st)
- Round 23: Repeat sc in next 21 st, inc, six times. (138 st)
- Round 24: Repeat sc in next 22 st, inc, six times. (144 st)
- Round 25: Repeat sc in next 23 st, inc, six times. (150 st)
- Round 26: Repeat sc in next 24 st, inc, six times. (156 st)
- Round 27: Repeat sc in next 25 st, inc, six times. (162 st)
- Round 28: Repeat sc in next 26 st, inc, six times. (168 st; approximately 29.7 cm diameter)
- Round 29: Sc in BLO around to turn down over the disk edge. (168 st)
- Rounds 30–31: Sc in every st for two rounds. (168 st each round)
- Round 32: Repeat skip next 2 st, 5 dc in next st, skip next 2 st, sl st in next st, 28 times. Join to the first dc and fasten off. (28 shells)
- Fit the cover to the disk. At each frame foot, separate stitches gently and pass the fastening through the resulting gap before retightening; do not cut the fabric. Stitch the lower edge to a felt underside with strong thread, leaving access to any service screws.
Cage Rib Covers and Diamond Netting
- Make six cream rib strips. Row 1: Ch 5; sc in second ch from hook and each remaining ch. (4 st)
- Row 2: Ch 1, turn, sc in each st. (4 st)
- Repeat Row 2 until each strip reaches its measured rib length, approximately 34–38 cm. Record the row count and make matching strips for equal ribs.
- Wrap each strip lengthwise around one cage rib and ladder-stitch its long edges together on the inside. Anchor both ends to the frame with strong thread.
- Mark seven equally spaced points along each covered rib, from foot to hub. These create six horizontal netting levels.
- For each of the six spaces between ribs, measure the straight distance between the two ribs at every marked level. Make one cream chain for each distance, allowing approximately 5% slack; at this gauge begin with approximately 1.8 chains per centimeter, then check the actual fit.
- Sew each chain between matching marks to form six horizontal bands in each bay. The chain should bow gently inward without pulling the ribs together.
- Between each pair of horizontal bands, tie a cream thread at the midpoint of the lower chain, take it to the left end of the upper chain, return to the lower midpoint, then take it to the right end of the upper chain. Secure each diagonal separately. Repeat for all five intervals in all six bays.
- At the lowest band, add diagonals from each bay’s base corners to the band midpoint. At the top, attach each highest-band midpoint to the cage hub. Knot securely and bury ends inside the rib covers.
Pedestal Sleeve and Lower Collar
- Pedestal sleeve, Row 1: With cream, ch 11; sc in second ch from hook and across. (10 st)
- Row 2: Ch 1, turn, sc across. (10 st)
- Repeat Row 2 until the sleeve measures 20 cm, approximately 40 rows total. Wrap around the pedestal and ladder-stitch the long edges together.
- Lower collar, Row 1: Ch 37; sc in second ch from hook and across. (36 st)
- Row 2: Ch 1, turn; repeat sc in next 4 st, dec, six times. (30 st)
- Row 3: Ch 1, turn; repeat sc in next 3 st, dec, six times. (24 st)
- Row 4: Ch 1, turn; repeat sc in next 2 st, dec, six times. (18 st)
- Row 5: Ch 1, turn; repeat sc in next st, dec, six times. (12 st)
- Sew the collar’s short edges together around the pedestal foot, with its wider edge spreading over the cage hub. Tack both edges securely.
- Collar edging: Join cream to the wide edge; repeat sl st in next edge st, ch 3, skip next 2 edge st, 12 times. Join and fasten off. (12 loops)
Candle Tray Cover
- Make the tray top in cream by following Base Cover Rounds 1–12. (72 st; approximately 12.7 cm diameter)
- Round 13: Sc in BLO around. (72 st)
- Round 14: Sc around. (72 st)
- Round 15: Repeat skip next 2 st, 5 dc in next st, skip next 2 st, sl st in next st, 12 times. Join to the first dc and fasten off. (12 shells)
- Fit the cover over the tray and sew its underside edge securely to a cream tape loop around the tray support. Keep the retaining ring exposed inside the candle position.
- Make a separate under-tray ruffle: Ch 73; sc in second ch from hook and across. (72 st)
- Ruffle Row 2: Ch 1, turn; repeat sc in next st, ch 3, skip next 2 st, 24 times. (24 loops)
- Ruffle Row 3: Ch 1, turn; work sc, hdc, 3 dc, hdc, sc in each loop. Fasten off. (24 scallops)
- Join the ruffle ends and sew its foundation edge underneath the tray rim. Let the scallops hang downward.
Burgundy LED Candle Sleeve
- Check the actual candle circumference. This sleeve fits approximately 25 cm circumference with slight stretch. With burgundy, ch 45 loosely and join without twisting.
- Round 1: Sc in each ch. (45 st)
- Rounds 2–20: Sc in every st for 19 rounds. (45 st each round; approximately 10 cm high)
- Round 21: Sl st loosely around and fasten off. (45 st)
- Slide the sleeve over the LED candle, leaving its flame, switch, ventilation openings, and battery access clear. The sleeve has an open top and bottom.
- Set the candle inside the tray retaining ring. Keep it removable; attach the sleeve to the tray with three loose thread ties if additional restraint is needed.
Crescent Support Cover
- With cream, ch 7; sc in second ch from hook and across. (6 st)
- Row 2: Ch 1, turn, sc across. (6 st)
- Repeat Row 2 until the strip matches the full curved support length, including its visible foot. Check against the frame after every 10 rows.
- Wrap the strip around the support and ladder-stitch the long edges together. Where brackets interrupt the seam, finish the seam on each side and sew a small cream tape patch over the bracket.
- Sew two parallel lines of strong thread along the outer face of the cover, approximately 1 cm apart. These attachment lines distribute the ornament weight along the frame.
Large Burgundy Baubles — Make Six
- Round 1: Work 6 sc in MR. (6 st)
- Round 2: Inc around. (12 st)
- Round 3: Repeat sc in next st, inc, six times. (18 st)
- Round 4: Repeat sc in next 2 st, inc, six times. (24 st)
- Round 5: Repeat sc in next 3 st, inc, six times. (30 st)
- Round 6: Repeat sc in next 4 st, inc, six times. (36 st)
- Rounds 7–11: Sc around for five rounds. (36 st each round)
- Round 12: Repeat sc in next 4 st, dec, six times. (30 st)
- Round 13: Repeat sc in next 3 st, dec, six times. (24 st)
- Round 14: Repeat sc in next 2 st, dec, six times. (18 st)
- Round 15: Repeat sc in next st, dec, six times. Add firm, even stuffing. (12 st)
- Round 16: Dec six times. Thread the tail through the front loops of the remaining stitches and close. Leave a long attachment tail. (6 st; approximately 6.5 cm diameter)
Medium Baubles — Make Four Burgundy and Five Ivory
- Round 1: Work 6 sc in MR. (6 st)
- Round 2: Inc around. (12 st)
- Round 3: Repeat sc in next st, inc, six times. (18 st)
- Round 4: Repeat sc in next 2 st, inc, six times. (24 st)
- Rounds 5–8: Sc around for four rounds. (24 st each round)
- Round 9: Repeat sc in next 2 st, dec, six times. (18 st)
- Round 10: Repeat sc in next st, dec, six times. Stuff evenly. (12 st)
- Round 11: Dec six times. Close and leave an attachment tail. (6 st; approximately 4.5 cm diameter)
Small Gold Baubles — Make Seven
- Round 1: Work 6 sc in MR. (6 st)
- Round 2: Inc around. (12 st)
- Round 3: Repeat sc in next st, inc, six times. (18 st)
- Rounds 4–6: Sc around for three rounds. (18 st each round)
- Round 7: Repeat sc in next st, dec, six times. Stuff lightly. (12 st)
- Round 8: Dec six times. Close and leave an attachment tail. (6 st; approximately 3 cm diameter)
Burgundy Berry Clusters — Make Twelve
- Make three berries per cluster, 36 berries total, using burgundy and the detail hook. Round 1: Work 6 sc in MR. (6 st)
- Round 2: Repeat sc in next st, inc, three times. (9 st)
- Round 3: Sc around. (9 st)
- Round 4: Repeat sc in next st, dec, three times. Add a small tuft of stuffing. (6 st)
- Round 5: Dec three times. Close and leave a 15 cm tail. (3 st)
- For each cluster, sew three berries together at their closed ends, leaving their rounded faces separate. Retain one long tail for attachment.
Gold and Burgundy Stars — Make Six
- Make three gold stars and three burgundy stars with the main hook. Make two identical faces for each star. Face Round 1: Work 5 sc in MR. (5 st)
- Face Round 2: Inc around. (10 st)
- Face Round 3: Repeat sc in next st, inc, five times. (15 st)
- Face Round 4: Repeat sc in next 2 st, inc, five times. (20 st)
- Face Round 5: Repeat sc in next 3 st, inc, five times. Join with sl st to the first sc. (25 st)
- Point 1, Row 1: Ch 1, sc in the next 5 unworked perimeter stitches. (5 st)
- Point Row 2: Ch 1, turn; dec, sc in next st, dec. (3 st)
- Point Row 3: Ch 1, turn; dec, sc in next st. (2 st)
- Point Row 4: Ch 1, turn; dec. Fasten off. (1 st)
- Points 2–5: Rejoin yarn at the next unworked perimeter stitch and repeat Point Rows 1–4 over the next group of 5 stitches. All 25 perimeter stitches are used once.
- Place two faces together. With matching yarn, sew around the five points, matching row ends and tips. Add a thin layer of stuffing before closing the final point. Finished stars measure approximately 7–8 cm across.
- For the hanging burgundy star, make a gold chain approximately 12 cm long. Sew one end firmly through the star’s upper point and reserve the other for the tray edge.
Evergreen Sprigs — Make Thirty
- With green and the detail hook, ch 15 for the central stem.
- Sl st in the second ch from the hook and in the next ch. (2 stem stitches worked)
- Branch unit: Ch 5; sl st in the second ch from hook and next 3 ch to return to the stem. Sl st in the next 2 unworked foundation chains.
- Repeat the branch unit five more times. All 14 available stem chains are now worked, with six side branches.
- Ch 1 and rotate the sprig. Working into the opposite side of the foundation, sl st in the first 2 chain bases.
- Repeat the same branch unit six times along this side, inserting the stem slip stitches into the remaining chain bases. Fasten off with a long tail. (12 branches total)
- Finger-shape each sprig into a gentle curve. Sew sprigs in overlapping groups rather than relying on stiffener to hold their position.
Snowman Body
- With cream and the main hook, Round 1: Work 6 sc in MR. (6 st)
- Round 2: Inc around. (12 st)
- Round 3: Repeat sc in next st, inc, six times. (18 st)
- Round 4: Repeat sc in next 2 st, inc, six times. (24 st)
- Round 5: Repeat sc in next 3 st, inc, six times. (30 st)
- Round 6: Repeat sc in next 4 st, inc, six times. (36 st)
- Round 7: Repeat sc in next 5 st, inc, six times. (42 st)
- Round 8: Repeat sc in next 6 st, inc, six times. (48 st)
- Rounds 9–14: Sc around for six rounds. (48 st each round)
- Round 15: Repeat sc in next 6 st, dec, six times. (42 st)
- Round 16: Repeat sc in next 5 st, dec, six times. (36 st)
- Round 17: Repeat sc in next 4 st, dec, six times. (30 st)
- Round 18: Repeat sc in next 3 st, dec, six times. (24 st)
- Round 19: Repeat sc in next 2 st, dec, six times. (18 st)
- Round 20: Repeat sc in next st, dec, six times. Stuff firmly and flatten the bottom slightly. (12 st)
- Round 21: Dec six times. Close the opening and retain a sewing tail. (6 st)
Snowman Head and Face
- With cream, follow Large Bauble Rounds 1–6 to reach 36 st.
- Rounds 7–10: Sc around for four rounds. (36 st each round)
- Round 11: Repeat sc in next 4 st, dec, six times. (30 st)
- Round 12: Repeat sc in next 3 st, dec, six times. (24 st)
- Round 13: Repeat sc in next 2 st, dec, six times. (18 st)
- Round 14: Repeat sc in next st, dec, six times. Stuff the head. (12 st)
- Round 15: Dec six times. Close and retain a long sewing tail. (6 st)
- Nose Round 1: With orange and the detail hook, work 4 sc in MR. (4 st)
- Nose Round 2: Sc around. (4 st)
- Nose Round 3: Repeat sc in next st, inc, twice. (6 st)
- Nose Round 4: Sc around. Fasten off, leaving the base open. (6 st)
- Choose the head front. Embroider two black eyes between Rounds 7 and 8, with five visible stitches between their centers. Sew the nose between them, its base centered across Rounds 8–10.
- Embroider a shallow curved smile across approximately seven stitches below the nose, between Rounds 10 and 12. Use small backstitches and secure the ends inside the head.
- Sew the head to the body with two passes around the neck, centering the face above the body front. The combined snowman is approximately 15–16 cm tall before its hat.
Snowman Hat, Scarf, and Buttons
- Hat Round 1: With burgundy and the main hook, work 6 sc in MR. (6 st)
- Hat Round 2: Inc around. (12 st)
- Hat Round 3: Repeat sc in next st, inc, six times. (18 st)
- Hat Round 4: Repeat sc in next 2 st, inc, six times. (24 st)
- Hat Round 5: Repeat sc in next 3 st, inc, six times. (30 st)
- Hat Round 6: Repeat sc in next 4 st, inc, six times. (36 st)
- Hat Rounds 7–11: Sc around for five rounds. (36 st each round)
- Hat Round 12: Sc in BLO around. (36 st)
- Hat Round 13: Sc around. Sl st in next st and fasten off. Fold the last two rounds outward to form the brim.
- Make a 2.5 cm yarn pompom, bind its center tightly, and sew it through the hat crown in two directions. Sew the hat to the head above the eyes.
- Scarf Row 1: Ch 55; hdc in third ch from hook and each remaining ch. (53 st)
- Scarf Rows 2–3: Ch 2, turn, hdc across. (53 st each row)
- Cut twelve 9 cm burgundy strands. Attach six folded strands to each scarf end as fringe. Wrap the scarf around the neck, cross its ends at the front, and tack it in place.
- Buttons: Make two burgundy circles, each with 6 sc in MR. Join and fasten off. Sew them vertically to the body front, approximately 2.5 cm apart.
Ornament Cascade and Light Placement
- Lay out the right-side cascade before sewing. Number the six large burgundy baubles from top to bottom. Position their centers approximately 46, 38, 30, 22, 14, and 6 cm above the base, alternating slightly left and right of the support.
- Sew each large bauble to both attachment lines on the support cover. Take at least three passes through a broad area of the bauble fabric; do not suspend its weight from a single stitch.
- Place three medium burgundy baubles in the outer gaps near heights 34, 26, and 18 cm. Place the fourth at the base, slightly forward of the lowest large bauble. Secure each to the support or base with two separate attachment points.
- Place four ivory baubles along the cascade near heights 40, 32, 24, and 10 cm. Place the fifth on the candle tray beside the candle.
- Place six gold baubles in the remaining cascade gaps, distributing them from top to bottom. Place the seventh on the tray opposite the ivory bauble.
- Position one gold star near the upper cascade, one gold star near the lower middle, and one gold star at the front of the base. Add two burgundy stars to the cascade or base. Leave the sixth star for hanging.
- Sew the hanging star’s chain to the left tray edge, with at least three reinforced stitches through the tray cover and its underlying tape attachment.
- Distribute eight berry clusters and eighteen evergreen sprigs along the cascade, hiding attachment threads while leaving the burgundy baubles visible.
- Add two berry clusters and four sprigs around the candle tray. Keep them below the candle’s upper edge and clear of its controls.
- Add the remaining two berry clusters and eight sprigs around the cage foot. Sew the optional pinecone to a thread harness and attach the harness at the front left of the base.
- Route the LED string from the rear base up through the cascade, then down into the cage. Secure its insulated wire with loose sewing-thread loops every 5–7 cm. Do not pierce the wire or pull it tightly around the frame.
- Place the battery box behind the lower cascade in a removable thread sling. Check that the switch and battery lid can be reached without disturbing the ornaments.
Finishing
- Set the snowman inside the cage, facing forward and slightly toward the open left side. Sew its lower body to the base cover at four widely spaced points so it remains upright.
- Check every structural seam, frame fastening, ornament attachment, and electrical access point. Bury yarn tails inside the covers or stuffed pieces.
- With batteries installed, test the display on a level surface. Press gently near each base edge to check for rocking; adjust the frame and ornament positions if necessary before displaying.
Take time to turn the centerpiece and inspect it from the front and both sides. The cream cage should remain visible beside the rich ornament cascade, and the snowman’s face should have a clear opening between the ribs.
Shape the sprigs with your fingers and turn on the LEDs for a final spacing check. Lift the finished arrangement with both hands beneath its rigid base. Dust it gently with a soft brush; remove the batteries before storage and keep the whole piece dry.
Tips for Success
- Fit the base cover after Round 24 and again after Round 28. Correct gauge before adding the turned edge.
- Stuff large baubles in small layers so the spiral surface stays smooth rather than developing hard lumps.
- Photograph the pinned ornament layout before sewing. It provides a useful placement guide when pieces must be moved for access.
- Keep the heaviest ornaments close to the support, with smaller berries and stars extending outward.
- Check the cage opening with the snowman in position before completing the netting attachments.
Common Mistakes to Avoid
- A flexible frame will sag under the cascade. Complete and test the rigid frame before crocheting fitted covers.
- Overtight netting can distort the cage. Allow gentle slack and sew to the rib covers without drawing neighboring ribs together.
- Attaching ornaments only to neighboring ornaments creates a heavy dangling chain. Anchor every large and medium bauble directly to the supported cover or base.
- A candle sleeve that covers the controls makes maintenance difficult. Leave both sleeve ends open and keep the candle removable.
- Excessive stuffing can stretch small berries and open their stitches. Use a small tuft and close each opening firmly.
Ways to Customize This Pattern
- Replace burgundy with deep pine green while keeping the cream structure and gold stars; retain all stitch counts.
- Use embroidered gold straight stitches on selected baubles for subtle ornament detailing, adding the embroidery before final stuffing.
- Omit the pinecone and fill its space with two additional green sprigs and one extra berry cluster.
- Use a shorter LED candle in the same diameter sleeve by working fewer plain rounds to match its measured height.
- Make the netting more open by using four horizontal levels instead of six, recalculating each chain from the actual rib spacing.
Frequently asked questions
No. This design uses a rigid cage, a secured pedestal, and a braced crescent support. The crochet covers and decorates those parts. Stiffener alone will not provide the required support.
Measure its circumference and multiply that measurement in centimeters by your stitches per centimeter. Round to a whole stitch, make a chain ring, and check the fit before working upward. Work enough rounds to reach the candle body height while leaving its flame and controls clear.
The assembled piece is intended for dry dusting because it contains a wooden base, rigid frame, stuffing, and electrical components. Spot-clean crochet carefully with a barely damp cloth after removing the batteries, then allow it to dry fully.
Cage ribs and support curves vary between frames. Fixed stitch widths provide the cover shape, while measured lengths let each strip fit its actual support without bunching or stretching. Record your finished row counts when making a matching set.
The finished Crimson Christmas Crochet Candle Centerpiece

