Crochet Autumn Blanket Pattern – Cozy Botanical Striped Bedspread
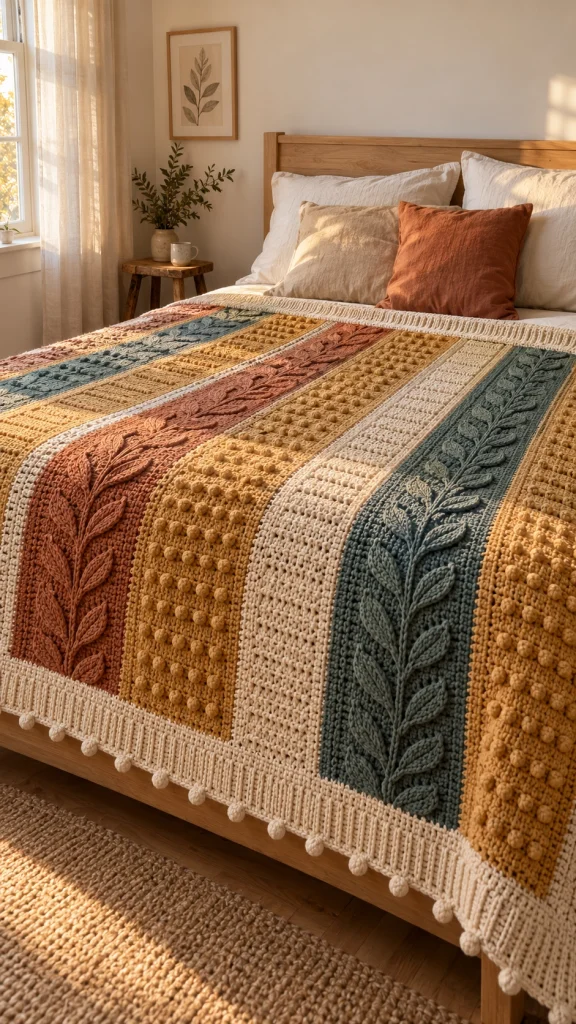
Bring the warmth of autumn into your bedroom with this beautiful crochet autumn blanket! Combining soft cream, mustard gold, terracotta, and muted sage green, this handmade bedspread features elegant raised botanical vines, textured bobble stitches, and a delicate cream border with playful pom-poms.
Inspired by the colors of falling leaves, golden sunshine, and peaceful autumn mornings, this crochet blanket is perfect for creating a warm, welcoming bedroom. Its combination of textures makes it a beautiful statement piece for anyone who loves handmade home decor.
In this tutorial, you’ll learn how to crochet the striped blanket base, create the raised botanical details, add textured bobble sections, and finish your blanket with a decorative border.
Materials You’ll Need
- Worsted-weight yarn in cream or ivory
- Worsted-weight yarn in mustard gold
- Worsted-weight yarn in terracotta
- Worsted-weight yarn in muted sage green
- 5 mm crochet hook, or size needed for gauge
- Yarn needle
- Scissors
- Stitch markers
- Measuring tape
- Blocking mats (optional)
Skill Level: Intermediate
Estimated Time: 30–50 hours, depending on size and experience.
Suggested Finished Size: Approximately 150 × 200 cm (59 × 79 inches).
Pattern Note: This is an original, adaptable pattern inspired by the reference image, rather than an exact reproduction. The design uses long textured panels joined side by side, allowing you to recreate the botanical striped appearance.
Crochet Abbreviations (US Terms)
- ch – Chain
- sc – Single crochet
- hdc – Half double crochet
- dc – Double crochet
- sl st – Slip stitch
- st – Stitch
- sts – Stitches
- RS – Right side
- WS – Wrong side
- FO – Fasten off
- BLO – Back loop only
- FPdc – Front post double crochet
- BO – Bobble stitch
Part 1 – Plan Your Autumn Blanket
The blanket features alternating vertical panels in warm autumn colors.
For a balanced design, create nine panels:
- 2 terracotta botanical panels
- 2 sage-green botanical panels
- 2 mustard-gold bobble panels
- 2 cream textured panels
- 1 additional mustard-gold bobble panel
Arrange the panels in your preferred repeating order. The panels are worked lengthwise and joined side by side.
For a 150 cm wide blanket, aim for panels approximately 16–17 cm wide after blocking.
Make a gauge swatch before beginning and adjust the starting chain to achieve the desired panel width.
Part 2 – Crochet the Basic Panel Foundation
Use a 5 mm crochet hook.
R1: Chain enough stitches to reach approximately 16–17 cm, plus 2 turning chains.
R2: Work 1 dc into the third chain from the hook and 1 dc into each remaining chain.
R3: Ch 2, turn, and work 1 dc into each stitch across.
R4: Repeat R3 until the panel reaches the desired blanket length.
For a 200 cm blanket, continue until the panel measures approximately 190 cm, leaving room for the finishing borders.
FO and weave in the ends.
Use this foundation method for the botanical panels before adding the raised vine details.
Part 3 – Crochet the Mustard-Gold Bobble Panels
The golden bobble panels add beautiful dimension and a cozy, tactile texture.
How to Make a Bobble Stitch
Yarn over and insert your hook into the indicated stitch.
Yarn over and pull up a loop.
Yarn over and pull through two loops.
Repeat this partial double crochet four more times in the same stitch.
Yarn over and pull through all six loops on the hook.
Ch 1 to secure the bobble if needed for your tension.
Bobble Panel Instructions
R1: Ch to your required panel width, plus 1 turning chain.
R2: Starting in the second chain from the hook, work 1 sc in each chain.
R3: Ch 1, turn, and work 1 sc in each stitch across.
R4: Ch 1, turn, work 3 sc, then 1 bobble stitch in the next stitch. Continue with 3 sc between bobbles, ending with sc stitches as needed.
R5: Ch 1, turn, and work sc across.
R6: Ch 1, turn, and work sc across.
R7: Repeat the bobble placement from R4, staggering the bobbles if desired.
Continue repeating the texture sequence until the panel reaches the desired length.
Make three mustard-gold bobble panels.
Part 4 – Crochet the Terracotta Botanical Panels
The terracotta panels feature raised vine motifs inspired by autumn leaves and climbing plants.
Begin by crocheting a solid terracotta panel using the basic foundation instructions.
Once the panel is complete, add the botanical design using surface crochet and separately crocheted leaves.
Create the Raised Vine
Lay the panel flat with the right side facing upward.
Using matching terracotta yarn, create a gently curved vertical line along the center of the panel.
Work surface slip stitches through the blanket fabric to form the main vine.
Keep the tension relaxed to prevent puckering.
Continue the vine from the bottom toward the top of the panel.
Part 5 – Crochet the Botanical Leaves
Use matching terracotta yarn and a 4 mm crochet hook.
Leaf Pattern
R1: Ch 11.
R2: Starting in the second chain from the hook, work 1 sc, 2 hdc, 4 dc, 2 hdc, and 1 sc.
R3: Ch 1 and work along the opposite side of the foundation chain.
R4: Repeat 1 sc, 2 hdc, 4 dc, 2 hdc, and 1 sc.
R5: Sl st to join.
FO and leave a long tail for sewing.
Make approximately 20–30 leaves for each botanical panel, depending on the desired spacing.
Arrange the leaves alternately along the raised vine.
Sew each leaf securely to the blanket, keeping the tips slightly raised for dimension.
Repeat to complete the second terracotta botanical panel.
Part 6 – Crochet the Sage-Green Botanical Panels
Use muted sage-green yarn.
Follow the same basic panel instructions used for the terracotta sections.
After completing the solid panel, add a raised central vine using surface slip stitches.
Crochet matching sage-green leaves using the botanical leaf pattern.
Arrange the leaves in alternating directions along the vine.
Sew the leaves in place, ensuring they remain evenly spaced.
Make two sage-green botanical panels.
These cool, earthy green sections create a beautiful contrast with the warmer terracotta and mustard tones.
Part 7 – Crochet the Cream Textured Panels
The cream panels soften the overall design and separate the richer autumn colors.
Use cream yarn and a 5 mm hook.
R1: Ch to the required panel width, plus 2 turning chains.
R2: Work 1 dc in the third chain from the hook and continue with dc across.
R3: Ch 2, turn, and work 1 dc in each stitch.
R4: Ch 2, turn, alternate 1 FPdc and 1 dc across where the stitch structure allows.
R5: Ch 2, turn, and work 1 dc in each stitch.
Repeat the textured rows until the panel reaches the desired length.
Make two cream textured panels.
Part 8 – Arrange the Blanket Panels
Lay all nine completed panels on a large, clean surface.
Arrange them in a repeating autumn color sequence.
A suggested order is:
- Terracotta botanical
- Sage-green botanical
- Mustard-gold bobble
- Cream textured
- Terracotta botanical
- Mustard-gold bobble
- Cream textured
- Sage-green botanical
- Mustard-gold bobble
Adjust the order to create a balanced mix of warm and cool tones.
Check that all panels are approximately the same length before joining.
Part 9 – Join the Crochet Panels
Place two panels side by side with the right sides facing upward.
Using cream yarn, join the panels with a flat slip-stitch seam or a mattress stitch.
Work carefully along the entire length, matching the rows as evenly as possible.
Continue joining the remaining panels one at a time.
Keep the seams relaxed so the blanket lies flat.
Once all panels are joined, weave in the loose yarn ends.
Part 10 – Crochet the Cream Outer Border
Use cream yarn and a 5 mm crochet hook.
Round 1: Join yarn at any corner and work sc evenly around the entire blanket, placing 3 sc in each corner.
Round 2: Ch 2 and work dc evenly around, placing 3 dc in each corner.
Round 3: Work another round of dc or hdc to create a substantial cream border.
Round 4: Work a round of sc to finish the edge neatly.
Adjust corner increases as necessary to prevent curling or rippling.
Part 11 – Crochet the Decorative Ribbed Edge
For a cozy, structured finish, add a ribbed border.
Join cream yarn along the outer edge.
Ch 8.
Starting in the second chain from the hook, work 7 sc.
Sl st into the next two stitches along the blanket edge.
Turn and work 7 sc in BLO.
Ch 1, turn, and work 7 sc in BLO.
Continue attaching the ribbed rows around the blanket, adjusting the number of joining stitches at corners.
This creates a soft, decorative frame around the striped design.
Part 12 – Crochet the Pom-Pom Border
The small cream pom-poms add a playful handmade detail to the blanket.
Use cream yarn and a 4 mm crochet hook.
Small Crochet Pom-Pom Pattern
R1: 6 sc in MR. (6)
R2: Inc in each stitch. (12)
R3: Sc around. (12)
R4: Sc around. (12)
R5: Dec around. (6)
Add a small amount of stuffing before closing.
FO and leave a long yarn tail.
Make enough pom-poms to space them evenly along the bottom edge of the blanket.
Attach each pom-pom securely to the ribbed border.
For a more decorative look, you can also add pom-poms to the top edge.
Part 13 – Block and Shape the Blanket
Lay the completed blanket flat on a clean surface.
Gently straighten the joined panels.
Adjust the raised botanical vines and leaves so they lie neatly.
Use blocking mats if appropriate for your yarn fiber.
Follow the yarn manufacturer’s care instructions when choosing wet blocking or steam blocking.
Allow the blanket to dry completely before using it.
Part 14 – Styling Your Autumn Crochet Blanket
Drape your finished blanket across the bed for a warm, welcoming autumn look.
Pair it with cream bedding, natural wooden furniture, and soft neutral pillows.
Add terracotta cushions to highlight the warm orange tones.
Use sage-green accessories to complement the botanical panels.
For a cozy farmhouse-inspired bedroom, combine the blanket with linen curtains, woven baskets, and warm lighting.
The textured stripes make this blanket especially beautiful when displayed across a bed or folded over a wooden bench.
Autumn Crochet Blanket Color Combinations
Classic Autumn: Mustard gold, terracotta, sage green, and cream.
Cozy Farmhouse: Oatmeal, chocolate brown, dusty olive, and ivory.
Soft Cottagecore: Blush pink, muted peach, sage green, and cream.
Modern Earthy: Rust, warm beige, eucalyptus green, and caramel.
Winter Neutral: Ivory, taupe, dusty blue, and warm gray.
Tips for a Beautiful Textured Crochet Blanket
- Use yarns of the same weight for consistent panel sizing.
- Make a gauge swatch before beginning the full blanket.
- Keep your stitch tension consistent across every panel.
- Use stitch markers to help maintain straight edges.
- Block individual panels before joining if needed.
- Space the bobble stitches evenly for a balanced appearance.
- Attach the botanical leaves securely for everyday use.
- Choose a soft, washable yarn if the blanket will be used regularly.
- Keep the cream border wide enough to frame the colorful stripes.
- Weave in yarn ends carefully for a neat, durable finish.
Care Instructions
- Follow the washing instructions on your yarn labels.
- Use a gentle wash cycle if the yarn is machine washable.
- Place the blanket in a large mesh laundry bag when possible.
- Avoid harsh bleach.
- Lay flat to dry to help preserve its shape.
- Avoid hanging the wet blanket, as the weight may stretch the stitches.
- Reshape the botanical leaves while damp.
- Store folded in a clean, dry place.
Frequently Asked Questions
Is this crochet autumn blanket suitable for beginners?
The basic panels use beginner-friendly stitches, but the bobble textures, raised botanical motifs, and panel assembly make this project more suitable for intermediate crocheters.
Can I make this blanket in a smaller size?
Yes! Reduce the number of panels or shorten their length to create a throw blanket for a sofa or armchair.
What yarn is best for this blanket?
Soft worsted-weight acrylic, cotton blends, or washable wool blends are suitable choices. Choose yarn that provides good stitch definition and feels comfortable against the skin.
Can I change the colors?
Absolutely! The striped construction makes it easy to personalize the blanket with seasonal or neutral color palettes.
How do I keep the raised leaves secure?
Sew the leaves firmly along their centers and bases, leaving only a small amount of movement at the tips. This helps them maintain their decorative appearance during regular use.
Can I make the blanket without pom-poms?
Yes. You can finish the blanket with a simple ribbed or scalloped border for a more minimalist look.
How long does this crochet blanket take to make?
A large bedspread may take approximately 30–50 hours or longer, depending on your crochet speed, chosen size, and the complexity of the decorative details.
Would this make a good handmade gift?
Definitely! A textured crochet blanket is a thoughtful gift for housewarmings, weddings, birthdays, or anyone who appreciates cozy handmade home decor.
Final Thoughts
This beautiful crochet autumn blanket pattern combines warm seasonal colors, cozy textures, and elegant botanical details to create a truly special handmade bedspread.
From the raised terracotta and sage-green vines to the soft mustard bobbles and delicate cream pom-pom border, every section adds warmth and character to the finished blanket.
Whether you’re refreshing your bedroom for autumn or making a meaningful handmade gift, this crochet project is a lovely way to celebrate the beauty of the season.
Happy crocheting, and may your home always be filled with cozy handmade warmth! 🍂🧶

