Crochet Autumn Leaf Table Runner Pattern
Beginner Friendly
Perfect for those just starting their crochet journey, with clear instructions and simple techniques
Single-Day Project
A satisfying project you can complete in a single afternoon or evening.
Handmade Gift
A beautiful keepsake — free forever. Read online or print at home.
About This Crochet Autumn Leaf Table Runner Pattern
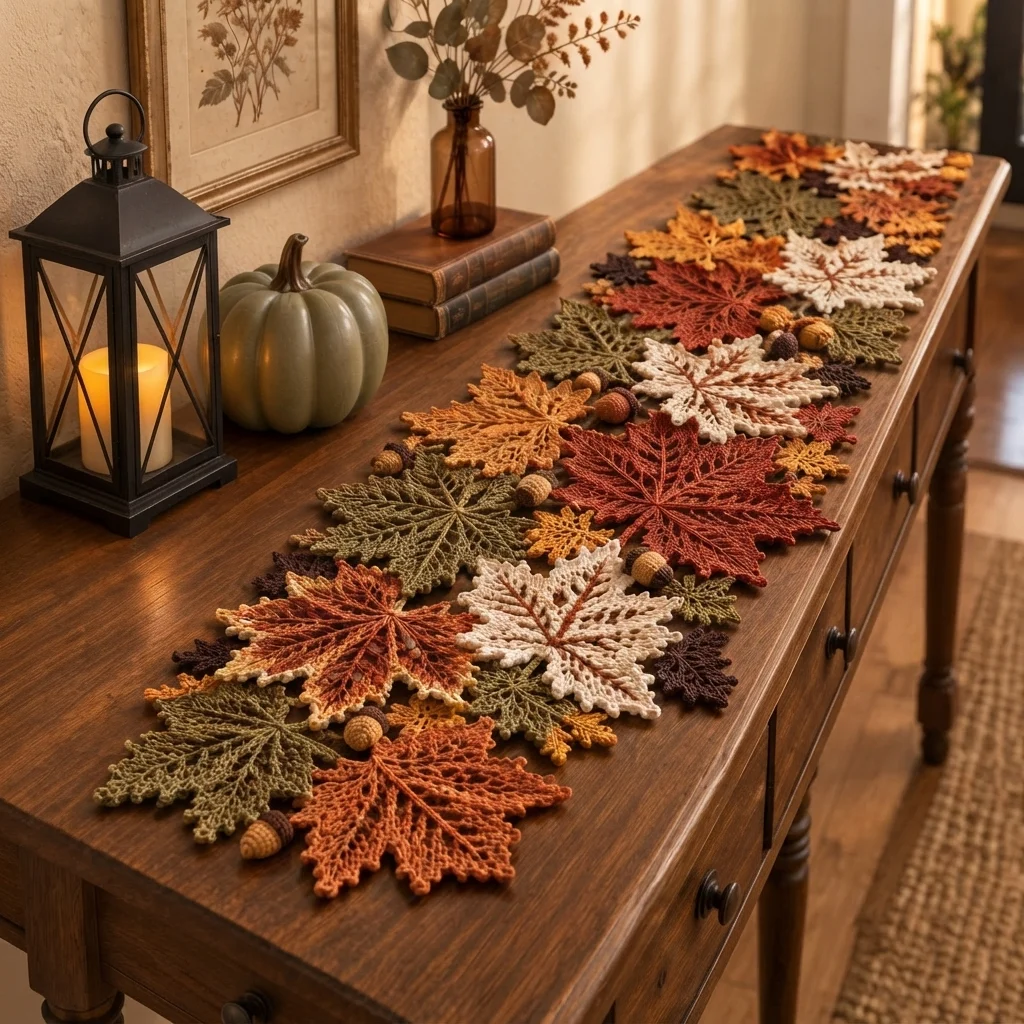
This crochet autumn leaf table runner pattern creates a layered arrangement of delicate maple leaves, smaller oak-style leaves, and dimensional acorns in rust, burnt orange, mustard, olive, cream, and deep brown. Instead of crocheting a conventional rectangular runner, you make the botanical elements separately and join them into an organic arrangement that runs naturally along the center of a table.
The large maple leaves are the focal point. Each one uses an open lace structure with a defined center vein, branching side veins, five shaped lobes, pointed tips, and a lightly picot-textured outer edge. Smaller leaves fill the spaces between them, while crocheted acorns add three-dimensional details and help reproduce the woodland appearance shown in the reference photo.
This is an advanced project requiring approximately 18-24 hours for the full runner. It is best suited to crocheters comfortable with chains, slip stitches, multiple stitch heights, branching construction, picots, working into chain spaces, shaping individual motifs, color planning, blocking, small amigurumi pieces, and assembling many motifs into one stable decorative textile.
Materials
- Sport / fine DK mercerized cotton in burnt orange approximately 120 m
- Sport / fine DK mercerized cotton in deep rust red approximately 120 m
- Sport / fine DK mercerized cotton in mustard gold approximately 90 m
- Sport / fine DK mercerized cotton in olive green approximately 120 m
- Sport / fine DK mercerized cotton in warm cream approximately 100 m
- Sport / fine DK mercerized cotton in dark chocolate brown approximately 60 m
- Sport / fine DK cotton in medium acorn brown approximately 40 m
- 2.75 mm crochet hook main leaf hook
- 2.25 mm crochet hook for firm acorns
- Polyester fiberfill small amount for acorns
- Yarn needle for joining motifs and weaving ends
- Stitch markers optional for leaf branch points
- Rustproof blocking pins essential for defining leaf points
- Blocking mat large enough for individual motifs
- Scissors 1 pair
Abbreviations
MRmagic ringchchainsl stslip stitchscsingle crochethdchalf double crochetdcdouble crochettrtreble crochetdtrdouble treble crochetinc2 single crochet in the same stitchdecinvisible single crochet decreaseststitchstsstitchesspspaceskskipRSright sidepicotch 3, sl st in first chLarge Lacy Maple Leaf – Make 10
- Foundation: Ch 19. This chain forms the central vein and stem foundation of the leaf.
- Row 1: Beginning in second ch from hook, sl st in next 3 ch, sc in next 2 ch, hdc in next 2 ch, dc in next 4 ch, tr in next 4 ch, dc in next 2 ch, then 5 dc in last ch. Rotate the work to continue along the opposite side of the foundation chain.
- Row 2: Working along the opposite side, dc in next 2 ch, tr in next 4 ch, dc in next 4 ch, hdc in next 2 ch, sc in next 2 ch, sl st in final 3 ch. The elongated central leaf foundation is complete.
- First lower side branch: From the base, ch 8. Beginning in second ch from hook work sl st, sc, hdc, dc, tr, dc, hdc. Sl st back into the side of the central foundation.
- Second lower side branch: Ch 11. Beginning in second ch from hook work sl st, sc, hdc, dc, tr, dtr, tr, dc, hdc, sc. Sl st into the central foundation approximately 3 sts above the previous branch.
- Upper side branch: Ch 14. Beginning in second ch from hook work sl st, sc, hdc, dc, tr, dtr in next 3 ch, tr in next 2 ch, dc, hdc, sc. Sl st into the central foundation approximately 3 sts above the second branch.
- Repeat the three branch constructions symmetrically on the opposite side of the central foundation.
- Center lobe foundation: At the top center, ch 16. Beginning in second ch from hook work sl st, sc, hdc, dc, tr, dtr in next 5 ch, tr in next 2 ch, dc, hdc, sc, sl st. Join securely to the top of the central foundation.
- Outer lace round: Work around the entire leaf silhouette. Along straight sections work (ch 2, sk approximately 1 edge st, sc in next edge point). At the sides of each lobe use ch-3 spaces to keep the lace open.
- At each major lobe tip work (sc, ch 3, sl st in first ch, sc) to form a defined picot point.
- Along each inward valley between lobes, use sl st, ch 1, sl st to pull the valley inward and preserve separation between adjacent lobes.
- Second lace round: In each ch-2 sp work (sc, ch 3, sc). In each ch-3 sp work (sc, ch 4, sc). At each major tip work (sc, picot, sc).
- Vein reinforcement: Surface sl st from the base of the leaf to the tip along the original foundation chain. Do not pull tightly.
- Surface sl st from the central vein outward along each major branch foundation to create visible side veins.
- Stem: Join yarn at the lower center, ch 10, then sl st in second ch from hook and each remaining ch. Sl st back into the leaf base and fasten off.
- Block the finished leaf to approximately 19-21 cm from stem base to center tip and 18-20 cm across the widest lobes.
Contrast-Edged Maple Leaf – Make 2
- Work one complete Large Lacy Maple Leaf through the first outer lace round using burnt orange yarn.
- Change to mustard gold at the beginning of the second lace round.
- Work (sc, ch 3, sc) in each ch-2 sp and (sc, ch 4, sc) in each larger side space.
- At each of the five major lobe tips work (sc, picot, sc) in mustard gold.
- Fasten off the contrast yarn and complete the central and side-vein surface stitches in rust or dark orange.
- Block firmly so the gold edging remains visible around the outer silhouette without curling beneath the orange body.
Medium Lacy Maple Leaf – Make 6
- Foundation: Ch 15.
- Beginning in second ch from hook, sl st in next 2 ch, sc in next 2 ch, hdc in next 2 ch, dc in next 3 ch, tr in next 3 ch, dc in next ch, then 5 dc in final ch.
- Continue along the opposite side: dc in next ch, tr in next 3 ch, dc in next 3 ch, hdc in next 2 ch, sc in next 2 ch, sl st in final 2 ch.
- Lower branch: Ch 7. Work back along chain with sl st, sc, hdc, dc, hdc, sc. Attach to central foundation.
- Middle branch: Ch 9. Work back with sl st, sc, hdc, dc, tr, dc, hdc, sc. Attach 2 sts above lower branch.
- Upper branch: Ch 11. Work back with sl st, sc, hdc, dc, tr in next 3 ch, dc, hdc, sc. Attach 2 sts above middle branch.
- Repeat all three branches on the opposite side.
- Center lobe: Ch 13. Work back with sl st, sc, hdc, dc, tr in next 5 ch, dc, hdc, sc, sl st.
- Work around the perimeter using alternating ch-2 and ch-3 lace spaces, anchoring each with sc.
- At every lobe tip work one picot. At each valley work sl st, ch 1, sl st.
- Surface sl st along the center and side branches to emphasize the veins.
- Ch 8 for the stem and sl st back along the chain. Fasten off.
- Block to approximately 14-16 cm across.
Small Oak-Style Leaves – Make 12
- Ch 17.
- Beginning in second ch from hook work sl st, sc, hdc, dc, dc, tr, tr, dc, hdc, sc, then continue with varied stitch heights toward the tip, finishing with 5 sc in the final ch.
- Continue along the opposite side of the chain using mirrored stitch heights to return toward the base.
- Outer edge: (Sl st in next edge st, ch 3, 2 dc in next edge st, ch 2, sl st in next edge st) to create the first rounded oak lobe.
- Repeat the lobe sequence 3 more times along the first side, varying between 2 dc and 2 tr in the tallest lobes.
- At the leaf tip work (sc, ch 3, sl st in first ch, sc).
- Repeat 4 corresponding lobes down the opposite side.
- Surface sl st through the original foundation chain from base to tip to create a pronounced central vein.
- Stem: Ch 7, sl st back along all 6 chains, then sl st into the leaf base.
- Fasten off and block to approximately 9-11 cm long.
Small Pointed Accent Leaves – Make 8
- Ch 12.
- Beginning in second ch from hook work sl st, sc, hdc, dc, tr, dtr, tr, dc, hdc, sc, sl st.
- Ch 2 at the tip and continue down the opposite side of the foundation chain with sl st, sc, hdc, dc, tr, dtr, tr, dc, hdc, sc, sl st.
- Outer round: Ch 2, sc into next edge st around the leaf, working a picot at the tip and every third edge anchor.
- Surface sl st from base to tip along the central chain.
- Ch 6 for the stem, sl st back along the chain, and secure at the base.
- Fasten off and block into a narrow pointed silhouette.
Acorn Nut – Make 10
- Round 1: With medium brown and 2.25 mm hook, make 6 sc in MR. Continue in a spiral. (6 sts)
- Round 2: Inc in each st around. (12 sts)
- Round 3: (Sc in next st, inc) 6 times. (18 sts)
- Rounds 4-6: Sc in each st around. (18 sts)
- Round 7: (Sc in next st, dec) 6 times. (12 sts)
- Stuff lightly. The acorn should remain firm but small.
- Round 8: Dec 6 times. (6 sts)
- Fasten off and close the remaining opening. Shape the lower end into a gentle point.
Textured Acorn Cap – Make 10
- Round 1: With dark chocolate brown, make 6 sc in MR. (6 sts)
- Round 2: Inc in each st around. (12 sts)
- Round 3: (Sc in next st, inc) 6 times. (18 sts)
- Round 4: Working in BLO, sc in each st around. (18 sts)
- Round 5: (Sl st in next st, ch 2, sl st in same st) around to create a small textured scale-like edge.
- Fasten off leaving a long sewing tail.
- Place the cap over the wider end of the acorn nut and sew securely around Round 4.
Acorn Stems – Make 10
- Join dark brown yarn to the center top of one acorn cap.
- Ch 7.
- Beginning in second ch from hook, sl st in each ch back to the cap.
- Sl st securely into the cap center and fasten off.
- For paired acorns, join two finished stems together with several small sewing stitches approximately 1 cm above the caps.
Color Distribution
- Make 3 large maple leaves in deep rust red.
- Make 2 large maple leaves in burnt orange.
- Make 2 large maple leaves in olive green.
- Make 2 large maple leaves in warm cream.
- Make 1 large maple leaf in mustard gold.
- Make 2 contrast-edged leaves using burnt orange centers and mustard edging.
- Make the 6 medium maple leaves using a mixture of rust, olive, mustard, and cream.
- Make the 12 oak-style leaves primarily in olive and chocolate brown, with 2-3 mustard accents.
- Make the 8 pointed accent leaves using leftover rust, mustard, olive, and dark brown yarn.
- Use medium warm brown for the acorn nuts and dark chocolate brown for their caps.
Blocking the Leaf Motifs
- Dampen one finished leaf evenly without soaking it.
- Place it RS upward on a blocking mat and pin the base of the center vein first.
- Pull the central lobe gently outward and pin its tip.
- Pin the two upper side lobes symmetrically, followed by the lower lobes.
- Pin each small picot and lace point individually where necessary to reveal the openwork structure.
- Adjust the valleys between lobes so they curve inward rather than spreading into one continuous edge.
- Keep the central and side veins straight while the motif dries.
- Allow the leaf to dry completely before removing any pins. Repeat for every leaf before beginning runner assembly.
Planning the Table Runner Layout
- Choose a flat surface at least 130 cm long. Mark an imaginary center line approximately 120 cm long.
- Place one large rust maple leaf near the middle with its stem angled slightly toward the center line.
- Position one cream large maple leaf diagonally beside it so the two motifs overlap by approximately 2-3 cm.
- Add olive and orange large leaves alternately along both sides of the center, rotating each motif so the tips point in different directions.
- Continue toward each end using progressively more medium leaves so the runner narrows naturally rather than ending abruptly.
- Insert oak-style and pointed accent leaves beneath the gaps between large motifs. Allow their outer tips to extend beyond the main silhouette.
- Place the contrast-edged maple leaves near opposite thirds of the runner rather than next to each other.
- Distribute the 10 acorns irregularly throughout the arrangement. Place some individually and 2-3 as paired clusters.
- Step back and check the overall balance. Avoid arranging identical colors directly beside one another unless they overlap with a contrasting motif.
- The finished layout should be approximately 120 cm long and 30-32 cm at its widest points, with irregular botanical edges rather than a rectangular outline.
Joining the Leaf Runner
- Photograph the completed layout before moving any pieces. Use the image as a placement reference while sewing.
- Begin with the central two large leaves. Thread a yarn needle with matching yarn from the lower leaf.
- At each overlap, sew through the back loops and central vein areas of both motifs using small invisible stitches.
- Secure each large leaf at a minimum of three points: near the central vein, at one side lobe, and near the overlapping stem or lower lobe.
- Do not sew every outer point down. Leaving selected lobe tips free preserves the layered three-dimensional appearance.
- Continue outward from the center, adding one large or medium leaf at a time and checking the runner against the layout photograph.
- Attach the smaller oak leaves beneath neighboring maple leaves so their joining stitches remain hidden.
- After all leaves are connected, lift the runner gently from both ends. If any area folds away from the rest of the piece, add another discreet joining stitch at the nearest overlap.
Attaching the Acorns
- Place each acorn or paired cluster in the gaps marked during the layout stage.
- Sew the top of the acorn stem to a strong point along a leaf vein rather than to an open chain loop.
- For acorns resting directly on the table, add one tiny hidden stitch through the back of the cap and the neighboring leaf to prevent rolling.
- Leave some acorns attached only by their stems so they remain dimensional and can rest naturally between the leaves.
- Check that no heavy acorn cluster pulls a delicate lace point out of shape. Move the attachment closer to a center vein if necessary.
Finishing
Weave all joining ends into the backs of the leaves, following the thicker central veins wherever possible so the tails remain invisible from the front. Inspect every overlap and reinforce any connection that shifts when the runner is lifted. The finished piece should behave as one textile while still allowing individual leaf tips and several acorns to remain dimensional.
Give the assembled runner one final light blocking directly on a large mat or protected table. Do not stretch it into a perfect rectangle. Instead, straighten the central flow, arrange the maple lobes naturally, open the lacework, and position the outer leaves so the edges remain irregular. Allow it to dry completely before placing it on furniture. For storage, roll the runner loosely around a cardboard tube rather than folding it across the leaf points.
Tips for Success
- Use mercerized or firmly twisted cotton for the maple leaves. Crisp yarn makes the branching veins and pointed lace edges much easier to define during blocking.
- Block every motif before deciding its final position. An unblocked maple leaf can become several centimeters wider after its lobes are properly opened.
- Build the runner from the center outward rather than starting at one end. This makes it much easier to keep the color distribution and overall width balanced.
- Join motifs mainly through their center veins and thicker stitch sections. Sewing through delicate chain loops can distort the lace and make individual leaves curl.
- Keep some leaf points and acorns unattached. Controlled three-dimensional details are what give this runner the layered woodland appearance of the reference design.
Common Mistakes to Avoid
- Do not skip blocking. If a maple leaf looks rounded instead of sharply lobed, dampen it again and individually pin the five major tips and all inner valleys.
- Avoid joining every inch of overlapping leaves. Too many stitches flatten the runner and hide the separate botanical shapes. Use several strategic anchor points instead.
- Do not distribute colors in a strict repeating sequence. The reference has a natural scattered appearance, so alternate colors irregularly while maintaining overall balance.
- Avoid attaching acorns to thin lace chains. Their weight can stretch those spaces. Sew the stems to central veins or other dense crochet sections.
- Do not make all leaves face the same direction. Rotate and overlap the motifs so some point toward the sides, others toward the runner ends, and a few diagonally across the center.
Ways to Customize This Pattern
- Create a longer dining-table runner by adding 4 large maple leaves, 4 small leaves, and 2 acorns for approximately every additional 30 cm of length.
- Make a lighter neutral version using ivory, oatmeal, camel, muted sage, and mocha instead of the stronger rust and orange palette.
- Add fine metallic copper thread to the final edging round of selected rust leaves for a subtle holiday transition from autumn into Thanksgiving or Christmas decor.
- Turn the design into a matching set of placemats by joining 3 large leaves, 2 small leaves, and 1 acorn into each compact arrangement.
- Create a matching autumn garland by crocheting only the medium and small leaves and joining their stems along a long chain instead of assembling them into a flat runner.
Frequently asked questions
Use a firm cotton yarn and block each leaf while damp. Pin the center tip first, then every major side lobe, inner valley, and decorative picot. Allow the motif to dry completely before removing the pins. For decorative runners that will not be washed often, a very light fabric-stiffening treatment can provide additional definition.
Overlap only the edges and selected lower sections of neighboring leaves rather than stacking entire motifs. Keep most joins to two layers and reserve three-layer overlaps for occasional areas where a small leaf fills a visible gap.
Yes. For a runner around 75-80 cm long, use approximately 7 large maple leaves, 4 medium leaves, 8 small leaves, and 6 acorns. Arrange the largest motifs first and stop adding leaves when the proportions suit your furniture.
The joining stitches are probably too tight or are anchored through delicate outer lace. Remove the tight join and reconnect the motifs through thicker vein sections with relaxed sewing tension. Lightly reblock the affected leaves afterward.
If you use washable cotton yarn, hand wash the runner gently in cool water and support the entire piece when lifting it. Do not wring it. Press out excess water between towels, then reshape every leaf and dry the runner flat. The motifs will normally need to be blocked again after washing.
The finished Crochet Autumn Leaf Table Runner Pattern