Crochet Autumn Tree Wall Hanging Pattern
Beginner Friendly
Perfect for those just starting their crochet journey, with clear instructions and simple techniques
Single-Day Project
A satisfying project you can complete in a single afternoon or evening.
Handmade Gift
A beautiful keepsake — free forever. Read online or print at home.
About This Crochet Autumn Tree Wall Hanging Pattern
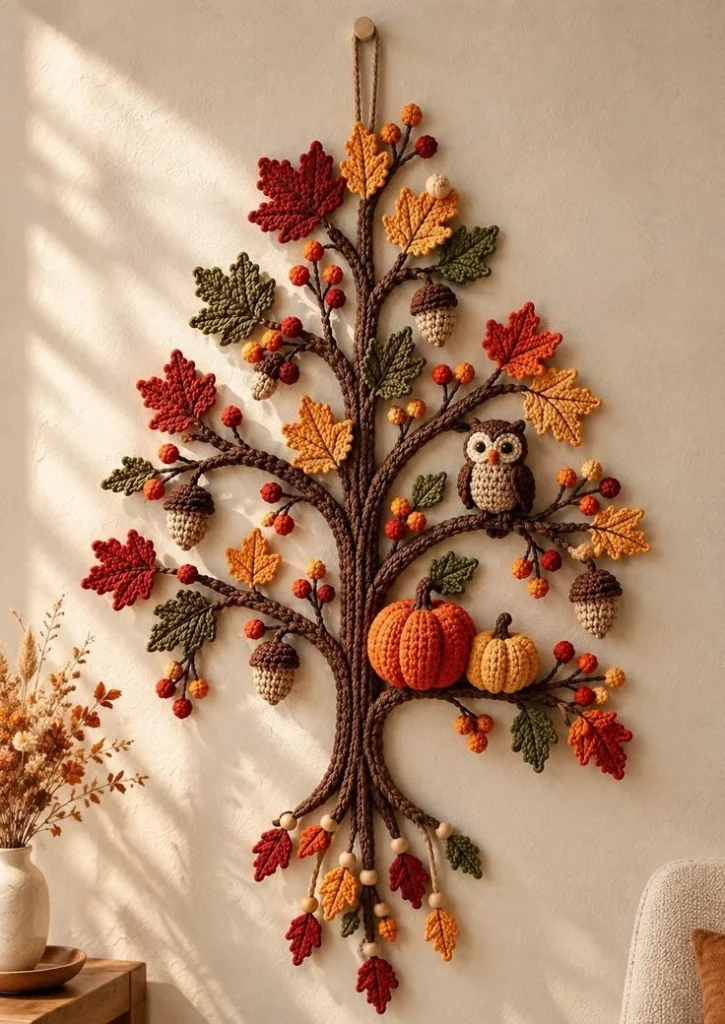
This crochet autumn tree wall hanging pattern creates a beautiful dimensional piece of handmade fall décor featuring a textured brown tree, branching limbs, maple and oak leaves, clusters of autumn berries, acorns, two pumpkins and a tiny woodland owl.
The design is assembled from individual crochet elements, so you can easily make the tree smaller, larger, fuller or more minimal. Warm rust, mustard, olive, burgundy and brown give it the cozy autumn palette shown in the inspiration.
Materials
- DK cotton yarn – dark brown 150–200 g
- DK cotton yarn – medium brown 50 g
- DK cotton yarn – rust red 60–80 g
- DK cotton yarn – burnt orange 60–80 g
- DK cotton yarn – mustard gold 50–70 g
- DK cotton yarn – olive green 50–70 g
- DK cotton yarn – beige / oatmeal 40–50 g
- Small amount black and cream yarn owl details
- 3.0–3.5 mm crochet hook 1
- Fiberfill small amount
- Yarn needle 1
- Scissors 1 pair
- Stitch markers optional
- Wooden beads optional
- Wooden wall peg or hanging hook 1
Abbreviations – US Terms
MRmagic ringchchainsl stslip stitchscsingle crochethdchalf double crochetdcdouble crochettrtreble crochetincincreasedecdecreasest(s)stitch(es)FOfasten offFinished Size
Approximately 65 cm wide × 90 cm tall / 26 × 35 in, including the hanging loop and dangling roots.
Because every branch is positioned individually, the dimensions can easily be adjusted to fit your wall.
Construction Overview
The wall hanging is assembled from several separate crochet components:
- Long textured tree trunk.
- Large and small brown branches.
- Maple and oak-style autumn leaves.
- Small berry clusters.
- Crochet acorns.
- Two dimensional pumpkins.
- Mini woodland owl.
- Decorative roots and hanging loop.
Make all pieces first, arrange them on a flat surface, then join them securely into one wall hanging.
Part 1 – Main Tree Trunk
With dark brown yarn, ch 110.
Row 1
Starting in the second chain from hook, sc across.
Row 2
Ch 1, turn. Sc in each st across.
Rows 3–5
Repeat Row 2.
FO, leaving a long tail.
Make 3–5 long strips using slightly different chain lengths between 95 and 120 chains.
Part 2 – Branches
Create branches in several lengths.
Large Branch
Ch 55.
Starting in second chain, sl st or sc across.
Medium Branch
Ch 35–45.
Sc across.
Small Branch
Ch 18–30.
Sc across.
Make approximately 12–16 branches in mixed lengths.
For thicker branches, crochet two rows of sc or make two cords and twist them together.
Part 3 – Branch Forks
To make the tree look natural, some branches should divide into smaller twigs.
Join brown yarn approximately halfway along a finished branch.
Ch 12–20.
Sl st back down the chain.
FO.
Add one or two twig extensions to selected branches.
Part 4 – Maple-Style Leaf
With rust, red, mustard or olive yarn:
Ch 13.
Starting in second chain from hook:
sl st, sc, hdc, dc, tr, dc, hdc, sc.
At the end work 3 sc.
Continue along the opposite side with the mirrored stitch sequence.
Join with sl st.
Part 5 – Leaf Lobes
Work around the leaf edge to create the characteristic autumn points.
Repeat sections of:
sc, hdc, dc, ch 3, sl st in first ch, dc, hdc, sc.
Create approximately 5 main points around each leaf.
At the top, make the center point slightly longer with ch 4 instead of ch 3.
Part 6 – Leaf Veins
Join yarn at the bottom center of the leaf.
Surface crochet slip stitches along the center toward the tip.
Use a yarn needle to add two or three diagonal side veins if desired.
Leave a short yarn tail at the base to act as the leaf stem.
Part 7 – Small Oak-Style Leaves
Ch 15.
Starting in the second chain:
sl st, sc, hdc, dc, hdc, sc along the foundation.
Work around the opposite side.
On the final round create rounded lobes with:
[sc, hdc, 2 dc, hdc, sc]
at several points around the leaf.
Add a surface crochet center vein.
Leaf Quantity
For a full tree similar to the inspiration, make approximately:
- 8–10 rust/red leaves
- 7–9 mustard leaves
- 8–10 olive leaves
- 4–6 smaller mixed-color leaves
You can add more if you prefer a fuller tree.
Part 8 – Autumn Berries
With red, orange or mustard yarn:
Round 1
Make a MR and work 6 sc into the ring.
Round 2
2 sc in each st around. 12 sts.
Round 3
Sc around.
Round 4
Sc2tog around.
Add a tiny amount of fiberfill before closing.
FO and pull closed.
Part 9 – Berry Clusters
Make approximately 25–35 berries in rust, red and mustard.
Group them in clusters of 2–4.
Attach each berry to a thin brown crochet chain approximately 4–8 cm long.
Join several stems together before attaching them to the tree branches.
Part 10 – Crochet Acorn
With beige yarn:
Round 1
MR, 6 sc.
Round 2
Inc around. 12 sts.
Round 3
[1 sc, inc] around. 18 sts.
Rounds 4–7
Sc around.
Round 8
[1 sc, dec] around.
Add a small amount of fiberfill.
Round 9
Dec around and close.
Part 11 – Acorn Cap
With dark brown yarn:
MR, 6 sc.
Round 2: inc around.
Round 3: [sc, inc] around.
Round 4: sc around.
FO.
Sew the cap onto the beige acorn body.
Add a small brown chain stem at the top.
Make approximately 5–7 acorns.
Part 12 – Large Pumpkin
With burnt orange yarn:
Ch 25.
Row 1
Hdc in second chain and across.
Rows 2–22
Ch 1, turn.
Work hdc in the back loop only across.
This creates vertical ridges.
FO, leaving a long tail.
Part 13 – Shape the Pumpkin
Join the first and last rows to create a tube.
Using the yarn tail, weave around one open end and pull tightly closed.
Add fiberfill.
Close the opposite end.
Pass a long yarn strand through the center several times, pulling gently to flatten the pumpkin and emphasize the ridges.
Part 14 – Small Pumpkin
Repeat the same method using:
Ch 17 and approximately 16 rows.
Use mustard yarn for the smaller pumpkin.
Add a short dark brown crochet stem to both pumpkins.
Part 15 – Mini Woodland Owl Body
With beige yarn:
Round 1
MR, 6 sc.
Round 2
Inc around. 12 sts.
Round 3
[1 sc, inc] around. 18 sts.
Rounds 4–8
Sc around.
Round 9
[1 sc, dec] around.
Add fiberfill.
Round 10
Dec around and close.
Part 16 – Owl Eyes
Make two cream circles.
MR, 6 sc.
Round 2: 2 sc in each stitch.
FO.
Sew both circles onto the upper body.
Add small black centers using embroidery or tiny crochet circles.
Embroider a small orange triangular beak between the eyes.
Part 17 – Owl Wings & Ears
For each wing:
Ch 6.
Work sc, hdc, dc, hdc, sc along the chain.
Make two and sew to the sides.
For the small ear points, attach brown yarn at each upper corner and work:
ch 3, sl st back to the body.
Part 18 – Decorative Roots
At the bottom of the trunk, leave several brown strips extending downward.
Separate them into approximately 5–7 roots.
Allow the roots to curve slightly instead of hanging perfectly straight.
Attach small leaves and wooden beads to selected root ends.
Part 19 – Hanging Loop
With brown yarn, ch approximately 30–35.
Sl st back across the chain for extra strength.
Fold into a loop.
Sew securely behind the top of the trunk.
The loop should be strong enough to support the complete decoration.
Part 20 – Arrange the Tree
Lay all pieces on a large flat surface before sewing.
Place the twisted trunk vertically in the center.
Position the largest branches first.
Create approximately:
- 3–4 branches toward the upper left
- 3–4 branches toward the upper right
- 2–3 middle branches on each side
- 2–3 lower branches
Keep the arrangement slightly asymmetrical for a natural tree shape.
Part 21 – Attach the Branches
Use dark brown yarn and a yarn needle.
Sew the first 5–8 cm of each branch securely to the trunk.
Allow the outer portion of the branch to remain slightly flexible.
Cross some smaller branches over larger branches to create depth.
Part 22 – Add the Leaves
Start with the largest leaves.
Sew each leaf to a branch only at the stem and lower center vein.
Leave the pointed edges free.
Mix rust, mustard and olive leaves throughout the tree.
Rotate the leaves in different directions so they appear naturally scattered.
Part 23 – Add Acorns and Berries
Hang the acorns from selected branches using short brown stems.
Add berry clusters between the leaves.
Use the brightest red and orange berries near the middle and upper branches to create small focal points.
Avoid filling every empty space.
Part 24 – Position the Pumpkins
Place the large orange pumpkin on one lower-middle branch.
Position the smaller mustard pumpkin beside it.
Sew them securely through the back of the pumpkin into the branch.
Keep the front stitches hidden.
Part 25 – Position the Owl
Place the owl on a sturdy middle branch.
Sew the bottom of the body firmly to the branch.
Add one or two hidden stitches through the back of the owl into a nearby twig if extra stability is needed.
Part 26 – Final Shaping
Lightly steam or wet-block the individual leaves if needed.
Curve some leaf tips slightly forward.
Adjust the branches so they spread naturally.
Allow some berries and acorns to hang freely.
Gently shape the pumpkins with your fingers.
Color Palette Ideas
Classic Autumn: rust, pumpkin orange, mustard, olive and chocolate brown.
Vintage Fall: burgundy, muted gold, moss green, oatmeal and dark brown.
Neutral Woodland: cream, camel, taupe, sage and walnut brown.
Deep Forest: forest green, burnt orange, wine red and espresso brown.
Thanksgiving: pumpkin, cranberry, golden yellow, olive and warm beige.
Ways to Customize Your Autumn Tree
- Add more pumpkins to the lower branches.
- Add tiny crochet mushrooms.
- Replace the owl with a small fox or squirrel.
- Add embroidered leaf veins.
- Add wooden beads between the dangling roots.
- Make several leaves in two-tone colors.
- Add tiny pinecones.
- Create a smaller version for a front door.
- Add a few cream leaves for a softer neutral palette.
Displaying the Wall Hanging
Hang the finished tree from a sturdy wooden wall peg or decorative hook.
Because the design is dimensional, leave a little space around it rather than surrounding it with other busy decorations.
A cream, beige or warm neutral wall provides beautiful contrast with the autumn colors.
Care Instructions
Dust gently with a soft cloth or low-power handheld vacuum.
If washing is necessary, hand wash individual removable elements in cool water.
Avoid machine washing the fully assembled wall hanging.
Reshape leaves and branches while damp and allow them to dry completely flat.
Frequently Asked Questions
Yes. Shorten the trunk and branches and reduce the number of leaves, berries and decorative elements. The same construction method works for almost any size.
Use firm cotton yarn, tight stitches and doubled or twisted crochet cords for the main branches. Keeping heavy pieces such as pumpkins close to the trunk also improves stability.
No. The leaves remain flat. Only the berries, acorns, pumpkins and owl require a small amount of fiberfill.
Yes. The owl is an optional decorative detail and can be removed or replaced with another woodland motif.
Use matching yarn and a yarn needle for the strongest handmade finish. Attach heavier pieces through several stitches and hide the knots on the back.
Yes. Change the leaves to forest green, deep red and cream, replace the pumpkins with crochet ornaments and add small stars, bells or snowflakes.
The finished Crochet Autumn Tree Wall Hanging Pattern