Crochet Autumn Wreath Pattern
Beginner Friendly
Perfect for those just starting their crochet journey, with clear instructions and simple techniques
Single-Day Project
A satisfying project you can complete in a single afternoon or evening.
Handmade Gift
A beautiful keepsake — free forever. Read online or print at home.
About This Crochet Autumn Wreath Pattern
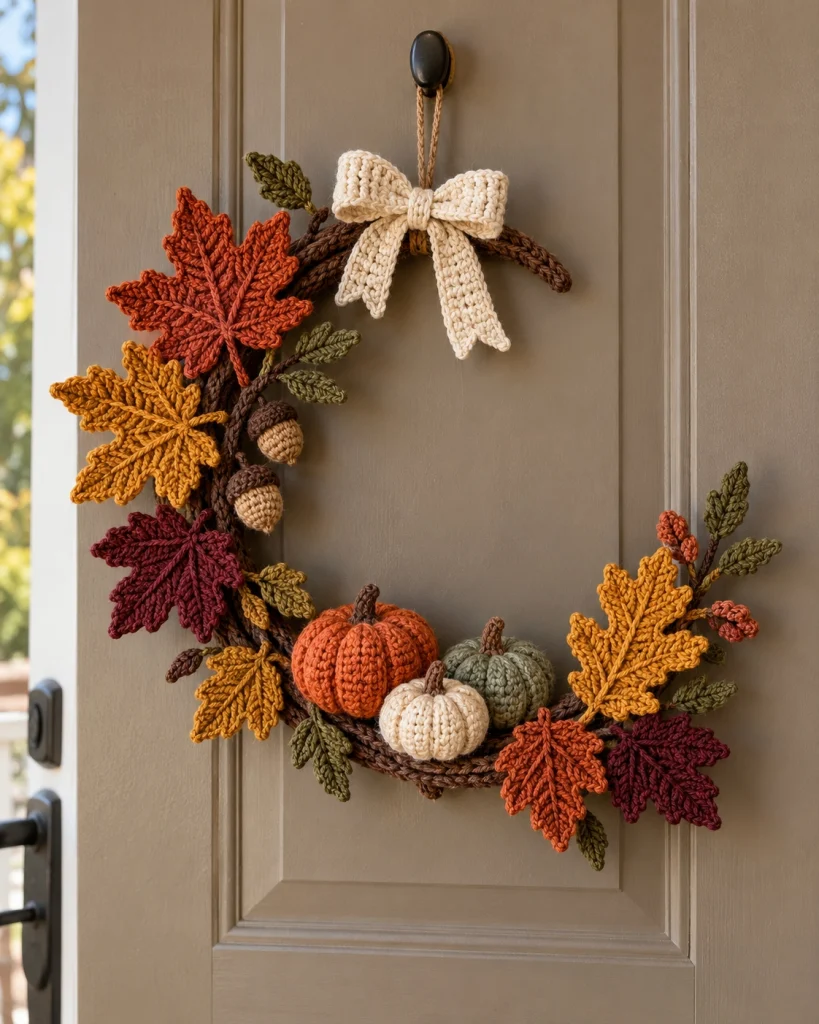
This beautiful crochet autumn wreath pattern brings the warmth of fall right to your front door. With rich rust-orange maple leaves, golden yellow foliage, miniature crochet pumpkins, tiny acorns, and a soft cream bow, this handmade wreath captures everything we love about cozy autumn decorating.
The design features a rustic brown wreath base with an asymmetrical arrangement of fall decorations. A generous cluster of leaves decorates the left side, three adorable pumpkins sit along the bottom, and smaller autumn leaves and berries complete the right side. The elegant cream crochet bow adds the perfect finishing touch.
Whether you’re decorating your front door, creating seasonal farmhouse decor, or making a thoughtful handmade gift, this fall wreath is a lovely project to enjoy throughout autumn.
Materials
- Dark brown cotton yarn 150–200 g
- Rust orange yarn 50 g
- Mustard yellow yarn 50 g
- Burgundy yarn 40 g
- Olive green yarn 40 g
- Sage green yarn 30 g
- Burnt orange yarn 40 g
- Cream cotton yarn 40–50 g
- Beige and tan yarn small amounts
- 3.5 mm crochet hook leaves and details
- 4 mm crochet hook base and pumpkins
- Foam or wire wreath form 30–35 cm
- Polyester fiberfill small amount
- Yarn needle 1
- Scissors 1 pair
- Stitch markers 2–4
- Floral wire optional
- Strong sewing thread for assembly
- Natural twine for hanging
Abbreviations – US Terms
chchainsl stslip stitchscsingle crochethdchalf double crochetdcdouble crochettrtreble crochetincincreasedecdecreaseBLOback loop onlyMRmagic ringststitchFOfasten offPart 1 – Prepare the Wreath Base
Begin with a sturdy circular wreath form measuring approximately 30–35 cm / 12–14 inches in diameter.
A foam wreath form works especially well because it is lightweight and easy to cover.
Alternatively, use a metal wreath ring and wrap it with cotton batting before adding the crochet cover.
Choose dark chocolate brown yarn to create the rustic appearance of intertwined branches.
Part 2 – Crochet the Brown Wreath Cover
Using brown yarn and a 4 mm hook, ch 19.
Row 1: Starting in the second chain from the hook, work 18 sc. Ch 1, turn. (18)
Row 2: Work 18 sc in BLO. Ch 1, turn. (18)
Rows 3 onward: Repeat Row 2 until the strip is long enough to wrap around the entire wreath form.
Measure frequently to ensure the strip fits snugly around the wreath without excessive stretching.
The BLO stitches create subtle ridges that resemble the texture of rustic branches.
Wrap the finished crochet strip around the wreath form and sew the long edges together on the back.
Join the two short ends invisibly.
Part 3 – Add Rustic Branch Texture
To make the wreath base resemble intertwined branches, crochet several narrow brown cords.
Using a 3.5 mm hook, ch 80–120 depending on the desired length.
Work one sl st into each chain across.
FO and leave a long tail.
Make approximately 4–6 cords in slightly different shades of brown.
Twist the cords loosely around sections of the wreath base.
Secure them with small stitches on the back.
Allow a few sections of the textured brown base to remain visible between the decorative leaves.
Part 4 – Crochet the Maple Leaf Center
The maple leaves are the main decorative elements of this autumn wreath.
Use rust orange, mustard yellow, burgundy, and burnt orange yarn with a 3.5 mm hook.
Begin with a central foundation.
Round 1: Make a MR and work 10 sc into the ring. Join with sl st. (10)
Round 2: Ch 1, work 2 sc into each stitch around. Join. (20)
This circular foundation provides an anchor for the five pointed lobes.
Part 5 – Create the Five Maple Leaf Lobes
Each leaf has five pointed lobes arranged around the center.
Work the following lobe into four consecutive stitches of the circular foundation:
Step 1: Sl st into the first stitch of the group.
Step 2: Ch 9.
Step 3: Starting in the second chain from the hook, work 1 sc, 1 hdc, 3 dc, 2 hdc, and 1 sc.
Step 4: Sl st into the second foundation stitch of the group.
Step 5: Sl st into the remaining two foundation stitches to position the hook for the next lobe.
Repeat this process five times, working one lobe across each group of four foundation stitches.
For a more realistic maple leaf silhouette, make the middle lobe slightly longer by adding two chains and corresponding stitches.
FO, leaving a long tail.
Part 6 – Add Maple Leaf Veins
The raised leaf veins make the maple leaves look detailed and realistic.
Use matching or slightly lighter yarn.
Insert your hook at the center of the leaf.
Work surface slip stitches toward the tip of the central lobe.
Return to the center and create smaller branching veins toward the remaining lobes.
Keep the stitches slightly raised without pulling the leaf too tightly.
For an embroidered finish, use a yarn needle and backstitch instead.
Gently shape each lobe with your fingers.
Part 7 – Make the Autumn Leaf Collection
For a full wreath similar to the reference, crochet approximately 9–12 maple leaves.
Suggested colors:
- 3 rust-orange leaves
- 3 mustard-yellow leaves
- 2 burgundy leaves
- 2 burnt-orange leaves
- 1 additional leaf in your favorite autumn shade
Make some leaves slightly smaller by using a smaller hook or shortening the foundation chains of the lobes.
Variation in size and color creates a more natural autumn arrangement.
Part 8 – Crochet the Mini Pumpkin Base
The wreath features three small pumpkins in orange, cream, and sage green.
Using your chosen pumpkin color and a 3.5 mm hook, make a MR.
R1: 6 sc into MR. (6)
R2: Inc around. (12)
R3: *1 sc, inc* repeat around. (18)
R4: *2 sc, inc* repeat around. (24)
R5: *3 sc, inc* repeat around. (30)
R6: *4 sc, inc* repeat around. (36)
R7–R13: Sc in each stitch around. (36)
R14: *4 sc, dec* repeat around. (30)
R15: *3 sc, dec* repeat around. (24)
R16: *2 sc, dec* repeat around. (18)
Begin stuffing firmly but not excessively.
R17: *1 sc, dec* repeat around. (12)
R18: Dec around. (6)
FO, leaving a long yarn tail.
Close the remaining opening using a yarn needle.
Part 9 – Shape the Pumpkin Ridges
Thread the long yarn tail through a yarn needle.
Insert the needle through the center of the pumpkin from top to bottom.
Bring the yarn around the outside and insert the needle through the center again.
Pull gently to create the first pumpkin groove.
Repeat approximately 6–8 times, spacing the grooves evenly around the pumpkin.
Keep the tension consistent so the pumpkin develops a rounded, ribbed shape.
Secure the yarn firmly at the bottom.
Part 10 – Crochet the Pumpkin Stems
Using dark brown yarn and a 3.5 mm hook, ch 7.
Row 1: Starting in the second chain, work 6 sc.
Ch 1, turn.
Rows 2–3: Work 6 sc across.
FO, leaving a long tail.
Roll the small rectangle tightly into a short stem.
Sew the edge closed.
Attach the stem to the top center of the pumpkin.
Repeat for all three pumpkins.
Part 11 – Make the Three-Pumpkin Arrangement
Create three pumpkins using the same basic pattern.
Pumpkin 1: Burnt orange, approximately 9–10 cm wide.
Pumpkin 2: Cream, approximately 7–8 cm wide.
Pumpkin 3: Sage green, approximately 8–9 cm wide.
To create slightly different sizes, use different yarn weights or add and remove increase rounds while adjusting the decrease rounds accordingly.
Place the largest orange pumpkin on the left side of the bottom wreath arrangement.
Position the cream pumpkin in front of the other two.
Place the sage-green pumpkin slightly behind the cream pumpkin on the right.
Part 12 – Crochet the Acorn Bodies
The little acorns add a charming woodland detail.
Using tan yarn and a 3.5 mm hook, make a MR.
R1: 6 sc into MR. (6)
R2: Inc around. (12)
R3: *1 sc, inc* repeat around. (18)
R4–R7: Sc around. (18)
R8: *1 sc, dec* repeat around. (12)
Stuff lightly.
R9: Dec around. (6)
FO and close the opening.
Make approximately 3–5 acorns.
Part 13 – Crochet the Acorn Caps
Using dark brown yarn, make a MR.
R1: 6 sc into MR. (6)
R2: Inc around. (12)
R3: *1 sc, inc* repeat around. (18)
R4: Sc in BLO around. (18)
FO, leaving a long tail.
Position the cap over the wider end of the acorn body.
Sew it securely around the edge.
Add a small brown crochet stem at the top.
Part 14 – Crochet the Small Olive Leaves
Small olive-green leaves fill the gaps between the larger maple leaves.
Using olive or sage yarn, ch 12.
Round 1: Starting in the second chain, work 1 sc, 1 hdc, 6 dc, 1 hdc, 1 sc, then 3 sc in the final chain.
Continue along the opposite side of the foundation chain with 1 sc, 1 hdc, 6 dc, 1 hdc, and 1 sc.
Join with sl st.
FO, leaving a tail.
Make approximately 10–14 leaves.
Use different shades of olive and sage green for a natural appearance.
Part 15 – Crochet the Small Autumn Berries
Use burnt orange, rust, and burgundy yarn.
R1: Make a MR and work 6 sc. (6)
R2: Inc around. (12)
R3: Sc around. (12)
R4: Dec around. (6)
Stuff lightly if desired.
FO and close the opening.
Make approximately 6–10 small berries.
Attach them in small clusters around the right side of the wreath.
Part 16 – Crochet the Cream Bow
The large cream bow gives this autumn wreath its soft farmhouse appearance.
Using cream yarn and a 4 mm hook, ch 15.
Row 1: Sc in the second chain from the hook and across. (14)
Rows 2–34: Ch 1, turn, sc across. (14)
FO, leaving a long tail.
Fold the rectangle so the two short ends meet.
Sew the ends together to create a loop.
Pinch the center to form two rounded bow loops.
Wrap cream yarn around the center several times to secure the bow shape.
Part 17 – Crochet the Bow Tails
Using cream yarn, ch 12.
Row 1: Sc in the second chain and across. (11)
Rows 2–23: Ch 1, turn, sc across. (11)
FO.
Make two identical pieces.
To create pointed ribbon ends, fold each tail lengthwise and cut the shape only if using fabric. For crochet, shape the final rows with decreases instead.
Attach both tails behind the bow center.
Allow the tails to hang naturally in slightly different directions.
Part 18 – Position the Main Autumn Leaves
Lay the wreath flat on a table.
Begin by arranging the largest maple leaves on the left side.
Place one rust-orange leaf near the upper-left section.
Position a golden yellow leaf beneath it.
Add a burgundy leaf lower down to create contrast.
Continue layering smaller leaves toward the bottom.
Overlap the leaves slightly, but keep their pointed shapes visible.
Secure the leaves with strong yarn or sewing thread.
Part 19 – Attach the Pumpkins
Position the three pumpkins along the bottom curve of the wreath.
Arrange them in a small overlapping group.
The orange pumpkin should sit slightly higher on the left.
The cream pumpkin should sit at the front center.
The sage-green pumpkin should sit behind and slightly to the right.
Sew each pumpkin to the crochet wreath cover using strong matching yarn.
For extra stability, pass the sewing thread through the wreath base several times.
Check that the pumpkins remain securely positioned when the wreath is lifted.
Part 20 – Add the Acorns and Greenery
Place two small acorns along the inner left side of the wreath.
Position additional acorns near the lower-left leaves if desired.
Add olive-green leaves around the acorns and between the maple leaves.
Arrange a few green sprigs near the right side of the wreath.
Keep the decorations asymmetrical to preserve the natural woodland appearance.
Sew the pieces securely to the base.
Part 21 – Decorate the Right Side
The right side should be slightly lighter than the left side.
Place one large mustard-yellow maple leaf near the middle-right section.
Add one rust-orange leaf beneath it.
Position a burgundy leaf near the lower-right corner.
Fill the spaces with olive-green leaves and small orange berries.
Allow a few small stems to extend beyond the wreath for a natural finish.
Part 22 – Attach the Cream Bow
Position the finished bow at the upper center of the wreath.
Allow the loops to sit horizontally while the two tails fall downward.
Secure the bow to the wreath base with strong cream yarn.
Make several hidden stitches through the bow center.
Adjust the loops until they appear full and symmetrical.
The bow should be one of the most noticeable details without overwhelming the autumn foliage.
Part 23 – Create the Hanging Loop
Using natural twine or strong brown yarn, create a hanging loop approximately 15–20 cm long.
Fold the cord in half.
Secure both ends around the upper section of the wreath base.
Use several strong knots or stitches to prevent slipping.
Make sure the loop is centered so the wreath hangs evenly.
Test the hanging position before permanently securing the knot.
Part 24 – Final Shaping
Hang the wreath on a sturdy hook.
Gently adjust the maple leaves so their pointed lobes remain visible.
Fluff the cream bow and straighten the tails.
Arrange the small green leaves around the pumpkins.
Check that the acorns hang naturally.
Make sure the pumpkins remain centered along the bottom.
Trim any loose yarn ends.
For a polished finish, lightly steam-block the flat crochet leaves if appropriate for your yarn.
Suggested Color Variations
Classic Autumn: Burnt orange, mustard yellow, burgundy, olive green, and cream.
Neutral Farmhouse: Oatmeal, ivory, taupe, caramel, and sage green.
Rustic Woodland: Chocolate brown, copper, forest green, and golden yellow.
Elegant Fall: Dusty rose, muted terracotta, cream, and champagne beige.
Harvest Festival: Pumpkin orange, sunflower yellow, deep red, and moss green.
Soft Cottagecore: Pale peach, warm cream, sage, and light caramel.
Care Instructions
Dust the wreath gently with a soft brush.
Avoid soaking the finished decoration in water.
Spot-clean small areas using a damp cloth and mild detergent.
Allow the wreath to air-dry completely.
Keep away from strong sunlight to reduce color fading.
Store the wreath in a large protective box between seasons.
Place tissue paper around the bow and leaves to help maintain their shape.
Frequently Asked Questions
This pattern is best suited to intermediate crocheters because it includes shaped leaves, amigurumi pumpkins, decorative acorns, and several assembly steps. Confident beginners can complete the project by working through each element separately.
Medium-weight cotton yarn is a great choice because it provides clear stitch definition and helps the maple leaves hold their shape. Acrylic yarn can also be used for a lighter decoration.
Yes. Use a larger wreath form and crochet additional leaves, pumpkins, and greenery to fill the extra space.
No. A metal wreath ring, wooden embroidery hoop, or sturdy wire frame can also work. The base simply needs to be strong enough to support the crochet decorations.
Yes. Attach the pumpkins with small fabric-backed fasteners or removable ties instead of sewing them permanently.
Approximately 9–12 maple leaves create a full arrangement for a medium-sized wreath. Adjust the number depending on your wreath size and preferred fullness.
Absolutely! The pumpkins, acorns, maple leaves, and warm harvest colors make it a lovely decoration for Thanksgiving gatherings and seasonal celebrations.
Use firm cotton yarn, maintain even tension, and gently block the finished leaves. If necessary, add thin floral wire to the back of selected leaves for extra support.
Yes. It works beautifully on an indoor door or a sheltered exterior door. Avoid exposing the yarn to prolonged rain or harsh weather.
Yes! A crochet autumn wreath makes a thoughtful housewarming gift, fall birthday present, Thanksgiving hostess gift, or seasonal decoration for someone who loves handmade home decor.
Final Thoughts
This crochet autumn wreath pattern is a wonderful way to celebrate the beauty of fall with handmade decorations.
From the textured brown wreath base to the colorful maple leaves, miniature pumpkins, woodland acorns, and soft cream bow, every detail adds warmth and charm to the finished design.
Display your wreath on a front door, above a fireplace, or in a cozy entryway to welcome the autumn season.
With its beautiful harvest colors and inviting handmade texture, this crochet wreath is a decoration you’ll enjoy bringing out year after year.
Happy crocheting and happy fall! 🍂🧶🎃
The finished Crochet Autumn Wreath Pattern

