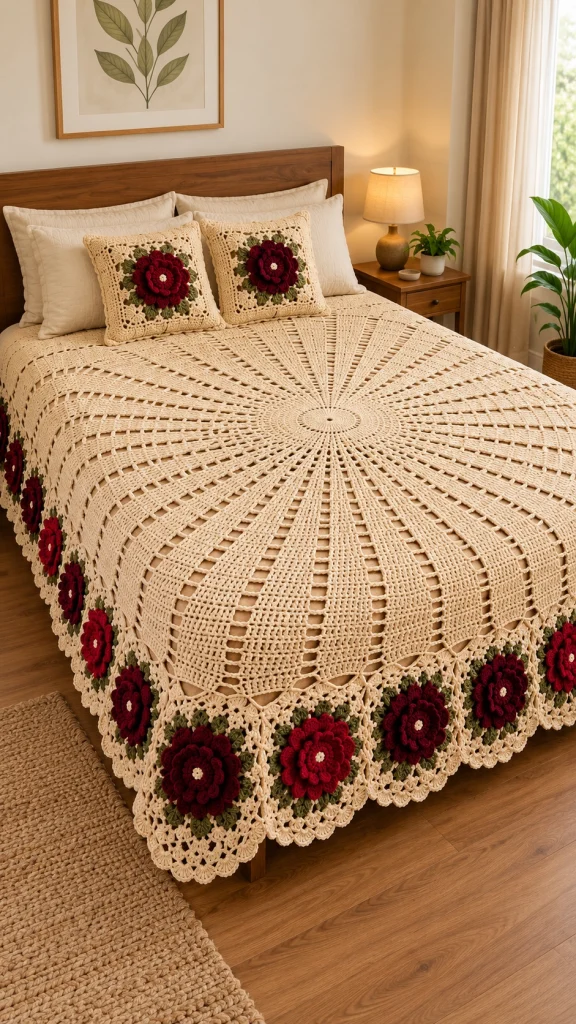
Elegant Crochet Bedspread Pattern – Ivory Sunburst Blanket with Burgundy Roses
Transform your bedroom into a cozy, romantic retreat with this stunning ivory crochet bedspread featuring a sunburst lace design and beautiful burgundy roses.
This elegant handmade bedspread combines a delicate circular sunburst centerpiece, flowing openwork crochet lace, a decorative floral border, and matching crochet flower pillows.
The warm ivory color creates a timeless vintage appearance, while the deep burgundy flowers and olive-green leaves add a rich, sophisticated touch.
Inspired by traditional heirloom crochet bedspreads, this design is perfect for anyone who loves romantic farmhouse decor, vintage crochet, and beautiful handmade home accessories.
Project Overview
- Skill Level: Advanced
- Project Type: Crochet bedspread and matching pillow covers
- Style: Vintage, romantic, farmhouse, heirloom crochet
- Main Color: Warm ivory
- Accent Colors: Burgundy, deep red, and olive green
- Finished Size: Approximately 220 × 240 cm, adjustable
- Suggested Bed: Queen size
- Estimated Time: 50–90 hours, depending on experience
- Crochet Terminology: US terms
Materials Needed
- Approximately 3,000–4,000 meters of ivory cotton yarn, depending on gauge and finished size
- 400–600 meters of burgundy cotton yarn
- 150–250 meters of deep-red cotton yarn
- 200–300 meters of olive-green cotton yarn
- 3.5 mm crochet hook
- 4 mm crochet hook
- Yarn needle
- Stitch markers
- Measuring tape
- Scissors
- Blocking mats and rust-resistant pins
- Two square pillow inserts, approximately 45 × 45 cm
Crochet Abbreviations – US Terms
- MR: Magic ring
- ch: Chain
- sc: Single crochet
- hdc: Half double crochet
- dc: Double crochet
- tr: Treble crochet
- sl st: Slip stitch
- st: Stitch
- sp: Space
- rep: Repeat
- FO: Fasten off
Part 1 – Understanding the Sunburst Bedspread Design
The central feature of this crochet bedspread is its large circular sunburst motif.
The design begins with a small round center and gradually expands into radiating sections of solid stitches and openwork lace.
Once the circular centerpiece is complete, additional crochet sections are worked around the edges to create a rectangular bedspread.
A wide floral border featuring burgundy crochet roses and olive-green leaves finishes the design.
For a balanced appearance, measure your bed before beginning and plan the final border width accordingly.
Part 2 – Crochet the Circular Sunburst Center
Use ivory yarn and a 3.5 mm crochet hook.
Round 1
Make a magic ring.
Ch 3 (counts as first dc), work 11 dc into the ring.
Join with a sl st to the top of the beginning ch-3. (12 dc)
Round 2
Ch 3, work 1 dc in the same stitch.
Work 2 dc in each remaining stitch around.
Join with a sl st. (24 dc)
Round 3
Ch 3, 1 dc in the next stitch, 2 dc in the next stitch.
Repeat the sequence around, increasing evenly.
Join with a sl st. (36 dc)
Round 4
Ch 3, 1 dc in each of the next 2 stitches, 2 dc in the next stitch.
Repeat around.
Join with a sl st. (48 dc)
Round 5
Ch 3, 1 dc in each of the next 3 stitches, 2 dc in the next stitch.
Repeat around.
Join with a sl st. (60 dc)
Round 6
Ch 3, 1 dc in each of the next 4 stitches, 2 dc in the next stitch.
Repeat around.
Join with a sl st. (72 dc)
Round 7
Ch 3, 1 dc in each of the next 5 stitches, 2 dc in the next stitch.
Repeat around.
Join with a sl st. (84 dc)
Round 8
Ch 3, 1 dc in each of the next 6 stitches, 2 dc in the next stitch.
Repeat around.
Join with a sl st. (96 dc)
The center should now form a flat circular foundation.
Part 3 – Create the Radiating Sunburst Sections
Place 12 stitch markers evenly around the circle.
Each marked section will form one radiating sunburst panel.
Openwork Round
Ch 3, dc in the next stitch.
*Ch 2, skip 2 stitches, dc in each of the next 2 stitches.*
Repeat around, adjusting the final repeat to maintain an even circular shape.
Join with a sl st.
Solid Lace Round
Ch 3, dc in each stitch and work 2 dc into selected chain spaces to maintain the circular shape.
Join with a sl st.
Decorative Mesh Round
Ch 5, skip 2 stitches, sc in the next stitch.
Repeat the chain-space pattern around.
Join with a sl st.
Alternate solid crochet rounds with openwork mesh rounds to create the delicate radiating appearance.
Continue increasing evenly as the circle grows, checking regularly that the fabric remains flat.
Work until the circular section reaches approximately 140–160 cm in diameter, or your preferred size.
Design note: The reference image shows an intricate radial lace construction. The instructions above establish the general structure, but the complete large-scale stitch chart would need to be developed and tested for exact reproduction.
Part 4 – Transform the Circular Center into a Rectangular Bedspread
Lay the circular crochet centerpiece flat.
Mark four evenly spaced points around the outer edge to represent the corners of the finished bedspread.
Using ivory yarn, work additional rows of openwork crochet along the outer sections.
Use combinations of:
- Double crochet panels
- Chain-space lace
- Treble crochet groups
- Decorative mesh stitches
- Gradual corner shaping
Work the additional sections until the overall bedspread reaches approximately 220 × 240 cm before or including the final border, depending on your preferred drape.
Keep the corner sections symmetrical and measure frequently.
The goal is to preserve the circular sunburst as the visual centerpiece while creating a rectangular outer shape.
Part 5 – Crochet the Burgundy Roses
The deep burgundy flowers give this elegant bedspread its romantic appearance.
Make approximately 24–36 flowers, depending on the finished border size and spacing.
Rose Center
Using deep burgundy yarn:
Round 1: 6 sc in MR. (6)
Round 2: 2 sc in each stitch. (12)
Round 3: (1 sc, inc) × 6. (18)
Join with a sl st.
First Layer of Petals
*Ch 3, skip 1 stitch, sl st into the next stitch.*
Repeat around to create petal loops.
Into each loop work:
1 sc, 1 hdc, 3 dc, 1 hdc, 1 sc.
Repeat around and join.
Second Layer of Petals
Working behind the first petal layer, create larger chain-5 loops.
Into each loop work:
1 sc, 1 hdc, 5 dc, 1 hdc, 1 sc.
Repeat around.
Third Layer of Petals
Create another layer of chain-7 loops behind the previous petals.
Into each loop work:
1 sc, 2 hdc, 5 dc, 2 hdc, 1 sc.
Repeat around.
FO, leaving a long sewing tail.
Gently shape the petals to create a full dimensional rose.
For visual variety, make some roses in deep burgundy and others in brighter wine-red shades.
Part 6 – Crochet the Olive-Green Leaves
Make approximately 2–3 leaves per rose.
Using olive-green yarn, ch 12.
Starting in the second chain from the hook, work:
1 sc, 2 hdc, 5 dc, 2 hdc, 1 sc.
Ch 1, rotate the work, and crochet the same sequence along the opposite side of the foundation chain.
Join with a sl st.
FO, leaving a long tail.
Embroider a central vein using a slightly darker green yarn if desired.
Arrange the leaves behind the burgundy roses.
Part 7 – Create the Floral Border
The floral border is one of the most beautiful features of this crochet bedspread.
Work several rounds of ivory openwork lace around the outer edge.
Foundation Border
Work 1 sc evenly around the entire bedspread.
At each corner, work 3 sc into the corner stitch or space.
Join with a sl st.
Openwork Border
Ch 5, skip 2 stitches, sc in the next stitch.
Repeat around, keeping the spacing consistent.
At each corner, add extra chain spaces as needed to prevent pulling.
Decorative Lace Round
Into each chain space, work:
1 sc, ch 3, 1 sc.
Repeat around.
Continue adding openwork rows until the border reaches approximately 15–20 cm wide.
Attach the Roses
Lay the bedspread flat.
Position the burgundy roses evenly along the lower border and sides.
Place olive-green leaves behind each flower.
Sew the flowers securely to the lace border using matching yarn.
Arrange the flowers at consistent intervals for a balanced appearance.
Part 8 – Crochet the Scalloped Lace Edging
Use ivory yarn.
Attach yarn to the outer edge of the border.
*Skip 2 stitches, work 7 dc in the next stitch, skip 2 stitches, sl st in the next stitch.*
Repeat around the entire bedspread.
Adjust the spacing at corners to maintain smooth, rounded scallops.
FO and weave in the ends.
Block the scalloped edging carefully to create a beautiful vintage lace finish.
Part 9 – Crochet the Matching Floral Pillow Covers
The matching pillows complete the elegant bedroom set.
Make two pillow covers using ivory yarn and burgundy floral motifs.
Square Pillow Front
Begin with ivory yarn.
Round 1: Ch 4 and join to form a ring.
Ch 3, work 2 dc into the ring, ch 2.
*3 dc, ch 2.*
Repeat until you have four groups of 3 dc.
Join with a sl st.
Round 2
Sl st into the nearest corner space.
Ch 3, 2 dc, ch 2, 3 dc in the same corner.
Ch 1.
Work (3 dc, ch 2, 3 dc) in each remaining corner space, with ch 1 between corners.
Join with a sl st.
Round 3 and Beyond
Continue working granny-square rounds, adding one additional side cluster between corners in each round.
Work until the square measures approximately 45 × 45 cm.
For a more delicate lace appearance, alternate granny-square rounds with decorative chain-space rounds.
Attach the Floral Motif
Make one large burgundy rose using the instructions from Part 5.
Make 4–6 olive-green leaves.
Arrange the rose at the center of the pillow front.
Position the leaves around the flower.
Sew everything securely into place.
Pillow Back
Make a second ivory square using the same dimensions.
Place the front and back pieces together.
Join three sides using single crochet.
Insert the pillow form.
Close the remaining side using single crochet or add a removable closure.
Repeat for the second pillow.
Part 10 – Blocking and Finishing
Blocking is especially important for a large lace crochet bedspread.
- Lay the finished bedspread on a clean, flat surface.
- Lightly dampen the crochet fabric.
- Gently stretch the sunburst sections into an even circular shape.
- Align the rectangular edges and corners.
- Pin the scalloped lace border into position.
- Shape each burgundy rose and olive-green leaf.
- Allow the entire bedspread to dry completely.
Once dry, remove the pins and check the finished dimensions.
Place the bedspread on your bed and arrange the matching pillows near the headboard.
Tips for a Professional Handmade Finish
- Choose a consistent yarn weight throughout the project.
- Make a gauge swatch before beginning the large centerpiece.
- Use stitch markers to keep the sunburst sections evenly spaced.
- Measure the circular centerpiece frequently.
- Avoid overly tight stitches in the lace sections.
- Make all the roses before attaching them to the border.
- Arrange the flowers symmetrically for a polished appearance.
- Block the finished bedspread to open the lace details.
- Reinforce flower attachment points for durability.
- Use a neutral bedsheet underneath to highlight the openwork pattern.
Beautiful Color Variations
Classic Romantic: Ivory, burgundy, and olive green.
Vintage Rose Garden: Cream, dusty pink, and sage green.
Elegant Neutral: Ivory, champagne, and soft beige.
Spring Cottage: White, lavender, and pale green.
Luxury Floral: Warm cream, deep plum, and forest green.
Frequently Asked Questions
Is this crochet bedspread suitable for beginners?
This project is recommended for advanced crocheters because it involves large-scale lace construction, circular shaping, decorative borders, and floral appliqués.
How much yarn will I need?
The amount depends on your chosen yarn, hook size, gauge, and finished dimensions. A queen-size bedspread may require several thousand meters of yarn.
Can I make this bedspread for a king-size bed?
Yes. Increase the dimensions of the outer sections and floral border to suit your mattress and preferred drape.
Can I use acrylic yarn?
Yes, although cotton yarn generally provides better stitch definition for intricate lace patterns.
How do I keep the sunburst center flat?
Maintain an appropriate increase rate, check your gauge, and block the circular section before adding the outer panels.
Can I make the roses in different colors?
Absolutely. Pink, lavender, cream, peach, and dusty rose are beautiful alternatives.
Can I make matching cushion covers?
Yes. Use the same ivory lace background and burgundy floral motifs to create coordinating pillows.
How should I wash the finished bedspread?
Follow the yarn manufacturer’s care instructions. For delicate cotton lace and attached floral motifs, gentle washing and flat drying are recommended.
Can I use this design as a wedding gift?
Yes. A handmade crochet bedspread makes a thoughtful heirloom-style wedding or anniversary gift.
Can I make a smaller version?
Yes. Adapt the dimensions to create a decorative throw, sofa blanket, or smaller bed cover.
Final Thoughts
This ivory sunburst crochet bedspread with burgundy roses is more than a beautiful bedroom accessory. It is a celebration of traditional crochet craftsmanship and timeless handmade elegance.
The delicate lace centerpiece, romantic floral border, and matching pillows create a coordinated bedroom set filled with warmth and charm.
Whether you make it for your own home or as a special handmade gift, this elegant crochet project is sure to become a treasured piece.
Happy crocheting! May every stitch bring a little more beauty, comfort, and handmade love into your home. 🧶🌹

