Crochet Christmas Angel Wreath Ornaments: Free Crochet Pattern
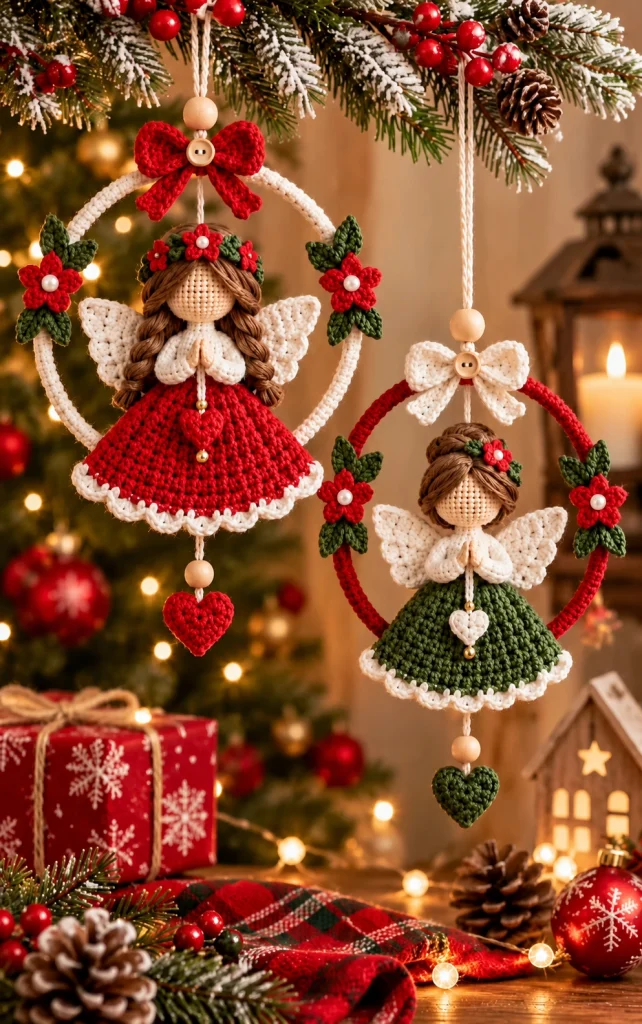
Bring a touch of handmade Christmas magic to your holiday decorations with these beautiful crochet Christmas angel wreath ornaments. Featuring delicate ivory wings, festive red and forest-green dresses, charming braided hairstyles, miniature flowers, and decorative hanging hearts, these ornaments combine traditional Christmas colors with timeless crochet craftsmanship.
Each ornament features a sweet faceless crochet angel suspended inside a circular wreath. One angel wears a rich Christmas-red dress with ivory scalloped edging, while the other wears a deep forest-green dress with matching white trim.
The angels have softly textured cream-colored heads, long brown yarn hairstyles, delicate ivory wings, and small praying hands positioned in front of their dresses.
The circular wreaths are wrapped in crochet stitches and decorated with red flowers, dark-green leaves, pearl accents, wooden beads, and elegant crochet bows.
A miniature crochet heart hangs beneath each wreath, creating a beautiful finishing detail that makes these ornaments especially lovely for Christmas trees, holiday garlands, window displays, and handmade gifts.
In this complete tutorial, you will learn how to crochet the angel heads, shape the dresses, create the wings and praying hands, make braided hairstyles, cover the wreath rings, crochet decorative flowers and bows, assemble the ornaments, and add hanging hearts.
Pattern at a Glance
Finished measurements depend on yarn thickness, hook size, tension, and the diameter of the wreath rings.
Materials and Supplies
- DK-weight cotton yarn in rich Christmas red.
- DK-weight cotton yarn in dark forest green.
- DK-weight cotton yarn in warm ivory.
- DK-weight cotton yarn in light beige for the angel heads.
- DK-weight yarn in medium brown for the hairstyles.
- Small amounts of dark-green yarn for leaves.
- Small amounts of red yarn for miniature flowers.
- 3 mm crochet hook.
- 2.5 mm crochet hook for decorative details.
- Two lightweight circular wreath rings, approximately 15–18 cm in diameter.
- Polyester fiberfill.
- Wooden beads, approximately 10–15 mm.
- Small decorative buttons.
- White pearl beads for flower centers.
- Small gold-colored beads for hanging decorations.
- Yarn needle.
- Fine sewing needle and strong matching thread.
- Stitch markers.
- Sharp scissors.
- Optional craft wire for positioning the wings.
Yarn recommendation: Mercerized cotton yarn is ideal because it provides clear stitch definition, maintains the shape of the angel dresses and wings, and creates a neat decorative finish.
Gauge and Finished Measurements
Using DK-weight cotton yarn and a 3 mm crochet hook, aim for approximately 20 single crochet stitches per 10 cm.
Each wreath should measure approximately 15–18 cm across.
The angel should fit comfortably inside the ring without touching the sides excessively.
The complete hanging ornament, including the upper loop and lower heart decoration, may measure approximately 23–28 cm tall.
Abbreviations
All instructions use US crochet terminology.
Part 1: Crochet the Angel Head
Each angel begins with a small round amigurumi head in soft beige or ivory yarn.
Head instructions
Using light beige yarn and a 3 mm hook, make a magic ring.
Round 1: Work 6 sc into the ring. 6 sc.
Round 2: Inc in every stitch. 12 sc.
Round 3: (Sc 1, inc) repeat around. 18 sc.
Round 4: (Sc 2, inc) repeat around. 24 sc.
Round 5: (Sc 3, inc) repeat around. 30 sc.
Rounds 6–10: Sc in every stitch. 30 sc.
Round 11: (Sc 3, dec) repeat around. 24 sc.
Round 12: (Sc 2, dec) repeat around. 18 sc.
Round 13: (Sc 1, dec) repeat around. 12 sc.
Stuff the head firmly but evenly.
Round 14: Dec around. 6 sc.
FO and close the opening.
Make two heads, one for each angel.
Part 2: Crochet the Angel Neck and Upper Body
The upper body forms a small foundation for the dress and praying hands.
Upper body instructions
Using ivory yarn, make a magic ring.
Round 1: Work 6 sc into the ring.
Round 2: Inc around. 12 sc.
Rounds 3–5: Sc around. 12 sc.
FO, leaving a long sewing tail.
Lightly stuff the body and sew the head securely to the top.
Part 3: Crochet the Red Angel Dress
The red dress features a gently flared skirt with beautiful ivory scalloped edging.
Red dress instructions
Using Christmas-red yarn, make a magic ring.
Round 1: Work 12 dc into the ring. Join. 12 dc.
Round 2: Ch 3, dc in the same stitch, 2 dc in each remaining stitch. Join. 24 dc.
Round 3: Ch 3, dc in the next stitch, 2 dc in the following stitch. Repeat around. 36 dc.
Round 4: Ch 3, dc in the next two stitches, 2 dc in the following stitch. Repeat around. 48 dc.
Round 5: Ch 3, dc in every stitch around. 48 dc.
Round 6: Ch 3, dc in the next three stitches, 2 dc in the following stitch. Repeat around. 60 dc.
Round 7: Ch 3, dc in every stitch around. 60 dc.
FO and weave in the ends.
The skirt should flare gently outward to create a traditional angel silhouette.
Part 4: Crochet the Forest-Green Angel Dress
The second angel wears a forest-green dress with the same flared silhouette.
Green dress instructions
Using dark forest-green yarn, repeat the red dress pattern.
Work all seven rounds using green yarn.
FO and weave in the ends.
Both dresses should have matching dimensions.
Part 5: Add the Ivory Scalloped Dress Edging
The white scalloped edging creates a beautiful contrast against the red and green skirts.
Scalloped edging instructions
Join ivory yarn at the lower edge of the dress.
Repeat the following sequence around:
Skip one stitch, work 5 dc into the next stitch, skip one stitch, and sl st into the following stitch.
Continue around the skirt.
Join with a sl st and FO.
The finished hem should have soft decorative scallops.
Part 6: Crochet the Angel Wings
Each angel has two delicate ivory wings with softly pointed upper edges.
Wing instructions
Using ivory yarn and a 3 mm hook, ch 13.
Row 1: Sc in the second chain from the hook and across. 12 sc.
Row 2: Ch 1, turn, sc across.
Row 3: Ch 1, turn, inc, sc across until one stitch remains, inc.
Row 4: Ch 1, turn, sc across.
Row 5: Ch 1, turn, dec, sc across until two stitches remain, dec.
Row 6: Ch 1, turn, sc across.
FO, leaving a long sewing tail.
Make four wings in total.
Part 7: Shape the Angel Wings
Careful shaping creates the delicate wing silhouette.
Wing finishing
- Lay each wing flat.
- Gently shape the upper edge into a soft point.
- Block lightly if necessary.
- Allow the wings to dry completely.
- Position two wings behind each angel body.
- Sew the inner edges securely to the upper back.
Angle the wings outward to create a balanced appearance.
Part 8: Crochet the Praying Hands
The angels feature small ivory hands held together in front of their dresses.
Hand instructions
Using ivory yarn and a 2.5 mm hook, ch 7.
Row 1: Sc in the second chain from the hook and across. 6 sc.
Rows 2–4: Ch 1, turn, sc across.
FO, leaving a sewing tail.
Make four hands in total.
Fold each piece slightly lengthwise to create a rounded hand shape.
Part 9: Attach the Praying Hands
Hand placement
- Position two hands in front of the angel’s upper body.
- Angle them inward so the fingertips meet.
- Sew the lower edges to the body.
- Secure the fingertips together with a few small stitches.
- Repeat for the second angel.
The hands should rest gently above the upper section of the dress.
Part 10: Create the Brown Yarn Hair
Warm brown yarn creates the angels’ charming hairstyles.
Hair preparation
- Cut multiple strands of brown yarn approximately 20–25 cm long.
- Fold the strands in half.
- Attach them to the upper section of the head using a yarn needle or crochet hook.
- Distribute the strands evenly around the crown.
- Leave the face area uncovered.
- Arrange the strands into two sections.
Part 11: Create the Braided Hairstyles
The red angel features long brown braids, while the green angel has a shorter softly styled hairstyle.
Long braided hairstyle
- Divide the hair into two equal sections.
- Separate each section into three strands.
- Braid each side evenly.
- Secure the ends with matching yarn.
- Trim the ends neatly.
- Position the braids over the shoulders.
Short hairstyle
- Arrange the yarn strands around the head.
- Create a side part.
- Twist selected strands into soft sections.
- Secure the hair near the back of the head.
- Trim any uneven ends.
Part 12: Crochet the Circular Wreath Cover
Each angel is framed by a circular crochet wreath.
Wreath covering instructions
Using ivory yarn for the red angel and red yarn for the green angel, make a slip knot.
Insert the hook through the center of the wreath ring.
Work single crochet stitches around the ring, enclosing the ring inside the stitches.
Continue until the entire ring is covered.
Push the stitches together gently to eliminate gaps.
Join with a sl st and FO.
Repeat for the second wreath using the alternate color.
Part 13: Crochet the Miniature Red Flowers
Small red flowers decorate the wreaths and the angels’ hair.
Miniature flower pattern
Using red yarn and a 2.5 mm hook, make a magic ring.
Work 5 sc into the ring.
For each stitch, work:
Sl st, ch 2, 2 dc, ch 2, sl st.
Repeat around to create five petals.
FO and weave in the ends.
Make approximately eight to twelve flowers for the complete ornament set.
Part 14: Crochet the Dark-Green Leaves
Small pointed leaves surround the red flowers.
Leaf instructions
Using forest-green yarn, ch 8.
Starting in the second chain from the hook, work:
Sl st, sc, hdc, dc, hdc, sc, sl st.
FO, leaving a sewing tail.
Make approximately 12–16 leaves.
Part 15: Assemble the Floral Decorations
Flower cluster assembly
- Place one red flower on a flat surface.
- Position two green leaves behind the flower.
- Sew the leaves to the flower base.
- Add a small white pearl bead to the flower center.
- Secure the bead firmly.
- Repeat for the remaining flowers.
Use the flower clusters to decorate the wreaths and the angels’ hairstyles.
Part 16: Crochet the Decorative Bows
Each wreath features a beautiful crochet bow at the top.
Bow rectangle
Using red yarn for the ivory wreath and ivory yarn for the red wreath, ch 19.
Row 1: Sc in the second chain from the hook and across. 18 sc.
Rows 2–7: Ch 1, turn, sc across. 18 sc.
FO, leaving a long tail.
Shape the bow
- Pinch the rectangle at the center.
- Wrap matching yarn around the middle several times.
- Secure the wrap on the back.
- Adjust the two loops.
Part 17: Crochet the Bow Tails
Bow tail instructions
Using matching yarn, ch 13.
Sc in the second chain from the hook and across.
Work three additional rows of sc.
FO.
Make two tails for each bow.
Sew the tails behind the center of the bow.
Attach the completed bows to the top of each wreath.
Part 18: Crochet the Hanging Hearts
A miniature crochet heart hangs beneath each angel wreath.
Heart instructions
Using red or forest-green yarn, make a magic ring.
Into the ring, work:
Ch 3, 3 tr, 3 dc, ch 1, 1 tr, ch 1, 3 dc, 3 tr, ch 3.
Sl st into the ring.
Pull the ring closed carefully.
FO, leaving a long hanging tail.
Make one red heart and one forest-green heart.
Part 19: Add the Wooden Beads and Hanging Cords
Natural wooden beads create a warm handmade finish.
Upper hanging cord
- Cut a length of ivory yarn approximately 25–30 cm long.
- Fold it in half to form a hanging loop.
- Thread a wooden bead onto the doubled cord.
- Attach the cord securely to the top of the wreath.
- Position the bead above the crochet bow.
- Secure the cord with a strong knot.
Lower heart decoration
- Attach a length of matching yarn to the bottom of the wreath.
- Thread a wooden bead onto the cord.
- Attach the crochet heart below the bead.
- Secure all knots carefully.
Part 20: Assemble the Red Angel Ornament
The first ornament features a red angel framed by an ivory wreath.
Red angel assembly
- Attach the beige head to the ivory upper body.
- Secure the red dress beneath the upper body.
- Attach the ivory scalloped skirt edging.
- Sew the ivory wings to the back.
- Position the praying hands in front.
- Attach the long brown braids.
- Add a floral headband.
- Place the angel inside the ivory wreath.
- Secure the angel to the upper interior of the wreath using strong thread.
- Attach the red crochet bow at the top.
- Add floral clusters to the sides of the wreath.
- Attach the red hanging heart below.
Part 21: Assemble the Green Angel Ornament
The second ornament features a forest-green angel framed by a red wreath.
Green angel assembly
- Attach the beige head to the ivory upper body.
- Secure the forest-green dress.
- Add the ivory scalloped hem.
- Attach the ivory wings.
- Position the praying hands.
- Create the shorter brown hairstyle.
- Add a miniature red flower to the hair.
- Place the angel inside the red wreath.
- Secure the angel carefully.
- Attach the ivory crochet bow at the top.
- Decorate the wreath with red flowers and green leaves.
- Add the forest-green hanging heart below.
Part 22: Final Finishing
Inspect both ornaments carefully before displaying them.
- Check that the angel heads are securely attached.
- Reinforce the dress seams.
- Adjust the ivory wings.
- Check the praying hands.
- Secure the brown hairstyles.
- Inspect the floral decorations.
- Reinforce the crochet bows.
- Check the wooden beads and buttons.
- Secure the hanging hearts.
- Weave in all loose yarn ends.
- Adjust the ornaments so they hang evenly.
Customization Ideas
1. Create a white Christmas angel
Use ivory yarn for the dress, wings, and wreath, with gold-colored accents.
2. Make a pastel angel set
Use blush pink, sage green, and cream yarn for a softer holiday palette.
3. Create a rustic farmhouse version
Use natural cotton yarn, wooden beads, and muted burgundy flowers.
4. Make miniature angel ornaments
Use thinner yarn and smaller wreath rings to create compact Christmas tree decorations.
5. Add personalized details
Use different hair colors, dress colors, or decorative flowers to create unique angels.
6. Create a matching Christmas collection
Make coordinating crochet stars, hearts, snowflakes, and miniature wreaths using the same colors.
Care Instructions
- Dust gently with a soft brush.
- Spot-clean when necessary.
- Avoid soaking the wooden beads and buttons.
- Do not machine wash the assembled ornaments.
- Allow the crochet pieces to dry completely before storing.
- Keep away from open flames and direct heat.
- Store in a protective box.
- Use tissue paper to protect the wings, flowers, and bows.
Frequently Asked Questions
Are these crochet Christmas angel ornaments beginner-friendly?
They are best suited to intermediate and advanced crocheters because they include amigurumi heads, shaped dresses, wings, hairstyles, floral decorations, and detailed assembly.
What yarn works best for crochet angel ornaments?
DK-weight cotton yarn is recommended because it provides clear stitch definition and helps the small decorative pieces maintain their shape.
Can I make the angels without wreath rings?
Yes. You can attach a hanging loop directly to the top of each angel and display them as standalone Christmas tree ornaments.
Can I change the dress colors?
Absolutely. The angels look beautiful in ivory, gold, blush pink, burgundy, sage green, and traditional Christmas red.
Can I make these ornaments as gifts?
Yes. These decorative angels make thoughtful handmade Christmas gifts for friends, family members, teachers, and crochet enthusiasts.
Can I use these angels as toys?
No. The ornaments contain small decorative beads, buttons, and other embellishments and are designed for decorative use only.
Final Thoughts
These crochet Christmas angel wreath ornaments combine delicate handmade textures, traditional festive colors, and charming decorative details into beautiful holiday keepsakes.
The red and forest-green dresses, soft ivory wings, braided brown hairstyles, miniature flowers, crochet bows, wooden beads, and hanging hearts create a wonderful balance of rustic Christmas charm and elegant handmade craftsmanship.
Whether you display them on your Christmas tree, hang them from a festive garland, or give them as special handmade gifts, these angel ornaments are a beautiful way to celebrate the warmth and joy of the holiday season.
Enjoyed this pattern? Save it to your Christmas crochet inspiration board and share your finished angel ornaments with fellow crochet lovers.

