Crochet Christmas Bauble Ornament Pattern – Bobble Stitch
Beginner Friendly
Perfect for those just starting their crochet journey, with clear instructions and simple techniques
Single-Day Project
A satisfying project you can complete in a single afternoon or evening.
Handmade Gift
A beautiful keepsake — free forever. Read online or print at home.
About This Crochet Christmas Bauble Ornament Pattern – Bobble Stitch
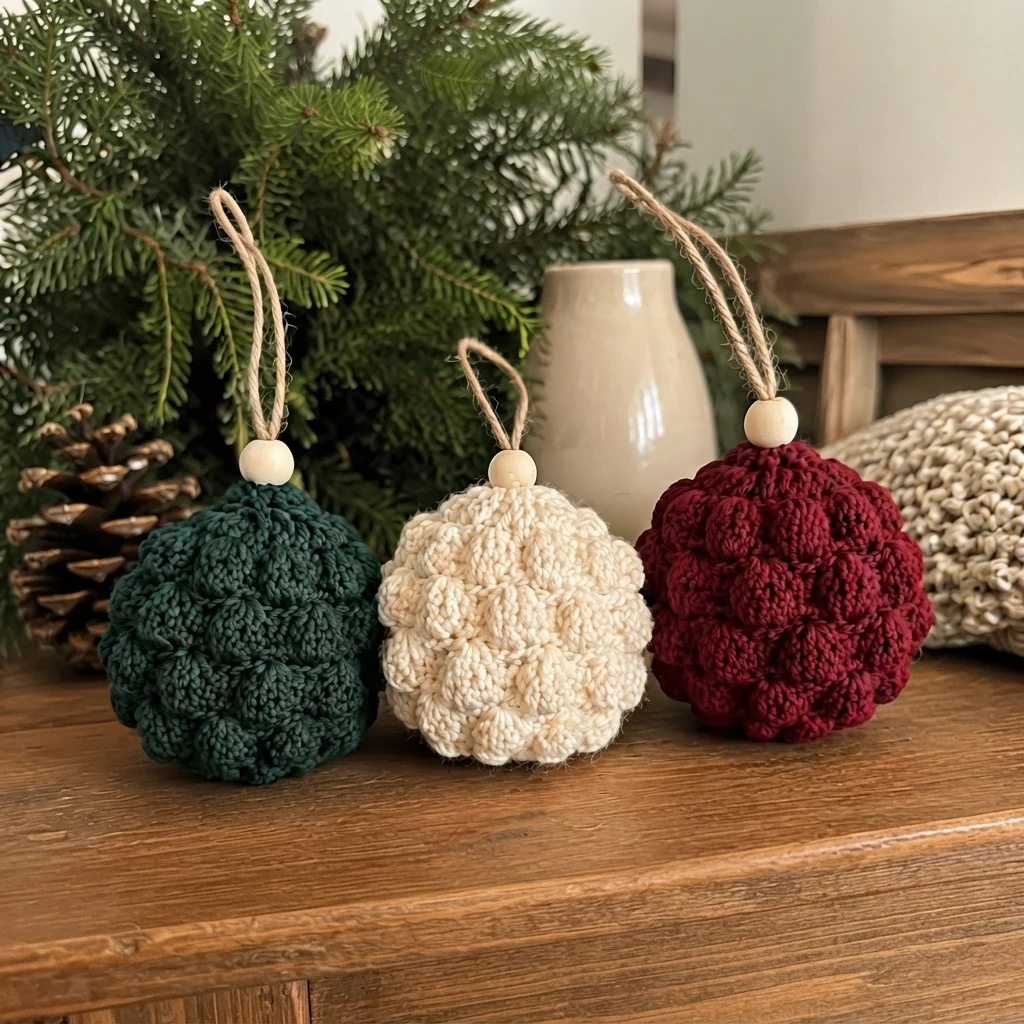
This crochet Christmas bauble ornament pattern creates soft, chunky ornaments covered with rows of raised bobble stitches. Made in traditional forest green, warm cream and deep burgundy, they have a cozy handmade look that works beautifully with natural wood, pine branches and rustic Christmas decorations.
Each ornament is crocheted in the round, lightly stuffed, then finished with a natural wooden bead and simple jute hanging loop. They are quick enough to make in sets and are lovely for Christmas trees, garlands, gift wrapping or handmade holiday gifts.
Materials
- Worsted #4 yarn – forest green 25-35 g
- Worsted #4 yarn – warm cream 25-35 g
- Worsted #4 yarn – deep burgundy 25-35 g
- 3.5 mm crochet hook 1
- Polyester fiberfill small amount
- Natural wooden beads 1 per ornament
- Natural jute or strong cotton cord 25-30 cm per ornament
- Yarn needle 1
- Stitch marker 1
- Scissors 1 pair
Abbreviations
MRmagic ringchchainscsingle crochetsl stslip stitchinc2 sc in same stitchdecsingle crochet decreaseBObobble stitchststitchstsstitchesreprepeatFOfasten offFinished Size
- Small ornament: approximately 8 cm
- Standard ornament: approximately 9-10 cm
- Large ornament: approximately 11-12 cm
- Hanging loop: approximately 9-11 cm
Bobble Stitch (BO)
The raised texture is created with a 5-dc bobble.
- Yarn over and insert hook into the indicated stitch.
- Yarn over and pull up a loop.
- Yarn over and pull through 2 loops.
- Repeat these steps 4 more times in the same stitch.
- You should now have 6 loops on the hook.
- Yarn over and pull through all 6 loops.
- Gently push the bobble toward the outside of the ornament.
Bauble – Base
Work in continuous rounds unless otherwise stated. Use a stitch marker to mark the beginning of each round.
Round 1
MR, 6 sc. (6)
Round 2
Inc in each st around. (12)
Round 3
*Sc in next st, inc in next st.* Repeat around. (18)
Round 4
*Sc in next 2 sts, inc.* Repeat around. (24)
Round 5
*Sc in next 3 sts, inc.* Repeat around. (30)
Round 6
*Sc in next 4 sts, inc.* Repeat around. (36)
First Bobble Round
Round 7
*BO in next st, sc in next st.* Repeat around. (18 bobbles + 18 sc)
Round 8
Sc in every st around. (36)
Second Bobble Round
Round 9
Sc in first st, *BO in next st, sc in next st.* Repeat around, staggering the bobbles so they sit between the bobbles from Round 7.
Round 10
Sc in every st around. (36)
Third Bobble Round
Round 11
*BO in next st, sc in next st.* Repeat around.
Round 12
Sc in every st around. (36)
Fourth Bobble Round
Round 13
Sc in first st, *BO in next st, sc in next st.* Repeat around.
Round 14
Sc in every st around. (36)
Fifth Bobble Round
Round 15
*BO in next st, sc in next st.* Repeat around.
Round 16
Sc in every st around. (36)
Begin Shaping the Top
Round 17
*Sc in next 4 sts, dec.* Repeat around. (30)
Round 18 – Bobbles
*BO in next st, sc in next st.* Repeat as evenly as possible around.
Round 19
*Sc in next 3 sts, dec.* Repeat around. (24)
Round 20 – Bobbles
Work alternating BO and sc around, adjusting the final stitches if necessary.
Stuffing the Ornament
- Begin adding small pieces of fiberfill.
- Push the stuffing gently toward the bottom and sides.
- Continue adding small amounts until the ornament becomes round.
- Do not overstuff.
- Use your fingers to redistribute the stuffing behind the bobbles.
The ornament should feel firm enough to hold its shape but still remain soft.
Closing the Top
Round 21
*Sc in next 2 sts, dec.* Repeat around. (18)
Round 22
*Sc, dec.* Repeat around. (12)
Add the final amount of stuffing.
Round 23
Dec around. (6)
- FO leaving a long tail.
- Thread the tail onto a yarn needle.
- Pass through the front loops of the remaining 6 sts.
- Pull tightly to close.
- Secure and hide the yarn end inside the ornament.
Wooden Bead Top
The natural wooden bead gives the ornament a simple rustic finish.
- Cut approximately 25-30 cm of jute cord.
- Fold the cord in half.
- Thread both loose ends through the wooden bead.
- Pull the bead down toward the folded loop.
- Pass both loose ends through the top center of the crochet ornament.
- Tie the ends securely inside or directly beneath the bead.
- Hide the knot inside the top of the ornament.
Hanging Loop
The folded jute cord should form a loop approximately 9-11 cm long above the bead. Adjust the length before securing the cord.
For a softer finish, replace the jute with cotton cord, velvet ribbon or a crochet chain.
Forest Green Ornament
For the dark green version, use deep forest or bottle-green yarn throughout. Pair it with a pale unfinished wooden bead and natural jute cord for a warm woodland Christmas look.
Warm Cream Ornament
The cream ornament has a softer, neutral appearance and works especially well in farmhouse, Scandinavian and natural Christmas decor.
Choose ivory, oatmeal or warm vanilla rather than a very bright white if you want the cozy appearance shown in the finished set.
Burgundy Ornament
For the red version, choose a deep wine or burgundy shade rather than a bright scarlet. The darker tone makes the bobble texture stand out beautifully and pairs well with green pine branches.
Making a Smaller Ornament
For an approximately 7-8 cm bauble:
- Increase only to 30 sts.
- Work 4-5 textured bobble rounds.
- Begin decreasing earlier.
- Use slightly less stuffing.
Making a Larger Ornament
For an approximately 11-12 cm bauble:
- Continue increasing to 42 sts.
- Add 2-3 additional bobble rounds.
- Stuff gradually as you decrease.
- Use a slightly larger wooden bead to keep the proportions balanced.
Alternative Color Sets
- Traditional Christmas: forest green + burgundy + cream
- Scandinavian: oatmeal + white + muted red
- Woodland: moss green + caramel + cream
- Elegant: ivory + champagne + deep wine
- Snowy: white + pale gray + icy blue
- Vintage: sage + dusty rose + antique cream
How Many to Make?
- Small decorative bowl: 3-5 ornaments
- Mini tree: 6-10 ornaments
- Standard Christmas tree: 12-24 ornaments
- Garland: 8-15 ornaments
- Gift set: 3 ornaments in coordinating colors
Finishing
- Check that every bobble is facing outward.
- Roll the ornament gently between your palms to improve the round shape.
- Redistribute stuffing if necessary.
- Secure the hanging cord firmly.
- Center the wooden bead over the top opening.
- Trim any visible fibers or yarn tails.
Ways to Use the Ornaments
- Hang them on the Christmas tree.
- Add them to a pine garland.
- Use them as gift toppers.
- Hang several from a mantel.
- Place three in a decorative wooden bowl.
- Add them to a handmade Christmas wreath.
- Use them as small holiday hostess gifts.
Frequently Asked Questions
Stuffing gives the ornaments their rounded shape. If you prefer a firmer bauble, you can crochet around a lightweight ornament form instead.
This is normal. Bobbles often naturally pop toward the wrong side while crocheting. Push each one outward with your finger as you work.
Yes. Chunky yarn will create a larger ornament with more dramatic texture. Increase the hook size according to your yarn while keeping the stitches tight enough to hide the stuffing.
Yes. Try a small crochet cap, large decorative bead, wooden ring or tied velvet bow.
A confident beginner who knows single crochet, increases and decreases can make the ornament after practicing the bobble stitch. The construction itself is simple and repetitive.
Finished handmade ornaments can be produced in your own colors and style for personal gifting or handmade product collections.
The finished Crochet Christmas Bauble Ornament Pattern – Bobble Stitch

