Crochet Christmas Bauble Ornament
Beginner Friendly
Perfect for those just starting their crochet journey, with clear instructions and simple techniques
Single-Day Project
A satisfying project you can complete in a single afternoon or evening.
Handmade Gift
A beautiful keepsake — free forever. Read online or print at home.
About This Crochet Christmas Bauble Ornament
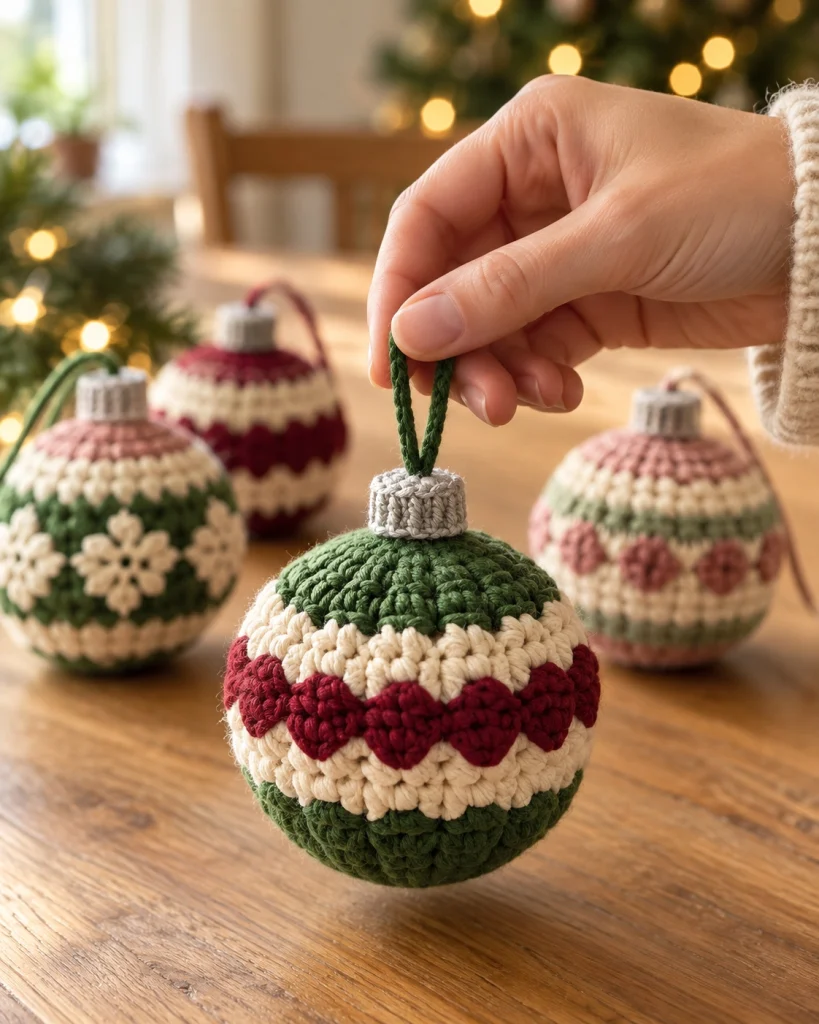
This crochet Christmas bauble ornament combines traditional holiday colors with beautiful handmade texture. The round ornament features deep forest green, warm cream and rich Christmas red, finished with a raised scalloped band through the center.
It looks lovely hanging from a Christmas tree, but you can also use several together for a garland, holiday centerpiece, gift decoration or handmade ornament set.
Materials
- DK / Light Worsted #3 yarn – forest green 20-25 g
- DK / Light Worsted #3 yarn – warm cream 20-25 g
- DK / Light Worsted #3 yarn – deep Christmas red 15-20 g
- Light gray or silver yarn for ornament cap 5 g
- 3.5 mm crochet hook 1
- Polyester fiberfill small amount
- Yarn needle 1
- Stitch marker 1
- Scissors 1 pair
Abbreviations
MRmagic ringchchainsl stslip stitchscsingle crochethdchalf double crochetdcdouble crochetincincreasedecdecreaseBLOback loop onlyststitchstsstitchesFOfasten offFinished Size
- Bauble: approximately 9-10 cm / 3.5-4 in diameter
- Cap: approximately 2 cm tall
- Hanging loop: approximately 8-10 cm long
Part 1 – Bottom of the Bauble
Begin with forest green yarn.
Round 1
Make a MR.
Work 6 sc into MR.
6 sts.
Round 2
2 sc in each st around.
12 sts.
Round 3
*Sc in next st, inc in next st.*
Repeat around.
18 sts.
Round 4
*Sc in next 2 sts, inc in next st.*
Repeat around.
24 sts.
Round 5
*Sc in next 3 sts, inc in next st.*
Repeat around.
30 sts.
Round 6
*Sc in next 4 sts, inc in next st.*
Repeat around.
36 sts.
Round 7
*Sc in next 5 sts, inc in next st.*
Repeat around.
42 sts.
Part 2 – Shape the Lower Half
Rounds 8-10
Sc in each st around using forest green.
42 sts.
Change to warm cream.
Rounds 11-13
Sc in each st around.
42 sts.
Part 3 – Decorative Red Scalloped Band
Change to deep Christmas red.
Round 14
Sc in each st around.
42 sts.
Round 15 – Scallops
*Skip 1 st, work 5 dc into next st, skip 1 st, sl st into next st.*
Repeat around.
This creates the raised red petal-like band around the middle of the ornament.
Part 4 – Upper Cream Section
Join warm cream yarn behind the decorative scalloped round.
Rounds 16-18
Sc evenly around.
Maintain approximately 42 sts.
The scallops should sit raised over the surface while the cream section continues behind them.
Part 5 – Upper Green Section
Change to forest green.
Rounds 19-21
Sc in each st around.
42 sts.
Part 6 – Begin Decreasing
Round 22
*Sc in next 5 sts, dec.*
Repeat around.
36 sts.
Round 23
*Sc in next 4 sts, dec.*
Repeat around.
30 sts.
Round 24
*Sc in next 3 sts, dec.*
Repeat around.
24 sts.
Part 7 – Finish the Sphere
Round 25
*Sc in next 2 sts, dec.*
Repeat around.
18 sts.
Round 26
*Sc in next st, dec.*
Repeat around.
12 sts.
Add the final amount of stuffing.
Round 27
Dec around.
6 sts.
FO, leaving a long tail.
Thread the tail through the remaining stitches and pull firmly closed.
Weave in securely.
Part 8 – Crochet Ornament Cap
Using light gray or silver yarn:
Round 1
Make a MR.
Work 8 sc into MR.
8 sts.
Round 2
2 sc in each st around.
16 sts.
Round 3
Work in BLO.
Sc in each st around.
16 sts.
Rounds 4-5
Sc in each st around.
FO leaving a long sewing tail.
Attach the Cap
Place the silver crochet cap directly over the closed top of the bauble.
Using the long tail, sew around the lower edge of the cap.
Keep it centered and slightly raised to imitate the metal cap of a traditional Christmas ornament.
Part 9 – Hanging Loop
Using forest green yarn, ch 30.
Sl st into each chain back toward the beginning to create a stronger cord.
FO leaving two tails.
Fold the cord in half.
Insert both ends through the center of the silver cap and sew securely into the top of the bauble.
The finished loop should be approximately 8-10 cm / 3-4 in long.
Optional Variation – Cream & Green Snowflake Bauble
For the floral/snowflake version shown with the coordinating ornaments:
- Work the lower half in forest green.
- Add a warm cream central band.
- Crochet several tiny cream snowflakes or flowers.
- Sew them evenly around the center.
- Finish the upper section with dusty rose or cream.
This variation looks especially beautiful when displayed beside the striped bauble.
Optional Variation – Burgundy Striped Bauble
Use the same basic sphere pattern but alternate:
- 3 rounds burgundy
- 2 rounds cream
- 3 rounds burgundy
- 2 rounds cream
Continue the color sequence while shaping the sphere.
Add a burgundy hanging loop for a coordinated finish.
Optional Variation – Dusty Rose Bauble
For a softer vintage Christmas palette, combine:
- Dusty rose
- Warm cream
- Sage green
- Light gray
Add small raised bobbles or crochet flowers around the center for extra texture.
Make a Set of Four
For a coordinated handmade ornament collection, make:
- One forest green, cream and red scalloped bauble.
- One forest green bauble with cream snowflake motifs.
- One burgundy and cream striped bauble.
- One dusty rose, cream and sage patterned bauble.
Use the same silver crochet cap on every ornament to visually tie the collection together.
Color Ideas
- Traditional Christmas: forest green + cream + burgundy
- Vintage Christmas: dusty rose + sage + ivory
- Scandinavian: red + white + natural beige
- Elegant: cream + champagne + deep green
- Winter: white + silver + dusty blue
- Rustic: oatmeal + brown + dark green
Finishing Tips
- Check that the sphere is evenly stuffed.
- Massage the filling gently to create a smooth round shape.
- Adjust the red scallops so they sit evenly around the center.
- Secure all color-change ends inside the ornament.
- Center the silver cap.
- Check that the hanging loop is firmly attached.
- Trim any visible yarn tails.
Frequently Asked Questions
Yes. Use sport-weight or fingering-weight yarn with a smaller hook, or stop increasing after 30 or 36 stitches.
Yes. Continue the increase sequence for another round before working the straight center section, then add corresponding decrease rounds at the top.
Yes. Cotton is an excellent choice because it gives the stitches strong definition and helps the ornament maintain a clean round shape.
Yes. Tie one onto a wrapped Christmas present, gift bag or holiday basket. The recipient can later use it as a tree ornament.
For this rounded design, stuffing is recommended. If you want a flat ornament instead, crochet two flat circles, decorate them and join them around the edges.
The exact number depends on yarn weight and skein size, but these ornaments use relatively small amounts of each color, making them useful for leftover holiday yarn.
The finished Crochet Christmas Bauble Ornament