Crochet Christmas Bauble Pattern – Elegant Holiday Ornaments
Beginner Friendly
Perfect for those just starting their crochet journey, with clear instructions and simple techniques
Single-Day Project
A satisfying project you can complete in a single afternoon or evening.
Handmade Gift
A beautiful keepsake — free forever. Read online or print at home.
About This Crochet Christmas Bauble Pattern – Elegant Holiday Ornaments
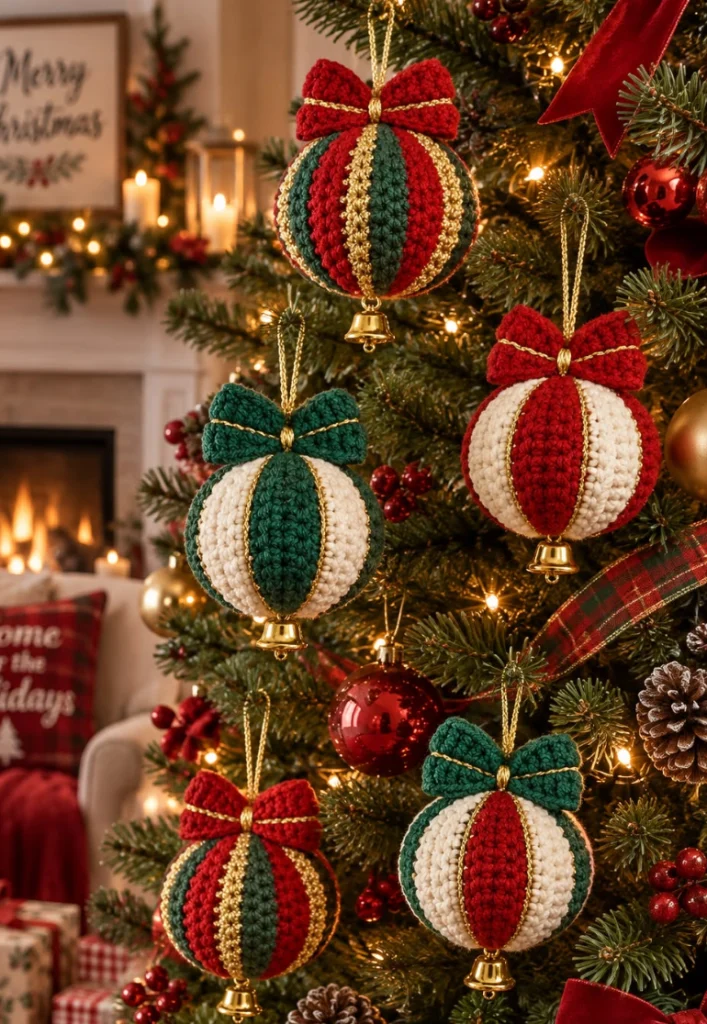
This crochet Christmas bauble pattern creates beautiful dimensional ornaments with raised vertical panels, festive red, green and cream colors, delicate gold accents and a large crochet bow on top.
The finished ornaments have a lovely rounded shape and look especially beautiful hanging among warm Christmas lights. Make several color combinations for a coordinated handmade Christmas tree collection.
Materials
- Red DK or light worsted yarn small amount
- Forest green DK or light worsted yarn small amount
- Ivory / cream yarn small amount
- Metallic gold crochet thread or thin yarn small amount
- Polyester fiberfill for stuffing
- 3.0–3.5 mm crochet hook 1
- Yarn needle 1
- Scissors 1 pair
- Small gold bell optional
- Gold hanging cord 20–25 cm
- Stitch markers optional
Abbreviations – US Terms
MRmagic ringchchainsl stslip stitchscsingle crochethdchalf double crochetdcdouble crochetincincreasedecdecreaseBLOback loop onlyFOfasten offFinished Size
Each finished bauble measures approximately 9–11 cm / 3.5–4.3 in across, not including the bow, hanging cord or bell.
The size can easily be adjusted by changing yarn weight and hook size.
Part 1 – Crochet the Bauble Base
Choose the main color for your ornament.
Round 1: MR, 6 sc. (6)
Round 2: inc around. (12)
Round 3: *sc, inc* around. (18)
Round 4: *2 sc, inc* around. (24)
Round 5: *3 sc, inc* around. (30)
Round 6: *4 sc, inc* around. (36)
Round 7: *5 sc, inc* around. (42)
Part 2 – Form the Round Shape
Rounds 8–14: sc around. (42)
These straight rounds create the widest section of the ornament.
Keep checking that the piece remains evenly rounded rather than becoming stretched or cylindrical.
Part 3 – Begin Decreasing
Round 15: *5 sc, dec* around. (36)
Round 16: *4 sc, dec* around. (30)
Round 17: *3 sc, dec* around. (24)
Begin stuffing firmly.
Part 4 – Finish the Bauble
Round 18: *2 sc, dec* around. (18)
Add more stuffing, especially around the sides.
Round 19: *sc, dec* around. (12)
Round 20: dec around. (6)
FO and close the opening securely.
Part 5 – Raised Decorative Panel
The reference ornaments feature raised vertical sections running from the top toward the bottom.
Using a contrasting color, ch 22.
Starting in the 2nd ch from hook:
sc in each chain across. (21)
Ch 1, turn.
Work 21 sc BLO.
Repeat for 3–4 rows.
FO leaving a long sewing tail.
Part 6 – Shape the Panel
The strip should be long enough to curve from near the top of the ornament, across the widest section and toward the bottom.
Gently stretch it lengthwise.
The BLO rows create subtle ridges that make the decorative sections stand out from the bauble base.
Part 7 – Attach the First Panel
Position the strip vertically over the stuffed bauble.
Pin the top and bottom first.
Sew both long edges to the bauble using small invisible stitches.
Do not pull the stitches too tightly—the panel should remain slightly raised.
Part 8 – Add Additional Panels
Make enough panels to divide the ornament into approximately 6 vertical sections.
Alternate colors around the ornament.
Example combinations:
Bauble 1: red + forest green + gold.
Bauble 2: cream + green.
Bauble 3: cream + red.
Part 9 – Gold Dividing Lines
Thread metallic gold yarn onto a yarn needle.
Work a neat line between each colored panel from top to bottom.
You can use surface slip stitches, chain embroidery or simple couching stitches.
Keep the gold line narrow so it accents the crochet rather than covering it.
Part 10 – Optional Gold Crochet Panel
For the richer red-and-green version, one narrow section can be crocheted completely in metallic gold.
Ch 22.
Work sc across for 2–3 rows.
FO and sew vertically onto the ornament just like the other panels.
Part 11 – Large Crochet Bow
Using red or green yarn:
Ch 31.
Join carefully with sl st to form a ring without twisting.
Rounds 1–5: sc around.
FO.
Flatten the ring so the joining seam sits at the back center.
Part 12 – Shape the Bow
Pinch the flattened crochet ring tightly in the center.
Wrap matching yarn around the middle approximately 8–10 times.
Secure firmly at the back.
Spread both sides outward to create two full bow loops.
Part 13 – Gold Bow Detail
Using metallic gold yarn, wrap once or twice around the center of the bow.
Add a thin gold line along the upper surface of each bow loop if desired.
Keep this detail subtle and symmetrical.
Part 14 – Attach the Bow
Place the bow directly above the bauble.
Sew the center securely to the top of the ornament.
Add a few hidden stitches underneath each bow loop so the bow remains upright when hanging.
Part 15 – Hanging Loop
Cut approximately 20–25 cm / 8–10 in of gold hanging cord.
Fold it in half.
Thread the ends securely through the top center behind the bow.
Tie several strong knots inside or sew the ends firmly into the crochet.
Part 16 – Bottom Bell
For the classic ornament finish, attach a small gold bell to the bottom center.
Use strong sewing thread or metallic yarn.
Pass through the bauble several times before knotting securely.
The bell should hang just below the crochet ball.
Part 17 – Crochet Bell Alternative
If you prefer an entirely crocheted ornament:
Using gold or mustard yarn:
Round 1: MR, 6 sc. (6)
Round 2: inc around. (12)
Rounds 3–4: sc around.
Round 5: *sc, inc* around. (18)
FO.
Attach a tiny bead underneath if desired.
Part 18 – Red, Green & Gold Version
Use a red base.
Add alternating forest-green and red raised panels.
Include one or two narrow metallic-gold sections.
Finish with a large red bow and gold bell.
This creates the richest traditional Christmas version.
Part 19 – Cream & Green Version
Use cream as the dominant base color.
Add deep-green raised panels around the ornament.
Separate every section with fine metallic-gold lines.
Finish with a forest-green bow.
This variation has a softer farmhouse Christmas look.
Part 20 – Cream & Red Version
Use cream for most of the bauble.
Add rich red vertical panels.
Outline the panels with thin gold accents.
Finish with a red bow and gold hanging cord.
This combination looks especially beautiful against dark green Christmas branches.
Part 21 – Alternative Integrated Stripe Method
If you do not want to sew panels onto the finished ball, the colored sections can also be worked directly into the bauble.
Divide each round into six approximately equal sections.
Change colors at the same positions on every round.
Carry unused yarn loosely inside the ornament.
This produces flatter stripes, while sewn panels create the stronger dimensional appearance shown in the reference style.
Part 22 – Stuffing & Shaping
Massage the finished bauble between both hands.
Move small amounts of stuffing toward any flat areas.
The finished ornament should look round from the front, side and bottom.
Do not overstuff—the crochet stitches should remain clearly visible.
Part 23 – Final Gold Detailing
Check every gold dividing line.
If one section appears uneven, gently reposition the metallic thread with your yarn needle.
Add a tiny gold wrap around the base of the hanging loop for a polished finish.
Part 24 – Make a Coordinated Set
For a Christmas tree collection, make at least 6–9 ornaments.
Mix the three main color combinations:
- Red + green + gold
- Cream + green + gold
- Cream + red + gold
Repeat the same bow and bell design on every ornament to make the collection feel coordinated.
Part 25 – Optional Smaller Bauble
For a smaller ornament, stop increasing at 30 stitches.
Work 5–6 even rounds before decreasing in the same sequence.
Shorten each decorative panel accordingly.
This size works beautifully on smaller Christmas trees or garlands.
Part 26 – Optional Large Statement Bauble
Continue increasing beyond 42 stitches:
Next round: *6 sc, inc* around. (48)
Next round: *7 sc, inc* around. (54)
Work additional even rounds before beginning the decreases.
Use more stuffing and enlarge the bow proportionally.
Part 27 – Final Assembly Check
Before hanging the ornament, check that:
- The hanging loop is firmly secured.
- The bow cannot rotate.
- The bell is attached strongly.
- All yarn ends are woven in.
- The gold trim is secure.
- The ornament is evenly stuffed.
Part 28 – Final Finishing
Gently reshape the bow loops with your fingers.
Smooth each raised panel from top to bottom.
Rotate the bauble and check that the panel spacing looks balanced from every side.
If needed, lightly steam the crochet from a distance without flattening the dimensional sections.
Christmas Color Variations
Traditional: red, forest green, cream and gold.
Vintage: burgundy, moss green and antique gold.
White Christmas: ivory, champagne and soft gold.
Farmhouse: cream, deep green and natural beige.
Candy Cane: red, cream and touches of green.
Elegant: deep emerald, burgundy and metallic gold.
Ways to Use Your Crochet Baubles
- Christmas tree ornaments
- Holiday garlands
- Window decorations
- Christmas gift toppers
- Festive wreath accents
- Handmade stocking gifts
- Christmas market items
- Holiday table-place decorations
Frequently Asked Questions
Using DK or light worsted yarn with a 3.0–3.5 mm hook, each bauble measures approximately 9–11 cm / 3.5–4.3 in across before adding the bow and bell.
Cotton, cotton-blend or smooth acrylic yarn works well. A yarn with clear stitch definition makes the raised panels and bows especially attractive.
No. You can substitute mustard, beige or camel yarn. Metallic thread simply gives the ornament a more festive finish.
Yes. Leave the bottom plain, add a tassel or make the small crochet bell included in the pattern.
A confident beginner can make the basic ball. The decorative panels, color placement and assembly make the complete ornament better suited to an intermediate crocheter.
Use a hook slightly smaller than the yarn label recommends and maintain firm tension. Add stuffing gradually rather than stretching the crochet fabric excessively.
Yes. Store them in a box with tissue paper around each ornament so the bows are not crushed. Reshape the bows gently before hanging them again the following Christmas.
The finished Crochet Christmas Bauble Pattern – Elegant Holiday Ornaments

