Crochet Christmas Baubles Pattern – Rustic Handmade Tree Ornaments
Beginner Friendly
Perfect for those just starting their crochet journey, with clear instructions and simple techniques
Single-Day Project
A satisfying project you can complete in a single afternoon or evening.
Handmade Gift
A beautiful keepsake — free forever. Read online or print at home.
About This Crochet Christmas Baubles Pattern – Rustic Handmade Tree Ornaments
Crochet Christmas Baubles Pattern – Rustic Handmade Christmas Tree Ornaments
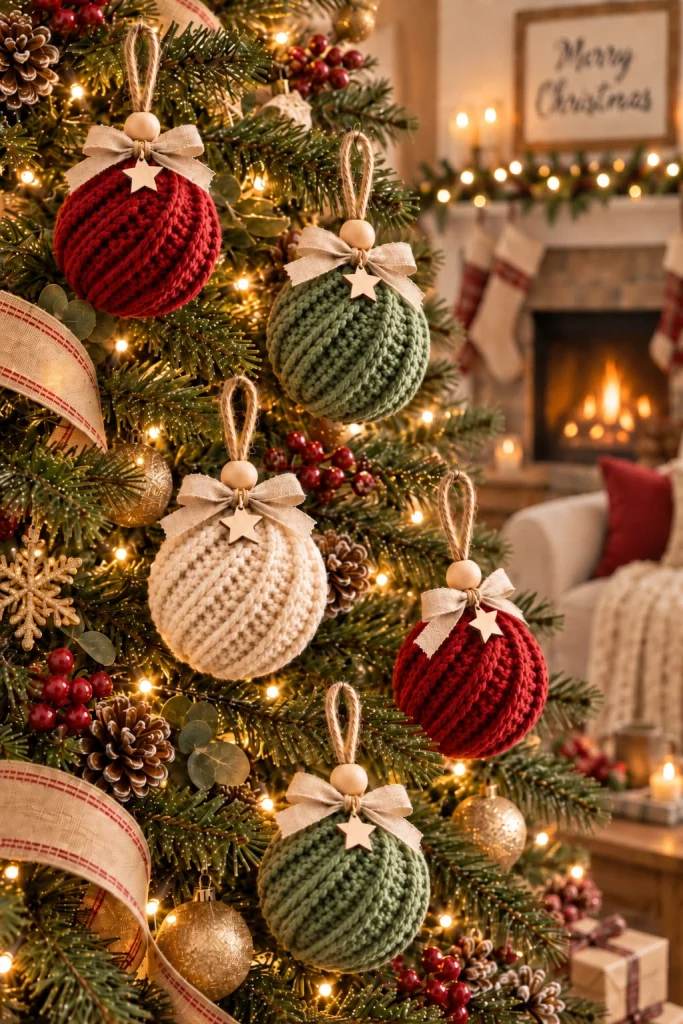
Bring a little handmade magic to your Christmas tree with these beautiful crochet Christmas baubles! Featuring rich Christmas red, soft sage green, and warm ivory yarn, these charming ornaments combine cozy crochet textures with timeless farmhouse Christmas style.
Each bauble features raised diagonal crochet ridges, a natural jute hanging loop, a wooden bead, a delicate beige bow, and a tiny wooden star. Together, these details create an elegant rustic ornament that looks beautiful among twinkling fairy lights, pinecones, and evergreen branches.
Whether you’re decorating your own tree, preparing handmade Christmas gifts, or looking for a festive crochet project, these textured ornaments are a wonderful way to celebrate the holiday season.
Materials You’ll Need
- Worsted-weight yarn in Christmas red, sage green, and ivory
- 3.5 mm crochet hook
- Polyester fiberfill stuffing
- Yarn needle
- Stitch marker
- Scissors
- Natural jute twine for hanging loops
- Small wooden beads with large holes
- Beige linen or burlap-style ribbon
- Mini wooden star charms
- Needle and matching sewing thread
Skill Level: Intermediate
Estimated Time: 45–75 minutes per bauble
Finished Size: Approximately 8–9 cm in diameter, depending on yarn and tension
Crochet Abbreviations – US Terms
- MR – Magic ring
- ch – Chain
- sc – Single crochet
- hdc – Half double crochet
- sl st – Slip stitch
- inc – Increase (2 sc in one stitch)
- dec – Invisible decrease
- BLO – Back loop only
- FO – Fasten off
Pattern Note: This is an original, adaptable pattern inspired by the pictured ornaments. The raised ridges are formed using unused front loops and surface crochet. Exact stitch appearance and finished dimensions may vary. The pattern is not an independently tested reproduction of the image.
Part 1 – Crochet the Round Bauble Base
Choose your first yarn color and begin with a 3.5 mm crochet hook.
Work in continuous rounds unless otherwise indicated.
R1: 6 sc in MR. (6)
R2: Inc in each stitch around. (12)
R3: (1 sc, inc) × 6. (18)
R4: (2 sc, inc) × 6. (24)
R5: (3 sc, inc) × 6. (30)
R6: (4 sc, inc) × 6. (36)
R7: (5 sc, inc) × 6. (42)
R8: (6 sc, inc) × 6. (48)
R9: (7 sc, inc) × 6. (54)
The increasing rounds create the upper curved section of your Christmas bauble.
Part 2 – Create the Textured Bauble Body
R10–R18: Work 1 sc in BLO in every stitch around. (54)
Working in the back loops creates a series of unused front loops on the outside of the ornament. These will be used to add the decorative raised ridges.
Keep your stitch tension consistent so the bauble remains evenly rounded.
Part 3 – Shape the Bottom of the Bauble
R19: (7 sc, dec) × 6. (48)
R20: (6 sc, dec) × 6. (42)
R21: (5 sc, dec) × 6. (36)
R22: (4 sc, dec) × 6. (30)
Begin filling the ornament with polyester fiberfill. Add small amounts at a time to maintain a smooth spherical shape.
R23: (3 sc, dec) × 6. (24)
R24: (2 sc, dec) × 6. (18)
R25: (1 sc, dec) × 6. (12)
R26: Dec around. (6)
Finish stuffing before closing the final opening.
FO, leaving a long yarn tail. Thread it through the remaining front loops and pull closed. Weave in the end securely.
Part 4 – Add the Raised Crochet Ridges
The reference ornaments feature beautiful diagonal ridges that wrap around each bauble.
To create a similar textured effect, use a separate strand of matching yarn and a crochet hook.
Begin near the top of the bauble and insert the hook under an unused front loop.
Pull up a loop of yarn and work a surface sl st.
Continue along the unused front loops, gradually shifting the working position around the ornament to form a diagonal path.
Repeat the surface crochet along additional diagonal paths, spacing the ridges evenly.
For more pronounced texture, work surface sc instead of sl st where practical.
Important: The BLO rounds provide horizontal anchor loops, so creating diagonal ridges requires intentionally moving between rows and securing the yarn neatly. The ridges are decorative rather than part of the main stitch-counted rounds.
Part 5 – Shape and Smooth the Ornament
Roll the completed bauble gently between your hands.
Distribute the stuffing evenly, especially around the upper and lower curves.
Adjust the raised ridges so they follow smooth diagonal lines.
Check that the ornament looks round from every angle.
Part 6 – Make the Rustic Hanging Loop
Cut approximately 22–25 cm of natural jute twine.
Fold the twine in half to create a hanging loop.
Thread both loose ends through a large yarn needle.
Pass the ends through the top center of the bauble.
Tie a secure knot inside or directly against the top stitches, and reinforce the attachment with sewing thread if needed.
Adjust the loop to approximately 8–10 cm in hanging length.
Part 7 – Add the Wooden Bead
Choose a smooth natural wooden bead with a hole large enough for the doubled twine.
Thread the bead onto the hanging loop.
Slide it down until it rests against the top of the crocheted ornament.
Secure its position with a small knot if necessary.
The natural wood adds a warm farmhouse touch to the festive yarn colors.
Part 8 – Create the Beige Ribbon Bow
Cut approximately 20–25 cm of beige linen or burlap-style ribbon.
Fold the ribbon into two equal loops.
Pinch the center and wrap it with matching thread.
Tie securely and adjust the loops until they look full and symmetrical.
Trim the ribbon tails into soft diagonal or V-shaped ends.
For a delicate finish, keep the bow slightly smaller than the bauble.
Part 9 – Attach the Bow
Position the bow beneath the wooden bead.
Use matching thread to stitch the center of the bow securely to the top of the crochet bauble.
Arrange the tails so they fall gently to either side.
Avoid pulling too tightly, as this can distort the top of the ornament.
Part 10 – Add the Wooden Star Charm
Choose a small wooden star charm with a hanging hole.
Thread a short piece of jute twine through the charm.
Attach it directly beneath the center of the beige bow.
Allow the star to hang freely against the upper section of the bauble.
Use a lightweight charm to prevent the ornament from tipping forward.
Part 11 – Make the Christmas Red Baubles
Using deep Christmas-red yarn, repeat Parts 1–10.
For a traditional festive look, combine the red bauble with a beige bow, natural wooden bead, and pale wooden star.
Make two or more red ornaments to create a coordinated Christmas tree display.
Part 12 – Make the Sage-Green Baubles
Using soft sage-green yarn, repeat the entire bauble pattern.
The muted green color creates a beautiful contrast against dark evergreen branches.
Add the same rustic accessories to maintain a consistent ornament collection.
Make two sage-green baubles for a balanced arrangement.
Part 13 – Make the Ivory Bauble
Using warm ivory yarn, repeat Parts 1–10.
Ivory highlights the raised crochet texture beautifully and complements both red and sage-green ornaments.
Finish with a beige bow, wooden bead, and small star charm.
Part 14 – Create a Coordinated Set of Five
For a set inspired by the reference image, make:
- 2 Christmas-red crochet baubles
- 2 sage-green crochet baubles
- 1 warm-ivory crochet bauble
Use matching beige bows, wooden beads, wooden stars, and natural hanging loops on all five ornaments.
This coordinated color palette looks elegant, warm, and beautifully handmade.
Part 15 – Arrange the Ornaments on Your Christmas Tree
Hang the crochet baubles at different heights among the evergreen branches.
Place the red ornaments near warm fairy lights to highlight their rich festive color.
Position the sage-green ornaments near gold decorations or pinecones for a subtle natural look.
Use the ivory bauble to brighten darker sections of the tree.
Combine the handmade ornaments with rustic ribbon, natural pinecones, and soft golden lighting.
Christmas Bauble Color Variations
Traditional Christmas: Red, forest green, and ivory.
Rustic Farmhouse: Sage green, oatmeal, cream, and cinnamon.
Winter Wonderland: White, silver gray, and icy blue.
Vintage Christmas: Burgundy, dusty rose, antique gold, and cream.
Neutral Scandinavian: Ivory, beige, taupe, and soft gray.
Elegant Woodland: Moss green, chocolate brown, rust, and natural linen.
Tips for Perfect Crochet Christmas Baubles
- Use consistent yarn weight throughout the ornament set.
- Keep your crochet tension firm enough to hide the stuffing.
- Stuff each bauble evenly to create a smooth round shape.
- Use stitch markers to track continuous rounds.
- Keep decorative ridges evenly spaced.
- Choose lightweight wooden charms.
- Use matching ribbons and beads for a coordinated appearance.
- Reinforce hanging loops before placing ornaments on the tree.
Care and Storage Instructions
- Spot clean gently with a damp cloth.
- Avoid soaking ornaments with wooden decorations.
- Allow ornaments to air dry completely.
- Store in a dry container after Christmas.
- Wrap delicate bows and charms in tissue paper.
- Reshape the baubles gently before displaying them again.
Frequently Asked Questions
Are these crochet Christmas baubles beginner-friendly?
The basic round bauble is suitable for adventurous beginners familiar with increases and decreases. The raised diagonal ridges make the complete design more appropriate for intermediate crocheters.
Can I make the ornaments smaller?
Yes! Use thinner yarn and a smaller crochet hook. You can also stop increasing at an earlier round, provided you adjust the straight and decreasing sections accordingly.
Can I use cotton yarn?
Absolutely. Cotton yarn provides excellent stitch definition and gives the ornaments a structured handmade appearance.
Can I use acrylic yarn instead?
Yes. Acrylic yarn is lightweight, affordable, and available in many beautiful Christmas colors.
How do I keep my baubles perfectly round?
Use even stitch tension, distribute the stuffing carefully, and avoid overstuffing. Gently shape each ornament by hand after closing.
Can I make these ornaments without wooden stars?
Of course! The baubles look beautiful with simple bows and hanging loops. You can also replace wooden stars with crocheted stars or small embroidered snowflakes.
Are these ornaments safe for homes with small children?
Small beads and detachable charms can be choking hazards. For homes with young children, omit small decorative pieces and secure all attachments carefully. These are decorations, not toys.
Can I give these as Christmas gifts?
Definitely! A coordinated set of handmade crochet Christmas baubles makes a thoughtful gift for friends, family, teachers, and anyone who loves cozy holiday decorations.
Final Thoughts
These crochet Christmas baubles bring together everything wonderful about handmade holiday decorating: beautiful yarn textures, warm traditional colors, rustic natural details, and the special charm of something made with care.
Whether you crochet a single ornament or create a complete set in red, sage green, and ivory, these textured baubles will add a cozy, timeless touch to your Christmas tree.
Pair them with warm fairy lights, pinecones, natural ribbons, and treasured family decorations for a Christmas tree filled with handmade personality.
Happy crocheting, and may your Christmas be filled with warmth, creativity, and handmade joy! 🎄❤️
The finished Crochet Christmas Baubles Pattern – Rustic Handmade Tree Ornaments

