Crochet Christmas Bell Door Hanger
Beginner Friendly
Perfect for those just starting their crochet journey, with clear instructions and simple techniques
Single-Day Project
A satisfying project you can complete in a single afternoon or evening.
Handmade Gift
A beautiful keepsake — free forever. Read online or print at home.
About This Crochet Christmas Bell Door Hanger
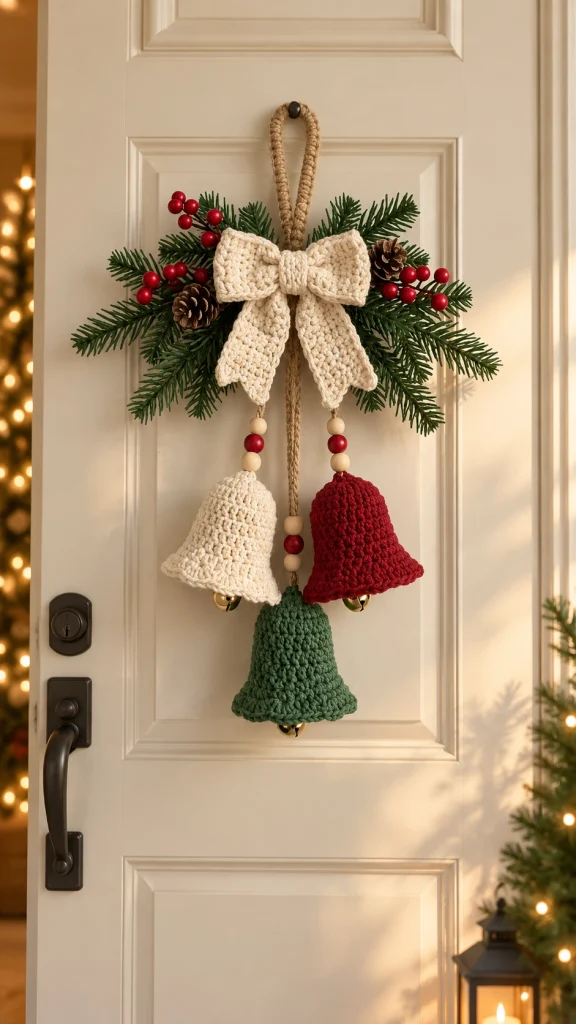
This crochet Christmas bell door hanger is such a beautiful handmade alternative to a traditional wreath. The design features three large crochet bells in warm cream, deep Christmas red and forest green, suspended beneath an oversized cream crochet bow and festive evergreen arrangement.
Natural wooden beads, red accent beads, pinecones and berry branches give the decoration a warm farmhouse Christmas look. Hang it from an interior door, entryway hook or wall peg for an elegant handmade holiday accent.
Materials
- Worsted / Aran #4 yarn – warm cream 80-100 g
- Worsted / Aran #4 yarn – deep Christmas red 50-70 g
- Worsted / Aran #4 yarn – forest green 50-70 g
- Worsted yarn – natural beige for hanging loop 20-30 g
- 4.0 mm crochet hook 1
- Large wooden beads, approximately 15-18 mm 6-8
- Red wooden or acrylic beads, approximately 15-18 mm 3-4
- Small gold jingle bells 3
- Artificial evergreen sprigs 5-7
- Artificial red berry stems 3-4
- Small natural pinecones 2-3
- Strong cord or cotton twine approximately 1.5 m
- Yarn needle 1
- Scissors 1 pair
- Hot glue or floral wire optional for greenery
Abbreviations
MRmagic ringchchainsl stslip stitchscsingle crochethdchalf double crochetdcdouble crochetststitchstsstitchesincincreasereprepeatFOfasten offFinished Measurements
- Entire hanging: approximately 50-55 cm / 20-22 in
- Each bell: approximately 12-14 cm / 4.75-5.5 in tall
- Bell opening: approximately 13-15 cm / 5-6 in
- Crochet bow: approximately 24-28 cm / 9.5-11 in wide
- Top greenery arrangement: approximately 40-45 cm / 16-18 in wide
Part 1 – Large Crochet Bell
Make 3 bells:
- 1 warm cream
- 1 deep Christmas red
- 1 forest green
Round 1
Make a MR.
Work 6 sc into MR.
Pull closed.
6 sts.
Round 2
Work 2 sc in each st around.
12 sts.
Round 3
*Sc in next st, 2 sc in next st.*
Repeat around.
18 sts.
Round 4
*Sc in next 2 sts, 2 sc in next st.*
Repeat around.
24 sts.
Round 5
*Sc in next 3 sts, 2 sc in next st.*
Repeat around.
30 sts.
Shape the Bell Body
Rounds 6-9
Sc in each st around.
30 sts.
Round 10
*Sc in next 4 sts, 2 sc in next st.*
Repeat around.
36 sts.
Rounds 11-13
Sc in each st around.
36 sts.
Round 14
*Sc in next 5 sts, 2 sc in next st.*
Repeat around.
42 sts.
Rounds 15-16
Sc in each st around.
42 sts.
Create the Flared Bell Edge
Round 17
*Sc in next 2 sts, 2 sc in next st.*
Repeat around.
Round 18
Work 2 hdc in each st around.
This strong increase creates the softly flared Christmas-bell silhouette.
Round 19
Sc in each st around.
Sl st to first sc.
FO and weave in the end.
Part 2 – Jingle Bell Inside Each Crochet Bell
Cut approximately 30 cm / 12 in of strong matching yarn or cotton cord.
Thread one small gold jingle bell onto the cord.
Pass both ends upward through the center of the crochet bell.
Adjust the metal bell so it sits just inside the lower opening, with a small portion visible underneath.
Tie securely at the top.
Repeat for all three crochet bells.
Part 3 – Cream Crochet Bow
The oversized bow is the focal point at the top of the decoration.
Main Bow Rectangle
Using cream yarn, ch 61.
Row 1
Sc in 2nd ch from hook and across.
60 sc.
Rows 2-13
Ch 1, turn.
Sc in every st across.
FO leaving a long sewing tail.
Shape the Bow
Fold both short ends of the rectangle toward the center so they overlap slightly.
Using the long tail, sew the overlapping section securely.
Pinch the center into several accordion folds.
Wrap yarn firmly around the middle several times.
Tie securely at the back.
Adjust both sides until the bow has two full symmetrical loops.
Bow Center Band
Ch 11.
Sc in 2nd ch from hook and across.
10 sc.
Work approximately 8-10 rows or until the strip wraps comfortably around the center of the bow.
Wrap around the gathered center.
Sew the ends together at the back.
Part 4 – Bow Tails
Make 2.
Ch 16.
Row 1
Sc in 2nd ch from hook and across.
15 sc.
Rows 2-25
Ch 1, turn.
Sc across.
For a gently tapered tail, decrease one stitch at each side during the final 5 rows.
FO.
Fold the bottom edge slightly and shape it into a soft pointed end.
Sew both tails behind the center of the bow so they hang downward.
Part 5 – Crochet Hanging Loop
Using beige or natural yarn, ch 45-50.
Sl st back through every chain to create a thick cord.
FO leaving long tails.
Fold into a loop approximately 14-16 cm / 5.5-6.25 in long.
Sew the two ends together securely.
The lower joined section will later be hidden behind the bow and greenery.
Part 6 – Bell Hanging Cords
Cut three strong cords:
- Left cream bell: approximately 28 cm
- Right red bell: approximately 29 cm
- Center green bell: approximately 39 cm
The center bell should hang noticeably lower than the two side bells.
Add the Beads
Thread the beads onto each side cord before attaching the bells.
Left Cream Bell
Use:
natural bead → red bead → natural bead
Right Red Bell
Use:
natural bead → red bead → natural bead
Center Green Bell
Use:
natural bead → red bead → natural bead
Leave a small amount of visible cord between the beads if desired.
Attach the Three Bells
Thread the lower end of each cord through the center top of its crochet bell.
Tie securely on the inside.
Position the cream bell slightly toward the left.
Position the red bell slightly toward the right.
Position the green bell in the center and approximately 10-12 cm lower than the side bells.
Part 7 – Evergreen Arrangement
Arrange approximately 5-7 artificial evergreen sprigs horizontally behind the bow.
Place the longest pieces toward the outer edges and shorter branches toward the center.
The finished greenery should extend approximately 20-22 cm on either side of the bow.
Secure the branches together at their stems using floral wire or strong twine.
Add Red Berry Branches
Tuck red berry stems among the evergreen branches.
Concentrate the berries near:
- Upper left side
- Lower left side
- Upper right side
- Outer right side
Keep some evergreen tips visible so the arrangement does not become overcrowded.
Add Pinecones
Attach 2-3 small natural pinecones among the evergreen branches.
Place one near the left side of the bow and another toward the upper-right side.
Secure with floral wire or a small amount of hot glue.
Part 8 – Assemble the Top
- Lay the evergreen arrangement flat.
- Position the hanging loop behind the center.
- Place the three bell cords behind the greenery.
- Secure all cords firmly with strong yarn or floral wire.
- Place the large cream crochet bow over the center attachment point.
- Sew or wire the bow securely to the greenery bundle.
- Arrange the bow tails so they fall naturally over the upper portions of the bell cords.
Final Arrangement
Once the hanger is suspended, gently adjust each element.
- The cream bell should hang left.
- The red bell should hang right.
- The green bell should hang lower in the center.
- The large cream bow should remain centered.
- Evergreen branches should fan outward.
- Berry stems should remain visible around the bow.
- Pinecones should sit naturally within the greenery.
Optional – Make the Greenery in Crochet
If you prefer a completely crocheted decoration, replace the artificial greenery with crochet evergreen branches.
Using forest green yarn, ch 26.
Starting in the second chain:
*Sl st in next ch, ch 5, sl st in 2nd ch from hook and down remaining chains, sl st into next foundation ch.*
Repeat along the foundation chain.
Make approximately 8-12 branches.
Layer them behind the bow to imitate evergreen foliage.
Optional – Crochet Red Berries
Using red yarn, make MR.
Work 6 sc into MR.
Pull tightly closed.
Sl st to first sc.
FO leaving a long sewing tail.
Make approximately 12-18 berries.
Cluster berries in groups of three and sew them onto the crochet evergreen branches.
Color Variations
- Traditional: red + forest green + cream
- Rustic: oatmeal + dark green + burgundy
- Scandinavian: cream + muted red + natural wood
- Winter: white + sage + pale gray
- Vintage: burgundy + antique cream + olive green
- Neutral: cream + beige + brown with natural pinecones
Where to Display It
- Interior doors
- Entryway wall hooks
- Kitchen doors
- Above a fireplace mantel
- Staircase posts
- Guest room doors
- Holiday craft market displays
Final Finishing
- Weave in every visible yarn end.
- Steam or lightly block the crochet bow.
- Shape the three bell openings evenly.
- Check that each jingle bell moves freely.
- Tighten all bead cords.
- Secure the evergreen branches.
- Check berry stems and pinecones.
- Center the bow.
- Hang the decoration and make final bell-length adjustments.
Frequently Asked Questions
Use cotton or cotton-blend yarn with firm tension. You can also lightly steam-block the bells or apply a small amount of fabric stiffener to the inside.
Yes. Replace the artificial evergreen and berries with the optional crochet versions included above. Crochet pinecones can also be substituted for natural ones.
Yes. Use DK yarn with a 3-3.5 mm hook or stop increasing at 30 stitches before working the straight bell body.
The staggered arrangement creates the cascading three-bell silhouette. The center bell hangs lower while the cream and red bells frame it from above.
It is best used indoors or in a fully covered area. Yarn, wooden beads, natural pinecones and decorative greenery may deteriorate when repeatedly exposed to rain or moisture.
Yes. If you attach the greenery with removable floral wire rather than glue, the crochet bells and bow can be reused or restyled with different seasonal decorations.
The finished Crochet Christmas Bell Door Hanger