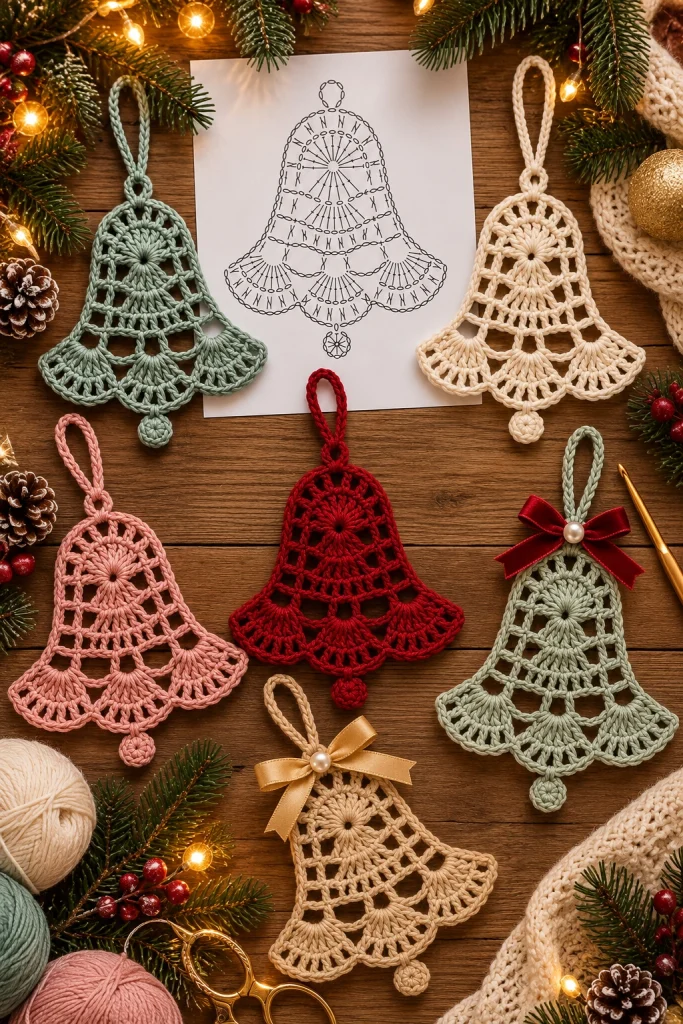
Crochet Christmas Bell Ornaments – Free Lace Bell Crochet Pattern
Add a delicate handmade touch to your holiday decorations with these beautiful crochet Christmas bell ornaments. Featuring intricate openwork lace, elegant scalloped edges, decorative hanging loops, and tiny crocheted clappers, these charming bells are perfect for creating a timeless Christmas atmosphere.
Inspired by traditional vintage crochet decorations, these ornaments combine classic lace techniques with a modern color palette of sage green, warm ivory, dusty pink, Christmas red, and champagne beige. Some bells are finished with satin bows and pearl accents for an extra touch of elegance.
This free crochet Christmas bell pattern will guide you through creating lightweight lace bells that can be hung on Christmas trees, attached to gift packages, displayed in windows, or used as festive garlands.
Pattern Information
- Skill Level: Intermediate
- Finished Size: Approximately 10–12 cm tall, excluding hanging loop
- Width: Approximately 9–11 cm at the bottom
- Yarn Weight: Sport-weight cotton or size 3 crochet thread
- Hook Size: 2 mm–2.5 mm
- Terminology: US crochet terms
- Construction: Worked in joined rounds from the top downward
- Estimated Time: 1–2 hours per ornament
Materials Needed
- Cotton yarn or crochet thread in sage green, ivory, dusty pink, Christmas red, or champagne beige
- 2 mm or 2.5 mm crochet hook
- Yarn needle
- Scissors
- Stitch markers
- Small satin ribbon bows (optional)
- Decorative pearl beads (optional)
- Fabric stiffener or diluted craft glue (optional)
- Small bell-shaped mold for blocking
- Measuring tape
Crochet Abbreviations
- ch: Chain
- sc: Single crochet
- hdc: Half double crochet
- dc: Double crochet
- tr: Treble crochet
- sl st: Slip stitch
- st: Stitch
- sp: Space
- sk: Skip
- MR: Magic ring
- FO: Fasten off
Part 1: Crochet the Top of the Bell
Begin at the crown of the bell and work downward in joined rounds.
Round 1
Make a magic ring.
Ch 3 (counts as first dc), work 11 dc into the ring.
Pull the ring closed and join with a sl st to the top of the beginning ch-3. (12 dc)
Round 2
Ch 3 (counts as first dc), dc in the same stitch.
Work 2 dc in each remaining stitch around.
Join with a sl st. (24 dc)
Round 3
Ch 4 (counts as dc and ch 1).
Skip the next stitch, dc in the following stitch, ch 1.
Repeat around.
Join with a sl st into the third chain of the beginning ch-4.
You should have 12 dc and 12 ch-1 spaces.
Part 2: Create the Decorative Lace Body
The openwork body gives these ornaments their airy, vintage-inspired appearance.
Round 4
Sl st into the first ch-1 space.
Ch 3, work 2 dc in the same space, ch 2.
*Work 3 dc in the next ch-1 space, ch 2.*
Repeat around.
Join with a sl st to the top of the beginning ch-3.
Round 5
Sl st across to the first ch-2 space.
Ch 3, work 2 dc in the same space, ch 3.
*Work 3 dc in the next ch-2 space, ch 3.*
Repeat around.
Join with a sl st.
Round 6
Sl st into the first ch-3 space.
Ch 3, work 3 dc in the same space, ch 3.
*Work 4 dc in the next ch-3 space, ch 3.*
Repeat around.
Join with a sl st.
Round 7
Sl st into the first ch-3 space.
Ch 3, work 3 dc in the same space, ch 4.
*Work 4 dc in the next ch-3 space, ch 4.*
Repeat around.
Join with a sl st.
Part 3: Shape the Flared Bell Bottom
The lower section gradually widens to create the traditional bell silhouette.
Round 8
Sl st into the first ch-4 space.
Ch 3, work 5 dc in the same space, ch 2.
*Work 6 dc in the next ch-4 space, ch 2.*
Repeat around.
Join with a sl st.
Round 9
Sl st into the first ch-2 space.
Ch 3, work 6 dc in the same space, ch 2.
*Work 7 dc in the next ch-2 space, ch 2.*
Repeat around.
Join with a sl st.
Round 10
Sl st into the first ch-2 space.
Ch 3, work 7 dc in the same space, ch 2.
*Work 8 dc in the next ch-2 space, ch 2.*
Repeat around.
Join with a sl st.
The bell should now have a noticeably flared bottom edge.
Part 4: Crochet the Scalloped Lace Border
The decorative scalloped border is one of the most recognizable features of the finished ornaments.
Round 11
Sl st into the first ch-2 space.
Ch 1, sc in the same space.
*Ch 3, skip the next 2 dc, sc in the next dc, ch 3, skip the next 2 dc, sc in the next dc, ch 3, sc in the next ch-2 space.*
Repeat around, adjusting the final repeat as necessary to maintain an even border.
Round 12
Sl st into the first ch-3 space.
Ch 1, work 7 dc in the same space.
Sl st into the next ch-3 space.
*Work 7 dc in the following ch-3 space, sl st into the next ch-3 space.*
Repeat around.
FO and weave in ends.
Gently stretch the scallops into a smooth, symmetrical shape.
Part 5: Crochet the Bell Clapper
The small round clapper hanging beneath the bell adds a charming traditional detail.
Use the same yarn color as the main bell.
Round 1
Make a magic ring.
Work 6 sc into the ring. (6)
Round 2
Work 2 sc in each stitch around. (12)
Round 3
Sc in each stitch around. (12)
Round 4
Work sc2tog six times. (6)
Lightly stuff the clapper with a small amount of yarn.
FO, leaving a long tail.
Attach the Clapper
Thread the yarn tail through the center of the bell.
Secure it to the inside of the crown.
Allow the clapper to hang approximately 1–2 cm below the scalloped edge.
Part 6: Crochet the Hanging Loop
Each bell includes a simple crocheted loop for easy hanging.
Step 1
Attach yarn to the top center of the bell.
Step 2
Ch 25–30, depending on the desired loop length.
Step 3
Sl st into the same attachment point to form a loop.
Step 4
For a thicker loop, work sl st into each chain around the loop.
Step 5
FO and weave in ends securely.
Part 7: Add Decorative Satin Bows
Some of the bells in the reference design feature elegant satin bows decorated with pearl centers.
Materials
- Red velvet or satin ribbon
- Champagne-gold satin ribbon
- Silver-gray satin ribbon
- Small pearl beads
- Matching sewing thread
Instructions
Cut approximately 15–20 cm of ribbon.
Fold the ribbon into a small bow.
Secure the center using matching thread.
Attach a pearl bead to the center.
Sew the finished bow near the top of the crochet bell, just below the hanging loop.
For a coordinated ornament collection, use different ribbon colors on selected bells.
Part 8: Shape and Stiffen the Lace Bells
Blocking helps the crochet bells maintain their elegant three-dimensional shape.
Step 1
Prepare a small amount of fabric stiffener according to the manufacturer’s instructions.
Step 2
Lightly dampen the crochet bell with the stiffening solution.
Step 3
Place the bell over a smooth bell-shaped mold.
Step 4
Gently arrange the lace openings and scalloped edges.
Step 5
Allow the ornament to dry completely.
Step 6
Carefully remove the mold.
The finished bell should hold its flared shape while remaining lightweight.
Tip: Protect your mold with plastic wrap before applying fabric stiffener.
Part 9: Create the Complete Christmas Bell Collection
The reference image features six beautiful crochet bells in complementary colors.
Sage-Green Bells
Create two sage-green lace bells for a soft, botanical Christmas appearance.
Decorate one with a deep-red ribbon bow and a pearl accent.
Ivory Bell
Make one warm ivory bell for a classic vintage look.
Leave it undecorated to highlight the delicate lace pattern.
Dusty-Pink Bell
Use muted dusty-pink cotton yarn for a romantic pastel ornament.
Pair it with ivory, champagne, and sage-green decorations.
Christmas-Red Bell
Create a rich red bell for a traditional festive accent.
The deep color makes the openwork lace especially noticeable.
Champagne-Beige Bell
Use warm beige yarn and finish the ornament with a gold satin bow and pearl center.
This variation is ideal for elegant neutral Christmas decorations.
Creative Ways to Display Crochet Christmas Bells
- Hang them on your Christmas tree.
- Use them as handmade gift toppers.
- Decorate a Christmas garland.
- Hang them in front of a window.
- Attach them to a festive door hanging.
- Create a crochet bell wall display.
- Use them as Christmas dinner place-setting decorations.
- Hang several bells from a decorative branch.
- Add them to a handmade Christmas wreath.
- Give them as small handmade holiday gifts.
Helpful Crochet Tips
- Use cotton thread for crisp lace details.
- Keep your tension consistent throughout the project.
- Use stitch markers to identify the beginning of each round.
- Count stitches carefully to maintain symmetry.
- Choose a smaller hook for more defined openwork.
- Block each ornament before attaching decorative ribbons.
- Allow fabric stiffener to dry completely.
- Use lightweight ribbons to avoid distorting the bell shape.
- Secure pearl beads with strong sewing thread.
- Make the hanging loops approximately the same length for a coordinated collection.
- Experiment with different yarn colors.
- Use metallic embroidery thread for subtle festive accents.
- Store finished ornaments flat or in individual compartments.
Frequently Asked Questions
Are these crochet Christmas bells beginner-friendly?
This pattern is best suited to intermediate crocheters who are familiar with working in rounds, chain spaces, double crochet stitches, and lace patterns.
What yarn works best for crochet bell ornaments?
Mercerized cotton yarn or crochet thread is ideal because it provides excellent stitch definition and holds its shape well after blocking.
Do I need to stiffen the bells?
Stiffening is optional but recommended if you want the ornaments to maintain a firm, three-dimensional bell shape.
Can I make larger bells?
Yes. Use thicker yarn and a larger crochet hook, or add additional lace rounds before creating the scalloped border.
Can I make smaller bells?
Yes. Choose finer crochet thread and a smaller hook to create delicate miniature ornaments.
Can I use acrylic yarn?
Yes, although cotton yarn is generally better for lace ornaments because it produces sharper stitch definition and responds well to blocking.
How long does one bell take to crochet?
Most intermediate crocheters can complete one bell in approximately one to two hours, excluding drying time if fabric stiffener is used.
Can I sell finished bells made from this pattern?
Yes. You may sell handmade ornaments created using this original pattern. Credit to the pattern designer is appreciated.
Can I decorate the bells without ribbon?
Absolutely. The openwork lace is beautiful on its own. You can also use small crochet bows, embroidery, or simple pearl accents.
Care and Storage Instructions
- Keep ornaments away from moisture.
- Avoid machine washing stiffened bells.
- Dust gently with a soft brush.
- Do not tumble dry.
- Keep away from open flames.
- Store in a clean, dry container.
- Protect delicate scalloped edges from crushing.
- Wrap individual ornaments in tissue paper if needed.
- Keep pearl decorations and loose beads away from small children.
Final Thoughts
These crochet Christmas bell ornaments are a beautiful way to bring handmade elegance to your holiday decorations. Their delicate lace texture, scalloped edges, charming clappers, and coordinated colors create a timeless Christmas collection that can be enjoyed year after year.
Whether you prefer classic Christmas red, elegant ivory, soft sage green, romantic dusty pink, or champagne beige, these bells are easy to personalize and make wonderful handmade gifts.
Love this free crochet Christmas bell pattern? Save it to Pinterest and share it with your crochet-loving friends for more festive handmade inspiration!

