Crochet Christmas Bow Garland Pattern
Beginner Friendly
Perfect for those just starting their crochet journey, with clear instructions and simple techniques
Single-Day Project
A satisfying project you can complete in a single afternoon or evening.
Handmade Gift
A beautiful keepsake — free forever. Read online or print at home.
About This Crochet Christmas Bow Garland Pattern
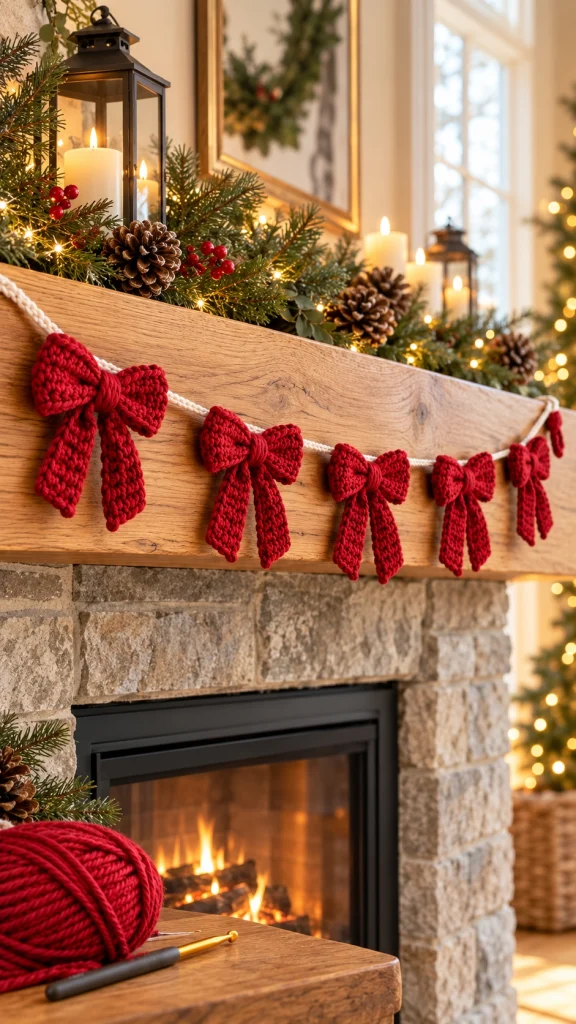
This crochet Christmas bow garland pattern creates a cozy holiday decoration made from a row of chunky red crochet bows attached to a simple cream cord. The finished garland looks beautiful draped across a wooden mantel, fireplace, shelf, staircase or Christmas tree.
Each bow is worked with two rounded loops, a wrapped center and two long ribbon tails. The slightly chunky crochet texture gives the bows a soft handmade appearance while still keeping their shape.
The pattern is easy to customize: make five bows for a short mantel garland, seven for a fuller fireplace display, or continue adding bows for a long staircase or Christmas tree garland.
Materials
- Deep Christmas red worsted / aran yarn 180–250 g
- Warm cream yarn for cord 40–60 g
- 4.0–4.5 mm crochet hook 1
- Yarn needle 1
- Scissors 1 pair
- Stitch markers optional
Abbreviations – US Terms
chchainsl stslip stitchscsingle crochethdchalf double crochetdcdouble crochetststitchFOfasten offFinished Size
Each finished bow measures approximately 15–18 cm / 6–7 in wide and 17–20 cm / 6.5–8 in long including the tails.
A garland with six bows measures approximately 150–180 cm / 59–71 in long.
You can easily change the finished length by adding or removing bows or changing the spacing between them.
Part 1 – Crochet the Main Bow Rectangle
Using deep red yarn:
Ch 31.
Row 1: sc in 2nd ch from hook and in each ch across. (30)
Row 2: ch 1, turn, sc in each st across. (30)
Rows 3–10: repeat Row 2.
FO, leaving a long tail for sewing.
You should now have a firm rectangular crochet strip.
Part 2 – Form the Bow Loops
Lay the rectangle horizontally with the wrong side facing upward.
Bring both short ends toward the center.
Overlap the ends by approximately 1–2 cm / ½ in.
Sew the overlapping ends securely together.
Turn the seam toward the back.
You now have one continuous flattened loop.
Part 3 – Shape the Center
Pinch the middle of the loop firmly between your fingers.
Create approximately three accordion folds through the center.
Using red yarn, wrap tightly around the pinched center several times.
Tie securely at the back.
Spread both sides outward to create two rounded bow loops.
Part 4 – First Ribbon Tail
Using red yarn:
Ch 10.
Row 1: sc in 2nd ch from hook and across. (9)
Rows 2–16: ch 1, turn, sc across.
Begin shaping the pointed end:
Row 17: skip first st, sc across. (8)
Row 18: ch 1, turn, sc across.
Row 19: skip first st, sc across. (7)
Continue decreasing gradually until the end forms a soft point.
FO, leaving a long sewing tail.
Part 5 – Second Ribbon Tail
Repeat Part 4 to make a second matching tail.
Before attaching them, place both tails beside each other.
They should be approximately the same length but do not need to be perfectly identical—a slight difference gives the bow a natural handmade appearance.
Part 6 – Shape the Ribbon Tails
Lay both tails with their pointed ends facing downward.
Angle one tail slightly toward the left and the other slightly toward the right.
Overlap their top edges at the center.
Sew the top edges together with several secure stitches.
Do not sew down the lower sections; they should hang freely.
Part 7 – Attach the Tails
Place the joined ribbon tails behind the center of the bow loops.
Position the tails so they extend evenly below the bow.
Sew securely through the center only.
Avoid sewing into the outer loops so they remain dimensional.
Part 8 – Crochet the Center Wrap
Using red yarn:
Ch 7.
Row 1: sc in 2nd ch from hook and across. (6)
Rows 2–8: ch 1, turn, sc across.
Check the length around the center of your bow.
Add or remove rows if necessary.
FO, leaving a long tail.
Part 9 – Finish the Bow Center
Wrap the small rectangle tightly around the pinched center of the bow.
The wrap should cover the stitches used to attach the tails.
Bring both ends to the back.
Sew them together securely.
Hide all remaining yarn ends inside the center wrap.
Part 10 – Optional Border for Extra Definition
If you want a more structured bow, join red yarn along the outer edge of each loop.
Work:
1 sl st in each edge stitch around.
Repeat around the ribbon tails.
This creates a clean raised edge while keeping the entire decoration monochromatic.
Part 11 – Make the Remaining Bows
Repeat Parts 1–10 until you have the desired number of bows.
Suggested quantities:
- 5 bows – small mantel or shelf
- 6 bows – standard fireplace mantel
- 8 bows – large mantel or window
- 10–12 bows – staircase or Christmas tree
Part 12 – Crochet the Garland Cord
Using warm cream yarn:
Ch 260–300, or continue chaining until the cord reaches your desired finished length.
Starting in the 2nd chain from the hook:
sl st loosely in every chain across.
This creates a stronger, slightly thicker cord than a simple chain.
FO.
Part 13 – Create Hanging Ends
Leave approximately 15–20 cm / 6–8 in free at both ends of the cord.
These sections can be tied around hooks, mantel brackets or branches.
You can also form a small hanging loop at each end:
Fold approximately 8 cm of cord back onto itself and sew securely.
Part 14 – Plan the Bow Spacing
Lay the cream cord flat on a table or floor.
Place the finished bows underneath it before sewing anything.
For six bows, leave approximately 18–24 cm / 7–9 in between the centers of each bow.
Adjust the spacing until the garland looks balanced.
Part 15 – Attach the First Bow
Position the cream cord behind the top section of the bow’s center wrap.
Using matching red yarn, sew through the back of the center wrap and around the cord several times.
Do not sew through the front of the bow.
Knot securely at the back.
Part 16 – Attach the Remaining Bows
Continue attaching the bows using the spacing planned in Part 14.
Check the garland after every bow.
All bows should face forward while the ribbon tails hang naturally downward.
Keep the cord visible between each bow for the simple red-and-cream Christmas look.
Part 17 – Final Bow Shaping
Hang the garland temporarily.
Use your fingers to open each loop.
Pull the upper edges slightly outward.
Allow the center of each loop to curve inward.
Straighten the ribbon tails and angle them slightly away from one another.
The bows should look soft and dimensional rather than perfectly flat.
Part 18 – Optional Blocking
If your ribbon tails curl, lightly dampen them and pin them into shape.
Allow them to dry completely before hanging.
For acrylic yarn, gentle steam can be used from a safe distance.
Never press a hot iron directly onto the crochet.
Part 19 – Mantel Styling
Drape the garland across the front edge of a wooden mantel.
Allow the cord to curve very slightly between bows rather than pulling it completely straight.
Pair it with evergreen branches, warm white lights, pinecones and red berries for a traditional cozy Christmas look.
The simple red bows stand out beautifully against natural wood and greenery.
Part 20 – Christmas Tree Version
For a Christmas tree garland, make a longer cream cord and add more bows.
Space the bows approximately 20–30 cm / 8–12 in apart.
Wrap the finished garland loosely around the tree.
Turn each bow toward the front after positioning the cord between the branches.
Color Variations
Classic Christmas: deep red bows + warm cream cord.
Vintage Christmas: burgundy bows + antique ivory cord.
Winter Neutral: cream bows + oatmeal cord.
Forest Christmas: dark green bows + cream cord.
Candy Cane: alternate red and cream bows.
Elegant Christmas: burgundy bows + champagne beige cord.
Where to Display Your Crochet Bow Garland
- Fireplace mantel
- Christmas tree
- Staircase railing
- Window frame
- Entryway console
- Open shelving
- Bed headboard
- Kitchen shelves
- Holiday party table
Care Instructions
Spot clean using cool water and a small amount of mild detergent.
Do not wring or twist the bows.
Reshape each bow while damp and allow the garland to air dry flat.
For storage, loosely coil the cord and place tissue paper inside each bow loop to help preserve its shape.
Frequently Asked Questions
Yes. The pattern mainly uses chains and single crochet. The most important part is shaping and assembling the individual bow pieces.
Yes. Start with fewer chains for the main rectangle and reduce the number of rows. Keep the same construction method for the loops, tails and center wrap.
Five to seven medium bows usually create a balanced mantel garland. For a wider fireplace, increase the number of bows while maintaining even spacing.
Yes. Use matching red yarn for a completely monochromatic garland, or dark green yarn for a stronger Christmas contrast.
A smooth worsted or aran-weight cotton blend gives good stitch definition and structure. Acrylic can also work well when crocheted with firm tension.
Yes. The same bows can be used as Christmas tree ornaments, wreath decorations, gift toppers, chair decorations or individual mantel accents.
Avoid flattening them during assembly. Keep the loops slightly curved, pinch the center firmly and allow the two tails to hang independently.
The finished Crochet Christmas Bow Garland Pattern