Crochet Christmas Candle Centerpiece Pattern
Beginner Friendly
Perfect for those just starting their crochet journey, with clear instructions and simple techniques
Single-Day Project
A satisfying project you can complete in a single afternoon or evening.
Handmade Gift
A beautiful keepsake — free forever. Read online or print at home.
About This Crochet Christmas Candle Centerpiece Pattern
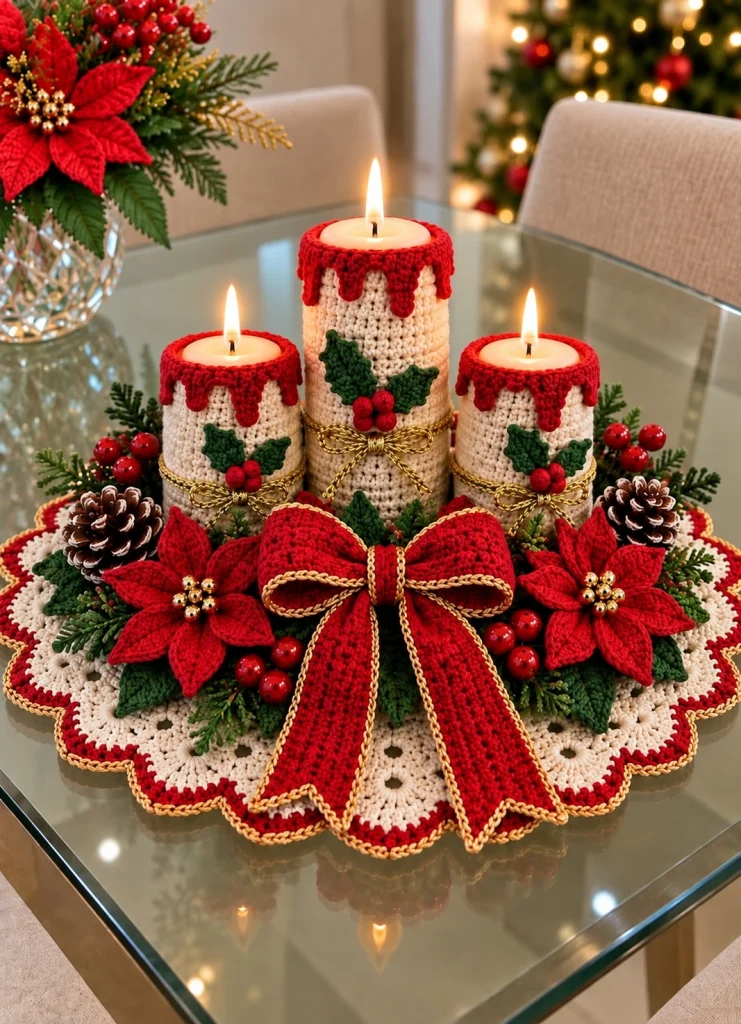
This crochet Christmas candle centerpiece pattern creates an impressive holiday table decoration featuring three candle columns surrounded by red poinsettias, green foliage, berries, pinecones and a large dimensional crochet bow.
The cream, Christmas red, deep green and metallic-gold palette gives the centerpiece an elegant traditional look. The individual elements can also be used separately for wreaths, garlands, table runners and other Christmas decorations.
Materials
- Cream cotton yarn DK / light worsted
- Christmas red yarn DK / light worsted
- Dark green yarn DK / light worsted
- Metallic gold crochet thread for decorative edging
- 3–3.5 mm crochet hook adjust to yarn
- 3 LED pillar candles recommended for safety
- Gold beads for poinsettia centers
- Floral wire or pipe cleaners optional for shaping
- Yarn needle 1
- Scissors 1 pair
- Stitch markers optional
Abbreviations – US Terms
MRmagic ringchchainsl stslip stitchscsingle crochethdchalf double crochetdcdouble crochettrtreble crochetststitchspspaceFOfasten offPart 1 – Crochet the Center of the Base
Using cream yarn, make a MR.
Round 1: ch 3, work 11 dc into MR. Join with sl st. (12 dc)
Round 2: ch 3, 1 dc in same st, 2 dc in every st around. Join. (24 dc)
Round 3: ch 3, *2 dc in next st, 1 dc in next st*. Repeat around.
Round 4: ch 3, *1 dc in next 2 sts, 2 dc in next st*. Repeat around.
Continue increasing evenly until the circle measures approximately 30–35 cm / 12–14 in.
Part 2 – Create the Openwork Lace Section
Once the solid center reaches the desired size, begin the decorative lace section.
Round 1: ch 1, sc in same st, *ch 4, skip 2 sts, sc in next st*. Repeat around.
Round 2: sl st into first ch-space, ch 3, work 3 dc into same space, ch 2, 4 dc into next space.
Repeat around, increasing occasionally as necessary to keep the work completely flat.
Part 3 – Add the Red Accent Round
Change to red yarn.
Work one decorative round around the cream base.
Into each larger chain space work:
3 dc, ch 2, 3 dc.
Into each smaller connecting space work 1 sc.
Continue evenly around and join with sl st.
Part 4 – Crochet the Scalloped Cream Border
Change back to cream yarn.
Work the following into each red ch-2 space:
1 sc, 1 hdc, 3 dc, 1 hdc, 1 sc.
Repeat around to create the large scalloped outer edge.
Keep each scallop relaxed so the base lies flat.
Part 5 – Add the Gold Outer Edge
Join metallic gold thread at any point along the outer border.
Work loose sl sts around the complete edge.
Follow every curve of the scallops.
Do not pull the metallic thread tightly or the border may curl.
FO and weave in securely.
Part 6 – Measure the Candle Sleeves
Measure the circumference and height of each LED pillar candle.
The centerpiece uses:
1 tall center candle
2 shorter side candles
The crochet sleeves should fit snugly but still slide on and off.
Part 7 – Crochet the Cream Candle Sleeve
Using cream yarn, ch enough stitches to fit snugly around your candle.
Join carefully with sl st, making sure the chain is not twisted.
Round 1: ch 1, sc in every ch around. Join.
Rounds 2 onward: ch 1, sc in every st around.
Continue until the sleeve reaches just below the top edge of the candle.
Repeat for all three candles.
Part 8 – Crochet the Red Dripping Candle Rim
Join red yarn around the upper edge of a cream sleeve.
Round 1: sc evenly around.
For the next round, alternate short and long decorative sections:
Short drip: ch 3, sl st back toward the rim.
Medium drip: ch 5, work back with sc.
Long drip: ch 7, work back with sc or hdc.
Space the drips irregularly around the candle for a natural melted-wax appearance.
Repeat for all three sleeves.
Part 9 – Crochet a Holly Leaf
Using dark green yarn, ch 12.
Starting in 2nd ch from hook:
1 sc, 1 hdc, 2 dc, 3 tr, 2 dc, 1 hdc, 1 sc.
Work 3 sc into the final chain.
Continue along the opposite side with corresponding stitches.
For a pointed tip, work sc, ch 2, sc at the end.
FO.
Part 10 – Add Holly Leaf Texture
Rejoin green yarn near the base of the leaf.
Surface crochet a line toward the tip to form the central vein.
For a more natural holly shape, work occasional ch 2 picots around the outer edge.
Make approximately 6 small leaves for the candles and additional leaves for the base.
Part 11 – Crochet the Red Holly Berries
Using red yarn, make a MR.
Round 1: work 6 sc into MR.
Round 2: 2 sc in each st. (12)
Round 3: sc around.
Stuff lightly with a tiny amount of yarn.
Round 4: sc2tog around.
FO and close the opening.
Make berries in groups of three.
Part 12 – Decorate the Candle Sleeves
Position two green holly leaves on the front of each candle sleeve.
Overlap their bases slightly.
Sew three red berries over the leaf bases.
Keep the decoration centered on the front of the sleeve.
Part 13 – Add the Gold Candle Bow
Wrap metallic gold cord or a crocheted gold chain around the lower third of each candle.
Tie it into a small bow at the front.
Secure the center of the bow with several hidden stitches so it remains in position.
Repeat for all three candles.
Part 14 – Crochet a Large Poinsettia Petal
Using red yarn, ch 12.
Starting in 2nd ch from hook work:
1 sc, 1 hdc, 2 dc, 4 tr, 2 dc, 1 hdc.
Work 3 sc into the final chain.
Continue along the opposite side with corresponding stitches.
At the tip work sc, ch 2, sc.
FO.
Part 15 – Assemble a Poinsettia
Make 6 large petals and 5–6 slightly smaller petals.
Arrange the large petals in a circle.
Place the smaller petals over them, rotating the upper layer so the petals fill the spaces below.
Sew only through the center so the petals remain dimensional.
Add a cluster of approximately 6 gold beads to the center.
Part 16 – Make Three Poinsettias
Create three dimensional red poinsettias.
One will sit on the left of the large bow, one on the right, and the third can be positioned slightly toward the center or rear depending on your arrangement.
Make additional green leaves and place them beneath each flower.
Part 17 – Crochet the Large Red Bow Loops
Using red yarn, ch 16.
Row 1: hdc in 2nd ch from hook and across.
Rows 2–8: ch 1, turn, hdc across.
FO.
Make 2 identical rectangles.
Fold each rectangle into a loop and sew the short ends together.
Part 18 – Crochet the Bow Tails
Using red yarn, ch 13.
Work hdc across.
Continue for approximately 25–30 rows, or until the tail reaches the desired length.
For the pointed end, decrease gradually toward the center to form a shallow V.
Make two matching tails.
Part 19 – Add Gold Edging to the Bow
Join metallic gold thread around each bow loop.
Work loose sl sts around all visible edges.
Repeat around both long bow tails.
The gold should form a fine continuous outline.
Part 20 – Assemble the Large Bow
Place the two loops side by side.
Pinch them together at the center.
Position the two tails behind the loops.
Wrap a small red crochet band tightly around the center.
Sew securely through all layers.
Add a narrow gold outline around the center band if desired.
Part 21 – Crochet Decorative Pine Sprigs
Using dark green yarn, ch 20–30 depending on the required length.
Starting near the hook, work small branches along the foundation:
*ch 5, sl st back along the chain, sl st into next foundation stitch.*
Repeat along both sides of the main chain.
Make several sprigs in different lengths.
Part 22 – Optional Crochet Pinecones
Using dark brown yarn, make a MR.
Work 6 sc into the ring.
Increase to 12 sts.
Continue several rounds while working textured bobble or popcorn stitches.
Decrease gradually toward the bottom.
Stuff lightly before closing.
Make two or three pinecones.
Part 23 – Position the Three Candles
Place the tall candle at the back center of the crochet base.
Place one shorter candle slightly forward on the left and the other on the right.
Leave enough space between them for the surrounding foliage.
The three candles should form a balanced triangular arrangement.
Part 24 – Build the Greenery Layer
Arrange the green leaves and pine sprigs around the candle bases.
Let some leaves extend toward the outer scalloped border.
Overlap the foliage naturally instead of arranging everything in perfectly straight rows.
Once satisfied, sew the greenery securely to the crochet base.
Part 25 – Position the Poinsettias
Place one poinsettia toward the front left.
Place another toward the front right.
Add the remaining flower toward the center or slightly behind the large bow.
Sew only the flower centers and inner sections to the base so the outer petals remain raised.
Part 26 – Add Berry Clusters
Place small groups of red berries between the flowers and greenery.
Use clusters of three or five rather than single berries for a fuller Christmas look.
Sew each cluster securely to the base.
Part 27 – Add the Pinecones
Position one pinecone on each side of the arrangement.
Tuck them partly beneath the surrounding leaves.
Sew through the base of each pinecone several times.
Keep them slightly raised for a natural dimensional effect.
Part 28 – Attach the Large Bow
Place the large red bow at the front center of the arrangement.
The loops should sit above the greenery while the two long tails extend over the scalloped crochet base.
Sew the bow securely through the center band.
Add one or two hidden stitches near each tail if necessary to keep them positioned neatly.
Part 29 – Final Assembly
Insert the LED candles into their finished crochet sleeves.
Place them inside the centerpiece arrangement.
Check the composition from every side.
Adjust the leaves, poinsettia petals, berries and bow until the arrangement looks full and balanced.
Part 30 – Final Shaping
Gently shape the scalloped base.
Lift and curve the poinsettia petals slightly.
Open the bow loops with your fingers.
Arrange the pine sprigs so they radiate naturally from the center.
Lightly block any flat crochet pieces if necessary.
Color Variations
Traditional Christmas: cream, bright red, forest green and gold.
Elegant Christmas: ivory, burgundy, deep green and antique gold.
Winter: white, sage green and silver.
Rustic: oatmeal, dark red, olive and natural brown.
Glamorous: white, emerald green, ruby red and metallic gold.
Care & Storage
Remove the LED candles before cleaning.
Spot clean the decorated centerpiece whenever possible.
If washing is necessary, hand wash gently in cool water.
Do not wring.
Reshape all flowers, leaves and scallops while damp.
Dry completely flat.
Store in a wide box so the large bow and poinsettia petals are not crushed.
Frequently Asked Questions
LED candles are strongly recommended because the centerpiece contains yarn and decorative fibers close to the candle surface. Open flames should not be used near crochet decorations.
Yes. Use one candle instead of three, reduce the diameter of the base and add one large poinsettia with a smaller bow.
Yes. Replace the gold with cream, red or green yarn for a softer farmhouse-style finish.
Yes. The flower can be used for wreaths, garlands, Christmas stockings, gift toppers, napkin rings and tree decorations.
Sew only the bases and centers of the decorative pieces. Leaving the outer portions of the petals, leaves and bow loops unattached allows them to retain their raised shape.
The finished Crochet Christmas Candle Centerpiece Pattern

