Crochet Christmas Candle Centerpiece with Poinsettias and Bells – Free Advanced Pattern
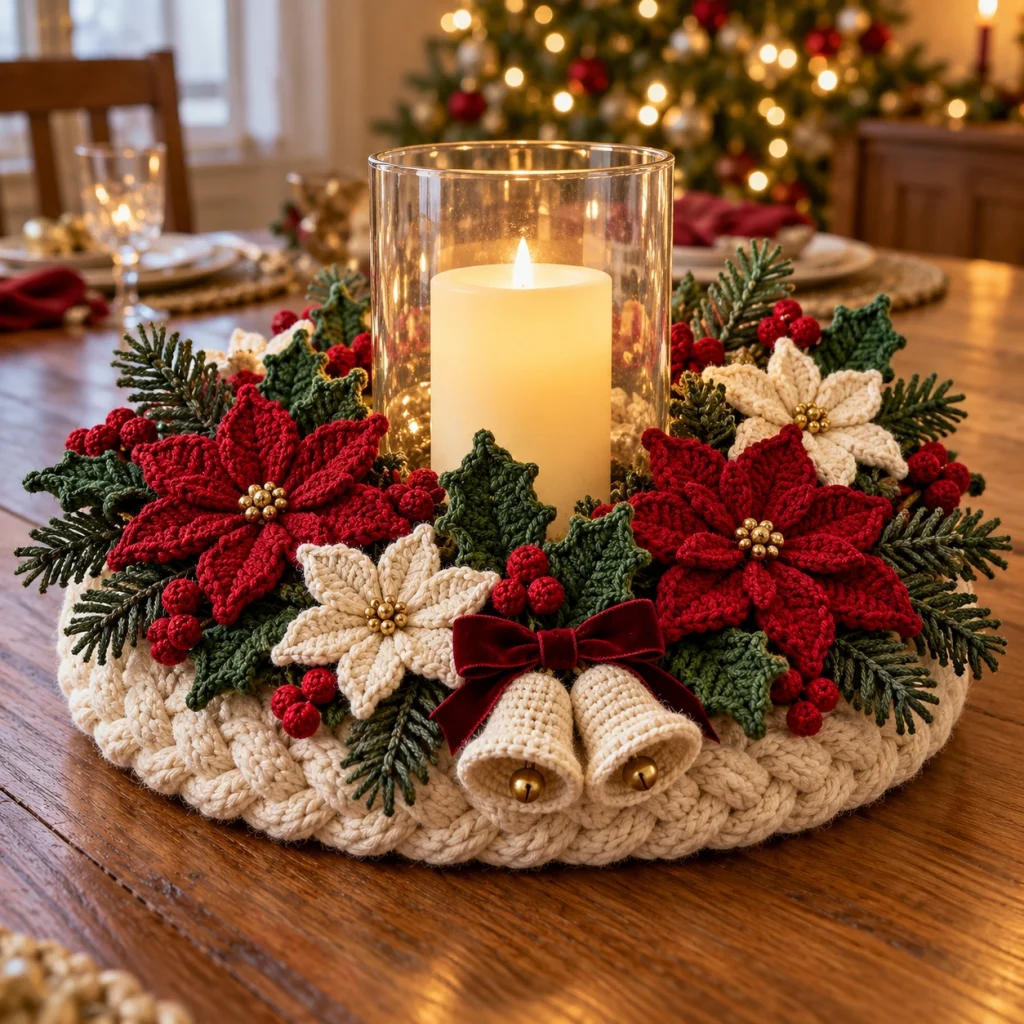
Create a stunning handmade holiday decoration with this elegant crochet Christmas candle centerpiece. Inspired by traditional festive floral arrangements, this design combines deep-red and ivory poinsettias, textured holly leaves, miniature crochet berries, evergreen foliage, and two charming cream bells tied with a burgundy bow.
The arrangement sits on a thick, braided ivory crochet wreath base surrounding a glass candle hurricane. Rich red flowers, soft cream accents, and dark-green leaves create a beautiful contrast, making this centerpiece a lovely addition to a Christmas dining table, mantel, or holiday display.
This free advanced crochet centerpiece pattern uses separately constructed floral elements, dimensional shaping, textured crochet techniques, and careful assembly to create a full, professional-looking decoration.
Pattern Overview
- Skill Level: Advanced
- Finished Diameter: Approximately 38–42 cm
- Finished Height: Approximately 18–22 cm, excluding the glass hurricane
- Construction: Separate wreath base, poinsettia petals, leaves, berries, foliage, bells, and bow
- Yarn Weight: DK cotton yarn
- Hooks: 2.5 mm, 3 mm, and 3.5 mm
- Terminology: US crochet terms
- Estimated Time: 20–28 hours
Materials
- 250 g ivory DK cotton yarn for the braided wreath base
- 120 g deep-red cotton yarn for poinsettias
- 90 g cream cotton yarn for ivory flowers and bells
- 130 g forest-green cotton yarn for leaves
- 50 g olive-green cotton yarn for foliage accents
- 30 g berry-red cotton yarn
- Small amount of gold yarn or embroidery thread
- 2.5 mm, 3 mm, and 3.5 mm crochet hooks
- Polyester fiberfill
- Yarn needle
- Scissors
- Stitch markers
- Gold beads for flower centers
- Two small decorative gold bells
- Burgundy ribbon, approximately 35 cm
- Optional artificial evergreen sprigs
- Optional floral wire for shaping leaves
- Removable, stable glass hurricane candle holder
- Battery-operated LED pillar candle
Safety: Use a battery-operated LED candle, not an open flame. Crochet yarn, ribbons, and decorative foliage are combustible. Keep the arrangement away from heat sources.
Crochet Abbreviations
- MR: Magic ring
- ch: Chain
- sc: Single crochet
- hdc: Half double crochet
- dc: Double crochet
- tr: Treble crochet
- sl st: Slip stitch
- inc: Increase
- dec: Decrease
- BLO: Back loop only
- FLO: Front loop only
- FO: Fasten off
Part 1: Crochet the Thick Braided Wreath Base
The foundation is a raised ivory wreath with a chunky braided appearance. It supports the flowers and leaves while leaving a clear central opening for the removable glass hurricane.
Step 1: Make Three Long Crochet Tubes
Using ivory yarn and a 3.5 mm hook, make a magic ring.
Round 1: Work 8 sc into the magic ring. (8)
Round 2: Inc in each stitch around. (16)
Rounds 3–160: Sc in each stitch around. (16)
Stuff the tube lightly as you work, keeping it flexible enough to braid.
FO, leaving a long sewing tail.
Repeat to make three identical tubes.
Step 2: Braid the Tubes
Secure the three tube ends together using a yarn needle.
Braid the tubes evenly, maintaining a consistent tension.
Curve the finished braid into a circular wreath.
Join the ends securely with mattress stitch, aligning each tube to create a continuous braid.
Adjust the wreath to approximately 38–42 cm in diameter.
Check that the center opening comfortably accommodates the glass hurricane without touching it.
Step 3: Reinforce the Wreath
Using ivory yarn, sew several hidden securing stitches around the underside of the braid.
This helps maintain the circular shape.
For additional stability, attach the wreath to a firm circular base covered with fabric or crochet.
Part 2: Crochet the Large Red Poinsettias
Make two large red poinsettias with layered, pointed petals and decorative gold centers.
Flower Center
Using red yarn and a 2.5 mm hook, make a magic ring.
Round 1: 6 sc into MR. (6)
Round 2: Inc around. (12)
Round 3: (Sc 1, inc) around. (18)
Join with a sl st.
Small Petal Layer – Make 6 Petals
Attach red yarn to an unused loop of the flower center.
Row 1: Ch 9.
Row 2: Sc in second ch from hook, hdc in next 2 ch, dc in next 3 ch, hdc in next ch, sc in last ch.
Continue around the opposite side of the foundation chain using matching stitches.
Work (sc, ch 2, sc) at the petal tip to create a defined point.
Sl st into the center.
Repeat until six petals are evenly distributed.
Large Petal Layer – Make 6 Petals
Using red yarn, ch 12 for each petal.
Sc in second ch from hook.
Hdc in next 2 ch.
Dc in next 6 ch.
Hdc in next ch.
Sc in last ch.
Work along the opposite side of the chain.
Add (sc, ch 2, sc) at the pointed end.
FO, leaving a long tail.
Make six separate large petals.
Assemble the Red Poinsettia
Arrange the six large petals behind the smaller petal layer.
Stagger them so the flower looks full and dimensional.
Sew each petal securely to the center.
Use red yarn to embroider a central raised vein along each petal.
Attach a cluster of small gold beads to the center.
Repeat for the second red poinsettia.
Part 3: Crochet the Ivory Poinsettias
Make two ivory poinsettias to balance the rich red flowers.
Follow the same construction as the red poinsettias, using cream or ivory yarn.
For a slightly smaller appearance, use a 2.5 mm hook and maintain firm tension.
Arrange the petals in two overlapping layers.
Add golden embroidery knots or small beads to the center.
Make one medium ivory poinsettia and one slightly smaller flower for the rear of the arrangement.
Part 4: Crochet the Textured Holly Leaves
The centerpiece uses dark-green holly leaves with pointed edges and visible central veins.
Make approximately 12–16 holly leaves.
Foundation
Using forest-green yarn and a 2.5 mm hook, ch 17.
Round 1
Sc in second ch from hook.
Hdc in next 2 ch.
Dc in next 10 ch.
Hdc in next 2 ch.
Work 3 sc in the final chain.
Continue along the opposite side of the foundation chain.
Hdc in next 2 ch.
Dc in next 10 ch.
Hdc in next 2 ch.
Sc in final stitch.
Join with a sl st.
Round 2: Holly Points
Ch 1.
Work sc along the leaf edge.
At evenly spaced positions, create pointed edges using:
(Sc, ch 3, sl st in second ch from hook, sc in next ch).
Continue around the leaf, creating three or four points on each side.
At the leaf tip, work (sc, ch 3, sc).
Join with a sl st.
Leaf Veins
Using lighter green yarn, embroider a central vein.
Add small diagonal veins extending toward the pointed edges.
FO and weave in ends.
Part 5: Crochet the Evergreen Sprigs
Evergreen sprigs fill the spaces between flowers and give the centerpiece a lush, natural appearance.
Make 12–18 sprigs in dark and olive green.
Main Stem
Using dark-green yarn, ch 22.
Sl st in second ch from hook and continue with sl st across.
Needle Branches
Working back along the stem, create small side branches.
*Ch 6, sl st in second ch from hook and across the remaining 4 ch, sl st into the next stem stitch.*
Repeat along one side.
Turn and repeat along the opposite side, staggering the branches.
FO and weave in ends.
Make several sprigs in different lengths by adjusting the foundation chain.
Part 6: Crochet the Red Berry Clusters
Make approximately 24–30 berries to arrange in groups of three.
Round 1
Using berry-red yarn, make a magic ring.
Work 6 sc into MR. (6)
Round 2
Inc around. (12)
Rounds 3–4
Sc around. (12)
Round 5
Dec around. (6)
Insert a small amount of fiberfill.
FO and close the opening.
Assemble the Clusters
Group three berries together.
Sew them onto a short crocheted green stem.
Make eight to ten berry clusters.
Part 7: Crochet the Two Ivory Bells
Two decorative cream bells hang at the front of the centerpiece beneath a burgundy bow.
Bell Body
Using ivory yarn and a 2.5 mm hook, make a magic ring.
Round 1: 6 sc into MR. (6)
Round 2: Inc around. (12)
Round 3: (Sc 1, inc) around. (18)
Rounds 4–7: Sc around. (18)
Round 8: (Sc 2, inc) around. (24)
Round 9: Sc around. (24)
Round 10: (Sc 3, inc) around. (30)
Round 11: Hdc in each stitch around. (30)
Round 12: Work 2 hdc in each stitch around. (60)
Join with a sl st.
FO and weave in ends.
Bell Rim
Attach ivory yarn to the lower edge.
Work one round of reverse single crochet to create a firm decorative rim.
FO.
Bell Clapper
Attach a small decorative gold bell inside each crochet bell using strong thread.
Secure the thread at the top of the bell.
Repeat to make the second bell.
Part 8: Create the Burgundy Bow
Cut approximately 35 cm of burgundy velvet ribbon.
Form a medium-sized bow with two symmetrical loops.
Wrap the center tightly with matching thread.
Trim the ribbon ends neatly.
Attach the two crocheted bells beneath the bow using short yarn loops.
Secure the bow to the front of the wreath.
Part 9: Assemble the Christmas Centerpiece
Step 1: Prepare the Base
Place the completed ivory braided wreath on a flat surface.
Position the removable glass hurricane in the center to check the spacing.
Remove it while attaching the decorative elements.
Step 2: Attach the Evergreen Sprigs
Arrange the crocheted evergreen sprigs around the inner and outer edges of the wreath.
Alternate dark-green and olive-green sprigs.
Sew them securely to the braided base.
Step 3: Position the Holly Leaves
Place the holly leaves between the evergreen sprigs.
Angle some leaves outward and others upward.
Overlap them slightly to create a full wreath appearance.
Step 4: Attach the Red Poinsettias
Position one large red poinsettia on the left-front side.
Place the second red poinsettia on the right-front side.
Sew both flowers firmly to the base.
Step 5: Add the Ivory Flowers
Position the larger ivory poinsettia between the red flowers near the front.
Place the smaller ivory poinsettia toward the rear-right side.
Adjust the petals so each flower remains visible.
Step 6: Add the Berry Clusters
Distribute the berry clusters between the flowers and leaves.
Concentrate several clusters around the front and side sections.
Secure them with hidden stitches.
Step 7: Attach the Bells and Bow
Place the burgundy bow at the front-center edge of the wreath.
Allow the two ivory bells to hang slightly over the braided base.
Check that both bells are evenly positioned.
Step 8: Final Arrangement
Fill any visible gaps with additional evergreen sprigs.
Adjust the leaves to create a balanced arrangement.
Reposition the flower petals as needed.
Place the glass hurricane in the center.
Insert a battery-operated LED pillar candle.
Advanced Crochet Techniques Used
- Magic-ring construction
- Working in continuous rounds
- Increasing and decreasing
- Dimensional petal shaping
- Layered floral assembly
- Textured leaf edging
- Decorative embroidery
- Crochet tube construction
- Three-strand braided assembly
- Amigurumi berry shaping
- Three-dimensional bell construction
- Invisible sewing techniques
- Balanced decorative arrangement
Color Variations
- Classic Christmas: Deep red, ivory, forest green, and gold.
- Winter Elegance: White poinsettias, sage leaves, and silver accents.
- Rustic Christmas: Terracotta flowers, olive-green foliage, and beige bells.
- Vintage Holiday: Burgundy flowers, cream leaves, and antique-gold accents.
- Modern Neutral: Ivory flowers, eucalyptus-green foliage, and champagne ribbon.
- Traditional Festive: Bright red poinsettias, emerald leaves, and white berries.
Tips for a Professional Finish
- Use firm cotton yarn for the poinsettia petals.
- Maintain consistent tension throughout each flower.
- Block the petals before assembling the flowers.
- Use smaller hooks for delicate decorative pieces.
- Arrange all elements before sewing them permanently.
- Place larger flowers first and fill gaps afterward.
- Stagger the leaves to avoid a flat appearance.
- Keep the berry clusters compact.
- Secure beads and bells with strong thread.
- Reinforce the braided wreath base.
- Keep the center opening clear.
- Use only a battery-operated LED candle.
Frequently Asked Questions
Is this crochet Christmas centerpiece beginner-friendly?
This pattern is designed for advanced crocheters. It includes multiple separately constructed elements, dimensional flowers, shaped leaves, and detailed assembly.
How large is the finished centerpiece?
The finished wreath measures approximately 38–42 cm across, depending on yarn tension and assembly.
Can I make the centerpiece smaller?
Yes. Use thinner yarn, a smaller hook, and fewer floral elements. Adjust the braided base to fit your chosen candle holder.
Can I use acrylic yarn?
Yes, but cotton yarn is recommended for better stitch definition and structure. Regardless of fiber type, keep the project away from heat and open flames.
Can I use a real candle?
No. Because the centerpiece contains yarn, ribbon, and decorative foliage, use a battery-operated LED candle only.
Can I replace the poinsettias with other flowers?
Yes. Crochet roses, winter flowers, or decorative leaves can be substituted while keeping the same wreath construction.
How many poinsettias do I need?
This design uses four poinsettias: two large red flowers and two ivory flowers.
Can I add more berries?
Absolutely. Additional berry clusters can make the centerpiece appear fuller, but avoid overcrowding the flowers.
Can I wash the finished centerpiece?
Spot cleaning is recommended because the arrangement contains several delicate decorative elements and optional beads or wire.
Can I sell finished centerpieces made from this pattern?
Yes. You may sell handmade finished items created from this original pattern. Credit to the pattern designer is appreciated.
Care Instructions
- Dust gently with a soft brush.
- Spot clean with a slightly damp cloth.
- Avoid soaking the assembled decoration.
- Do not machine wash.
- Keep away from heat and direct flames.
- Reshape petals and leaves carefully when necessary.
- Store in a clean, dry container.
- Protect the flowers from being crushed.
- Remove the LED candle before storage.
- Keep decorative beads and small bells away from young children and pets.
Final Thoughts
This crochet Christmas candle centerpiece with poinsettias and bells combines beautiful handmade textures with timeless holiday colors. The chunky braided ivory base, layered red and cream flowers, richly textured greenery, festive berries, and decorative bells create an elegant centerpiece that looks beautiful from every angle.
Display it on your Christmas dining table, a sideboard, or a holiday console table to add a cozy handmade touch to your seasonal decorations.
Love this free crochet Christmas centerpiece pattern? Save it to Pinterest and share it with fellow crochet lovers for more beautiful holiday crochet inspiration!

