Crochet Christmas Door Swag Pattern – Festive Poinsettia Holiday Door Decoration
Beginner Friendly
Perfect for those just starting their crochet journey, with clear instructions and simple techniques
Single-Day Project
A satisfying project you can complete in a single afternoon or evening.
Handmade Gift
A beautiful keepsake — free forever. Read online or print at home.
About This Crochet Christmas Door Swag Pattern – Festive Poinsettia Holiday Door Decoration
Crochet Christmas Door Swag Pattern – Beautiful Poinsettia Holiday Door Decoration
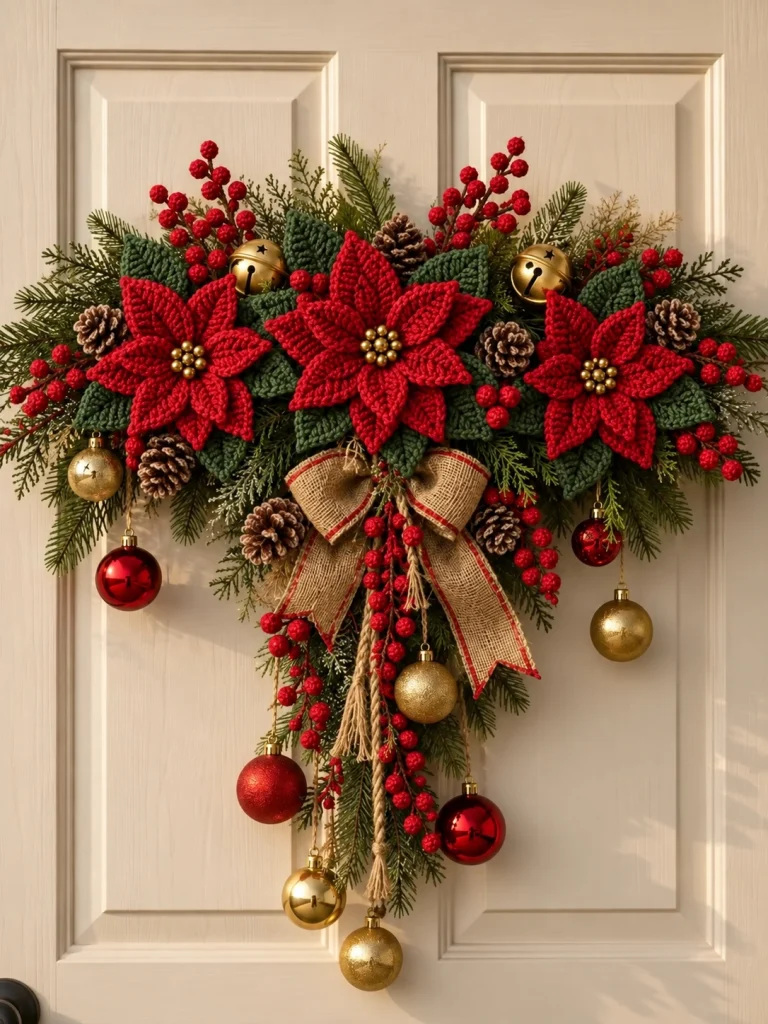
Welcome the holiday season with a breathtaking crochet Christmas door swag! This festive handmade decoration features three gorgeous red crochet poinsettias surrounded by rich green foliage, bright red berries, rustic pinecones, golden bells, and elegant Christmas ornaments.
Finished with a beautiful burlap bow and cascading holiday greenery, this Christmas door arrangement brings traditional festive charm to any home.
Whether you’re decorating your front door, preparing a thoughtful handmade gift, or looking for a special Christmas crochet project, this elegant poinsettia door swag is sure to become a treasured holiday decoration.
Materials You’ll Need
- Worsted-weight yarn in Christmas red and forest green
- Small amounts of gold or mustard yarn for flower centers
- 3.5 mm and 4 mm crochet hooks
- Yarn needle
- Stitch markers
- Scissors
- Strong floral wire or a lightweight swag frame
- Floral tape
- Artificial evergreen branches
- Artificial red berry stems
- Small natural pinecones
- Gold jingle bells
- Lightweight red and gold Christmas baubles
- Wide burlap ribbon with red edging
- Jute twine for hanging
- Strong sewing thread or floral wire for assembly
Skill Level: Intermediate
Estimated Time: 5–8 hours, depending on the number of flowers and decorative elements
Finished Size: Approximately 45–60 cm wide and 65–85 cm long, depending on the arrangement
Pattern Note: This original tutorial is inspired by the pictured decoration. The crochet flowers and leaves are handmade, while the evergreen branches, pinecones, bells, berries, and baubles may be ready-made decorative elements. Exact placement and dimensions can be customized.
Crochet Abbreviations – US Terms
- MR – Magic ring
- ch – Chain
- sc – Single crochet
- hdc – Half double crochet
- dc – Double crochet
- tr – Treble crochet
- sl st – Slip stitch
- inc – Increase
- FO – Fasten off
Part 1 – Crochet the Large Red Poinsettia Petals
Begin with Christmas-red yarn and a 3.5 mm crochet hook.
Each large poinsettia will have five outer petals and five smaller inner petals.
Large Outer Petal – Make 5
R1: Ch 15.
R2: Starting in the second chain from the hook, work 1 sc, 2 hdc, 8 dc, 2 hdc, and 1 sc. Ch 1 and turn to work along the opposite side of the foundation chain.
R3: Work 1 sc, 2 hdc, 8 dc, 2 hdc, and 1 sc along the opposite side.
R4: Sl st into the first stitch to close the petal outline.
FO, leaving a long tail for assembly.
Gently shape the petal into an elongated pointed leaf.
Repeat until you have five large red petals.
Part 2 – Crochet the Smaller Inner Petals
Small Inner Petal – Make 5
R1: Ch 11.
R2: Starting in the second chain from the hook, work 1 sc, 2 hdc, 4 dc, 2 hdc, and 1 sc.
R3: Ch 1, turn to the opposite side of the foundation chain, and repeat the same stitch sequence.
R4: Sl st to close the petal outline.
FO, leaving a long sewing tail.
Repeat until you have five smaller petals.
The smaller petals will form the raised center layer of the poinsettia.
Part 3 – Assemble the Poinsettia Flower
Arrange the five large petals in a star shape, slightly overlapping their bases.
Use a yarn needle and matching red yarn to sew the bases together securely.
Position the five smaller petals on top, rotating them slightly so they sit between the larger petals.
Sew the inner petals securely to the center.
Adjust the petals to create a full, dimensional Christmas poinsettia.
For the door swag shown, make three poinsettias:
- 1 large central poinsettia
- 2 slightly smaller side poinsettias
For the side flowers, use a smaller hook or slightly thinner yarn while keeping the same construction.
Part 4 – Crochet the Golden Flower Center
Using golden-yellow yarn:
R1: Make 6 sc in MR. (6)
R2: Work 2 sc in each stitch. (12)
R3: Sl st into the first stitch and FO.
For extra dimension, crochet several small bobbles or attach securely stitched gold-colored beads to the flower center.
Sew the center onto the poinsettia, covering the joined petal bases.
Repeat for all three flowers.
Safety Tip: If using decorative beads, secure each bead individually so it cannot detach easily.
Part 5 – Crochet the Dark Green Leaves
Use forest-green yarn and a 3.5 mm crochet hook.
Large Leaf – Make 8–12
R1: Ch 16.
R2: Starting in the second chain from the hook, work 1 sc, 2 hdc, 9 dc, 2 hdc, and 1 sc.
R3: Ch 1 and work along the opposite side of the foundation chain using the same stitch sequence.
R4: Sl st to close the leaf outline.
FO, leaving a long tail.
For a more natural shape, gently pinch the tip of each leaf.
Optional: Add a central vein using surface slip stitches in a slightly lighter shade of green.
Part 6 – Crochet Smaller Green Leaves
Make 6–10 smaller leaves for filling spaces between the poinsettias.
R1: Ch 11.
R2: Starting in the second chain, work 1 sc, 2 hdc, 4 dc, 2 hdc, and 1 sc.
R3: Ch 1 and repeat along the opposite side.
R4: Sl st to finish.
FO and weave in the ends, leaving a sewing tail where needed.
These smaller leaves add fullness and help the poinsettias blend naturally into the greenery.
Part 7 – Make Optional Crochet Red Berries
For a fully handmade touch, crochet small red berries using Christmas-red yarn.
R1: 6 sc in MR. (6)
R2: Inc in each stitch. (12)
R3–R4: 1 sc in each stitch. (12)
R5: Dec around. (6)
Add a tiny amount of stuffing before closing.
FO and weave the yarn through the remaining stitches to close.
Make several berries and group them into small clusters.
Attach the clusters to short lengths of wrapped floral wire if desired.
Part 8 – Prepare the Door Swag Base
Use a lightweight floral swag frame or create a base with sturdy floral wire.
Shape the base into a wide horizontal arrangement with a gently cascading center.
The design should be widest across the top and narrow toward the bottom.
Secure the structure with floral tape and additional wire.
Attach a strong hanging loop to the upper back of the frame.
Make sure the base can support the finished decoration without bending.
Part 9 – Arrange the Evergreen Branches
Begin with artificial pine or fir branches.
Attach longer branches horizontally across the top of the frame.
Angle shorter branches outward to create a natural fan shape.
Add several longer evergreen stems pointing downward from the center.
Keep the overall arrangement balanced while allowing the foliage to look soft and organic.
Secure each branch firmly using floral wire.
Part 10 – Position the Crochet Poinsettias
Place the largest red poinsettia in the center of the upper arrangement.
Position one smaller poinsettia on the left and one on the right.
Allow the petals to overlap some of the surrounding greenery.
Arrange the flowers so all three are clearly visible from the front.
Sew or wire each flower securely to the swag base.
Check the overall balance before tightening the attachments.
Part 11 – Add the Crochet Green Leaves
Tuck the large crochet leaves behind the red poinsettias.
Arrange smaller leaves around the sides and between the flowers.
Use the leaves to create depth and contrast against the bright red petals.
Keep the leaves angled naturally rather than arranging them in perfectly straight rows.
Secure them with yarn or floral wire.
Part 12 – Add the Red Berry Clusters
Place bright red berry stems behind and between the poinsettias.
Allow several clusters to extend upward from the top of the swag.
Add smaller berry clusters along the sides.
Position a few longer berry stems to cascade downward through the center.
The berries create a beautiful festive contrast against the dark green foliage.
Part 13 – Decorate with Natural Pinecones
Choose small or medium natural pinecones.
Wrap floral wire around the base of each pinecone.
Attach the pinecones between the poinsettias and greenery.
Place a few near the outer edges and several around the central flower.
For a winter-inspired finish, lightly brush the pinecone tips with white craft paint and let them dry before assembly.
Part 14 – Add the Golden Jingle Bells
Attach two or three golden jingle bells near the upper poinsettias.
Position them among the greenery so they are visible without overpowering the crochet flowers.
Use thin floral wire to secure each bell.
The gold accents add warmth and a traditional Christmas feel.
Part 15 – Add the Hanging Christmas Baubles
Select lightweight red and gold Christmas baubles in different sizes.
Attach short lengths of strong thread or thin decorative cord to each ornament.
Hang several baubles from the outer sections of the swag.
Allow a few ornaments to hang lower through the center.
Alternate red and gold colors for a balanced arrangement.
Keep the hanging lengths varied to create movement and visual interest.
For a lightweight door decoration, shatterproof plastic baubles are preferable to glass ornaments.
Part 16 – Make the Rustic Burlap Bow
Cut a generous length of wide burlap ribbon with red edging.
Create two large loops and pinch the ribbon at the center.
Wrap the center securely with floral wire or jute twine.
Leave two long ribbon tails hanging downward.
Trim the ends into neat V shapes.
Fluff the loops and adjust the bow until it looks full and symmetrical.
Part 17 – Attach the Bow to the Door Swag
Position the burlap bow directly beneath the central poinsettia.
Secure it to the frame using floral wire.
Arrange the ribbon tails so they cascade naturally through the hanging greenery.
Allow the tails to overlap some of the red berries and evergreen branches.
For an elegant finish, keep the bow centered without covering the crochet flowers.
Part 18 – Create the Cascading Center
Gather several long evergreen stems, berry branches, and strands of jute twine.
Attach them beneath the central bow.
Arrange the stems at different lengths to create a tapered shape.
Add one or two lightweight Christmas baubles toward the lower ends.
Keep the arrangement full near the top and more delicate toward the bottom.
This cascading section gives the door swag its distinctive elegant silhouette.
Part 19 – Final Assembly and Finishing
Place the completed swag on a flat surface.
Check that the three poinsettias are evenly spaced.
Adjust the greenery to fill any visible gaps.
Make sure all bells, pinecones, baubles, and berry stems are securely attached.
Trim any visible loose yarn ends or excess floral wire.
Gently reshape the crochet petals and leaves.
Lift the decoration by its hanging loop and check that the arrangement remains balanced.
Part 20 – Hang Your Crochet Christmas Door Swag
Choose a sturdy wreath hanger or door hook suitable for the finished weight.
Hang the swag near the upper center of your door.
Adjust the hanging loop until the arrangement sits at your preferred height.
Allow the cascading greenery and ornaments to hang freely.
For outdoor display, use a sheltered doorway to protect the crochet pieces from rain, snow, and prolonged moisture.
Christmas Door Swag Color Variations
Traditional Christmas: Bright red poinsettias, forest-green leaves, gold bells, and burlap ribbon.
Elegant Burgundy: Burgundy flowers, dark green foliage, champagne-gold accents, and cream ribbon.
Winter Wonderland: Ivory poinsettias, sage-green leaves, silver ornaments, and white ribbon.
Rustic Farmhouse: Deep red flowers, natural pinecones, wooden ornaments, and neutral burlap bows.
Vintage Christmas: Cranberry-red poinsettias, antique gold bells, dark evergreen branches, and velvet ribbon.
Tips for a Beautiful Handmade Christmas Door Swag
- Use firm crochet stitches so the flower petals hold their shape.
- Choose rich red yarn for a traditional Christmas appearance.
- Layer large and small crochet leaves to create natural depth.
- Use a lightweight frame to make hanging easier.
- Secure all decorations carefully before placing the swag on a door.
- Keep the central poinsettia slightly larger than the side flowers.
- Use red berries and gold accents sparingly to avoid overcrowding.
- Arrange the greenery in a wide upper shape with a tapered center.
- Use shatterproof ornaments for doors that open and close frequently.
- Protect the finished decoration from prolonged moisture and direct harsh weather.
Care and Storage Instructions
- Dust gently using a soft brush.
- Spot clean crochet flowers with a slightly damp cloth.
- Avoid soaking the entire arrangement.
- Keep away from open flames and excessive heat.
- Store in a large protective box after the holiday season.
- Support the crochet petals to prevent crushing.
- Keep the swag in a dry, cool location.
- Reshape the flowers and bow before displaying again.
Frequently Asked Questions
Is this crochet Christmas door swag suitable for beginners?
The individual flowers and leaves use common crochet stitches, but assembling the layered poinsettias and arranging the full door decoration requires patience. The project is best suited to intermediate crocheters.
Can I make the entire swag from crochet?
Yes! You can replace artificial berries, evergreen branches, and other decorative elements with handmade crochet versions. However, a sturdy internal frame is still recommended to support the arrangement.
Can I use cotton yarn instead of acrylic?
Absolutely. Cotton yarn offers excellent stitch definition and gives the poinsettia petals a structured appearance. Acrylic yarn is also suitable and may be lighter for a large hanging decoration.
How many poinsettias do I need?
Three poinsettias create the balanced design shown in the inspiration image. You can make additional flowers for a larger arrangement or use fewer flowers for a simpler decoration.
Can I hang this decoration outdoors?
It is best displayed on a sheltered front door or indoors. Crochet yarn and natural decorative materials can deteriorate when exposed to rain and prolonged moisture.
How can I make the crochet petals stiffer?
Use firm crochet tension, choose cotton yarn, or apply a suitable fabric stiffener according to its instructions. Always test stiffener on a spare yarn sample first.
Can I make a smaller version?
Yes! Use smaller flowers, fewer branches, and a compact frame. A miniature Christmas swag looks lovely on interior doors, cabinets, or as a festive wall decoration.
Is this a good handmade Christmas gift?
Definitely! A crochet poinsettia door swag makes a thoughtful handmade gift for family members, friends, neighbors, and anyone who loves traditional Christmas decorations.
Final Thoughts
This beautiful crochet Christmas door swag combines the warmth of handmade crochet with the timeless beauty of traditional holiday decorating.
The three-dimensional red poinsettias, rich green leaves, festive berry clusters, rustic pinecones, golden bells, and cascading burlap bow create a stunning arrangement that can transform an ordinary doorway into a welcoming Christmas display.
Whether you make it for your own home or give it as a special handmade gift, this festive project is a wonderful way to celebrate creativity, craftsmanship, and the joy of the holiday season.
Happy crocheting, and may your home be filled with Christmas warmth and handmade magic! 🎄❤️
The finished Crochet Christmas Door Swag Pattern – Festive Poinsettia Holiday Door Decoration

