Crochet Christmas Door Swag Pattern
Beginner Friendly
Perfect for those just starting their crochet journey, with clear instructions and simple techniques
Single-Day Project
A satisfying project you can complete in a single afternoon or evening.
Handmade Gift
A beautiful keepsake — free forever. Read online or print at home.
About This Crochet Christmas Door Swag Pattern
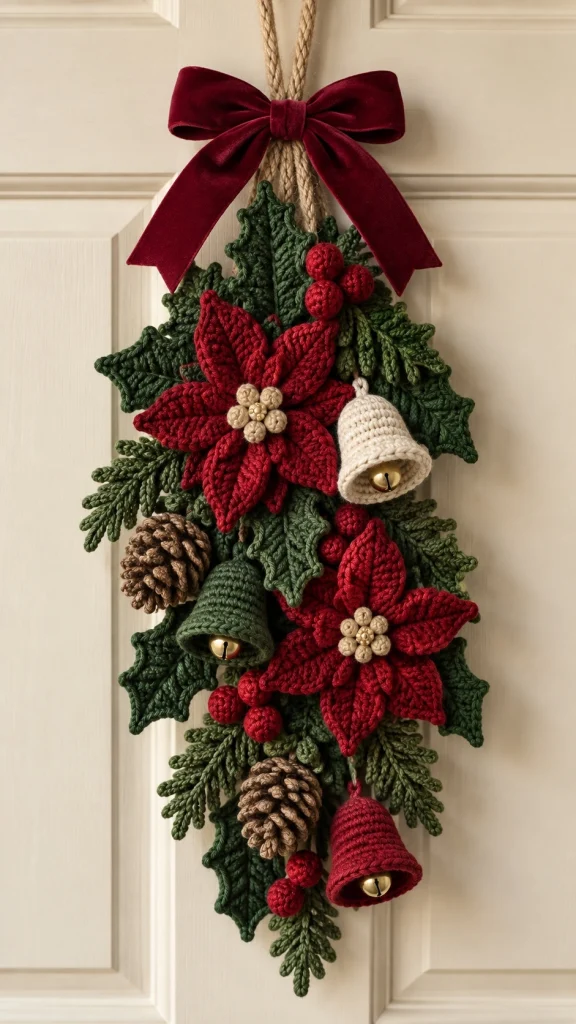
This crochet Christmas door swag pattern creates an elegant handmade decoration filled with classic holiday details: rich red poinsettias, deep green holly leaves, textured evergreen sprigs, crochet berries, pinecones and three charming bells.
The long cascading shape makes it especially beautiful on a front door, interior door or narrow wall. A deep burgundy velvet-style bow at the top gives the arrangement a polished traditional Christmas finish.
Materials
- Worsted / aran #4 yarn – deep forest green 250-300 g
- Worsted / aran #4 yarn – olive green 80-100 g
- Worsted / aran #4 yarn – Christmas red 150-180 g
- Worsted / aran #4 yarn – warm cream 60-80 g
- Worsted / aran #4 yarn – medium brown 60-80 g
- Worsted / aran #4 yarn – beige / champagne 30 g
- 3.5-4 mm crochet hook 1
- Fiberfill small amount
- Small gold jingle bells 3
- Floral wire or craft wire optional
- Jute cord for hanging 80-100 cm
- Wide burgundy ribbon 1-1.5 m
- Yarn needle 1
- Scissors 1 pair
Abbreviations
MRmagic ringchchainsl stslip stitchscsingle crochethdchalf double crochetdcdouble crochettrtreble crochetincincreasedecdecreaseststitchreprepeatFOfasten offFinished Size
- Overall length: approximately 60-70 cm
- Widest point: approximately 28-32 cm
- Large poinsettias: approximately 15-17 cm
- Bells: approximately 8-10 cm
Main Swag Base
The hidden base supports all of the decorative pieces.
- Using forest green, ch 71.
- Starting in the 2nd ch from the hook, sc across. (70 sts)
- Ch 1, turn.
- Sc across for 5 more rows.
- FO, leaving a long sewing tail.
For a firmer decoration, place floral wire along the back and sew it securely beneath the crocheted strip.
Large Poinsettia – Make 2
Each flower is made from two layers of pointed petals.
Flower Center
- With beige yarn, make an MR.
- Work 6 sc into the ring.
- Join with sl st.
- Work 2 sc in each st around. (12 sts)
- FO.
Large Petals – Make 6
- Using red, ch 10.
- Sl st in 2nd ch from hook.
- Sc in next ch.
- Hdc in next 2 ch.
- Dc in next 3 ch.
- Hdc in next ch.
- Work 5 dc into final chain.
- Continue along opposite side of foundation chain.
- Hdc, dc in next 3, hdc in next 2, sc, sl st.
- FO.
Small Petals – Make 6
- Ch 8.
- Sl st in 2nd ch.
- Sc, hdc, dc in next 3 sts.
- Hdc in next st.
- Work 5 dc into final chain.
- Mirror the stitches along the opposite side.
- FO.
Arrange the six large petals first. Place the six smaller petals over the gaps, then sew the beige center securely on top.
Large Holly Leaves – Make 10-14
- Using dark green, ch 15.
- Sl st in 2nd ch from hook.
- Sc, hdc, dc, tr in the next stitches.
- Work alternating sl st and groups of taller stitches along the chain to create pointed holly edges.
- Work 5 dc into the final chain.
- Repeat the pointed stitch sequence along the opposite side.
- Sl st into the first stitch.
- FO.
For extra definition, surface crochet one line of olive green down the center of each leaf.
Evergreen Sprigs – Make 12-18
- With forest green, ch 22.
- Beginning in the 2nd ch, sl st into the next 3 chains.
- Ch 5.
- Sl st back down the new chain.
- Sl st into the next 2 stitches of the main stem.
- Ch 6 and sl st back down.
- Continue creating alternating branches along both sides.
- Make branches slightly shorter near the tip.
- FO.
Mix dark forest green and olive green sprigs to keep the greenery from looking too uniform.
Crochet Berries – Make 12-16
- With red, make an MR.
- Work 6 sc into MR.
- Round 2: inc around. (12)
- Rounds 3-4: sc around. (12)
- Add a tiny amount of fiberfill.
- Round 5: dec around. (6)
- Close the opening and FO.
Sew berries together in clusters of three for the most natural arrangement.
Crochet Pinecones – Make 2-3
Use two shades of brown for extra texture.
- With brown, ch 22.
- Work 3 dc into each chain across.
- The strip will naturally curl into a spiral.
- Roll the strip tightly from one end.
- Shape it into an oval pinecone.
- Sew through the center several times to secure.
- Add a few darker brown stitches between the layers if desired.
Crochet Christmas Bells – Make 3
Make one cream, one forest green and one red bell.
- MR, 6 sc. (6)
- Round 2: inc around. (12)
- Round 3: (sc, inc) around. (18)
- Rounds 4-7: sc around. (18)
- Round 8: (2 sc, inc) around. (24)
- Round 9: sc around. (24)
- Round 10: (3 sc, inc) around. (30)
- Round 11: sc around. (30)
- Round 12: reverse sc around for a firm decorative rim.
- FO.
Thread a small gold jingle bell onto yarn and secure it inside the center of each crochet bell.
Bell Hanging Loop
- Attach matching yarn to the top center.
- Ch 12.
- Sl st back into the attachment point.
- FO securely.
Keep the three loops slightly different lengths so the bells sit naturally among the foliage.
Small Greenery Leaves
These small leaves are useful for filling visible gaps after the main arrangement is assembled.
- Ch 9.
- Sl st in 2nd ch.
- Sc, hdc, dc, dc, hdc, sc.
- Work 3 sc into final chain.
- Repeat the stitch sequence along the opposite side.
- FO.
Make approximately 15-20 in mixed shades of green.
Assembly – Step 1: Greenery
- Lay the long green base vertically.
- Position the largest holly leaves along both sides.
- Angle some leaves upward and others downward.
- Add evergreen sprigs between the leaves.
- Allow the bottom greenery to taper into a point.
- Sew every piece firmly to the base.
Assembly – Step 2: Poinsettias
- Place one poinsettia slightly above the center.
- Place the second poinsettia below and slightly to the opposite side.
- Avoid placing both flowers directly in one straight line.
- Sew through the flower centers and several petals.
Assembly – Step 3: Bells, Berries & Pinecones
- Place the cream bell near the upper poinsettia.
- Place the green bell around the middle section.
- Place the red bell toward the lower end.
- Add pinecones between large sections of greenery.
- Position berry clusters around both poinsettias.
- Fill remaining gaps with small leaves and evergreen sprigs.
Top Hanging Cord
- Cut three lengths of sturdy jute cord approximately 70 cm each.
- Fold them in half.
- Attach securely to the upper back of the crochet base.
- Bring the strands together at the top to form the hanging loop.
- Knot securely.
The cord should carry the weight of the decoration rather than relying on the crocheted foliage.
Burgundy Christmas Bow
A wide velvet-style burgundy bow creates the elegant finish shown in this design.
- Cut approximately 1-1.5 m of wide ribbon.
- Form two generous loops.
- Leave two long tails.
- Secure the center tightly with thread or floral wire.
- Wrap a smaller piece of matching ribbon around the center.
- Attach the bow where the hanging cords meet.
Final Shaping
- Hang the finished swag vertically.
- Gently bend wired leaves outward.
- Separate overlapping evergreen branches.
- Rotate the bells so their openings remain visible.
- Shape poinsettia petals individually.
- Check for exposed base sections and cover them with spare greenery.
Optional Variations
- Traditional: red, forest green, cream and brown
- Vintage: burgundy, olive, oatmeal and antique gold
- Snowy Christmas: ivory, sage, champagne and soft gold
- Rustic: brick red, pine green, camel and natural jute
- Elegant: wine red, dark emerald, ivory and gold
Ways to Customize Your Christmas Swag
- Add tiny crochet stars among the greenery.
- Use wooden beads between berry clusters.
- Add a fourth smaller poinsettia.
- Replace pinecones with crochet acorns.
- Add tiny gold beads to the poinsettia centers.
- Use metallic thread around the bell rims.
- Add removable battery fairy lights.
- Make a shorter version for cabinet doors.
Care & Storage
Because this decoration contains several sculptural pieces, spot cleaning is recommended. Avoid machine washing once the swag has been completely assembled.
After Christmas, store it flat in a large box rather than folding it. Place tissue paper between the flowers and bells to protect their shape until next season.
Frequently Asked Questions
The individual crochet stitches are fairly simple, but the project contains many separate pieces and requires careful assembly. An adventurous beginner can make it slowly, while intermediate crocheters should find the construction comfortable.
It is best used on a protected door or covered porch. Regular yarn can absorb rain and moisture, so avoid exposing the decoration directly to wet weather.
No, but wire helps the long arrangement maintain its shape and allows the leaves and evergreen branches to be positioned more precisely.
Yes. Crochet a long rectangle in burgundy yarn, fold it into two loops, wrap a narrow crocheted strip around the center and attach two separate tails behind it.
Add more evergreen sprigs and small holly leaves underneath the main decorations. Layering greenery at different angles creates much more volume than simply increasing the number of large flowers.
Yes. Use the same poinsettias, bells, berries, pinecones and greenery around a crocheted or wrapped circular wreath base for a coordinated holiday set.
The finished Crochet Christmas Door Swag Pattern