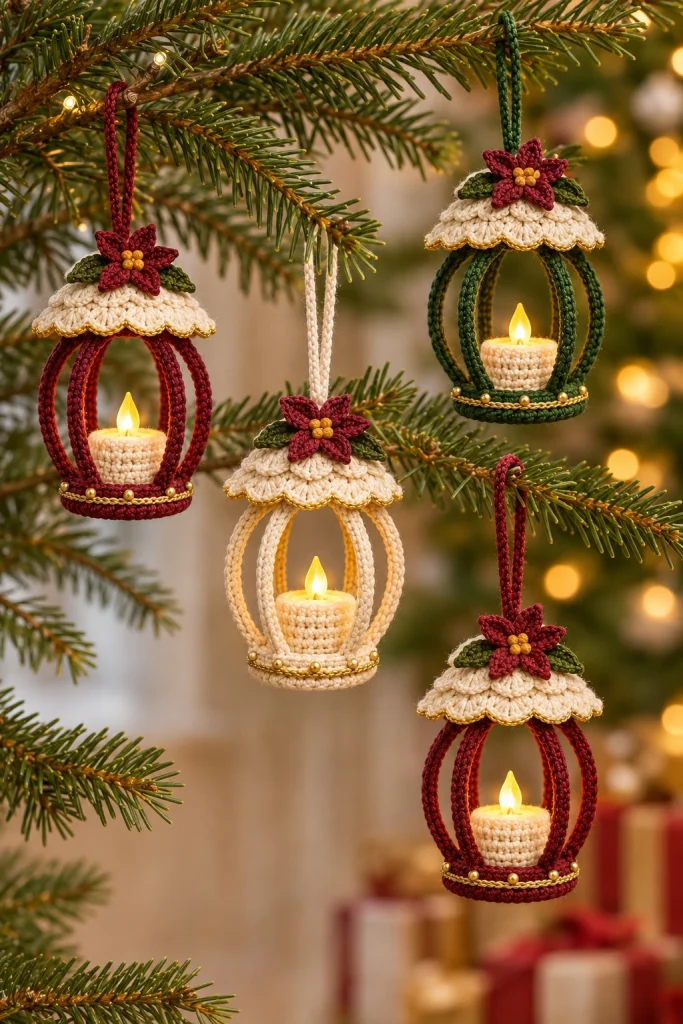
Crochet Christmas Lantern Ornaments – Free Advanced Pattern
Bring a magical handmade glow to your Christmas tree with these beautiful Crochet Christmas Lantern Ornaments! Featuring elegant openwork frames, scalloped ivory roofs, delicate poinsettia flowers, and miniature glowing LED candles, these charming decorations combine traditional crochet craftsmanship with timeless holiday elegance.
Inspired by classic Christmas lanterns, these ornaments feature a rounded cage-shaped silhouette made from curved crochet ribs. Each lantern is topped with a decorative cream-colored roof, a burgundy poinsettia flower, tiny golden accents, and a matching hanging cord.
The collection includes four beautiful color combinations: festive burgundy, traditional forest green, and elegant winter ivory. Their warm candlelight creates a cozy Christmas atmosphere, making them perfect for decorating trees, garlands, windows, and holiday displays.
This free advanced crochet pattern will guide you through creating the lantern base, curved structural ribs, decorative roof, miniature candle holder, poinsettia flower, and hanging loop.
Pattern Details
- Skill Level: Advanced
- Finished Height: Approximately 12–15 cm, excluding hanging loop
- Finished Width: Approximately 8–10 cm
- Yarn Weight: Sport or DK cotton yarn
- Hook Size: 2.5 mm–3.0 mm
- Construction: Separate crocheted components assembled into a three-dimensional lantern
- Main Colors: Burgundy red, forest green, ivory cream, and metallic gold
- Decoration: Miniature poinsettia flowers, green leaves, gold beads, and scalloped edging
- Lighting: Miniature battery-operated LED tealight only
- Terminology: US crochet terms
Pattern Note: This is an original, untested pattern inspired by the reference image. The construction is designed to approximate the pictured lanterns, so some shaping and sizing adjustments may be necessary.
Materials Needed
- 50–70 g burgundy red cotton yarn
- 50–70 g forest green cotton yarn
- 70–100 g ivory cotton yarn
- Small amount of mustard yellow yarn
- Metallic gold crochet thread
- 2.5 mm crochet hook
- 3.0 mm crochet hook
- Four miniature battery-operated LED tealights
- Thin craft wire or flexible plastic boning for structural support
- Small gold decorative beads
- Stitch markers
- Tapestry needle
- Scissors
- Measuring tape
- Fabric-safe craft glue, optional
- Small amount of polyester stuffing, optional
Important Safety Note: Use battery-operated LED candles only. Never place a real flame inside a crochet lantern. Keep batteries and small beads away from young children and pets, and ensure the LED unit remains accessible for switching off and replacing batteries.
Crochet Abbreviations
- MR: Magic ring
- ch: Chain
- sc: Single crochet
- hdc: Half double crochet
- dc: Double crochet
- tr: Treble crochet
- sl st: Slip stitch
- st: Stitch
- inc: Increase
- dec: Decrease
- BLO: Back loop only
- FLO: Front loop only
- FO: Fasten off
- RS: Right side
- WS: Wrong side
1. Understanding the Lantern Construction
Each Christmas lantern ornament is constructed from several separate crochet components.
The main structure consists of a circular bottom base, six curved vertical ribs, a scalloped decorative roof, and a small hanging loop.
The center remains open so the miniature LED candle is clearly visible.
The decorative components include:
- One circular bottom base
- One raised outer base rim
- Six curved vertical lantern ribs
- One circular roof foundation
- One scalloped ivory roof overlay
- One miniature poinsettia flower
- Two small green leaves
- One crocheted hanging loop
- One removable miniature LED candle holder
- Optional gold beads and metallic edging
Work the main structural pieces first, then assemble the lantern before attaching the decorative elements.
2. Crochet the Circular Lantern Base
Using burgundy red yarn and a 2.5 mm crochet hook, begin with a magic ring.
Round 1
Work 6 sc into MR. (6)
Round 2
Work 2 sc into each stitch around. (12)
Round 3
Work (1 sc, inc) around. (18)
Round 4
Work (2 sc, inc) around. (24)
Round 5
Work (3 sc, inc) around. (30)
Round 6
Work (4 sc, inc) around. (36)
Round 7
Work (5 sc, inc) around. (42)
Round 8
Work (6 sc, inc) around. (48)
Round 9
Work (7 sc, inc) around. (54)
Round 10
Work (8 sc, inc) around. (60)
Continue increasing by six stitches per round until the base measures approximately 8–9 cm in diameter.
Work one round of sc without increasing.
Fasten off and weave in the ends.
The base should lie flat and remain firm enough to support the LED candle.
3. Create the Raised Decorative Base Rim
Attach the same burgundy yarn to the outer edge of the circular base.
Round 1
Work sc evenly around the outer edge.
Round 2
Work sc in BLO around.
Round 3
Work one round of hdc.
Round 4
Work one round of sc.
Fasten off.
Using metallic gold thread, work a decorative surface slip stitch around the upper rim.
For an elegant finishing touch, sew small gold beads at evenly spaced intervals around the base.
The raised rim should measure approximately 1–1.5 cm high.
4. Crochet the Curved Lantern Ribs
The curved vertical ribs are the most distinctive structural feature of this design.
Each lantern requires six matching ribs.
Using burgundy red yarn and a 2.5 mm crochet hook, ch 31.
Row 1
Sc into the second chain from the hook and into each remaining chain. (30)
Row 2
Ch 1, turn, sc across. (30)
Row 3
Ch 1, turn, sc across. (30)
Row 4
Ch 1, turn, work sl st across to create a firm reinforced edge.
Fasten off, leaving a long sewing tail.
Repeat until you have six identical ribs.
Each rib should measure approximately 10–12 cm long, depending on your yarn and tension.
5. Shape and Reinforce the Lantern Ribs
To create the rounded cage appearance, each crochet rib must curve outward from the base before joining the upper roof section.
Gently bend each rib into an outward arch.
For additional stability, place thin flexible plastic boning inside a folded crochet rib or attach it discreetly along the inner surface.
If using craft wire, ensure all ends are fully covered and secured so no sharp points remain exposed.
Shape all six ribs to the same curve.
The widest section of the lantern should be approximately 8–10 cm across.
The ribs should remain evenly spaced around the circular base.
Do not attach the roof until all six ribs have been shaped.
6. Attach the Lantern Ribs to the Base
Place the circular base on a flat surface.
Use stitch markers to divide the outer rim into six equal sections.
Position the first rib at one marked point.
Sew the lower end securely to the raised base rim.
Repeat with the remaining five ribs.
Make sure all ribs are attached at equal intervals.
Gently curve the ribs upward and inward.
Gather their upper ends toward the center.
Temporarily secure them with stitch markers or scrap yarn.
The lantern should now resemble an open rounded cage.
7. Crochet the Roof Foundation
Using ivory cotton yarn and a 2.5 mm crochet hook, begin with a magic ring.
Round 1
Work 6 sc into MR. (6)
Round 2
Work 2 sc into each stitch around. (12)
Round 3
Work (1 sc, inc) around. (18)
Round 4
Work (2 sc, inc) around. (24)
Round 5
Work (3 sc, inc) around. (30)
Round 6
Work (4 sc, inc) around. (36)
Round 7
Work (5 sc, inc) around. (42)
Round 8
Work (6 sc, inc) around. (48)
Continue until the roof foundation measures approximately 8–9 cm in diameter.
Do not fasten off.
8. Create the Scalloped Roof Edge
The scalloped ivory roof gives the lantern its romantic vintage appearance.
Work the following decorative edging around the outer edge of the roof foundation.
Scallop Round
Ch 1, sc into the first stitch.
Skip 2 stitches.
Work 6 dc into the next stitch.
Skip 2 stitches.
Sc into the next stitch.
Repeat around, adjusting the final spacing if necessary.
Join with sl st.
Fasten off.
Attach metallic gold thread and work a delicate slip stitch edging along the outer scallops.
Keep the metallic thread loose enough to preserve the natural scalloped shape.
The finished roof should have a softly layered, decorative appearance.
9. Add a Second Decorative Roof Layer
For a fuller roof resembling the reference image, create a second smaller scalloped circle.
Using ivory yarn, begin with MR.
Round 1
Work 6 sc into MR. (6)
Round 2
Work 2 sc into each stitch around. (12)
Round 3
Work (1 sc, inc) around. (18)
Round 4
Work (2 sc, inc) around. (24)
Round 5
Work (3 sc, inc) around. (30)
Finish with a small scalloped edging.
Position this smaller layer over the larger roof.
Sew the centers together while leaving the outer scallops free.
This creates a beautiful layered roof with additional depth and texture.
10. Attach the Roof to the Lantern Frame
Position the completed roof above the curved ribs.
Arrange the upper ends of the six ribs evenly beneath the roof foundation.
Sew each rib securely to the underside of the roof.
Maintain equal spacing.
Check that the lantern remains symmetrical.
The roof should sit horizontally while the ribs form a rounded cage below.
Reinforce the attachment points with additional stitches.
Gently adjust the ribs until the lantern has a balanced shape.
11. Crochet the Miniature LED Candle Holder
Using ivory cotton yarn, begin with a magic ring.
Round 1
Work 6 sc into MR. (6)
Round 2
Work 2 sc into each stitch around. (12)
Round 3
Work (1 sc, inc) around. (18)
Round 4
Work (2 sc, inc) around. (24)
Round 5
Work sc in BLO around. (24)
Rounds 6–9
Work sc around without increasing. (24)
Fasten off and weave in the ends.
The holder should resemble a tiny ivory candle cup.
Place a miniature battery-operated LED tealight inside.
Adjust the dimensions to fit your chosen LED light.
Keep the LED unit removable so the battery can be replaced easily.
12. Position the Candle Inside the Lantern
Place the finished miniature candle holder at the center of the circular base.
Make sure it sits flat.
Use a few removable attachment stitches or a small detachable fastening system to prevent the holder from shifting.
Do not permanently seal the LED candle inside the crochet structure.
Switch on the LED light to check the finished effect.
The warm glow should shine through the open spaces between the curved ribs.
13. Crochet the Miniature Poinsettia Flower
Each lantern is decorated with a small burgundy poinsettia flower at the top of the roof.
Using burgundy yarn and a 2.5 mm crochet hook, begin with MR.
Flower Center
Work 5 sc into MR.
Join with sl st.
Petal 1
Ch 5.
Starting in the second chain from the hook, work:
1 sc, 1 hdc, 1 dc, 1 hdc.
Sl st into the next stitch of the center ring.
Petals 2–5
Repeat the same sequence around the center.
Fasten off, leaving a sewing tail.
Gently shape each petal into a pointed oval.
For a fuller flower, create a second layer of slightly larger petals and sew it beneath the first.
The finished flower should measure approximately 3–4 cm across.
14. Crochet the Small Green Leaves
Using forest green yarn, ch 8.
Leaf Row 1
Starting in the second chain from the hook, work:
1 sc, 1 hdc, 3 dc, 1 hdc, 1 sc.
Ch 1 and rotate to work along the opposite side of the foundation chain.
Work:
1 sc, 1 hdc, 3 dc, 1 hdc, 1 sc.
Join with sl st.
Fasten off, leaving a sewing tail.
Repeat to create a second leaf.
For added detail, work a line of surface slip stitches along the center of each leaf.
Position the leaves behind the burgundy poinsettia flower.
15. Create the Golden Flower Center
Using mustard yellow yarn, begin with MR.
Work 5 small bobble stitches into the ring.
Pull the ring closed.
Fasten off.
Alternatively, crochet five small yellow beads or use tiny decorative gold beads.
Sew the golden center securely to the middle of the poinsettia flower.
The yellow center should contrast beautifully with the deep burgundy petals.
16. Attach the Poinsettia Decoration
Position the completed poinsettia flower at the center top of the ivory roof.
Arrange the two green leaves behind the flower.
Sew the leaves to the roof first.
Attach the poinsettia over the leaves.
Make sure the flower is centered and securely attached.
Adjust the petals so they point outward evenly.
The finished decoration should sit neatly above the scalloped roof.
17. Crochet the Hanging Loop
Using yarn that matches the lantern ribs, ch 45.
Sl st into the second chain from the hook and into each remaining chain.
Fasten off, leaving a long sewing tail.
Fold the cord into a loop.
Sew both ends securely to the center top of the roof, beneath the poinsettia flower.
Reinforce the attachment with several additional stitches.
Check that the loop is strong enough to support the complete lantern.
The hanging loop should measure approximately 8–10 cm when folded.
18. Create the Burgundy Lantern
For the classic burgundy version, use the following colors:
- Base: Deep burgundy red
- Curved ribs: Deep burgundy red
- Roof: Ivory cream
- Flower: Burgundy red
- Leaves: Forest green
- Flower center: Golden yellow
- Edging: Metallic gold
- Hanging loop: Burgundy red
This combination creates a rich, traditional Christmas ornament with a warm and elegant appearance.
19. Create the Forest Green Lantern
For the forest green version, follow the same instructions while changing the main structural color.
- Base: Forest green
- Curved ribs: Forest green
- Roof: Ivory cream
- Flower: Burgundy red
- Leaves: Dark olive green
- Flower center: Golden yellow
- Edging: Metallic gold
- Hanging loop: Forest green
The forest green version looks especially beautiful against natural evergreen branches.
20. Create the Ivory Lantern
For a soft winter-inspired ornament, crochet the lantern using ivory yarn for the main structure.
- Base: Ivory cream
- Curved ribs: Ivory cream
- Roof: Ivory cream
- Flower: Burgundy red
- Leaves: Forest green
- Flower center: Golden yellow
- Edging: Metallic gold
- Hanging loop: Ivory cream
This elegant color combination creates a delicate, vintage-inspired ornament that complements traditional and neutral Christmas decorations.
21. Final Assembly and Finishing
- Check that the circular base is flat and symmetrical.
- Make sure all six curved ribs are evenly spaced.
- Reinforce the attachment points between the ribs and roof.
- Adjust the roof so it sits horizontally.
- Check the scalloped edges for even spacing.
- Secure the poinsettia flower and green leaves.
- Attach the hanging loop firmly.
- Position the removable LED candle holder at the center.
- Add optional decorative gold beads around the base.
- Weave in all remaining yarn ends.
- Switch on the LED candle and check the lighting effect.
- Hang the ornament from a sturdy Christmas tree branch.
Your beautiful Crochet Christmas Lantern Ornament is now complete!
22. Advanced Crochet Tips
- Use firm cotton yarn for better stitch definition and structural stability.
- Keep all six ribs identical in length and width.
- Use stitch markers to maintain equal spacing during assembly.
- Reinforce the ribs discreetly if the lantern loses its rounded shape.
- Choose lightweight LED candles to avoid pulling the base downward.
- Maintain consistent tension when crocheting the scalloped roof.
- Use metallic gold thread sparingly for a refined decorative finish.
- Make the hanging loop strong enough to support the finished ornament.
- Keep the LED candle removable for easy battery replacement.
- Check all small decorations and beads for secure attachment.
23. Christmas Decorating Ideas
Christmas Tree Ornaments
Hang several lanterns throughout your Christmas tree to create a magical display of warm glowing lights.
Holiday Window Decorations
Hang the lanterns at different heights near a window for a charming winter-inspired arrangement.
Christmas Garland Accents
Attach the ornaments to an evergreen garland decorated with burgundy ribbons and golden accents.
Handmade Christmas Gifts
Gift a set of three lanterns in burgundy, green, and ivory to friends and family who appreciate handmade holiday decorations.
Festive Shelf Displays
Place the lanterns on decorative stands or sturdy hooks above a Christmas mantel or shelf.
Holiday Craft Fair Collection
Create coordinated sets in traditional Christmas colors for a beautiful handmade craft fair display.
24. Caring for Your Crochet Lantern Ornaments
- Remove the LED candle before cleaning.
- Dust gently using a soft brush.
- Avoid soaking ornaments containing wire or decorative beads.
- Keep the ornaments away from moisture.
- Store them in a dry, dust-free container.
- Use tissue paper to protect the scalloped roofs and flowers.
- Avoid crushing the curved lantern ribs during storage.
- Check the hanging loops before each holiday season.
- Remove batteries before long-term storage.
- Keep the ornaments away from open flames and excessive heat.
Frequently Asked Questions
Are these crochet Christmas lanterns suitable for beginners?
These ornaments are recommended for advanced crocheters because they require multiple separate components, three-dimensional shaping, structural reinforcement, and careful assembly.
What yarn works best for crochet lantern ornaments?
Sport or DK cotton yarn is recommended because it provides good stitch definition and helps maintain the lantern’s shape.
Can I use real candles inside the lanterns?
No. Never use real candles or open flames inside crochet ornaments. Use battery-operated LED tealights only.
How large are the finished lanterns?
Each lantern measures approximately 12–15 cm tall and 8–10 cm wide, excluding the hanging loop.
How many ribs does each lantern need?
Each lantern uses six curved crochet ribs, evenly spaced around the circular base.
Can I make the lanterns in different colors?
Yes. Burgundy, forest green, ivory, champagne, gold, and dusty rose are beautiful color options.
How do I keep the lantern ribs curved?
Use firm cotton yarn and reinforce the ribs with flexible plastic boning or carefully enclosed craft wire when necessary.
Can I make larger lanterns?
Yes. Increase the diameter of the base and roof, then adjust the rib length to maintain the rounded proportions.
Can the LED candle be replaced?
Yes. The candle holder is designed to remain accessible so the LED unit can be removed for battery replacement.
Are these ornaments suitable for Christmas gifts?
Absolutely! A coordinated set of handmade crochet lantern ornaments makes a beautiful and thoughtful Christmas gift.
Final Thoughts
These Crochet Christmas Lantern Ornaments are a wonderful way to bring warmth, elegance, and handmade charm to your holiday decorations.
With their delicate scalloped roofs, rounded openwork frames, festive poinsettia flowers, and softly glowing LED candles, these ornaments create a magical Christmas atmosphere.
Whether you choose classic burgundy, rich forest green, or elegant ivory, each lantern becomes a beautiful miniature work of crochet art.
Make a complete set for your Christmas tree, share them as handmade gifts, or use them to decorate your home throughout the holiday season.
Save this free crochet Christmas lantern pattern to Pinterest and share it with your crochet-loving friends!
Pattern disclaimer: This original pattern is inspired by the supplied reference image and has not been physically tested. Finished measurements, stitch counts, and assembly details may need adjustment based on yarn thickness, tension, and LED candle dimensions.

