Crochet Christmas Lantern Ornaments – Free Advanced Pattern
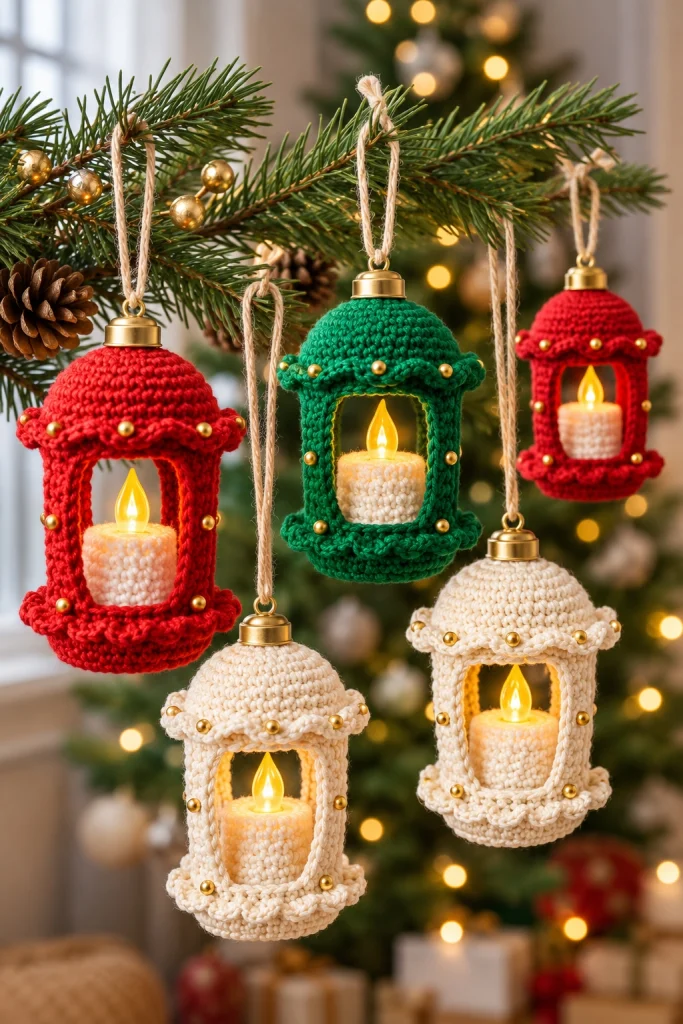
Bring a magical handmade glow to your Christmas tree with these beautiful Crochet Christmas Lantern Ornaments. Featuring miniature lantern-shaped crochet frames in festive red, emerald green, and warm ivory, these charming decorations combine textured crochet stitches, delicate scalloped edges, metallic gold beads, and tiny battery-operated LED candles.
Each lantern features a rounded dome, four open window panels, a decorative lower base, and a hanging loop. The finished ornaments create the appearance of glowing miniature Christmas lanterns while remaining lightweight enough to hang from tree branches.
Pattern Information
- Skill Level: Advanced
- Finished Size: Approximately 11–13 cm tall, excluding hanging loop
- Width: Approximately 6–7 cm
- Construction: Multiple separately crocheted pieces assembled around a reinforced lantern frame
- Yarn Weight: Sport-weight or DK cotton yarn
- Hook Size: 2.5 mm and 3 mm
- Colors: Christmas red, emerald green, warm ivory
- Terminology: US crochet terms
Materials Needed
- Red DK cotton yarn
- Emerald-green DK cotton yarn
- Warm ivory DK cotton yarn
- Small amount of cream yarn for candle sleeves
- 2.5 mm crochet hook
- 3 mm crochet hook
- Gold decorative beads, approximately 3–4 mm
- Five miniature battery-operated LED tealights or LED inserts
- Five small gold-colored ornament caps or hanging rings
- Natural cotton twine for hanging loops
- Thin, lightweight plastic canvas for structural reinforcement
- Tapestry needle
- Stitch markers
- Scissors
- Clear flexible craft adhesive, optional
Safety: Use only cool-running, battery-operated LED lights. Never place a real flame or heated light inside a crochet ornament. Keep button-cell batteries secured and inaccessible to children and pets.
Crochet Abbreviations
- MR: Magic ring
- ch: Chain
- sl st: Slip stitch
- sc: Single crochet
- hdc: Half double crochet
- dc: Double crochet
- tr: Treble crochet
- inc: Increase
- dec: Invisible decrease
- BLO: Back loop only
- FLO: Front loop only
- FO: Fasten off
1. Crochet the Rounded Lantern Dome
Choose red, emerald green, or ivory yarn and use a 2.5 mm crochet hook.
- Round 1: Make a magic ring and work 6 sc into the ring. (6)
- Round 2: Work 2 sc in each stitch around. (12)
- Round 3: *1 sc, inc* repeat six times. (18)
- Round 4: *2 sc, inc* repeat six times. (24)
- Round 5: *3 sc, inc* repeat six times. (30)
- Round 6: *4 sc, inc* repeat six times. (36)
- Round 7: *5 sc, inc* repeat six times. (42)
- Round 8: *6 sc, inc* repeat six times. (48)
- Rounds 9–11: Work 1 sc in each stitch around. (48)
- Round 12: Work in BLO, 1 sc in each stitch around. (48)
Fasten off and weave in the ends.
The dome should form a smooth rounded cap with a gently curved lower edge.
2. Create the Decorative Scalloped Dome Trim
Join matching yarn into an unused front loop from Round 12.
- Ch 1 and sc in the first stitch.
- *Skip 2 stitches, work 5 dc into the next stitch, skip 2 stitches, sc in the next stitch.*
- Repeat around the dome.
- Join with sl st and fasten off.
Adjust the final repeat if necessary to keep the scallops evenly spaced.
Sew small gold beads at the center of selected scallops to recreate the elegant decorative trim.
3. Crochet the Four Vertical Window Frames
Each lantern features four open window panels separated by narrow crochet columns.
Make four vertical frame strips using the same yarn color as the dome.
- Ch 23.
- Row 1: Starting in the second chain from the hook, work 22 sc.
- Row 2: Ch 1, turn, work 22 sc in BLO.
- Row 3: Ch 1, turn, work 22 sc.
- Fasten off, leaving a long sewing tail.
Repeat until four identical frame strips are completed.
Each strip should be firm enough to maintain its shape without curling.
4. Create the Window Borders
Make four rectangular window outlines.
- Ch 19.
- Work 18 sc along the chain.
- At the end, ch 2 to form a corner.
- Continue working around the foundation to form an elongated oval-rectangle frame.
- Add one additional round of sc to strengthen the window border.
- Fasten off.
Shape each window into a softly rounded rectangle, approximately 3 × 5 cm.
Attach the four window frames evenly around the lantern structure, leaving the centers completely open for the LED candle to remain visible.
5. Crochet the Lower Lantern Base
Use the same yarn color as the dome.
- Round 1: MR, 6 sc. (6)
- Round 2: Inc in every stitch. (12)
- Round 3: *1 sc, inc* repeat six times. (18)
- Round 4: *2 sc, inc* repeat six times. (24)
- Round 5: *3 sc, inc* repeat six times. (30)
- Round 6: *4 sc, inc* repeat six times. (36)
- Round 7: *5 sc, inc* repeat six times. (42)
- Round 8: *6 sc, inc* repeat six times. (48)
- Round 9: BLO, 1 sc in each stitch. (48)
- Rounds 10–11: Work 1 sc in each stitch around. (48)
Fasten off, leaving a long tail for assembly.
Insert a matching circular piece of lightweight plastic canvas into the base to provide support for the LED candle.
6. Add the Lower Scalloped Border
Join matching yarn to the outer edge of the base.
- Ch 1, sc in the first stitch.
- *Skip 2 stitches, work 5 dc into the next stitch, skip 2 stitches, sc in the next stitch.*
- Repeat around.
- Join with sl st.
Gently shape the scallops outward to create the decorative lantern base visible in the reference design.
7. Assemble the Lantern Structure
- Position the four vertical crochet strips evenly around the lower dome edge.
- Secure each strip using matching yarn and a tapestry needle.
- Attach the lower ends of the strips to the lantern base.
- Position the four decorative window borders between the vertical supports.
- Sew the window borders carefully to the frame.
- Check that the dome and base remain centered.
- Insert narrow strips of plastic canvas behind the vertical supports if additional stability is needed.
- Secure all reinforcement pieces so no sharp edges are exposed.
The completed lantern should hold its shape while leaving four open windows for the LED candlelight.
8. Crochet the Miniature Candle Sleeve
Use ivory yarn and a 2.5 mm hook.
- Round 1: MR, 6 sc. (6)
- Round 2: Inc around. (12)
- Round 3: *1 sc, inc* repeat six times. (18)
- Round 4: BLO, sc around. (18)
- Rounds 5–8: Sc around. (18)
- Fasten off.
This creates a small textured sleeve that can surround the base of a miniature LED light.
Adjust the circumference to fit your specific LED insert. Do not cover the battery compartment, switch, or ventilation openings.
For the warm glowing effect shown in the photograph, choose a miniature flickering LED candle with a flame-shaped light.
9. Add the Gold Bead Details
Use small gold beads to decorate the lantern frame.
- Sew gold beads around the upper scalloped trim.
- Add beads along the vertical window borders.
- Position additional beads around the lower decorative base.
- Secure each bead individually using strong matching thread.
Keep the bead spacing symmetrical for a polished, elegant finish.
10. Create the Hanging Loop
Cut approximately 25 cm of natural cotton twine.
- Fold the twine in half.
- Pass both ends through the gold ornament cap or hanging ring.
- Secure the twine with a strong double knot.
- Attach the ring firmly to the center of the crochet dome.
- Weave the ends through several stitches inside the dome.
Test the hanging loop before placing the lantern on a Christmas tree.
11. Make the Complete Five-Lantern Set
For a coordinated collection matching the reference image, make:
- Two red crochet lanterns
- One emerald-green crochet lantern
- Two warm ivory crochet lanterns
Use identical stitch patterns and gold accents for every lantern, changing only the main yarn color.
Keep the domes, window frames, and bases consistent so the finished set looks professionally coordinated.
12. Finishing and Shaping
- Weave in all loose yarn ends.
- Check that every frame is securely attached.
- Shape the dome and scalloped borders by hand.
- Lightly steam-block the separate crochet pieces before final assembly if needed.
- Insert the miniature LED candle into the lantern base.
- Confirm that the LED switch remains accessible.
- Hang the lantern securely from a sturdy tree branch.
Advanced Crochet Tips
- Use tightly twisted cotton yarn for clearly defined stitches.
- Maintain consistent tension to keep the lantern frames symmetrical.
- Use plastic canvas reinforcement to prevent the windows from collapsing.
- Keep all four vertical supports equal in length.
- Attach beads only after the crochet structure is assembled.
- Use removable LED candles so batteries can be replaced easily.
- Choose warm-white LEDs for a cozy golden glow.
Creative Color Variations
- Classic Christmas: Red, emerald green, and ivory with gold beads.
- Winter Wonderland: Ice blue, white, and silver.
- Vintage Holiday: Burgundy, cream, and antique gold.
- Elegant Neutral: Champagne, beige, and ivory.
- Forest Cottage: Moss green, rust, and oatmeal.
Frequently Asked Questions
Can I use real candles inside the crochet lanterns?
No. Crochet yarn is flammable. Always use battery-operated LED lights and never place real candles or open flames inside these ornaments.
Can I make the lanterns without plastic canvas?
Yes, but the structure may become softer and less stable. Firm cotton yarn and tight stitches can help maintain the shape.
Can I use acrylic yarn?
Yes, although cotton yarn is generally preferred for its stitch definition and firmness. Keep all yarn away from heated light sources.
How do I make the lanterns larger?
Use thicker yarn and a larger hook, or increase the dome and base rounds proportionally. Adjust the window supports to match.
How should I store the ornaments?
Remove the batteries and store the lanterns in a dry box with tissue paper to preserve their shape.
Can I sell finished lantern ornaments?
Yes. You may sell finished handmade lanterns created using these original instructions.
Final Thoughts
These Crochet Christmas Lantern Ornaments combine traditional crochet craftsmanship with the warm beauty of miniature glowing decorations.
Their rounded domes, elegant open windows, delicate scalloped borders, and gold bead details create a charming handmade Christmas decoration that looks beautiful on a tree, garland, or festive display.
Make a complete set in red, emerald green, and ivory for a coordinated holiday collection that can be enjoyed year after year.
Save this free crochet Christmas lantern ornament pattern to Pinterest and share it with your crochet-loving friends!

