Crochet Christmas Mitten Door Hanger Pattern – Beautiful Poinsettia Holiday Decoration
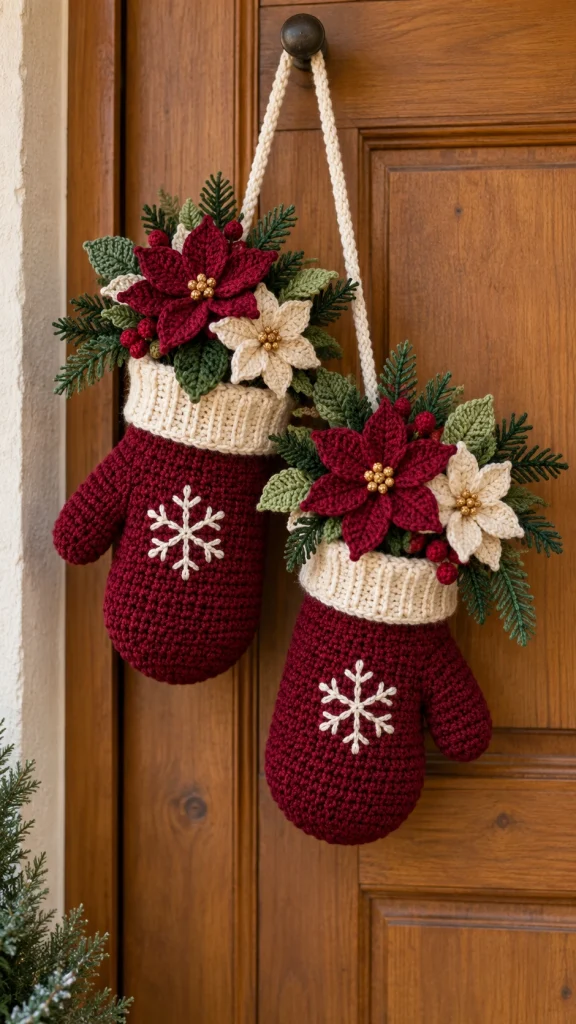
Bring a little handmade Christmas magic to your home with this beautiful crochet Christmas mitten door hanger! Featuring two deep burgundy crochet mittens, cozy cream cuffs, delicate snowflake embroidery, and gorgeous poinsettia flowers, this festive decoration is a wonderful way to welcome the holiday season.
The rich burgundy yarn, soft ivory details, evergreen leaves, and tiny golden accents create a warm, traditional Christmas look. Hung together with a braided cream cord, these oversized mittens make a lovely decoration for a front door, entryway, mantel, or cozy farmhouse living room.
In this tutorial, you’ll learn how to crochet the mittens, create the ribbed cuffs, embroider the snowflakes, make decorative poinsettia flowers, and assemble everything into a beautiful holiday door hanging.
Materials You’ll Need
- 200–250 g burgundy medium-weight cotton or acrylic yarn
- 80–100 g cream or ivory yarn
- Small amounts of dark green and sage green yarn
- Small amount of red yarn for berries
- 4 mm crochet hook
- 3.5 mm crochet hook for decorative details
- Yarn needle
- Scissors
- Stitch markers
- Polyester fiberfill or lightweight stuffing
- Small gold beads for flower centers
- Florist wire or pipe cleaners for optional shaping
- Strong thread for assembly
- Optional artificial evergreen sprigs
Skill Level: Intermediate
Estimated Time: 6–10 hours
Finished Size: Approximately 25–30 cm long per mitten, depending on yarn and tension.
Pattern note: This is an original decorative pattern inspired by the pictured mittens. It is not an exact reconstruction of the original design. The finished mittens are intended for decoration rather than wearing.
Crochet Abbreviations (US Terms)
- ch – Chain
- sc – Single crochet
- hdc – Half double crochet
- dc – Double crochet
- sl st – Slip stitch
- st – Stitch
- sts – Stitches
- inc – Increase (2 sc in one stitch)
- dec – Invisible single crochet decrease
- BLO – Back loop only
- FO – Fasten off
- MR – Magic ring
Part 1 – Crochet the Burgundy Mitten Body
Begin with burgundy yarn and a 4 mm crochet hook.
Work the mitten from the rounded bottom upward, using continuous rounds. Place a stitch marker at the beginning of each round.
Rounded Mitten Base
R1: Make a magic ring and work 6 sc into the ring. (6)
R2: Inc in each stitch around. (12)
R3: *1 sc, inc* repeat around. (18)
R4: *2 sc, inc* repeat around. (24)
R5: *3 sc, inc* repeat around. (30)
R6: *4 sc, inc* repeat around. (36)
R7: *5 sc, inc* repeat around. (42)
R8: *6 sc, inc* repeat around. (48)
Build the Mitten Body
R9–R22: Work 1 sc in each stitch around. (48)
This creates the main body of the mitten with a smooth rounded bottom.
Keep the tension even to produce the thick, cozy texture shown in the reference.
Part 2 – Create the Thumb Opening
The thumb adds the recognizable mitten silhouette.
R23: Sc in the first 8 sts, ch 7, skip the next 7 sts, sc in the remaining 33 sts. (48)
R24: Work 1 sc in every stitch and chain around. (48)
R25–R30: Continue working 1 sc in each stitch around. (48)
FO, leaving a yarn tail for attaching the cuff.
Crochet the Thumb
Join burgundy yarn at the thumb opening.
R1: Work 14 sc evenly around the opening. (14)
R2–R8: Sc in each stitch around. (14)
R9: *Sc 5, dec* twice. (12)
R10: Dec around. (6)
FO, leaving a tail. Thread the tail through the remaining stitches and pull gently to close the thumb.
Repeat Parts 1 and 2 to make a second mitten. Position the thumb opening on the opposite side for a mirrored pair.
Part 3 – Crochet the Cream Ribbed Cuffs
The thick ivory cuffs give the mittens their beautiful winter appearance.
Switch to cream yarn and a 4 mm crochet hook.
Ribbed Cuff Pattern
R1: Ch 13.
R2: Starting in the second chain from the hook, work 12 sc. Ch 1, turn. (12)
R3: Work 12 sc in BLO. Ch 1, turn. (12)
R4–R49: Repeat R3 to create a long ribbed rectangle.
Wrap the rectangle around the upper opening of the mitten to check the fit. Add or remove rows if necessary.
Join the short ends together using slip stitches to create a circular cuff.
Position the cuff over the top of the mitten, allowing part of it to overlap the burgundy body.
Sew securely around the edge using cream yarn.
Repeat for the second mitten.
Part 4 – Embroider the White Snowflakes
Each mitten features a delicate cream snowflake embroidered directly onto the burgundy crochet fabric.
Use a yarn needle and cream yarn.
- Choose the center of the front side of the mitten.
- Bring the needle from the inside to the outside.
- Embroider one vertical line.
- Add one horizontal line crossing the center.
- Create two diagonal lines to form six to eight snowflake arms.
- Add small V-shaped branches near the ends of the arms.
- Secure the yarn on the inside.
Keep the snowflake centered and approximately 7–9 cm wide.
Repeat the embroidery on the second mitten.
Part 5 – Crochet the Burgundy Poinsettia Flowers
The large burgundy poinsettias are the main decorative feature of this Christmas project.
Use burgundy yarn and a 3.5 mm crochet hook.
Poinsettia Flower Center
R1: Make a magic ring, work 6 sc into the ring. Join with sl st. (6)
R2: Work 2 sc in each stitch around. Join. (12)
Crochet the Pointed Petals
Each poinsettia flower is made from six individual petals.
R1: Ch 11.
R2: Starting in the second chain, work 1 sc, 1 hdc, 5 dc, 1 hdc, 1 sc, then 3 sc in the final chain.
R3: Continue along the opposite side of the foundation chain, working 1 sc, 1 hdc, 5 dc, 1 hdc, and 1 sc.
FO, leaving a long yarn tail.
Make six petals for each flower.
Arrange the petals evenly around the center, overlapping them slightly to create a full poinsettia shape.
Sew the petals together securely.
Add a cluster of small gold beads to the center.
Make two large burgundy poinsettias, one for each mitten.
Part 6 – Crochet the Cream Poinsettia Flowers
The smaller ivory poinsettias create a lovely contrast against the burgundy flowers.
Use cream yarn and a 3.5 mm crochet hook.
Follow the same construction method as the burgundy flowers, but make shorter petals.
R1: Ch 8.
R2: Starting in the second chain, work 1 sc, 1 hdc, 3 dc, 1 hdc, 3 sc in the final chain.
R3: Continue along the opposite side with 1 hdc, 3 dc, 1 hdc, and 1 sc.
FO, leaving a tail for assembly.
Make six petals per flower.
Sew the petals around a small crochet center.
Add several gold beads to create a beautiful festive finish.
Make two cream poinsettias.
Part 7 – Crochet the Evergreen Leaves
The green leaves help frame the poinsettia flowers and create a natural Christmas arrangement.
Use dark green and sage green yarn.
Simple Crochet Leaf
R1: Ch 13.
R2: Starting in the second chain, work 1 sc, 1 hdc, 7 dc, 1 hdc, 1 sc, then 3 sc in the final chain.
R3: Continue along the opposite side of the foundation chain, working 1 sc, 1 hdc, 7 dc, 1 hdc, and 1 sc.
FO, leaving a long yarn tail.
Make approximately 12–16 leaves in different shades of green.
For a more realistic appearance, vary the leaf sizes slightly and add surface slip stitches down the center to create a raised vein.
Part 8 – Crochet the Christmas Berries
Small red berries add cheerful holiday color between the poinsettias and greenery.
Use red yarn and a 3.5 mm hook.
R1: Make a magic ring and work 6 sc. (6)
R2: Inc around. (12)
R3: Sc around. (12)
R4: Dec around. (6)
Add a tiny amount of stuffing if desired.
FO, leaving a long tail for sewing.
Make approximately 10–14 berries.
Group them in clusters of three or four around the flowers.
Part 9 – Make the Evergreen Sprigs
The narrow evergreen sprigs extend beyond the flowers and give the decoration a full, natural appearance.
Use dark green yarn and a 3.5 mm hook.
R1: Ch 18.
R2: Working back along the chain, repeat *ch 5, sl st into the second chain from the hook, sc in the next 3 chains, sl st into the next foundation chain* until you reach the end.
This creates a narrow decorative branch with small side needles.
Make several sprigs in different lengths.
Alternatively, use small artificial evergreen branches for a mixed-media holiday decoration.
Part 10 – Assemble the Floral Arrangements
Now it’s time to bring all the decorative elements together.
Place the mittens flat on a table with the snowflakes facing upward.
Arrange the flowers along the upper cuffs.
For each mitten, use:
- 1 large burgundy poinsettia
- 1 smaller cream poinsettia
- 6–8 crochet leaves
- Several evergreen sprigs
- 5–7 small red berries
Begin by placing the evergreen sprigs behind the flowers.
Arrange the leaves in different directions to create a natural, layered appearance.
Position the burgundy poinsettia slightly higher than the cream flower.
Fill the gaps with berries and smaller leaves.
Once you’re happy with the arrangement, sew everything securely to the cuff area.
Make sure all decorations are attached firmly so they stay in place when the mittens are hanging.
Part 11 – Crochet the Hanging Cord
The two mittens are connected with a long cream crochet cord that hangs beautifully over a door hook.
Use cream yarn and a 4 mm crochet hook.
R1: Ch approximately 150–180, depending on the desired hanging length.
R2: Starting in the second chain from the hook, work 1 sl st into each chain across.
FO, leaving long tails for attachment.
For a thicker braided appearance, make three long yarn cords and braid them together.
Attach one end of the cord securely to the inside back of the first mitten cuff.
Attach the other end to the second mitten.
Adjust the hanging lengths so one mitten sits slightly higher than the other.
This staggered arrangement creates the charming layered look seen in the reference design.
Part 12 – Finishing and Shaping
Lightly stuff each mitten with polyester fiberfill or tissue paper to maintain its rounded shape.
Avoid overstuffing, as this can stretch the crochet stitches.
Adjust the cuffs so they sit evenly.
Fluff the poinsettia petals and arrange the green leaves around them.
Make sure the embroidered snowflakes face forward.
Check that the hanging cord is securely attached.
Hang the finished decoration on a sturdy door hook and adjust the mittens until they hang naturally.
Beautiful Ways to Display Your Crochet Christmas Mittens
These festive crochet mittens can be displayed in several lovely ways around your home.
- Front Door: Hang them on a wooden or painted front door as an alternative to a traditional Christmas wreath.
- Entryway: Display them on a decorative wall hook to welcome holiday guests.
- Fireplace Mantel: Hang them beside Christmas stockings or evergreen garlands.
- Staircase: Attach them to a banister decorated with ribbons and greenery.
- Bedroom Door: Add a cozy handmade Christmas touch to your bedroom.
- Christmas Gift: Wrap them in tissue paper and give them as a thoughtful handmade present.
Color Variations to Try
The burgundy and cream combination creates an elegant traditional Christmas look, but you can personalize your mittens with different holiday colors.
- Classic Christmas: Bright red mittens with white cuffs and dark green leaves.
- Rustic Farmhouse: Oatmeal beige mittens with cream flowers and olive greenery.
- Elegant Winter: Ivory mittens with champagne-gold accents.
- Woodland Christmas: Forest green mittens with burgundy flowers and pinecones.
- Vintage Holiday: Dusty rose mittens with cream flowers and muted sage leaves.
- Snowy Christmas: Soft blue mittens with white snowflakes and silver details.
Tips for a Beautiful Professional Finish
- Use consistent tension when crocheting both mittens.
- Make the cream cuffs slightly thicker than the mitten body for a cozy look.
- Keep the snowflake embroidery centered and symmetrical.
- Arrange the poinsettia petals in overlapping layers.
- Mix two or three shades of green for natural-looking foliage.
- Use small gold beads to create elegant flower centers.
- Position one mitten slightly higher than the other.
- Secure all decorative pieces with strong stitching.
- Use lightweight stuffing to maintain the mitten shape.
- Choose a sturdy hook that can support the finished decoration.
Frequently Asked Questions
Are these crochet Christmas mittens wearable?
No. This pattern is designed specifically for decorative Christmas mittens. They are larger and more structured than regular wearable mittens.
Can beginners make this project?
This project is best suited to intermediate crocheters, although confident beginners can complete it with patience and practice.
Can I use acrylic yarn instead of cotton?
Yes. Acrylic yarn works well for lightweight Christmas decorations and is available in many festive colors.
Do I need to stuff the mittens?
Light stuffing is recommended because it helps the mittens keep their rounded shape while hanging.
Can I make the poinsettia flowers removable?
Yes. You can attach the flowers to small fabric-backed pins or removable fasteners instead of sewing them permanently.
How do I make the mittens larger?
Use thicker yarn and a larger crochet hook, or add increase rounds to the mitten base and adjust the remaining stitch counts.
Can I hang these mittens outdoors?
They are best displayed indoors or on a covered porch protected from rain, snow, and strong wind.
Can I replace the gold beads?
Absolutely. Small crochet bobbles, embroidered French knots, or wooden beads are lovely alternatives.
Are these crochet mittens a good Christmas gift?
Yes! Handmade Christmas decorations make thoughtful gifts for friends, family members, neighbors, and anyone who enjoys cozy seasonal home decor.
Care Instructions
Gently dust the mittens regularly to keep them looking fresh.
If cleaning is necessary, spot-clean with a damp cloth and mild detergent.
Avoid soaking the decoration if it contains metal wire, artificial greenery, or glued embellishments.
Allow the mittens to air-dry completely.
Store them in a breathable fabric bag or protective box after Christmas.
Keep the flowers lightly supported during storage to prevent the petals from becoming flattened.
Final Thoughts
This crochet Christmas mitten door hanger pattern is a beautiful way to celebrate the holiday season with something handmade and meaningful.
The rich burgundy mittens, soft cream cuffs, embroidered snowflakes, layered poinsettias, and festive evergreen details come together to create a decoration that feels warm, nostalgic, and full of Christmas charm.
Whether you hang it on your front door, display it beside the fireplace, or give it as a handmade holiday gift, this crochet project is sure to bring a cozy festive touch to your home.
Gather your favorite Christmas yarn colors, pick up your crochet hook, and enjoy creating a beautiful decoration you’ll look forward to displaying year after year.
Happy crocheting and Merry Christmas! 🎄🧶❤️

