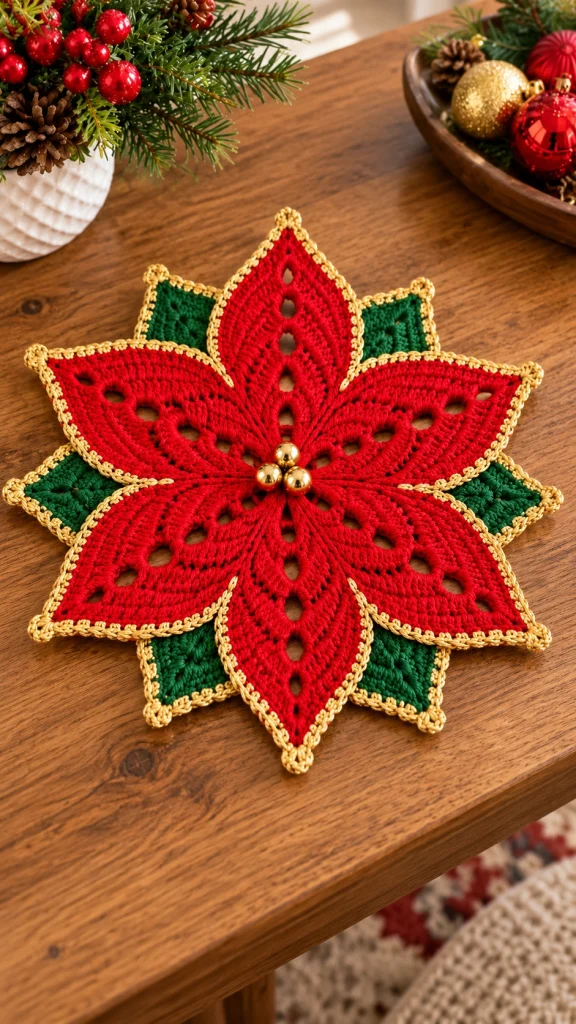
Crochet Christmas Poinsettia Doily Pattern – Red, Green & Gold Holiday Centerpiece
Beginner Friendly
Perfect for those just starting their crochet journey, with clear instructions and simple techniques
Single-Day Project
A satisfying project you can complete in a single afternoon or evening.
Handmade Gift
A beautiful keepsake — free forever. Read online or print at home.
About This Crochet Christmas Poinsettia Doily Pattern – Red, Green & Gold Holiday Centerpiece
This crochet Christmas poinsettia pattern creates a dramatic holiday centerpiece inspired by a blooming poinsettia. Six large red crochet petals form the main flower, while pointed green leaves peek from underneath and a delicate gold border gives the entire piece an elegant Christmas finish.
Use it as a Christmas table centerpiece, oversized holiday doily, decorative placemat, side-table decoration or handmade seasonal gift.
Materials
- Christmas red cotton yarn main petals
- Deep forest green cotton yarn back leaves
- Metallic gold crochet thread or fine yarn edging
- Gold beads 3–5 for flower center
- DK / light worsted yarn recommended
- 2.5–3.5 mm crochet hook 1
- Yarn needle 1
- Scissors 1 pair
- Stitch markers optional
- Blocking pins recommended
Abbreviations – US Terms
MRmagic ringchchainsl stslip stitchscsingle crochethdchalf double crochetdcdouble crochettrtreble crochetdtrdouble treble crochetspspaceincincreaseFOfasten offFinished Size
The finished poinsettia measures approximately 38–45 cm / 15–18 in from point to point when made with DK cotton and a 3 mm hook.
You can easily make a smaller ornament-sized version by using crochet thread and a smaller hook.
Part 1 – Center Ring
Using red yarn:
Round 1: MR, ch 1, 12 sc into ring. Join with sl st. (12)
Round 2: ch 1, 2 sc in each stitch around. Join. (24)
Round 3: ch 1, *sc in next st, 2 sc in next st* around. Join. (36)
FO, leaving a long tail for assembly.
Part 2 – Red Petal Foundation
Make 6 identical petals.
Using red yarn, ch 28.
Starting in the second chain from hook:
Row 1: sc in next 4 ch, hdc in next 4 ch, dc in next 7 ch, tr in next 7 ch, dc in next 4 ch, 5 dc in final ch.
Continue working along the opposite side of the foundation chain.
dc in next 4 ch, tr in next 7 ch, dc in next 7 ch, hdc in next 4 ch, sc in final 4 ch.
Join with sl st at the base.
Part 3 – Shape the Petal
Round 2: ch 1 and work around the entire petal.
Work sc through the narrow lower section.
Change gradually to hdc, dc and tr as you approach the widest section.
At the pointed tip work:
(dc, tr, ch 2, tr, dc) into the tip stitch.
Mirror the stitch sequence down the opposite side.
Join with sl st.
Part 4 – Petal Openwork Detail
The characteristic openings inside each petal are created with chain spaces.
Round 3: ch 1, sc in next 4 sts.
*Ch 3, skip 2 sts, sc in next 4 sts.*
Repeat toward the petal tip.
Near the center line, alternate ch-3 and ch-4 spaces to create gradually larger openings.
Work the opposite side symmetrically.
Part 5 – Fill Around the Openwork
Round 4: Work sc and hdc around each chain space while keeping the openings visible.
Work approximately:
3 sc into each ch-3 sp
4 sc into each ch-4 sp
At the pointed tip work (sc, ch 2, sc).
Continue around and join.
Part 6 – Final Red Petal Round
Work one complete round of sc around the petal.
At the tip work:
sc, ch 2, sc.
FO and weave in the red yarn ends.
Repeat Parts 2–6 until you have 6 red petals.
Part 7 – Gold Petal Edging
Join metallic gold yarn at the base of one red petal.
Work sl st loosely around the entire outer edge.
For a slightly more visible border, work:
*sl st in next 2 sts, ch 1* around.
At the petal point work ch 2.
FO carefully.
Repeat around all six red petals.
Part 8 – Green Leaf Foundation
Make 6 green leaves.
Using deep forest green yarn, ch 23.
Starting in second ch from hook:
sc in next 3 ch, hdc in next 4 ch, dc in next 6 ch, tr in next 6 ch, dc in next 2 ch.
Work 5 dc in the final chain.
Continue along the opposite side:
dc in next 2 ch, tr in next 6 ch, dc in next 6 ch, hdc in next 4 ch, sc in next 3 ch.
Join at base.
Part 9 – Shape the Green Leaves
Work another round around each leaf.
Use sc near the base, hdc and dc through the middle, and tr near the widest area.
At the tip work:
(dc, tr, ch 2, tr, dc).
Mirror the stitches down the second side.
Part 10 – Green Leaf Texture
For subtle openwork similar to the red petals:
Ch 2, skip 1 st, sc in next 3 sts several times along each side.
Keep the openings smaller than those on the red petals.
This allows the green layer to remain visually secondary.
Part 11 – Gold Green-Leaf Border
Join gold yarn at the base of the leaf.
Sl st loosely around the complete outer edge.
At the pointed tip, work ch 2 before continuing down the second side.
FO.
Repeat for all six green leaves.
Part 12 – Arrange the Green Layer
Place the six green leaves in a circle.
Space them evenly like a six-point star.
The narrow bases should overlap slightly in the center.
Using green yarn and a yarn needle, sew the overlapping bases together securely.
Part 13 – Position the Red Petals
Place one red petal between every two green leaves.
The red petals should cover most of the green layer while allowing the green pointed tips to remain visible around the outside.
Arrange all six petals before sewing.
Part 14 – Join the Red Petals
Using the long red yarn tails, sew the narrow bases of the six petals together.
Overlap each neighboring petal slightly.
Keep all six petal tips evenly spaced.
Do not sew the outer portions together—the petals should remain individually defined.
Part 15 – Attach Red Layer to Green Layer
Place the completed red flower over the green leaf foundation.
Using matching red or green yarn, sew securely around the central 5–7 cm / 2–2.75 in area.
Avoid sewing near the outer edges so the layered petals retain their dimensional appearance.
Part 16 – Strengthen the Center
Place the small red center circle from Part 1 underneath the joined petals.
Sew through the center circle, green layer and red petal bases.
This hidden reinforcement helps the centerpiece stay flat and prevents the petals from separating.
Part 17 – Gold Center Beads
Arrange 3–5 gold beads in the center of the poinsettia.
Using strong matching thread, sew each bead individually through several layers of crochet.
For the simple three-bead look, arrange them in a small triangle.
Part 18 – Optional Crochet Center
If you prefer a completely crocheted version instead of beads:
Using metallic gold yarn:
MR, 6 sc.
Join and FO.
Make 3 small circles and sew them together in the center.
Part 19 – Blocking
Blocking is especially important for this project.
Lightly dampen the finished poinsettia.
Place it on a blocking mat.
Pin each of the six red petals into a symmetrical pointed shape.
Then pin each green leaf so its point sits clearly between two red petals.
Allow to dry completely.
Part 20 – Optional Stiffening
If you want the centerpiece to remain very flat, especially when using soft yarn, apply a light fabric stiffener after blocking.
Concentrate mainly on the pointed tips and outer edges.
Allow it to dry flat before using.
Part 21 – Smaller Matching Poinsettias
To create smaller matching pieces, use the same construction with fewer foundation chains.
For medium petals, begin with approximately ch 20.
For ornament-sized petals, begin with approximately ch 12–14.
Maintain the same pointed shaping and gold edging.
Part 22 – Color Variations
Classic Christmas: bright red, forest green and metallic gold.
Vintage Christmas: burgundy, dark olive and antique gold.
Elegant Neutral: ivory petals, sage leaves and champagne gold.
Winter White: cream petals, deep green leaves and silver edging.
Rustic Holiday: brick red, moss green and warm beige edging.
Ways to Use Your Crochet Poinsettia
- Christmas dining-table centerpiece
- Holiday side-table doily
- Festive placemat
- Christmas coffee-table decoration
- Handmade hostess gift
- Holiday wall decoration
- Oversized Christmas ornament
- Centerpiece beneath a candle holder
- Decorative base for a Christmas floral arrangement
Care Instructions
Hand wash gently in cool water with mild detergent.
Do not wring or twist the petals.
Press excess moisture between clean towels.
Reshape and dry completely flat.
Store flat between sheets of tissue paper to protect the pointed petals and metallic edging.
Frequently Asked Questions
It is best for an intermediate crocheter or a confident beginner who already understands increases, taller stitches, working on both sides of a foundation chain and basic assembly.
Mercerized cotton or tightly spun cotton works especially well because it creates crisp stitches and helps the pointed petals keep their shape.
No. The gold edging can be replaced with cream, white, beige or another contrasting color. Metallic gold simply creates the festive finish shown in the design.
Yes. Use thicker yarn and a larger hook, or increase the foundation chain of every petal and leaf proportionally.
Use a firm cotton yarn, work the tip chain spaces carefully and block every point individually after assembly.
Yes. Make several smaller poinsettias and attach them around a crocheted or wrapped wreath base. The red, green and gold combination works especially well for a coordinated Christmas door decoration.
The finished Crochet Christmas Poinsettia Doily Pattern – Red, Green & Gold Holiday Centerpiece

