Crochet Christmas Poinsettia Ornament Pattern – Layered Star Decoration
Beginner Friendly
Perfect for those just starting their crochet journey, with clear instructions and simple techniques
Single-Day Project
A satisfying project you can complete in a single afternoon or evening.
Handmade Gift
A beautiful keepsake — free forever. Read online or print at home.
About This Crochet Christmas Poinsettia Ornament Pattern – Layered Star Decoration
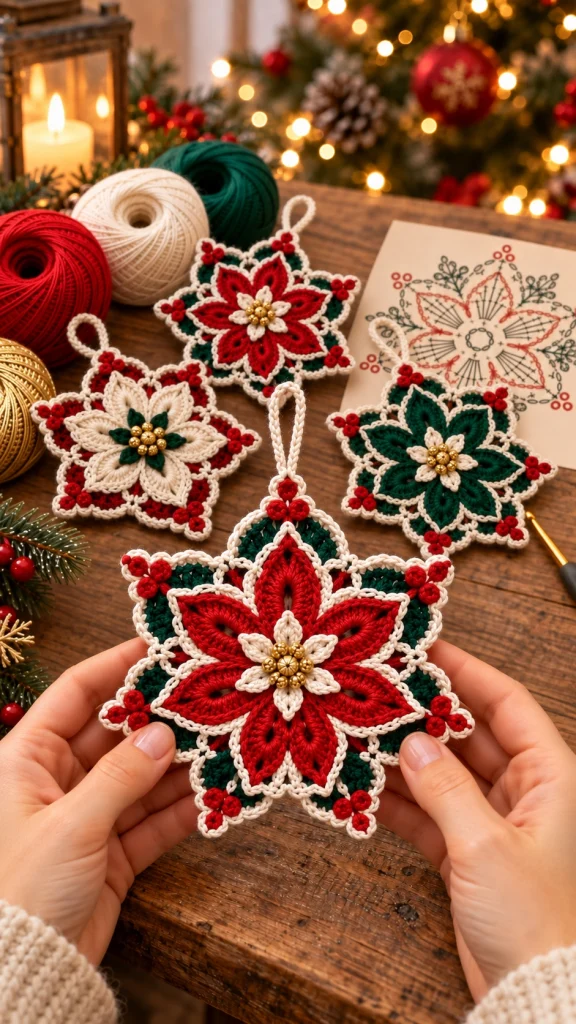
This crochet Christmas poinsettia ornament is a richly layered holiday decoration made with pointed crochet petals, contrasting borders, tiny berry clusters and a delicate hanging loop.
The design combines deep Christmas red, evergreen and warm ivory yarn with small gold beads in the center. The finished ornament can be hung on a Christmas tree, attached to a gift, displayed in a window or joined with several matching motifs to create a festive garland.
Materials
- Deep red cotton yarn main petals
- Evergreen cotton yarn background petals
- Ivory / cream cotton yarn edging and center petals
- Small amount of red yarn berries
- Gold beads 6–8
- 2.0–3.0 mm crochet hook 1
- Yarn needle 1
- Scissors 1 pair
- Stitch markers optional
Abbreviations – US Terms
MRmagic ringchchainsl stslip stitchscsingle crochethdchalf double crochetdcdouble crochettrtreble crochetincincreaseFOfasten offFinished Size
Using sport or DK cotton with a 2.0–3.0 mm hook, the finished ornament measures approximately 14–17 cm / 5.5–6.5 in from point to point, excluding the hanging loop.
Part 1 – Green Center Base
Using evergreen yarn:
Round 1: MR, ch 1, 12 sc into ring. Join with sl st. (12)
Round 2: ch 1, 2 sc in each stitch around. Join. (24)
Round 3: *sc, inc* around. Join. (36)
FO, leaving a long tail for assembly.
Part 2 – Large Green Pointed Petal
Make 6.
Using evergreen yarn:
Ch 13.
Starting in the 2nd chain from hook:
sl st, sc, hdc, dc, 4 tr, dc, hdc, sc, sl st.
Working along the opposite side of the foundation chain:
sl st, sc, hdc, dc, 4 tr, dc, hdc, sc, sl st.
At the tip, work ch 2, sl st into first ch to sharpen the point.
FO, leaving a sewing tail.
Part 3 – Shape the Green Petals
Lay each green petal flat.
Pin the tip outward and gently stretch the sides.
Steam-block or wet-block according to the yarn used.
The six petals should have approximately equal length and width.
Part 4 – Large Red Poinsettia Petal
Make 6.
Using deep red yarn:
Ch 15.
Starting in the 2nd chain:
sl st, sc, hdc, 2 dc, 5 tr, 2 dc, hdc, sc, sl st.
Work along the opposite side:
sl st, sc, hdc, 2 dc, 5 tr, 2 dc, hdc, sc, sl st.
At the tip, ch 2 and sl st into first ch.
FO.
Part 5 – Ivory Border Around Red Petals
Join ivory yarn at the base of one red petal.
Work evenly around the outer edge:
1 sl st in each edge stitch, adding ch 1 at the pointed tip.
Continue down the opposite side.
FO and weave in the ends.
Repeat for all six red petals.
Part 6 – Red Petal Center Ridge
For the raised center line visible on each petal, use red yarn.
Surface crochet a line of slip stitches from the base toward the tip.
Stop approximately one stitch before the final point.
Repeat on all six petals.
Part 7 – Arrange the Green Layer
Place the six green petals evenly around the green center base.
The points should form a symmetrical six-point star.
Sew only the inner 2–3 cm of each petal to the base so the outer portions remain dimensional.
Part 8 – Arrange the Red Layer
Place the six red petals over the green layer.
Position each red petal between or slightly over the green petals, following the layered appearance of the reference ornament.
Sew firmly through the center only.
Do not flatten the outer petals.
Part 9 – Small Ivory Center Petals
Make 6.
Using ivory yarn:
Ch 7.
Starting in the 2nd chain:
sl st, sc, hdc, dc, hdc, sc.
Work down the opposite side:
sc, hdc, dc, hdc, sc, sl st.
FO.
Part 10 – Assemble the Ivory Center Flower
Arrange the six small ivory petals in a circle.
Overlap the bases slightly.
Sew securely through all layers.
The ivory petals should sit directly over the center of the large red poinsettia.
Part 11 – Gold Bead Center
Sew one gold bead into the exact center.
Arrange another 5–7 small gold beads around it.
Pass the sewing thread through the crochet several times so the beads remain secure.
Part 12 – Outer Ivory Loops
Join ivory yarn between two green petals.
Ch 8.
Skip approximately 4–5 edge stitches and attach with sl st.
Repeat around the ornament to create delicate open loops between the major points.
Adjust the chain length if necessary so every loop lies flat.
Part 13 – Outer Point Detail
At each outer corner:
ch 4, sl st into first ch, ch 4, sl st into same base, ch 4, sl st into same base.
This creates a small three-loop decorative cluster.
Repeat at the remaining corners.
Part 14 – Crochet Red Berries
Make approximately 18–24 tiny berries.
Using red yarn:
Round 1: MR, 5 sc. (5)
Round 2: inc around. (10)
Round 3: sc around. (10)
Insert a tiny amount of stuffing.
Round 4: dec around. (5)
FO and close.
Part 15 – Berry Clusters
Group the berries in clusters of three.
Sew each cluster near an outer point of the ornament.
Keep the berries close together to imitate small Christmas holly berries.
Part 16 – Small Green Accent Leaves
Make several as needed.
Using evergreen yarn:
Ch 6.
Starting in the second chain:
sl st, sc, hdc, dc, sc.
Work down the opposite side:
sc, dc, hdc, sc, sl st.
FO.
Tuck these small leaves beneath selected berry clusters.
Part 17 – Hanging Loop
Using ivory yarn:
Ch 32–38.
Sl st into every chain back to the beginning for a stronger cord.
FO, leaving a long tail.
Fold the cord in half and sew both ends securely behind one point of the ornament.
Part 18 – Reinforce the Hanging Point
Cut a short strand of matching yarn.
Pass it through the green base, the red layer and the hanging loop several times.
Knot securely on the back.
This prevents the decorative edging from carrying the entire weight of the ornament.
Part 19 – Optional Backing Circle
For a cleaner reverse side, crochet one backing circle in evergreen yarn.
Round 1: MR, 12 dc.
Round 2: 2 dc in each stitch. (24)
Round 3: *dc, inc* around. (36)
Round 4: *2 dc, inc* around. (48)
Continue increasing if necessary until the circle covers the central assembly stitches.
Part 20 – Attach the Backing
Position the backing circle over the reverse side.
Sew around its edge using matching green yarn.
Do not sew through the outer petals.
This hides assembly threads while keeping the ornament lightweight.
Part 21 – Final Shaping
Place the finished ornament on a blocking mat.
Pin all six main points evenly.
Arrange the red petals so their tips remain clearly visible.
Shape the green background petals between them.
Allow the piece to dry completely before removing the pins.
Part 22 – Make the Red-Dominant Version
For the red ornament shown in the reference:
Use red for all six main poinsettia petals.
Use evergreen for the rear layer.
Use ivory for the borders and small center petals.
Add gold beads in the center.
Part 23 – Make the Green-Dominant Version
Swap the two main colors:
Use evergreen for the large front petals and red for selected background sections.
Keep the ivory edging and ivory center flower.
Use the same berry and gold-bead details.
Part 24 – Make the Ivory-Dominant Version
Use ivory yarn for the large central petals.
Add red background petals and small evergreen leaves.
Finish with red berries and gold center beads.
This creates a softer vintage Christmas variation.
Part 25 – Finishing
Weave in every loose end on the reverse side.
Check that the berry clusters are firmly attached.
Check all gold beads before hanging.
Trim any visible fibers.
Gently reshape every pointed petal with your fingers.
Christmas Color Ideas
Classic: deep red, forest green, ivory and gold.
Vintage: burgundy, olive green, antique cream and muted gold.
Scandinavian: red and warm white with minimal green.
Elegant: burgundy, dark emerald and champagne gold.
Snowy: ivory, white, sage green and pale gold.
Ways to Use the Ornament
- Hang it on a Christmas tree.
- Attach it to a wrapped Christmas gift.
- Make several for a holiday garland.
- Hang one from a cabinet or door handle.
- Use smaller versions as gift tags.
- Add one to a Christmas wreath.
- Make a coordinated set in red, green and ivory.
Frequently Asked Questions
The individual stitches are manageable, but the layered construction, pointed shaping and assembly make this project best for confident beginners or intermediate crocheters.
Use cotton yarn, keep the stitches firm and block every petal before assembly. Pinning the tip while the piece dries produces a much sharper shape.
Yes. Replace the gold beads with French knots, small crochet bobbles or a tiny gold-colored crochet circle.
Yes. Use thinner crochet thread and a smaller hook. You can also shorten the starting chains of the petals while preserving the same overall construction.
Keep the border tension relaxed and block the finished ornament. If the edging is worked too tightly, the outer points will pull inward.
Yes. Make several ornaments and connect their hanging loops to a crocheted chain or decorative cord. Alternating red-, green- and ivory-dominant versions creates a coordinated Christmas garland.
The finished Crochet Christmas Poinsettia Ornament Pattern – Layered Star Decoration

