Crochet Christmas Polar Bear Wall Hanging Pattern
Beginner Friendly
Perfect for those just starting their crochet journey, with clear instructions and simple techniques
Single-Day Project
A satisfying project you can complete in a single afternoon or evening.
Handmade Gift
A beautiful keepsake — free forever. Read online or print at home.
About This Crochet Christmas Polar Bear Wall Hanging Pattern
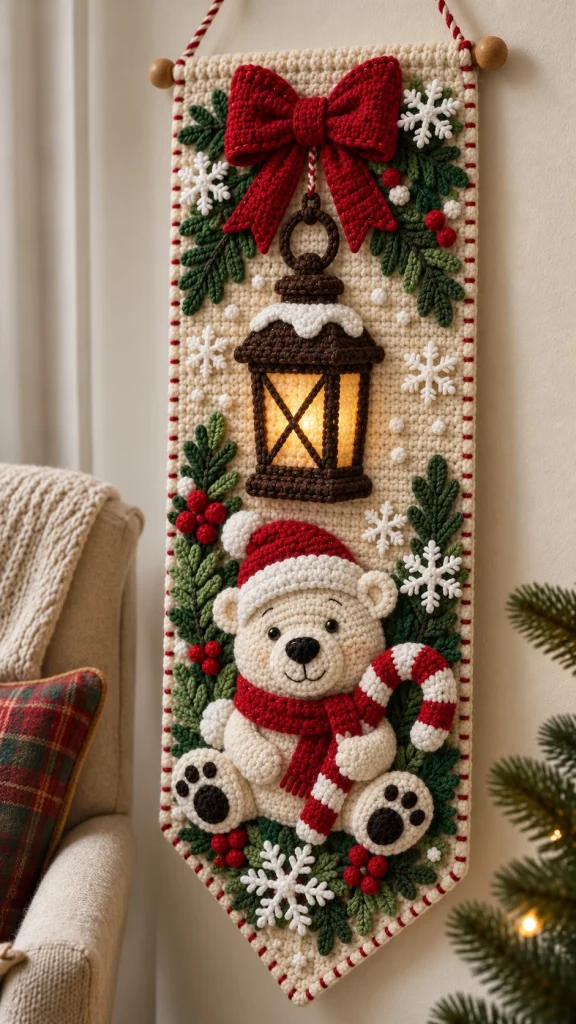
This crochet Christmas wall hanging pattern creates a cozy dimensional holiday decoration featuring a sweet polar bear dressed in a red Santa hat and scarf, a classic Christmas lantern, an oversized crochet bow, evergreen branches, bright red berries, delicate snowflakes and a striped candy cane.
The design is worked as separate crochet elements and then layered onto a sturdy cream-colored crochet banner. The raised pieces give the finished decoration a beautiful handmade, almost storybook appearance.
Hang it beside the Christmas tree, in an entryway, above a cozy chair or on a door for a warm handmade holiday accent.
Materials
- Cream / ivory worsted yarn 350–450 g
- White yarn 120–150 g
- Christmas red yarn 180–220 g
- Dark forest green yarn 150–180 g
- Olive green yarn 80–100 g
- Dark brown yarn 80–100 g
- Black yarn small amount
- Warm yellow / gold yarn small amount
- 3.5–4.0 mm crochet hook 1
- Fiberfill stuffing 200–250 g
- Wooden dowel 35–40 cm
- Wooden beads 2
- Yarn needle 1
- Stitch markers 4
- Scissors 1 pair
- Strong sewing thread optional
Abbreviations – US Terms
MRmagic ringchchainsl stslip stitchscsingle crochethdchalf double crochetdcdouble crochettrtreble crochetincincreasedecdecreaseBLOback loop onlyFOfasten offFinished Size
Approximately 32 cm / 12.5 in wide and 70–75 cm / 27.5–29.5 in long, excluding the hanging cord.
The finished dimensions can be adjusted by changing the width and number of rows in the background banner.
Part 1 – Cream Crochet Banner
Using cream yarn:
Ch 57.
Row 1
Sc in second ch from hook and across. (56)
Rows 2–105
Ch 1, turn, sc across. (56)
Continue until the panel measures approximately 68–70 cm.
Do not fasten off.
Part 2 – Pointed Bottom
Begin decreasing to form the banner point.
Row 106: dec, sc across to last 2 sts, dec. (54)
Repeat this decrease row until approximately 10 stitches remain.
Continue decreasing at both ends until one central point remains.
FO and weave in ends.
Part 3 – Decorative Border
Join cream yarn at the upper corner.
Work sc evenly around the entire banner.
On the second border round, alternate:
4 sc in cream, 1 sc in red.
This creates the subtle candy-cane-style red detail around the outside edge.
At the pointed bottom, work 3 sc into the point so the border remains flat.
Part 4 – Top Dowel Channel
Fold approximately 3 cm / 1.2 in of the top edge toward the back.
Sew the edge securely to create a channel.
Slide the wooden dowel through.
Add one wooden bead to each exposed end if desired.
Part 5 – Hanging Cord
Using cream and red yarn held together:
Ch 100–120.
Sl st back across the chain for a stronger cord.
Tie or sew each end securely around the wooden dowel.
Part 6 – Large Red Christmas Bow
The bow is made from two loops, two tails and one center band.
Bow Loop – Make 2
Using red yarn:
Ch 25.
Row 1: sc in second ch and across. (24)
Rows 2–12: ch 1, turn, sc across.
FO.
Fold each rectangle into a loop and sew the short ends together.
Bow Tails – Make 2
Ch 12.
Sc across for approximately 24–28 rows.
Decrease slightly during the final rows to create a pointed end.
FO.
Part 7 – Bow Center
Using red yarn:
Ch 9.
Sc in second ch from hook and across. (8)
Work approximately 12 rows.
Wrap the strip tightly around the middle of both bow loops.
Sew at the back.
Attach the two tails behind the bow.
Part 8 – Evergreen Branch
Using dark green yarn:
Ch 22.
Starting in second ch from hook, sl st along the chain.
For each branch needle:
Ch 5, sl st back 4, sl st into main stem.
Repeat along alternating sides of the stem.
Make approximately 18–24 branches in dark and olive green.
Vary the chain length from 16–28 stitches so the foliage looks natural.
Part 9 – Crochet Holly Berries
Using red yarn:
R1: 6 sc in MR. (6)
R2: inc around. (12)
R3: sc around. (12)
Add a tiny amount of stuffing.
R4: dec around. (6)
FO and close.
Make approximately 18–24 berries.
Arrange them mostly in clusters of three.
Part 10 – Small White Berries
Using white yarn:
R1: 6 sc in MR.
R2: sc around.
Stuff lightly.
FO and close tightly.
Make approximately 12–16.
Part 11 – Crochet Snowflake
Using white yarn:
R1: 6 sc in MR. Join with sl st.
R2: *ch 8, sl st in 2nd ch, ch 3, sl st into same ch, ch 3, sl st into same ch, sl st down remaining chains, sl st into next base stitch.*
Repeat around to create 6 snowflake arms.
FO.
Gently block each snowflake before attaching.
Make approximately 7–9 snowflakes in different sizes.
Part 12 – Lantern Body
Using warm yellow yarn:
Ch 19.
Row 1: sc in second ch and across. (18)
Rows 2–22: ch 1, turn, sc across.
FO.
This creates the glowing center of the lantern.
Part 13 – Lantern Frame
Using dark brown yarn, surface crochet or sew a thick border around the yellow rectangle.
Add one vertical bar to each side.
Create two diagonal chains across the center to form an X.
For each diagonal:
Ch approximately 25–28 or enough to reach from one corner to the opposite corner.
Sew securely across the yellow panel.
Part 14 – Lantern Bottom
Using dark brown yarn:
Ch 23.
Sc across for 4 rows.
Make a second strip slightly longer.
Layer both strips at the bottom of the lantern to create the thick raised base.
Part 15 – Lantern Top
Using dark brown yarn:
Ch 22.
Work 3 rows of sc.
Decrease one stitch at both ends of the next several rows until the top narrows.
FO.
Using white yarn, crochet a small irregular strip and sew it over the roof edge to imitate snow.
Part 16 – Lantern Hanging Ring
Using dark brown yarn:
Ch 28.
Sl st into the first chain to form a ring.
Work sc around the entire ring.
FO.
Make a small rectangular connector underneath and attach the ring to the lantern roof.
Part 17 – Polar Bear Head
Using cream yarn:
R1: 6 sc in MR. (6)
R2: inc around. (12)
R3: [sc, inc] ×6. (18)
R4: [2 sc, inc] ×6. (24)
R5: [3 sc, inc] ×6. (30)
R6: [4 sc, inc] ×6. (36)
R7: [5 sc, inc] ×6. (42)
R8–15: sc around. (42)
R16: [5 sc, dec] ×6. (36)
R17: [4 sc, dec] ×6. (30)
Stuff firmly.
R18: [3 sc, dec] ×6. (24)
R19: [2 sc, dec] ×6. (18)
R20: [sc, dec] ×6. (12)
R21: dec around. (6)
FO and close.
Part 18 – Bear Muzzle
Using cream yarn:
R1: 6 sc in MR. (6)
R2: inc around. (12)
R3: [sc, inc] ×6. (18)
R4–5: sc around. (18)
Stuff lightly.
FO leaving a long tail.
Sew onto the lower center of the face.
Part 19 – Bear Nose & Smile
Using black yarn:
R1: 6 sc in MR.
R2: inc around. (12)
FO.
Shape slightly into an oval while sewing onto the muzzle.
Embroider one short vertical line underneath the nose and two curved smile lines.
Part 20 – Bear Ears
Make 2 using cream yarn:
R1: 6 sc in MR. (6)
R2: inc around. (12)
R3: [sc, inc] ×6. (18)
Fold slightly and sew to each side of the head.
Part 21 – Bear Body
Using cream yarn:
R1: 6 sc in MR. (6)
R2: inc around. (12)
R3: [sc, inc] ×6. (18)
R4: [2 sc, inc] ×6. (24)
R5: [3 sc, inc] ×6. (30)
R6: [4 sc, inc] ×6. (36)
R7: [5 sc, inc] ×6. (42)
R8–16: sc around. (42)
R17: [5 sc, dec] ×6. (36)
R18: [4 sc, dec] ×6. (30)
R19: [3 sc, dec] ×6. (24)
Stuff firmly.
R20: [2 sc, dec] ×6. (18)
R21: [sc, dec] ×6. (12)
R22: dec around. (6)
FO.
Part 22 – Bear Arms
Make 2:
R1: 6 sc in MR.
R2: inc around. (12)
R3–10: sc around. (12)
Stuff lightly.
Flatten the opening and sew closed.
Attach one arm naturally beside the body.
Position the second arm so it can hold the candy cane.
Part 23 – Bear Legs
Make 2:
R1: 6 sc in MR. (6)
R2: inc around. (12)
R3: [sc, inc] ×6. (18)
R4–8: sc around. (18)
Stuff.
FO leaving a long tail.
Sew underneath the body with the feet pointing slightly outward.
Part 24 – Paw Pads
Using dark brown yarn, make 2 large pads and 6 small toe pads.
For the large pad:
R1: 6 sc in MR.
R2: inc around. (12)
For each toe:
6 sc in MR.
Sew one large pad and three toes onto each foot.
Part 25 – Santa Hat
Using red yarn:
R1: 6 sc in MR. (6)
R2: sc around. (6)
R3: [sc, inc] ×3. (9)
R4: sc around. (9)
R5: [2 sc, inc] ×3. (12)
R6: sc around. (12)
R7: [3 sc, inc] ×3. (15)
R8: [4 sc, inc] ×3. (18)
R9: [5 sc, inc] ×3. (21)
R10: [6 sc, inc] ×3. (24)
R11: [7 sc, inc] ×3. (27)
R12: [8 sc, inc] ×3. (30)
Continue increasing until the hat fits across the bear’s head.
FO.
Part 26 – White Hat Brim & Pom-Pom
Join white yarn around the bottom edge of the hat.
Work 3 rounds of sc.
For the pom-pom:
R1: 6 sc in MR.
R2: inc around. (12)
R3: sc around. (12)
R4: dec around. (6)
Stuff lightly and close.
Sew to the tip of the hat.
Part 27 – Red Bear Scarf
Using red yarn:
Ch 61.
Sc in second ch and across. (60)
Work 5–6 rows.
FO.
Add short fringe to both ends.
Wrap the scarf around the bear’s neck and secure discreetly with several stitches.
Part 28 – Crochet Candy Cane
Using white yarn:
Ch 35.
Work 3–4 rounds or rows of sc to create a thick narrow tube or strip.
Insert a flexible pipe cleaner if the decoration is intended for adults and will remain purely decorative.
Bend the upper section into a candy-cane curve.
Using red yarn, embroider diagonal stripes around the cane at regular intervals.
Part 29 – Assemble the Bear
Sew the head firmly onto the upper body.
Attach the ears before positioning the hat.
Add the muzzle, nose and embroidered smile.
Sew or embroider the eyes.
Attach the arms and legs.
Add the paw pads.
Place the Santa hat slightly sideways.
Wrap the scarf around the neck.
Position the candy cane against one arm and secure it with several hidden stitches.
Part 30 – Arrange the Upper Section
Lay the banner flat.
Position the large red bow approximately 5–7 cm below the top edge.
Arrange evergreen branches behind both sides of the bow.
Add red and white berry clusters.
Place one or two snowflakes between the foliage.
Pin everything temporarily before sewing.
Part 31 – Attach the Lantern
Position the lantern directly below the bow.
Leave enough space between the lantern and bear so each remains visually distinct.
Sew the yellow panel flat against the banner first.
Then sew the raised brown frame over it.
Attach the top, snow trim and hanging ring last.
Part 32 – Attach the Polar Bear
Position the bear in the lower half of the banner.
Use strong matching yarn and sew through several points along the back of the head and body.
Attach the legs separately so the paws remain dimensional.
Do not flatten the arms completely against the banner.
Part 33 – Lower Evergreen Arrangement
Arrange long green branches upward along both sides of the bear.
Add shorter branches underneath the feet.
Tuck berry clusters between the branches.
Add several snowflakes near the pointed bottom.
Keep the central bear visible rather than covering it with foliage.
Part 34 – Final Snow Details
Scatter several small white crochet berries across the cream background.
These imitate tiny snowballs and help connect the large snowflake motifs.
Sew each one individually using white yarn.
Part 35 – Final Shaping
Hang the completed banner from the dowel.
Adjust the bow loops so they remain open and rounded.
Spread the evergreen branches outward.
Shape the Santa hat gently to one side.
Position the candy cane so it remains clearly visible.
Pull the lantern frame slightly forward to preserve its dimensional appearance.
Steam-block the banner lightly from the reverse side if needed, avoiding direct heat on stuffed pieces.
Color Variations
Classic Christmas: cream + deep red + forest green + chocolate brown.
Vintage Christmas: antique white + burgundy + sage + warm brown.
Scandinavian: ivory + muted red + pine green + natural beige.
Winter Wonderland: white + icy blue + silver-gray + navy.
Neutral Christmas: cream + camel + taupe + muted evergreen.
Kids’ Christmas: bright red + snowy white + emerald green + golden yellow.
Ways to Customize Your Wall Hanging
- Replace the polar bear with a snowman or reindeer.
- Add the family name above the lantern.
- Embroider a year onto the banner.
- Add tiny crochet presents around the bear.
- Replace the candy cane with a miniature Christmas stocking.
- Add gold yarn around the bow edges.
- Make the lantern in black for a farmhouse Christmas look.
- Add miniature pinecones between the evergreen branches.
- Use fluffy yarn for the Santa hat trim.
- Add small bells to the pointed bottom.
Care Instructions
Spot clean whenever possible.
Do not machine wash the fully assembled wall hanging because of the dimensional stuffed decorations and wooden dowel.
Use a slightly damp cloth for small marks.
Allow the piece to air dry completely while lying flat.
Store flat or loosely rolled during the off-season.
Do not place heavy decorations on top of the bear, bow or lantern while storing.
Frequently Asked Questions
Yes. Reduce the starting chain and the number of background rows, then make the bear, lantern and bow with a slightly smaller hook and lighter yarn.
Use a firm yarn for the background, keep an even tension and block the finished banner before attaching the dimensional decorations.
Yes for a decorative wall hanging kept away from small children. Embroidered eyes are another option and keep the entire design yarn-based.
No. The glowing appearance can be created entirely with warm yellow or golden yarn. This keeps the decoration lightweight and avoids adding electrical components.
Add a very small amount of stuffing to the loops and secure each loop to the banner only near its center so the outer edges remain raised.
Yes, although an indoor wall or protected interior door is best. If used on an exterior door, keep it protected from rain, moisture and prolonged direct sunlight.
Yes. The bear can also be used as a separate Christmas ornament, appliqué or dimensional decoration by adjusting the yarn and hook size.
The finished Crochet Christmas Polar Bear Wall Hanging Pattern

