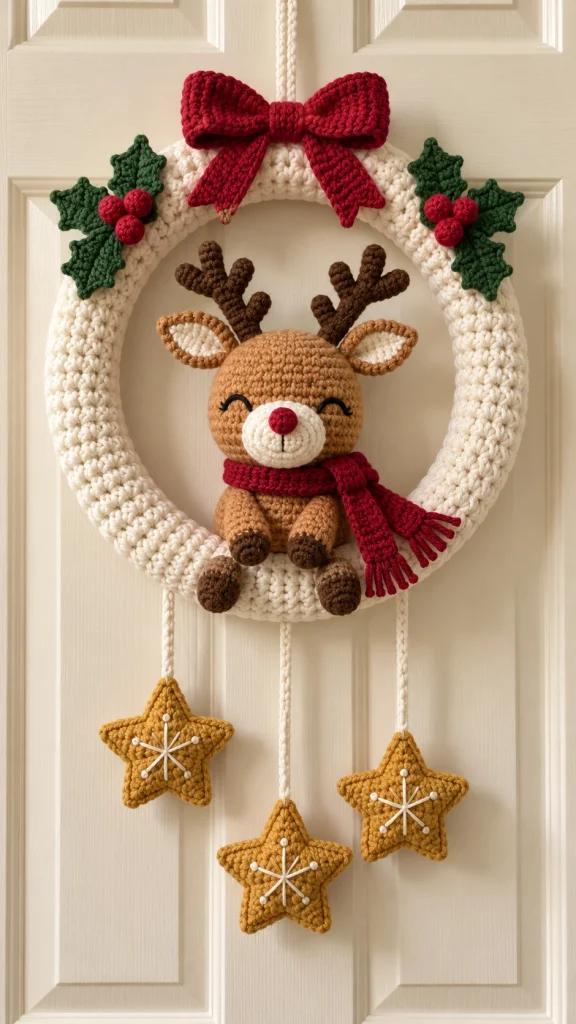
Crochet Christmas Reindeer Wreath Pattern – Cute Rudolph Door Decoration with Hanging Stars
Bring a little handmade Christmas magic into your home with this adorable crochet Christmas reindeer wreath! Featuring a soft cream crochet ring, a sweet little Rudolph with a bright red nose, a festive burgundy bow, holly leaves, and three golden hanging stars, this charming decoration is perfect for the holiday season.
This cozy Christmas crochet project combines amigurumi techniques with classic holiday decorations. The finished wreath looks beautiful hanging on a bedroom door, entryway, nursery wall, or above a festive mantel.
In this tutorial, you’ll learn how to create a reindeer-inspired Christmas wreath using simple crochet techniques, soft yarn, and cheerful holiday colors.
Pattern note: This is an original photo-inspired pattern for a similar decoration. Exact construction details and stitch counts cannot be determined from the image alone. Finished dimensions may vary with yarn, tension, and assembly.
Project Overview
- Project: Crochet Christmas Reindeer Wreath
- Skill Level: Intermediate
- Finished Wreath Diameter: Approximately 30 cm
- Overall Hanging Length: Approximately 48–55 cm
- Style: Christmas, cozy handmade, amigurumi
- Techniques: Single crochet, increases, decreases, embroidery, appliqué, assembly
- Hook Size: 3.5 mm and 4 mm
- Estimated Time: 8–12 hours
Materials You’ll Need
- Cream or ivory yarn for the wreath ring
- Caramel brown yarn for the reindeer
- Dark brown yarn for the antlers and hooves
- White yarn for the muzzle and star embroidery
- Burgundy or Christmas red yarn for the bow and scarf
- Dark green yarn for the holly leaves
- Mustard yellow or golden yarn for the hanging stars
- Small amount of black yarn for embroidered eyes
- 3.5 mm crochet hook
- 4 mm crochet hook
- Polyester fiberfill
- Foam wreath ring or a firm wreath base
- Yarn needle
- Scissors
- Stitch markers
- Optional small decorative beads
Crochet Abbreviations – US Terms
- MR: Magic ring
- ch: Chain
- sc: Single crochet
- hdc: Half double crochet
- dc: Double crochet
- sl st: Slip stitch
- inc: Increase (2 sc in the same stitch)
- dec: Invisible decrease
- st: Stitch
- FO: Fasten off
Unless otherwise stated, amigurumi pieces are worked in continuous spiral rounds.
Part 1 – Crochet the Cream Wreath Ring
The soft cream ring forms the foundation of this festive decoration.
Step 1 – Prepare the Base
Choose a foam wreath ring approximately 30 cm in diameter.
A ring with a rounded surface works best for creating the plush appearance shown in the inspiration.
Step 2 – Crochet the Cover
Using cream yarn and a 4 mm hook, chain enough stitches to cover the circumference of the wreath tube.
For a medium-sized foam ring, begin with approximately 22–28 chains, depending on yarn thickness and ring size.
Work sc rows back and forth until the strip is long enough to wrap around the entire wreath.
Step 3 – Wrap the Wreath
Place the crocheted strip around the foam ring.
Join the long edges using a yarn needle and mattress stitch.
Keep the stitches even so the fabric fits snugly without visible gaps.
Join the two short ends neatly.
You now have a soft, cream-colored crochet wreath base.
Part 2 – Crochet Rudolph’s Head
The little reindeer is the centerpiece of this adorable Christmas wreath.
Head – Caramel Brown Yarn
Using a 3.5 mm hook:
- Round 1: 6 sc in MR (6)
- Round 2: inc around (12)
- Round 3: (1 sc, inc) × 6 (18)
- Round 4: (2 sc, inc) × 6 (24)
- Round 5: (3 sc, inc) × 6 (30)
- Round 6: (4 sc, inc) × 6 (36)
- Round 7: (5 sc, inc) × 6 (42)
- Rounds 8–14: sc around (42)
- Round 15: (5 sc, dec) × 6 (36)
- Round 16: (4 sc, dec) × 6 (30)
- Round 17: (3 sc, dec) × 6 (24)
- Round 18: (2 sc, dec) × 6 (18)
Stuff the head firmly with polyester fiberfill.
- Round 19: (1 sc, dec) × 6 (12)
- Round 20: dec around (6)
FO and close the opening.
Part 3 – Crochet the White Muzzle and Red Nose
White Muzzle
Using white yarn:
- Round 1: 6 sc in MR (6)
- Round 2: inc around (12)
- Round 3: (1 sc, inc) × 6 (18)
- Rounds 4–5: sc around (18)
FO, leaving a long sewing tail.
Add a small amount of stuffing and sew the muzzle onto the lower front of the head.
Rudolph’s Red Nose
Using burgundy or red yarn:
- Round 1: 6 sc in MR (6)
- Round 2: sc around (6)
FO and sew the small red nose onto the upper center of the white muzzle.
Embroider the Face
Using black yarn, embroider two gently curved closed eyes.
Add a small vertical mouth line beneath the nose.
Keep the expression simple and sweet to create Rudolph’s peaceful, sleepy appearance.
Part 4 – Crochet the Reindeer Ears
Make two ears.
Using caramel brown yarn:
- Round 1: 4 sc in MR (4)
- Round 2: (1 sc, inc) × 2 (6)
- Round 3: (2 sc, inc) × 2 (8)
- Round 4: (3 sc, inc) × 2 (10)
- Rounds 5–6: sc around (10)
FO, leaving a long sewing tail.
Flatten the ears slightly and sew them onto opposite sides of the head.
For a two-tone appearance, embroider a cream inner-ear detail.
Part 5 – Crochet the Reindeer Antlers
Using dark brown yarn, create two small branching antlers.
Main Antler
Make two:
- Round 1: 5 sc in MR (5)
- Rounds 2–12: sc around (5)
FO, leaving a long tail.
Side Branches
Make four short branches:
- Round 1: 4 sc in MR (4)
- Rounds 2–5: sc around (4)
FO and sew two branches onto each main antler.
Shape the branches so they point slightly outward.
Attach the finished antlers securely to the top of Rudolph’s head.
Tip: For a child-friendly decoration, avoid exposed wire. Firm stitching and tightly crocheted pieces can help the antlers hold their shape.
Part 6 – Crochet the Reindeer Body
Using caramel brown yarn:
- Round 1: 6 sc in MR (6)
- Round 2: inc around (12)
- Round 3: (1 sc, inc) × 6 (18)
- Round 4: (2 sc, inc) × 6 (24)
- Rounds 5–9: sc around (24)
- Round 10: (2 sc, dec) × 6 (18)
- Round 11: (1 sc, dec) × 6 (12)
Stuff lightly.
FO, leaving a long sewing tail.
Sew the body beneath the head.
Part 7 – Crochet the Reindeer Legs
Make four small legs.
Begin with dark brown yarn for the hooves.
- Round 1: 6 sc in MR (6)
- Round 2: inc around (12)
- Rounds 3–4: sc around (12)
Change to caramel brown yarn.
- Rounds 5–8: sc around (12)
Stuff lightly and FO.
Attach the legs to the body so Rudolph appears to be sitting comfortably on the lower section of the wreath.
Part 8 – Crochet Rudolph’s Red Scarf
Using burgundy yarn:
Ch 55.
Row 1: Starting in the second chain from the hook, work 1 sc in each chain across.
Rows 2–5: Ch 1, turn, sc across.
FO and weave in the ends.
Add short yarn fringe to both scarf ends.
Wrap the scarf around Rudolph’s neck and secure it with a few discreet stitches.
Part 9 – Crochet the Festive Red Bow
The oversized burgundy bow gives the wreath a classic Christmas look.
Bow Loops
Using burgundy yarn:
Ch 15.
Work 14 sc across.
Continue for approximately 12 rows to form a rectangular strip.
FO.
Fold the strip so both ends meet in the center.
Wrap yarn tightly around the middle to form two bow loops.
Bow Tails
Make two narrow crochet strips approximately 12–15 cm long.
Shape the ends into points if desired.
Sew both tails behind the bow.
Attach the completed bow to the top center of the wreath.
Part 10 – Crochet Holly Leaves and Berries
Holly Leaves
Using dark green yarn:
Ch 12.
Work along the foundation chain using a combination of sc, hdc, dc, and slip stitches to create an elongated leaf.
Work along the opposite side of the chain to complete the leaf shape.
Add small pointed sections along the edges to imitate holly leaves.
Make approximately six leaves.
Red Holly Berries
Using red yarn:
- Round 1: 6 sc in MR (6)
- Round 2: sc around (6)
FO and close the opening.
Make six small berries.
Arrange three berries with a cluster of green leaves on each side of the wreath.
Sew everything securely in place.
Part 11 – Crochet the Three Golden Hanging Stars
The three dangling stars add movement and a whimsical finishing touch.
Star Center
Using mustard yellow yarn:
Round 1: Make a magic ring, ch 3, and work 14 dc into the ring.
Join with a sl st.
Create Five Points
Repeat the following sequence five times:
Ch 5, sl st into the second chain from the hook, sc in next chain, hdc in next chain, dc in next chain, skip 2 stitches on the center round, sl st into the next stitch.
FO and weave in the ends.
Make three stars.
Decorative Snowflake Embroidery
Using white yarn, embroider a small snowflake shape onto the center of each star.
Add tiny white knots at the ends of the embroidered lines.
Attach the Hanging Stars
Make three cream crochet cords of different lengths.
Suggested lengths:
- Left cord: 14 cm
- Center cord: 19 cm
- Right cord: 14 cm
Attach one star to each cord.
Sew the cords securely to the bottom of the wreath.
The center star should hang slightly lower than the two outer stars.
Part 12 – Assemble the Christmas Reindeer Wreath
Now it’s time to bring all the handmade pieces together.
- Place the finished cream wreath ring on a flat surface.
- Position Rudolph at the bottom center of the ring.
- Secure the reindeer using strong yarn stitches.
- Attach the large burgundy bow at the top.
- Add holly leaves and berries on both upper sides.
- Attach the three hanging golden stars at the bottom.
- Create a sturdy cream hanging loop.
- Check all attachments before hanging the wreath.
Adjust the positioning until the decoration looks balanced and symmetrical.
Beautiful Color Variations
Classic Christmas
Cream, burgundy red, forest green, and golden yellow.
Rustic Farmhouse
Oatmeal beige, chocolate brown, olive green, and muted red.
Winter Wonderland
White, silver gray, icy blue, and soft champagne gold.
Pink Christmas
Ivory, dusty rose, blush pink, and warm beige.
Vintage Christmas
Antique cream, deep wine red, dark pine green, and mustard gold.
Where to Display Your Crochet Reindeer Wreath
- Front Door: Create a welcoming handmade Christmas entrance.
- Bedroom Door: Add a cute festive detail to your room.
- Nursery Wall: Use as a decorative holiday accent, safely out of children’s reach.
- Living Room: Hang above a small shelf or mantel.
- Christmas Gift: Surprise a crochet lover with a thoughtful handmade decoration.
- Holiday Craft Display: Showcase your amigurumi skills with a unique festive design.
Tips for a Beautiful Handmade Finish
- Use consistent yarn thickness for the amigurumi pieces.
- Stuff Rudolph firmly but avoid overstuffing.
- Embroider the facial details before final assembly.
- Use matching yarn to hide attachment stitches.
- Keep the bow loops symmetrical.
- Space the holly leaves evenly.
- Make sure the hanging stars are balanced.
- Keep the wreath away from open flames and moisture.
Frequently Asked Questions
Is this crochet Christmas wreath beginner-friendly?
The project is best suited for intermediate crocheters, although beginners familiar with basic amigurumi techniques can work through the individual pieces.
Can I make the wreath smaller?
Yes. Choose a smaller wreath base and adjust the size of the decorative pieces to maintain the proportions.
What yarn works best for this project?
Cotton or acrylic yarn can work well. Cotton gives clear stitch definition, while acrylic is often soft and lightweight.
Can I make Rudolph without antlers?
Yes. You can simplify the design by leaving off the antlers or replacing Rudolph with another Christmas character.
Can I use different colors for the stars?
Absolutely. Cream, silver, red, and soft gold are beautiful alternatives.
Can I hang this wreath outdoors?
It is best displayed indoors or in a fully sheltered location because yarn and stuffing can absorb moisture.
Can I wash the wreath?
Spot cleaning is recommended, especially if the wreath contains a foam base or decorative embellishments.
Can I turn this into a Christmas gift?
Yes! A handmade crochet reindeer wreath makes a lovely personalized holiday gift for friends, family, or anyone who loves festive home decorations.
Final Thoughts
This crochet Christmas reindeer wreath pattern is a delightful way to bring handmade warmth and holiday charm into your home.
From Rudolph’s sweet embroidered eyes and bright red nose to the cozy cream ring, festive bow, holly leaves, and golden dangling stars, every detail adds personality to this cheerful decoration.
Whether you display it on your own door or make it as a special handmade Christmas gift, this adorable wreath is sure to become a favorite part of your holiday décor.
Happy crocheting and Merry Christmas! 🧶🎄❤️

