Crochet Christmas Santa Wreath Pattern
Beginner Friendly
Perfect for those just starting their crochet journey, with clear instructions and simple techniques
Single-Day Project
A satisfying project you can complete in a single afternoon or evening.
Handmade Gift
A beautiful keepsake — free forever. Read online or print at home.
About This Crochet Christmas Santa Wreath Pattern
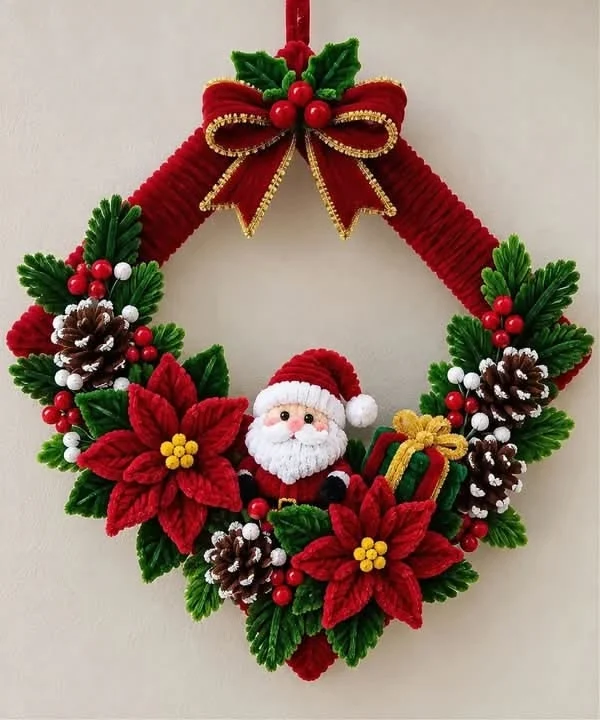
This crochet Christmas wreath pattern creates a rich handmade holiday decoration featuring a deep red wrapped wreath base, a miniature Santa, dimensional poinsettias, evergreen branches, berries, pinecones, a tiny Christmas present and a large red bow with gold edging.
The design is especially beautiful for a front door or indoor Christmas wall display. Each decoration is made separately and attached at the end, making it easy to customize the arrangement.
Materials
- Deep red yarn wreath base, poinsettias, Santa hat
- Dark green yarn pine branches and leaves
- White yarn Santa beard and snow details
- Skin-tone yarn Santa face
- Black yarn Santa boots and details
- Yellow or gold yarn flower centers and gift bow
- Brown yarn pinecones
- Red beads or crochet berries optional
- White beads or small pom-poms optional snow berries
- Gold cord bow edging
- 3–4 mm crochet hook adjust to yarn
- Fiberfill small amount
- Wreath frame 40–45 cm / 16–18 in
- Yarn needle 1
- Scissors 1 pair
Abbreviations – US Terms
MRmagic ringchchainsl stslip stitchscsingle crochethdchalf double crochetdcdouble crochettrtreble crochetincincreasedecdecreaseFOfasten offPart 1 – Cover the Wreath Base
Using deep red yarn, ch enough stitches to create a strip wide enough to wrap around the wreath frame.
Row 1: sc in 2nd ch from hook and sc across.
Row 2: ch 1, turn, sc in BLO across.
Repeat Row 2 until the strip is long enough to completely surround the wreath.
The BLO texture creates the raised ribbed appearance visible on the red upper section.
Wrap the strip tightly around the wreath frame and sew the long edges together on the back.
Part 2 – Crochet the Evergreen Branches
Using dark green yarn, ch 20–30 depending on the desired branch length.
Starting in the 2nd ch from hook, work along the chain:
*sl st, ch 5, sl st back into the same base stitch.*
Repeat along both sides of the foundation chain.
Vary the branch lengths so the finished greenery looks natural rather than perfectly symmetrical.
Make approximately 15–20 branches.
Part 3 – Crochet the Holly Leaves
Using green yarn, ch 10.
Beginning in the 2nd ch from hook work:
sc, hdc, dc, tr, tr, dc, hdc, sc.
Work 3 sc into the final chain.
Continue along the opposite side with corresponding stitches.
For a pointed leaf, finish with ch 2, sl st.
Make several leaves for the top bow and lower floral arrangement.
Part 4 – Crochet the Red Berries
Using red yarn, make a MR.
Round 1: 6 sc into MR.
Round 2: 2 sc in each st around. (12)
Round 3: sc around.
Add a tiny amount of fiberfill.
Round 4: dec around.
FO and close the opening.
Make berries in groups of three for the most natural Christmas arrangement.
Part 5 – Crochet the Poinsettia Petals
Using deep red yarn, ch 8.
Starting in the 2nd ch from hook:
sc, hdc, dc, 2 tr, dc, hdc.
Work 3 sc into the final chain.
Continue along the opposite side with corresponding stitches.
FO.
Make approximately 10–12 petals per large flower.
Part 6 – Assemble the Poinsettias
Arrange 5–6 larger petals as the bottom layer.
Place 5–6 slightly smaller petals over them, rotating the second layer so the petals fill the spaces below.
Sew firmly through the center.
Add 5–7 small yellow crochet bobbles or beads to create the flower center.
Make two large poinsettias for the lower wreath.
Part 7 – Crochet the Pinecones
Using dark brown yarn, make a MR.
Round 1: 6 sc into MR.
Round 2: 2 sc in each st around.
Round 3: *sc, ch 3, dc in same st, sl st in next st.* Repeat around.
Continue working textured scale rounds while gradually decreasing.
Stuff very lightly as you work.
Finish with 6 sts and close.
Add small touches of white yarn to the tips if you want the snowy pinecone appearance.
Part 8 – Crochet Santa’s Head
Using skin-tone yarn, make a MR.
Round 1: 6 sc into MR.
Round 2: inc around. (12)
Round 3: *sc, inc*. Repeat. (18)
Round 4: *2 sc, inc*. Repeat. (24)
Rounds 5–9: sc around.
Round 10: *2 sc, dec*. Repeat.
Stuff firmly.
Round 11: *sc, dec*. Repeat.
FO and close.
Part 9 – Santa’s Face
Add two small black eyes.
Embroider or crochet a tiny pink nose.
Add subtle pink stitches beneath the eyes for rosy cheeks.
Keep the expression simple and friendly.
Part 10 – Santa’s Beard
Join white yarn around the lower half of Santa’s face.
Work clusters such as:
sl st, ch 4, 3 dc, sl st
around the lower face.
Add a second overlapping layer underneath for a thick fluffy beard.
Use smaller white loops above the mouth for the moustache.
Part 11 – Santa’s Hat
Using red yarn, make a MR with 6 sc.
Work several rounds while gradually increasing until the hat fits Santa’s head.
Continue straight for several rounds.
Finish the lower edge with a thick white band.
Add a small white pom-pom to the tip.
Bend the hat slightly toward one side before sewing it to the head.
Part 12 – Santa’s Body
Using red yarn, make a small rounded body beginning with a MR.
Increase gradually until the body reaches approximately 8–10 cm / 3–4 in wide.
Work several straight rounds.
Decrease toward the bottom.
Stuff firmly before closing.
Add small black boots and mitten-shaped hands.
Part 13 – Tiny Christmas Present
Using red yarn, crochet six small squares or create one rectangular piece that can be folded into a box.
Stuff lightly and sew closed.
Using green yarn, crochet or embroider vertical and horizontal ribbon bands.
Using yellow or gold yarn, make a tiny bow and sew it to the top.
Part 14 – Crochet the Large Red Bow
Using deep red yarn, ch enough stitches for a strip approximately 7–8 cm / 3 in wide.
Work rows of sc until the strip measures approximately 35–40 cm / 14–16 in.
Fold both ends toward the center to create two loops.
Wrap a smaller crochet strip tightly around the center.
Part 15 – Make the Bow Tails
Crochet two red strips approximately 18–22 cm / 7–9 in long.
Decrease slightly near the lower ends.
Shape each end into a V by shortening the final rows.
Sew both tails behind the bow center.
Part 16 – Add the Gold Bow Edging
Using thin gold yarn or metallic crochet thread, work sl sts around the outer edges of both bow loops and tails.
Keep the edging thin so the red bow remains the dominant feature.
This small metallic detail gives the wreath its elegant Christmas finish.
Part 17 – Decorate the Top Bow
Place 2–3 green holly leaves behind the bow.
Add a cluster of three red berries in the center above the knot.
Sew all pieces together before attaching them to the wreath.
Part 18 – Arrange the Lower Greenery
Place the longest evergreen branches around the lower half of the wreath.
Point some branches outward and others slightly upward.
Overlap them heavily so the wreath frame underneath is mostly hidden.
Do not attach permanently until the flowers and Santa have been positioned.
Part 19 – Position the Poinsettias
Place one large poinsettia toward the lower-left area.
Place the second toward the lower-right.
Leave enough space between them for Santa and the small present.
Allow several green leaves to extend behind each flower.
Part 20 – Position Santa
Place Santa slightly left of center between the two poinsettias.
The head should remain clearly visible above the surrounding greenery.
Sew the back of Santa’s body firmly to the wreath base at several points.
Keep the face and beard free so the figure remains dimensional.
Part 21 – Add the Christmas Present
Place the miniature present immediately beside Santa.
Tilt it slightly rather than positioning it perfectly straight.
Sew the back and bottom of the gift securely into the greenery.
Part 22 – Add the Pinecones
Position pinecones on both sides of the lower arrangement.
Use approximately 3–5 pinecones around the wreath.
Place some partially behind evergreen branches so the decoration appears layered and full.
Part 23 – Fill with Berry Clusters
Add groups of red berries between the greenery, flowers and pinecones.
Add a few white berries for contrast.
Avoid spacing them perfectly evenly—the arrangement should look organic.
Part 24 – Attach the Top Bow
Position the large red-and-gold bow at the exact top center of the wreath.
Sew through the bow center and wreath covering several times.
Secure the loops separately so they keep their shape when the wreath hangs vertically.
Part 25 – Make the Hanging Loop
Using red yarn or ribbon, create a strong loop approximately 12–15 cm / 5–6 in long.
Attach it securely behind the top of the wreath.
Test the wreath by hanging it before completing the final decorations.
Part 26 – Final Shaping
Lift the poinsettia petals gently with your fingers.
Spread the evergreen branches outward.
Adjust Santa’s hat and beard.
Shape the bow loops so they remain rounded and dimensional.
Turn pinecones slightly outward so they remain visible.
Part 27 – Secure the Decorations
Once satisfied with the arrangement, sew each element securely through the wreath covering.
For heavier pieces such as Santa and the present, attach at several points.
Weave every yarn end into the back of the wreath.
Part 28 – Optional Extra Details
Add tiny gold beads between the greenery for additional sparkle.
Small crochet snowballs can be scattered among the pine branches.
A miniature gold bell can also be attached beneath the top bow.
Keep additional decorations limited so the handmade crochet elements remain the main focus.
Suggested Color Variations
Traditional Christmas: deep red, forest green, white and gold.
Vintage Christmas: burgundy, olive green, cream and antique gold.
Snowy Christmas: ivory, sage, muted red and champagne gold.
Rustic farmhouse: cranberry, dark green, oatmeal and natural brown.
Elegant Christmas: wine red, emerald green and metallic gold.
Care Instructions
Store the wreath flat in a large box after Christmas.
Avoid crushing the poinsettias, Santa or bow.
Gently reshape the crochet decorations by hand when displaying the wreath again.
If dust collects on the wreath, use a cool hair dryer on its lowest setting from a safe distance.
Frequently Asked Questions
Yes. A firm crochet tube stuffed with fiberfill can be joined into a ring, although a wreath frame provides better support for the dimensional decorations.
It is best used on a covered door protected from rain and moisture. Yarn decorations can lose their shape if repeatedly exposed to wet weather.
Yes. Reduce the wreath base and make smaller versions of Santa, the poinsettias, pinecones and bow so the proportions remain balanced.
Sew the flowers mainly through their centers and petal bases. Leave the outer portions of the petals unattached so they can lift naturally from the wreath.
Yes. The central area can hold a snowman, gingerbread figure, Christmas bell, angel or another small amigurumi decoration while keeping the same wreath structure.
The finished Crochet Christmas Santa Wreath Pattern

