Crochet Christmas Snowman Spiral Hanging Pattern – Festive Handmade Holiday Decoration
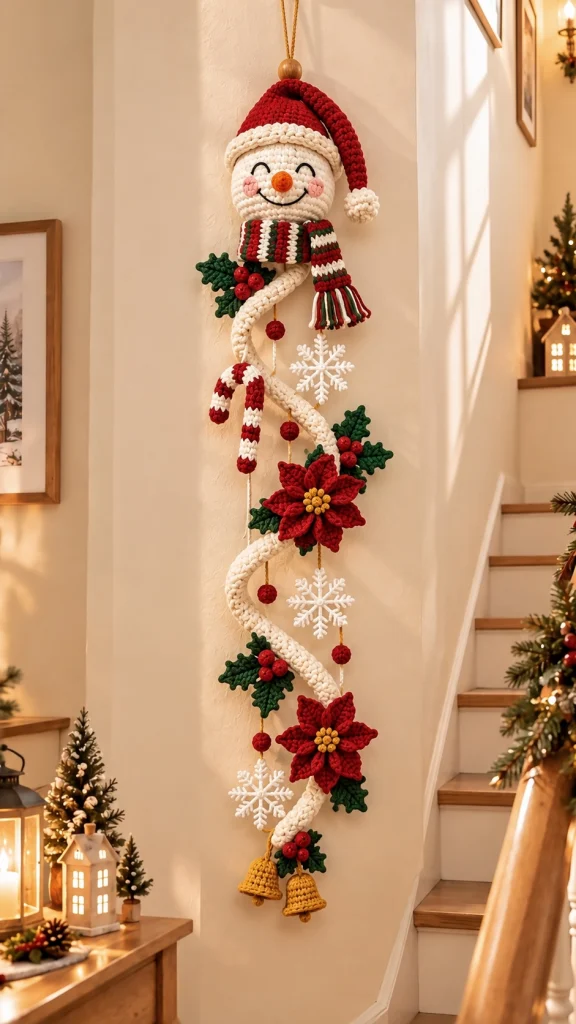
Bring a little handmade Christmas magic into your home with this adorable crochet snowman spiral hanging decoration! Featuring a cheerful snowman wearing a red Santa hat and festive striped scarf, this beautiful vertical Christmas decoration combines classic holiday colors with charming crocheted details.
The long ivory spiral is decorated with bright red poinsettias, green holly leaves, tiny red berries, white snowflakes, a striped candy cane, and two golden Christmas bells.
Perfect for decorating a staircase, hallway, living room, or cozy Christmas corner, this handmade crochet decoration adds warmth and festive personality to your home.
This tutorial provides an original interpretation of the pictured decoration, with individual crochet motifs assembled into one long hanging piece.
Project Details
- Skill Level: Intermediate to advanced
- Finished Length: Approximately 100–130 cm
- Snowman Head: Approximately 11–13 cm wide
- Estimated Time: 12–18 hours
- Crochet Terminology: US terms
- Construction: Individual crochet pieces assembled onto a long spiral cord
- Theme: Christmas, winter, farmhouse holiday decor
Materials Needed
- Worsted-weight cotton yarn in ivory or warm white
- Christmas-red yarn
- Dark forest-green yarn
- Golden-yellow yarn
- Orange yarn for the carrot nose
- Pink yarn for the cheeks
- Black embroidery yarn
- 3.5 mm crochet hook
- 4 mm crochet hook
- Polyester fiberfill stuffing
- Yarn needle
- Stitch markers
- Scissors
- Optional wooden bead for the hanging loop
- Optional craft wire or flexible support for the spiral
- Optional small bells for additional sound
Crochet Abbreviations – US Terms
- MR: Magic ring
- ch: Chain
- sc: Single crochet
- hdc: Half double crochet
- dc: Double crochet
- tr: Treble crochet
- sl st: Slip stitch
- inc: Two single crochets in one stitch
- dec: Invisible single crochet decrease
- BLO: Back loop only
- FO: Fasten off
- st: Stitch
Part 1 – Crochet the Snowman Head
Use ivory yarn and a 3.5 mm crochet hook.
Work in continuous rounds unless otherwise stated.
Round 1: 6 sc in MR. (6)
Round 2: Inc around. (12)
Round 3: (1 sc, inc) × 6. (18)
Round 4: (2 sc, inc) × 6. (24)
Round 5: (3 sc, inc) × 6. (30)
Round 6: (4 sc, inc) × 6. (36)
Round 7: (5 sc, inc) × 6. (42)
Rounds 8–14: Sc around. (42)
Round 15: (5 sc, dec) × 6. (36)
Round 16: (4 sc, dec) × 6. (30)
Round 17: (3 sc, dec) × 6. (24)
Stuff the head firmly, keeping the shape smooth and rounded.
Round 18: (2 sc, dec) × 6. (18)
Round 19: (1 sc, dec) × 6. (12)
Round 20: Dec around. (6)
FO and close the opening securely.
Snowman Face
Using black embroidery yarn, create two curved closed eyes near the upper center of the face.
Embroider a gentle curved smile below the nose.
Using pink yarn, create two small circular cheeks with several satin stitches.
Carrot Nose
Using orange yarn:
Round 1: 4 sc in MR. (4)
Round 2: Sc around. (4)
Round 3: (1 sc, inc) × 2. (6)
Round 4: Sc around. (6)
FO, leaving a sewing tail.
Attach the carrot nose to the center of the face.
Part 2 – Crochet the Red Santa Hat
Use Christmas-red yarn.
Round 1: 6 sc in MR. (6)
Rounds 2–3: Sc around. (6)
Round 4: (1 sc, inc) × 3. (9)
Rounds 5–6: Sc around. (9)
Round 7: (2 sc, inc) × 3. (12)
Rounds 8–9: Sc around. (12)
Round 10: (3 sc, inc) × 3. (15)
Rounds 11–12: Sc around. (15)
Round 13: (4 sc, inc) × 3. (18)
Round 14: Sc around. (18)
Round 15: (2 sc, inc) × 6. (24)
Round 16: Sc around. (24)
Round 17: (3 sc, inc) × 6. (30)
Round 18: Sc around. (30)
Round 19: (4 sc, inc) × 6. (36)
Round 20: (5 sc, inc) × 6. (42)
White Hat Brim
Change to ivory yarn.
Rounds 21–23: Sc around. (42)
FO, leaving a long tail.
Fold the upper part of the hat gently toward one side.
Sew the brim around the top of the snowman’s head.
Hat Pom-Pom
Using ivory yarn:
Round 1: 6 sc in MR. (6)
Round 2: Inc around. (12)
Round 3: Sc around. (12)
Round 4: Dec around. (6)
Stuff lightly, close the opening, and attach to the pointed end of the hat.
Part 3 – Crochet the Christmas Striped Scarf
Use red, forest-green, and ivory yarn.
Ch 9.
Row 1: Sc in second chain and across. (8)
Continue working rows of 8 sc, changing colors every two rows.
Follow this repeating color sequence:
- 2 rows red
- 2 rows ivory
- 2 rows forest green
- 2 rows ivory
Repeat until the scarf measures approximately 35–40 cm long.
FO and weave in the ends.
Cut short strands of yarn in all three colors and attach them to both ends of the scarf to create fringe.
Wrap the scarf around the lower part of the snowman’s head, allowing one end to hang downward.
Part 4 – Crochet the Long Ivory Spiral
The flowing ivory spiral is the central feature of this Christmas hanging decoration.
Use ivory yarn and a 4 mm crochet hook.
Spiral Foundation
Ch 180–220, depending on your desired finished length.
Row 1: Starting in the second chain, work 1 sc in each chain.
Row 2: Ch 1, turn, and work 1 sc in each stitch.
Row 3: Ch 1, turn, and work 1 sc in each stitch.
Continue for 5–7 rows to create a thick, flexible strip.
FO, leaving a long tail.
Gently twist the strip into a loose vertical spiral with wide, flowing curves.
Secure the shape with discreet stitches or attach it to a flexible support.
Important: A straight crocheted strip will not hold the pictured spiral shape by itself. A concealed support or carefully anchored hanging structure is needed to reproduce the flowing curves.
Part 5 – Crochet the Red Christmas Poinsettias
Make two large poinsettias using deep-red yarn.
Poinsettia Center
Round 1: 6 sc in MR. (6)
Round 2: Inc around. (12)
Join with a sl st.
Individual Petals
Make 6–8 petals for each flower.
Ch 11.
Starting in the second chain, work:
1 sc, 2 hdc, 4 dc, 2 hdc, 1 sc.
Ch 1, rotate the work, and crochet the same sequence along the opposite side of the chain.
Join with a sl st and FO, leaving a sewing tail.
Repeat until you have enough petals.
Arrange the petals around the center, slightly overlapping them to create a full poinsettia.
Sew them securely into place.
Golden Flower Center
Using golden-yellow yarn, make 6–8 small bobbles or French knots.
Attach them closely together at the center of the poinsettia.
Make a second poinsettia using the same method.
Part 6 – Crochet the Holly Leaves
Make approximately 8–12 dark-green holly leaves.
Ch 13.
Starting in the second chain, work:
1 sc, 2 hdc, 6 dc, 2 hdc, 1 sc.
Ch 1 and work along the opposite side of the foundation chain.
To create the pointed holly edges, work small chain-3 picots at intervals around the leaf.
FO, leaving a long tail.
Use a yarn needle to embroider a central vein along each leaf.
Arrange the holly leaves in groups of two or three around the poinsettias and berries.
Part 7 – Crochet the Red Holly Berries
Make approximately 12–16 berries using bright-red yarn.
Round 1: 6 sc in MR. (6)
Round 2: Inc around. (12)
Rounds 3–4: Sc around. (12)
Round 5: Dec around. (6)
Add a small amount of stuffing.
FO and close the opening.
Group the berries in clusters of three.
Sew them between the holly leaves.
Part 8 – Crochet the White Snowflakes
Make three snowflakes using ivory yarn.
Snowflake Center
Ch 6 and join with a sl st to form a ring.
Snowflake Arms
*Ch 7, sl st in the second chain from the hook, ch 3, sl st into the same chain space, ch 3, sl st into the same chain space, then sl st along the remaining foundation chains back to the center.*
Repeat until you have six snowflake arms.
FO and weave in the ends.
Gently block each snowflake to open the decorative points.
Attach a short strand of golden or ivory yarn to the top of each snowflake for hanging.
Part 9 – Crochet the Christmas Candy Cane
Use red and ivory yarn.
Begin with red yarn.
Round 1: 6 sc in MR. (6)
Round 2: (1 sc, inc) × 3. (9)
Rounds 3–5: Sc around. (9)
Change to ivory yarn.
Rounds 6–8: Sc around. (9)
Continue alternating red and ivory every three rounds until the tube measures approximately 18–20 cm.
Stuff lightly as you work.
Insert a flexible support if you want the candy cane to retain a firm curved shape.
FO and close the opening.
Bend the upper portion into a candy-cane hook.
Secure the curve with discreet stitches if necessary.
Part 10 – Crochet the Golden Christmas Bells
Make two bells using golden-yellow yarn.
Round 1: 6 sc in MR. (6)
Round 2: Inc around. (12)
Round 3: (1 sc, inc) × 6. (18)
Rounds 4–7: Sc around. (18)
Round 8: (2 sc, inc) × 6. (24)
Round 9: Sc around. (24)
Round 10: (3 sc, inc) × 6. (30)
Join with a sl st and FO.
The final increase creates the flared bell opening.
Bell Clapper
Using golden-yellow yarn, make a small crocheted ball.
Attach it to a short chain inside the bell.
Repeat for the second bell.
Join the two bells with a short length of golden yarn.
Part 11 – Make the Hanging Loop
Using golden or brown yarn, ch 45.
Work one row of sc across.
FO, leaving long tails.
Fold the strip into a loop.
Attach both ends securely to the top of the snowman’s hat.
If desired, thread a wooden bead onto the hanging cord for a rustic finishing touch.
Reinforce the hanging connection with several stitches.
Part 12 – Assemble the Christmas Spiral Decoration
Lay all the finished crochet pieces on a large flat surface.
Arrange the long ivory spiral vertically.
Position the snowman head at the very top.
Place the striped scarf around the snowman’s neck.
Arrange the decorative elements down the length of the spiral in the following order:
- Snowman head with Santa hat and striped scarf
- Small holly leaf and berry cluster
- White crochet snowflake
- Red-and-white candy cane
- First large red poinsettia
- Second white snowflake
- Additional holly berries and leaves
- Second large red poinsettia
- Third white snowflake
- Final holly cluster
- Two golden Christmas bells at the bottom
Adjust the spacing so the decoration looks balanced from top to bottom.
Secure each element using matching yarn and a yarn needle.
Make sure the poinsettias face forward and the snowflakes hang freely.
Attach the golden bells at the lower end of the spiral.
Part 13 – Final Finishing
Check every attachment point carefully.
Weave in all remaining yarn ends.
Gently shape the poinsettia petals and holly leaves.
Adjust the scarf fringe and bend the Santa hat naturally toward one side.
Make sure the spiral hangs evenly without twisting excessively.
Reinforce the hanging loop before displaying your decoration.
Your festive crochet snowman spiral hanging is now complete!
Where to Display Your Crochet Christmas Decoration
- Staircase Wall: Create a festive focal point beside your stairs.
- Entryway: Welcome guests with handmade Christmas charm.
- Living Room: Hang beside a Christmas tree or fireplace.
- Hallway: Add color to a narrow wall.
- Covered Front Porch: Display in an area protected from moisture.
- Christmas Gift: Give it to someone who loves handmade holiday decorations.
Christmas Color Variations
Traditional Christmas: Red, forest green, ivory, and gold.
Winter Wonderland: White, pale blue, silver, and soft gray.
Rustic Farmhouse: Cream, burgundy, sage green, and warm beige.
Elegant Christmas: Deep emerald, champagne gold, and ivory.
Candy Cane Christmas: Bright red, white, and peppermint pink.
Tips for a Beautiful Handmade Finish
- Use cotton yarn for crisp stitch definition.
- Keep the snowman head firmly stuffed.
- Embroider the face before attaching the hat and scarf.
- Arrange all decorative elements before sewing them permanently.
- Use consistent tension for the poinsettia petals.
- Block the snowflakes to emphasize their points.
- Use a flexible support if you want a structured spiral shape.
- Reinforce the hanging loop to support the full decoration.
- Keep optional wire and small decorative beads securely enclosed.
Frequently Asked Questions
Is this crochet Christmas decoration beginner-friendly?
This project is best suited to intermediate crocheters because it combines amigurumi, decorative motifs, color changes, and assembly.
How long does the project take?
Approximately 12–18 hours, depending on your crochet experience and the number of decorative pieces.
Can I make the decoration shorter?
Yes. Reduce the length of the central spiral and use fewer snowflakes, flowers, and berry clusters.
Can I make the snowman larger?
Yes. Use thicker yarn and a larger crochet hook while keeping the same stitch pattern.
Do I need craft wire?
No, but a flexible support can help maintain the spiral shape shown in the reference design.
Can I use acrylic yarn?
Yes. Acrylic yarn works well, although cotton generally provides more structure for the decorative motifs.
Can I use this pattern for Christmas garlands?
Yes. The snowflakes, poinsettias, berries, and candy canes can be adapted into separate Christmas garlands.
How should I store the decoration?
Store it loosely coiled in a dry container, protecting the snowman head and flowers from being crushed.
Can I wash the finished decoration?
Spot cleaning is recommended, particularly if the decoration contains wire, wooden beads, or other non-washable components.
Can I customize the snowman’s face?
Absolutely. Try different embroidered expressions, rosy cheeks, or a slightly larger carrot nose to create your own snowman personality.
Final Thoughts
This beautiful crochet Christmas snowman spiral hanging decoration combines the sweetness of amigurumi with classic Christmas motifs to create a truly charming handmade holiday project.
From the smiling snowman and cozy striped scarf to the delicate poinsettias, snowflakes, holly berries, and golden bells, every detail adds festive warmth.
Display it beside your staircase, hang it in your entryway, or give it as a special handmade Christmas gift.
Happy crocheting, and may your Christmas be filled with warmth, creativity, and handmade magic! 🎄☃️🧶

