Crochet Christmas Snowman Village Centerpiece Pattern
Beginner Friendly
Perfect for those just starting their crochet journey, with clear instructions and simple techniques
Single-Day Project
A satisfying project you can complete in a single afternoon or evening.
Handmade Gift
A beautiful keepsake — free forever. Read online or print at home.
About This Crochet Christmas Snowman Village Centerpiece Pattern
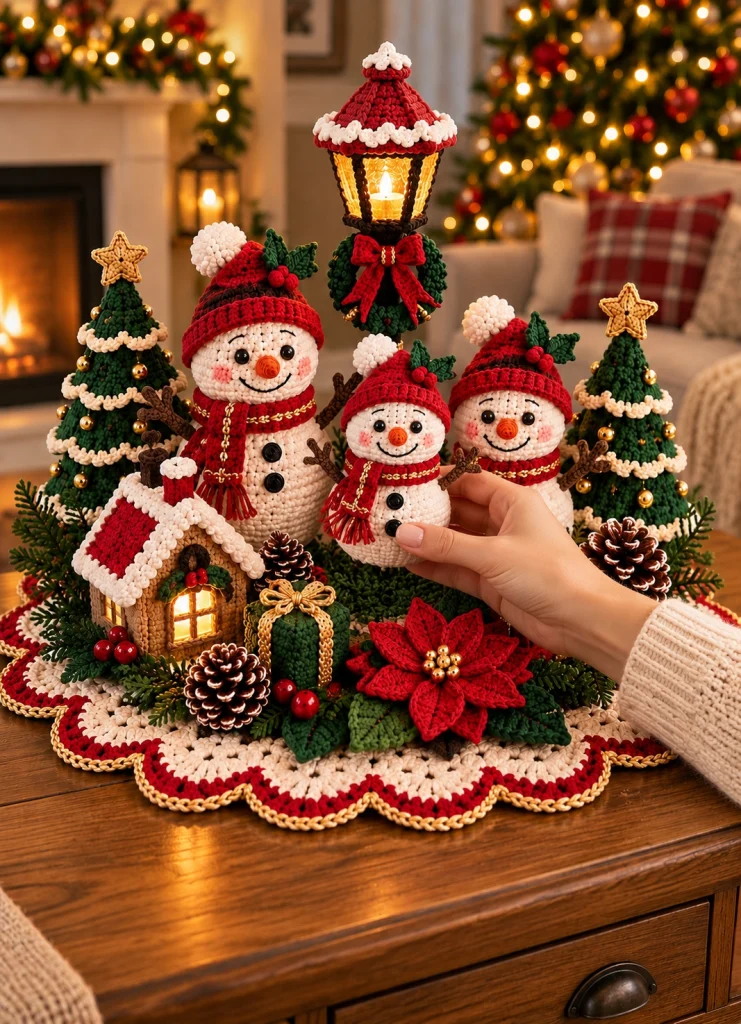
This crochet Christmas snowman centerpiece pattern creates an entire miniature holiday scene filled with handmade details: three cheerful snowmen, two decorated Christmas trees, a tiny glowing cottage, a festive lamp post, poinsettia flowers, pinecones, evergreen foliage and a beautiful scalloped crochet base.
The individual pieces are crocheted separately and then arranged together to create the dimensional Christmas village shown in the inspiration image. You can make the complete centerpiece or use the individual elements as ornaments and holiday decorations.
Materials
- Ivory / cream yarn main base + snowmen
- Deep red yarn hats, scarves, flowers, trim
- Forest green yarn trees, wreath, foliage
- Brown yarn cottage, branches, pinecones, lamp
- Gold or mustard yarn decorative accents
- Orange yarn snowman noses
- Black yarn eyes, smiles and buttons
- White yarn snow trim
- 2.5–3.5 mm crochet hook 1
- Polyester fiberfill for stuffing
- Yarn needle 1
- Scissors 1 pair
- Stitch markers optional
- Small gold beads optional
- Battery-operated LED tea light optional, for cottage/lamp
- Firm felt or plastic canvas optional base support
Abbreviations – US Terms
MRmagic ringchchainsl stslip stitchscsingle crochethdchalf double crochetdcdouble crochettrtreble crochetincincreasedecdecreaseBLOback loop onlyFLOfront loop onlyFOfasten offFinished Size
The complete arrangement measures approximately 35–45 cm / 14–18 in wide depending on yarn, hook size and spacing.
The large snowman measures approximately 18–22 cm / 7–8.5 in tall, while the two smaller snowmen measure approximately 13–16 cm / 5–6.5 in tall.
Part 1 – Large Snowman Body
Using cream yarn:
Round 1: MR, 6 sc. (6)
Round 2: inc around. (12)
Round 3: *sc, inc* around. (18)
Round 4: *2 sc, inc* around. (24)
Round 5: *3 sc, inc* around. (30)
Round 6: *4 sc, inc* around. (36)
Rounds 7–14: sc around. (36)
Round 15: *4 sc, dec* around. (30)
Round 16: *3 sc, dec* around. (24)
Stuff firmly.
Part 2 – Large Snowman Head
Continue in cream:
Round 17: *2 sc, inc* around. (32)
Round 18: *3 sc, inc* around. (40)
Rounds 19–25: sc around. (40)
Round 26: *3 sc, dec* around. (32)
Round 27: *2 sc, dec* around. (24)
Round 28: *sc, dec* around. (16)
Add stuffing and shape the head.
Round 29: dec around. (8)
FO and close.
Part 3 – Snowman Face
Embroider two black eyes approximately 5–6 stitches apart.
Using orange yarn, create a small carrot nose:
Round 1: MR, 4 sc. (4)
Round 2: sc around. (4)
Round 3: *sc, inc* twice. (6)
FO and sew horizontally to the center of the face.
Embroider a curved black smile beneath the nose.
Add tiny pink stitches or blush beneath each eye if desired.
Part 4 – Snowman Buttons
Using black yarn:
Round 1: MR, 6 sc.
Join with sl st and FO.
Make 2–3 buttons and sew vertically down the body.
Part 5 – Snowman Arms
Using brown yarn:
Ch 14.
Starting in the 2nd ch from hook, sl st back across.
For the twig fingers, attach yarn approximately 3 stitches from the end and ch 4, then sl st back.
Repeat once more.
Make two arms and sew them to the sides of the body.
Part 6 – Red Winter Hat
Using red yarn:
Round 1: MR, 6 sc. (6)
Round 2: *sc, inc* around. (9)
Round 3: sc around. (9)
Round 4: *2 sc, inc* around. (12)
Round 5: sc around. (12)
Round 6: *3 sc, inc* around. (15)
Round 7: *4 sc, inc* around. (18)
Round 8: *2 sc, inc* around. (24)
Rounds 9–11: sc around. (24)
Continue increasing if necessary until the hat fits the snowman head.
Finish with 2–3 rounds of ribbing or BLO sc.
Part 7 – White Pom-Pom
Using white yarn, wrap yarn approximately 50–70 times around two fingers.
Tie tightly through the center.
Cut the loops and trim into a round pom-pom.
Sew securely to the tip of the red hat.
Part 8 – Snowman Scarf
Using red yarn:
Ch 61.
Starting in the 2nd ch from hook, work 60 sc.
Ch 1, turn.
Work another row of sc.
Add gold surface stitches along one edge if desired.
Finish both ends with short yarn fringe.
Part 9 – Smaller Snowmen
Make two smaller snowmen using the same construction with fewer rounds.
For the body, increase to 30 stitches instead of 36.
Work approximately 6–7 even rounds.
Decrease to form the neck.
For the head, increase to approximately 30–32 stitches.
Work 5–6 even rounds before decreasing.
Add matching hats, scarves, carrot noses, buttons and twig arms.
Part 10 – Christmas Tree Base
Using forest green:
Round 1: MR, 6 sc. (6)
Round 2: sc around. (6)
Round 3: inc around. (12)
Round 4: sc around. (12)
Round 5: *sc, inc* around. (18)
Round 6: sc around. (18)
Round 7: *2 sc, inc* around. (24)
Round 8: sc around. (24)
Round 9: *3 sc, inc* around. (30)
Part 11 – Tree Branch Layers
Work decorative branch rounds into the FLO of selected rounds:
*sl st, ch 3, 2 dc in same stitch, ch 3, sl st in next stitch*.
Repeat around.
Add branch layers approximately every 2–3 rounds.
This creates the dimensional tiered Christmas-tree appearance.
Part 12 – Tree Snow Trim
Using cream or white yarn, surface crochet around selected branch layers.
Work:
*sl st, ch 2, sl st in next stitch* around.
Keep the trim irregular enough to resemble soft snow resting on the branches.
Part 13 – Tree Decorations
Add tiny gold beads or crocheted bobbles across the branches.
For crochet bobbles:
MR, 5 sc, FO and close tightly into a small ball.
Sew them randomly around the tree.
Make two trees for the complete centerpiece.
Part 14 – Crochet Tree Star
Using gold yarn:
Round 1: MR, 10 sc. (10)
For each point:
*sl st in next stitch, ch 5, sl st in 2nd ch, sc, hdc, dc down chain, sl st in next base stitch*.
Repeat five times.
FO and sew to the top of the tree.
Part 15 – Cottage Front
Using warm brown yarn:
Ch 21.
Work 20 sc across.
Continue for approximately 14–16 rows.
FO.
Make a matching back panel.
Part 16 – Cottage Side Walls
Ch 13.
Work 12 sc across for approximately 14 rows.
Make two identical pieces.
Sew the four walls together at the corners.
Part 17 – Cottage Roof
Using red yarn:
Ch 25.
Work 24 sc across for approximately 16–18 rows.
Make two roof panels.
Sew the upper long edges together to form the roof peak.
Position over the cottage walls.
Part 18 – Snowy Roof Trim
Using white yarn, attach along the roof edges.
Work:
*sc, hdc, 3 dc in next stitch, hdc, sc*.
Repeat to create a soft scalloped snow border.
Add white crochet along the roof peak as well.
Part 19 – Cottage Window
Create a small rectangular window using gold or mustard yarn.
Embroider or surface crochet a brown frame around it.
Add one vertical and one horizontal bar to create four panes.
For the glowing effect, place a battery-operated LED tea light only inside the cottage.
Part 20 – Cottage Door & Holly
Make a small brown door approximately 6–8 stitches wide.
Sew it to the cottage front.
Add tiny green leaves and red berries above or beside the door.
For each berry: MR, 5 sc, FO and close into a tiny ball.
Part 21 – Lamp Post
Using dark brown yarn, crochet a firm tube:
Round 1: MR, 6 sc.
Rounds 2–20: sc around.
Stuff lightly or insert a safe flexible craft support if desired.
FO.
Part 22 – Lamp Frame
Create four narrow brown crochet strips approximately 8–10 cm long.
Join them at the top and bottom to form the lantern frame.
Add a dark crochet base and roof.
Place a tiny battery LED inside if desired.
Part 23 – Santa-Style Lamp Roof
Using red yarn, crochet a small cone using the same increase principle as the snowman hat.
Add white scalloped trim around the lower edge.
Finish with a tiny white pom-pom at the top.
Sew the roof securely above the lamp frame.
Part 24 – Lamp Wreath
Using forest green:
Ch 24.
Join with sl st to form a ring.
Work 2 sc in each chain around.
FO.
Add tiny red berries and sew a small red bow to the center.
Attach the wreath beneath the lamp.
Part 25 – Poinsettia Petals
Using red yarn:
Ch 8.
Starting in the 2nd ch:
sl st, sc, hdc, dc, dc, hdc, 3 sc in final chain.
Work down the opposite side:
hdc, dc, dc, hdc, sc, sl st.
FO.
Make approximately 8 petals for one large flower.
Part 26 – Poinsettia Assembly
Arrange five larger petals as the bottom layer.
Place three smaller petals above them.
Sew all layers securely through the center.
Add 5–7 gold beads or small gold crochet bobbles to the flower center.
Part 27 – Evergreen Leaves
Using forest green:
Ch 11.
Starting in the 2nd ch:
sl st, sc, hdc, dc, 2 dc, dc, hdc, sc, sl st.
Work similarly along the opposite side of the foundation chain.
Make leaves in several sizes.
Part 28 – Crochet Berries
Using red yarn:
Round 1: MR, 6 sc.
Round 2: sc around.
Add a tiny amount of stuffing.
Round 3: dec around.
FO and close.
Make multiple berries and arrange them in clusters of three.
Part 29 – Crochet Pinecones
Using dark brown yarn:
Ch 16.
Work 3 dc into each chain across.
The strip will naturally curl.
Roll it tightly from one end to form a pinecone shape.
Sew through the center several times to secure.
Part 30 – Small Crochet Gift
Using forest green yarn:
Crochet six small square panels and sew them into a cube.
Stuff lightly before closing.
Using gold yarn, surface crochet one vertical and one horizontal ribbon around the box.
Add a small gold crochet bow on top.
Part 31 – Large Round Base
Using cream yarn:
Round 1: MR, 12 dc. (12)
Round 2: 2 dc in each stitch. (24)
Round 3: *dc, 2 dc in next* around. (36)
Round 4: *2 dc, 2 dc in next* around. (48)
Continue increasing evenly using the same progression until the circle reaches approximately 35–45 cm / 14–18 in.
Part 32 – Red Decorative Border
Change to red yarn.
Work one round of sc evenly around.
Next round:
*skip 1 stitch, 5 dc in next stitch, skip 1 stitch, sl st in next stitch*.
Repeat around to create the scalloped border.
Part 33 – Gold Outer Edge
Attach metallic gold or mustard yarn.
Work one round of sl st around the outermost scalloped edge.
Keep the tension loose enough that the base remains perfectly flat.
Part 34 – Position the Large Snowman
Place the largest snowman slightly left of center.
Angle the body very slightly toward the middle of the display.
Sew the bottom securely through the crochet base.
Add a few hidden anchoring stitches at the back if necessary.
Part 35 – Position the Small Snowmen
Place the two smaller snowmen toward the center and right.
Overlap them slightly rather than spacing them evenly.
This creates the grouped family appearance visible in the inspiration.
Sew each snowman securely to the base.
Part 36 – Add the Christmas Trees
Place one tree at the far left behind the cottage.
Place the second tree at the far right behind the smaller snowman.
The trees should frame the central snowman group without hiding their faces.
Part 37 – Add the Cottage
Position the cottage at the front-left section of the centerpiece.
Allow part of the house to overlap the base border visually.
Secure the bottom and rear of the cottage with hidden stitches.
Part 38 – Add the Lamp Post
Place the tall lamp post behind the central snowmen.
The lantern should rise above the snowmen and become the highest point of the arrangement.
Anchor the post securely at several points so it remains upright.
Part 39 – Front Poinsettia
Place the large red poinsettia toward the front-right area.
Surround it with dark-green leaves.
Add several gold center beads for a festive focal point.
Part 40 – Add Pinecones & Berries
Position crochet pinecones between the larger elements.
Add clusters of red berries around the cottage, poinsettia and trees.
Avoid filling every empty space—the individual crochet elements should remain easy to see.
Part 41 – Evergreen Filler
Use the crocheted leaves to fill small gaps around the base.
Layer several leaf sizes together to imitate natural evergreen branches.
Sew only the base of each leaf so the tips remain dimensional.
Part 42 – Final Assembly
Check the arrangement from the front before permanently securing every detail.
The lamp should form the tallest central point.
The trees should balance both sides.
The cottage should remain visible at the front-left.
The poinsettia and gift create visual interest along the lower front edge.
Part 43 – Optional Lights
Small battery-powered LED lights can be placed inside the cottage and lamp.
Hide the battery compartment behind the display or underneath a removable section of the base.
Do not permanently sew the battery compartment inside the crochet so batteries can be replaced.
Part 44 – Final Shaping
Shape each snowman gently with your hands.
Straighten the tree layers.
Spread the poinsettia petals.
Adjust the pinecones and evergreen leaves.
Fluff the hat pom-poms and scarf fringe.
Make sure the lamp remains vertical.
Part 45 – Finishing
Weave in every visible yarn end.
Remove loose fibers.
Lightly steam-block flat elements such as leaves and poinsettia petals if necessary.
Do not press or flatten stuffed amigurumi pieces.
Color Variations
Classic Christmas: deep red, forest green, cream and gold.
Vintage Christmas: burgundy, moss green, oatmeal and antique gold.
Snowy Christmas: ivory, white, sage and champagne gold.
Farmhouse: cream, natural brown, muted red and pine green.
Candy Cane: bright red, white and dark green.
Individual Pieces You Can Make Separately
- Snowman Christmas ornaments
- Crochet Christmas trees
- Mini crochet cottage
- Poinsettia decorations
- Crochet pinecones
- Christmas gift ornaments
- Mini lamp-post decoration
- Holiday table centerpiece
Frequently Asked Questions
No. Every major component can be used separately. The snowmen, trees, cottage and poinsettia also make beautiful individual Christmas decorations.
Smooth cotton, cotton-blend or acrylic yarn with clear stitch definition works well. Using the same yarn weight throughout makes the finished scene look coordinated.
Yes. Use thicker yarn and a larger hook, or continue the increase sequence for additional rounds before working the straight body rounds.
Stuff the figures firmly, sew them through several points of the base and reinforce the underside with felt or plastic canvas if needed.
Use only cool battery-operated LED lights. Never use candles, open flames or lights that become hot near yarn or stuffing.
Store it upright in a large box. Place tissue paper around the lamp, trees and snowmen to prevent them from bending or becoming crushed.
The finished Crochet Christmas Snowman Village Centerpiece Pattern

