Elegant Beaded Crochet Christmas Tree Ornaments – A Beautiful Handmade Holiday Pattern
There is something truly magical about handmade Christmas decorations, especially when delicate crochet stitches meet shimmering golden beads and beautiful pearls.
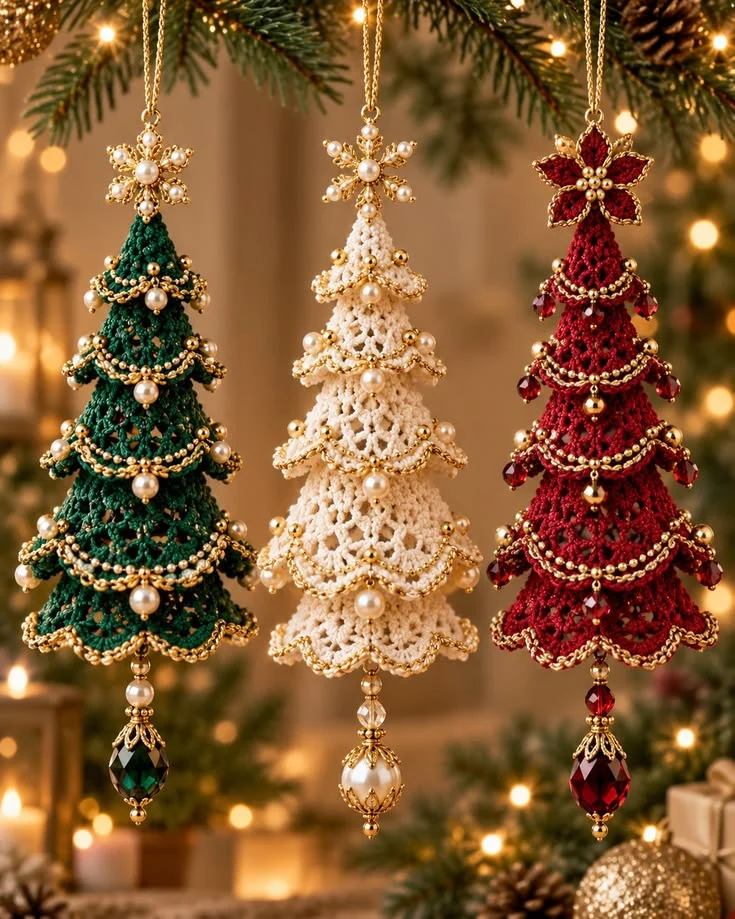
These elegant crochet Christmas tree ornaments bring a luxurious, vintage-inspired touch to holiday decorating. Featuring emerald green, warm ivory, and deep burgundy yarn, each miniature Christmas tree is embellished with graceful golden garlands, pearl accents, and a sparkling hanging pendant.
Inspired by traditional lace crochet and heirloom Christmas ornaments, these decorations are perfect for adding timeless elegance to your Christmas tree, creating thoughtful handmade gifts, or decorating a festive holiday table.
In this tutorial, you’ll learn how to crochet a delicate tiered Christmas tree ornament, shape its lace branches, and finish it with beautiful beadwork.
Project Overview
- Skill Level: Intermediate to Advanced
- Finished Height: Approximately 14–18 cm, including hanging pendant
- Tree Width: Approximately 7–9 cm
- Yarn: Size 3 crochet cotton thread or fine cotton yarn
- Hook Size: 2–2.5 mm
- Construction: Tiered lace cone with decorative scalloped branches
- Terminology: US crochet terms
Pattern note: This is an original, image-inspired design rather than an exact reconstruction of the photographed ornaments. The crochet instructions below provide a workable starting structure; the finished size and decorative placement may need adjustment according to your yarn, gauge, and bead sizes.
Materials You’ll Need
- Fine cotton crochet thread in emerald green
- Fine cotton crochet thread in ivory white
- Fine cotton crochet thread in burgundy red
- 2–2.5 mm crochet hook
- Small gold seed beads
- Small ivory pearl beads
- Optional red and green faceted crystal beads
- Decorative gold snowflake or flower charms
- Three decorative hanging teardrop beads
- Thin gold-colored beading wire or strong beading thread
- Gold-colored jewelry findings or bead caps
- Gold hanging cord
- Yarn needle
- Small scissors
- Stitch markers
- Optional fabric stiffener
- Optional lightweight cone-shaped support for shaping
Crochet Abbreviations
- ch: Chain
- sc: Single crochet
- hdc: Half double crochet
- dc: Double crochet
- tr: Treble crochet
- sl st: Slip stitch
- st: Stitch
- sts: Stitches
- sp: Space
- MR: Magic ring
- inc: Increase
- FO: Fasten off
Step 1 – Crochet the Christmas Tree Cone
Begin with your chosen Christmas tree color.
Use a 2.5 mm crochet hook.
The tree is worked from the top downward in continuous rounds, gradually increasing to create a cone.
Basic Cone Pattern
Round 1: Make a MR and work 6 sc into the ring. (6)
Round 2: Sc in each stitch around. (6)
Round 3: Repeat (sc in next st, inc) around. (9)
Round 4: Sc around. (9)
Round 5: Repeat (sc in next 2 sts, inc) around. (12)
Round 6: Sc around. (12)
Round 7: Repeat (sc in next 3 sts, inc) around. (15)
Round 8: Sc around. (15)
Round 9: Repeat (sc in next 4 sts, inc) around. (18)
Round 10: Sc around. (18)
Round 11: Repeat (sc in next 5 sts, inc) around. (21)
Round 12: Sc around. (21)
Round 13: Repeat (sc in next 6 sts, inc) around. (24)
Round 14: Sc around. (24)
Round 15: Repeat (sc in next 7 sts, inc) around. (27)
Round 16: Sc around. (27)
Round 17: Repeat (sc in next 8 sts, inc) around. (30)
Round 18: Sc around. (30)
Round 19: Repeat (sc in next 9 sts, inc) around. (33)
Round 20: Sc around. (33)
Round 21: Repeat (sc in next 10 sts, inc) around. (36)
Round 22: Sc around. (36)
Continue adding three evenly spaced increases every second round if you would like a taller tree.
Keep the cone hollow so the ornament remains lightweight.
Step 2 – Create the Delicate Lace Texture
To recreate the airy lace appearance of the inspiration, add decorative openwork layers over the basic cone.
Attach matching thread near the upper section of the cone.
Work the following decorative repeat into an even-numbered round:
Round A: Ch 3, skip 1 base stitch, sl st into the next stitch. Repeat around.
Round B: Work (sc, ch 3, sc) into each chain space around.
FO and secure the ends.
Repeat the lace treatment on selected lower rounds.
The result should resemble overlapping delicate branches rather than a tightly stuffed amigurumi tree.
Step 3 – Crochet the Scalloped Christmas Tree Branches
The softly curved edges are one of the most beautiful features of these ornaments.
Attach yarn to the lower edge of the cone.
Work the following pattern:
Scallop Repeat: Skip 1 stitch, work 5 dc into the next stitch, skip 1 stitch, sl st into the next stitch.
Repeat around the bottom edge.
For a more elaborate appearance, crochet additional scalloped bands and sew them around the cone at evenly spaced heights.
Arrange the layers so each lower tier is slightly wider than the tier above it.
This creates the graceful cascading Christmas tree silhouette.
Step 4 – Add the Gold Crochet Edging
For an elegant festive finish, add a thin metallic gold accent to the outer edges.
Using fine gold crochet thread or a suitable metallic embroidery thread:
Attach the thread at the beginning of a scalloped edge.
Work one sl st into each accessible edge stitch.
Continue around the decorative tier.
FO and carefully weave in the ends.
Repeat along the remaining lace tiers.
Keep the metallic edging delicate so it enhances the crochet rather than overpowering the lace pattern.
Step 5 – Create the Golden Bead Garlands
The golden garlands give these ornaments their luxurious heirloom appearance.
Cut a length of strong beading thread approximately 40–50 cm long.
Thread several small gold seed beads onto the strand.
Arrange the beads in gentle curved swags around the Christmas tree.
Secure the strand at regular intervals using small stitches through the crochet fabric.
Continue wrapping the bead garlands around the tree, allowing each section to form a graceful curve.
Repeat for three or four levels, depending on the size of your ornament.
Tip: Use matching thread to attach the bead garlands invisibly.
Step 6 – Add the Pearl Decorations
Small ivory pearls create a beautiful contrast against the green, red, and cream crochet.
Choose pearl beads approximately 4–6 mm in diameter.
Sew one pearl at the center of selected garland swags.
Add smaller pearls along the edges of the branches.
For the emerald green tree, combine white pearls with gold beads.
For the ivory tree, use warm gold beads and creamy pearls.
For the burgundy tree, combine gold beads with small red crystal accents.
Distribute the beads evenly to keep the ornament balanced.
Step 7 – Make the Decorative Tree Topper
Each tree in the inspiration has a beautiful gold decorative topper.
You can use a small snowflake charm, flower-shaped metal embellishment, or a crocheted star.
Simple Crochet Star Topper
Using fine metallic gold thread:
Round 1: Make a MR and work 10 sc into the ring. Join with sl st.
Round 2: Repeat the following five times:
Ch 4, sl st in the second chain from the hook, sc in the next chain, hdc in the next chain, skip 1 stitch of the center ring, sl st in the next stitch.
FO and weave in the ends.
Gently shape the five points.
Attach the star securely to the top of the Christmas tree.
Add a small pearl or gold bead to the center if desired.
Step 8 – Attach the Hanging Crystal Pendant
The hanging crystal pendant creates a graceful finishing touch beneath the tree.
Choose a lightweight teardrop-shaped bead.
For the green tree, use an emerald-colored crystal.
For the ivory tree, use a pearl or clear crystal.
For the burgundy tree, use a deep red crystal.
Thread the bead onto strong beading wire or jewelry thread.
Add a small decorative bead cap if desired.
Secure the pendant to the center of the lower edge of the tree.
Make sure the attachment is strong enough to support the bead without stretching the crochet fabric.
Step 9 – Add the Hanging Loop
Cut approximately 20 cm of gold hanging cord.
Fold it in half to create a loop.
Pass the ends through the top of the tree.
Tie a secure knot inside the crochet cone.
Reinforce the attachment with a few stitches using strong thread.
Trim the excess cord.
Your ornament is now ready to hang.
Step 10 – Shape and Finish the Ornament
For a crisp, elegant silhouette, gently shape the tree with your hands.
If using cotton thread, you may lightly block the ornament.
For a firmer result, apply a small amount of fabric stiffener according to the manufacturer’s instructions.
Place the tree over a suitable cone-shaped form while drying.
Allow it to dry completely before adding heavy decorative beads or hanging it.
Do not apply fabric stiffener directly to delicate pearls, plated metal findings, or crystal beads unless the product is compatible with those materials.
Three Beautiful Christmas Color Combinations
1. Emerald Green and Gold
Deep emerald crochet, delicate gold garlands, ivory pearls, and a dark green crystal pendant.
This combination creates a timeless traditional Christmas look.
2. Winter Ivory and Champagne Gold
Soft ivory crochet, champagne gold accents, creamy pearls, and a pearl drop pendant.
Perfect for elegant winter wonderland decorations and neutral Christmas interiors.
3. Burgundy Red and Antique Gold
Rich burgundy crochet, antique gold garlands, ruby-colored crystal beads, and a red hanging pendant.
A luxurious choice for classic Christmas decorating.
Creative Ways to Display Your Crochet Christmas Trees
- Hang them on your Christmas tree.
- Use them as elegant holiday gift toppers.
- Decorate a Christmas garland.
- Hang them from a mantelpiece.
- Create a handmade ornament gift set.
- Use them for Christmas table place settings.
- Decorate a festive wreath.
- Hang them in a window.
- Make matching ornaments for family members.
- Display them on a small decorative tabletop tree.
Helpful Tips for Beautiful Results
- Choose fine cotton thread for crisp lace stitches.
- Maintain even tension throughout the cone.
- Keep the tree hollow and lightweight.
- Use small beads to avoid distorting the crochet.
- Secure every bead individually or with a strong continuous thread.
- Arrange garlands before sewing them permanently.
- Use a cone-shaped form when blocking.
- Keep the scalloped layers evenly spaced.
- Match your pendant color to your yarn.
- Store finished ornaments in a padded box to protect the delicate beadwork.
Frequently Asked Questions
Are these crochet Christmas tree ornaments suitable for beginners?
The basic cone is approachable for confident beginners, but the lace layers, decorative scallops, and beadwork make the complete project more suitable for intermediate or advanced crocheters.
What yarn works best?
Fine cotton crochet thread works particularly well because it creates defined stitches and a delicate lace appearance.
Can I make the ornaments without beads?
Yes! The crocheted trees can look beautiful with simple metallic edging or small embroidered details.
How can I make the trees stand upright?
Use a suitable cone-shaped blocking form and apply fabric stiffener if desired. A lightweight internal support can also help maintain the shape.
Can I use regular worsted-weight yarn?
Yes, but the ornaments will be larger and less delicate. Adjust the hook size and decorations accordingly.
Can I replace the crystal pendant?
Absolutely. Try a pearl drop, miniature bell, wooden bead, or crocheted tassel.
How do I keep the gold bead garlands in place?
Secure the strands at multiple points with strong matching thread and reinforce the beginning and ending points.
Can I sell ornaments made from this pattern?
You may use this original pattern to make finished ornaments for personal use or sale, subject to any applicable third-party rights relating to separately purchased embellishments or designs.
How should I store the ornaments?
Wrap each ornament in tissue paper and store it in a sturdy box to protect the lace and beadwork.
Are these ornaments safe around small children?
These ornaments contain small beads and decorative parts that may present choking hazards. Keep them out of reach of young children and pets.
Final Thoughts
These elegant beaded crochet Christmas tree ornaments combine the beauty of delicate handmade lace with the sparkle of festive holiday decorations.
Whether you choose rich emerald green, soft winter ivory, or luxurious burgundy red, each ornament can become a treasured handmade keepsake.
Make a matching set for your own Christmas tree, gift them to someone special, or create a collection of beautiful handmade ornaments to enjoy year after year.
Happy crocheting, and may your Christmas sparkle with handmade magic! 🎄✨🧶