Crochet Christmas Trees – Free Advanced Winter Tree Trio Pattern
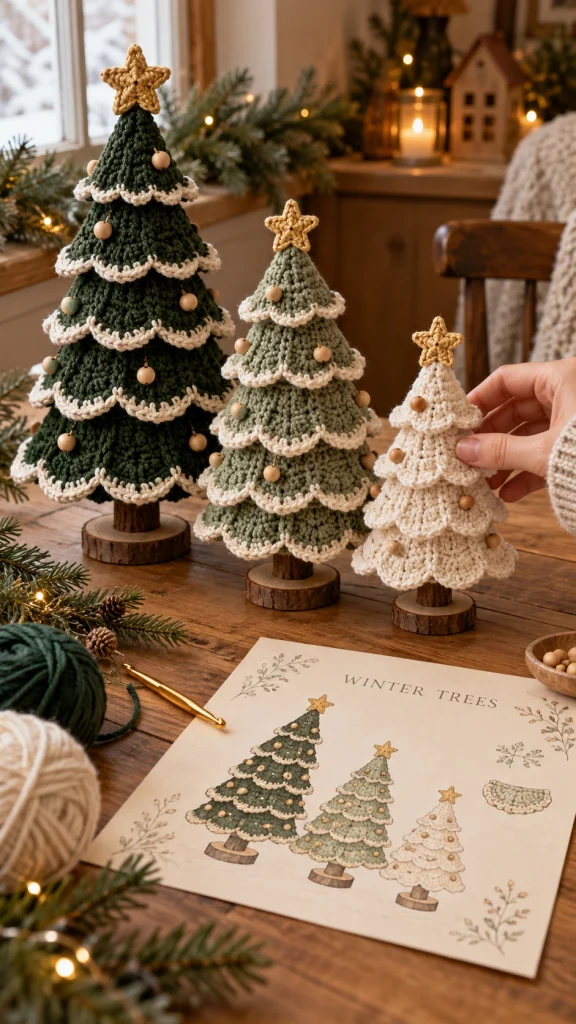
Bring cozy woodland charm into your home with this beautiful set of three handmade crochet Christmas trees. Featuring deep forest green, soft sage green, and warm ivory yarn, these miniature trees are decorated with delicate snowy scalloped branches, natural wooden beads, and golden crochet stars.
Each tree has a charming layered silhouette, with overlapping crocheted branches arranged around a tapered central structure. Rustic wooden trunks and round wood-slice bases complete the elegant farmhouse-inspired design.
This free advanced crochet pattern guides you through making three different-sized decorative Christmas trees, including shaped tree bodies, layered branch skirts, scalloped borders, star toppers, and finishing details.
Pattern Information
- Skill Level: Advanced
- Large Tree Height: Approximately 30 cm
- Medium Tree Height: Approximately 24 cm
- Small Tree Height: Approximately 18 cm
- Construction: Tapered crochet cone with separately crocheted overlapping branch tiers
- Yarn Weight: Worsted-weight cotton or cotton-blend yarn
- Hook Size: 3.5 mm and 4 mm
- Terminology: US crochet terms
- Estimated Time: 12–18 hours for the complete set
Materials Needed
- Forest-green worsted-weight yarn – approximately 180 m
- Sage-green worsted-weight yarn – approximately 140 m
- Warm ivory worsted-weight yarn – approximately 130 m
- Small amount of metallic gold or mustard-gold cotton yarn
- 3.5 mm crochet hook
- 4 mm crochet hook
- Polyester fiberfill or firm cone inserts
- Stitch markers
- Tapestry needle
- Scissors
- Natural wooden beads, approximately 8–12 mm
- Three short wooden dowels for trunks
- Three round wooden bases
- Strong craft adhesive suitable for wood
- Optional cardboard or plastic support cones
- Rustproof blocking pins
Crochet Abbreviations
- MR: Magic ring
- ch: Chain
- sc: Single crochet
- hdc: Half double crochet
- dc: Double crochet
- tr: Treble crochet
- sl st: Slip stitch
- st: Stitch
- inc: Increase – 2 sc in the same stitch
- dec: Decrease
- BLO: Back loop only
- FLO: Front loop only
- FO: Fasten off
Special Techniques
- Continuous Spiral Crochet: Creates a smooth tapered cone without visible seams.
- Layered Construction: Separate crocheted skirts overlap to form dimensional branches.
- Scalloped Edging: Ivory yarn forms delicate snow-covered branch borders.
- Surface Crochet: Adds subtle decorative texture to the tree layers.
- Structured Assembly: A central support maintains the upright shape.
- Decorative Star Shaping: Five individually formed points create a dimensional topper.
1. Crochet the Large Forest-Green Tree Cone
Using forest-green yarn and a 3.5 mm hook, work in continuous rounds.
Round 1: Make a MR and work 6 sc into the ring. (6)
Round 2: Sc in each stitch around. (6)
Round 3: *Sc in next stitch, inc* repeat around. (9)
Round 4: Sc around. (9)
Round 5: *Sc in next 2 stitches, inc* repeat around. (12)
Round 6: Sc around. (12)
Round 7: *Sc in next 3 stitches, inc* repeat around. (15)
Round 8: Sc around. (15)
Round 9: *Sc in next 4 stitches, inc* repeat around. (18)
Round 10: Sc around. (18)
Continue increasing by 3 stitches every second round, keeping the increases evenly distributed.
Work until the cone reaches approximately 25 cm in height and 78 stitches around its lower circumference.
Fasten off, leaving a long tail for assembly.
2. Crochet the Medium Sage-Green Tree Cone
Using sage-green yarn, follow the same cone construction as the large tree.
Begin with 6 sc in a magic ring and increase by 3 stitches every second round.
Continue until the cone measures approximately 19 cm high and reaches 60 stitches around the base.
Fasten off.
3. Crochet the Small Ivory Tree Cone
Using ivory yarn, begin with 6 sc in a magic ring.
Increase by 3 stitches every second round while maintaining even tension.
Continue until the cone measures approximately 13 cm high and reaches 42 stitches around the base.
Fasten off.
4. Crochet the Layered Branch Skirts
The layered branches give the trees their distinctive full and dimensional appearance.
Each branch skirt is crocheted separately and attached around the central cone.
Large Tree – Make 5 Branch Skirts
Using forest-green yarn, create five skirts in progressively larger sizes.
Foundation Chains: 18, 30, 42, 54, and 66 chains.
Join each foundation chain into a ring without twisting.
Round 1: Ch 1, sc in each chain around. Join.
Round 2: Ch 3, dc in each stitch around. Join.
Round 3: *Dc in next 2 stitches, 2 dc in next stitch* repeat around.
Round 4: Ch 1, sc in each stitch around.
Round 5: *Skip 2 stitches, work 5 dc in next stitch, skip 2 stitches, sc in next stitch* repeat around, adjusting the final repeat if necessary.
Fasten off.
Repeat for all five skirts, keeping the largest skirt for the bottom of the tree.
Medium Tree – Make 4 Branch Skirts
Using sage-green yarn, make four skirts with foundation chains of 18, 30, 42, and 54 stitches.
Follow the same branch-skirt instructions.
Small Tree – Make 3 Branch Skirts
Using ivory yarn, make three skirts with foundation chains of 18, 30, and 42 stitches.
Follow the same branch-skirt instructions.
5. Add the Snowy Scalloped Edging
Using warm ivory yarn and a 3.5 mm hook, add a delicate snowy border to each green branch skirt.
Join ivory yarn at the outer edge of a skirt.
Round 1: Work sc evenly around the lower edge.
Round 2: Repeat *sl st in next stitch, skip 1 stitch, 5 dc in next stitch, skip 1 stitch* around.
Join with a sl st and fasten off.
The scallops should create soft, gently curved white edges resembling snow resting on evergreen branches.
For the ivory tree, use the same ivory yarn to create a subtle raised scalloped texture.
6. Attach the Branch Skirts
Place the largest skirt near the base of the large tree cone.
Secure the upper edge of the skirt to the cone using matching yarn.
Position the second-largest skirt above the first, allowing the scalloped edges to overlap naturally.
Continue upward, attaching progressively smaller skirts.
Keep approximately 2–3 cm between the attachment lines, depending on the tree size.
Repeat the process for the medium and small trees.
Make sure the layers remain evenly spaced around the entire circumference.
7. Crochet the Golden Star Toppers
Make 3 stars using metallic gold or mustard-gold cotton yarn.
Round 1: Make a MR, ch 2, work 10 hdc into the ring. Join with a sl st. (10)
Round 2: *Ch 5, sl st into the second chain from the hook, sc in the next chain, hdc in the next chain, dc in the final chain, skip 1 stitch on the center ring, sl st into the next stitch* repeat 5 times.
Fasten off.
Make a second matching star if you want a thicker topper.
Place both stars together and sew around the edges using gold yarn.
Lightly stuff the center if desired.
Repeat for all three trees.
8. Add Decorative Wooden Beads
Use small natural wooden beads to decorate the tree branches.
Position the beads at irregular intervals around the layered skirts.
For the large tree, use approximately 12–15 beads.
For the medium tree, use approximately 8–10 beads.
For the small tree, use approximately 5–7 beads.
Sew each bead securely through the crochet fabric using strong thread.
Avoid overcrowding the branches. The design looks most elegant when the ornaments are distributed naturally.
Note: Small beads are a choking hazard. Keep the finished decorations away from young children and pets.
9. Create the Wooden Tree Trunks
Cut or purchase three short wooden dowels to serve as tree trunks.
Suggested visible trunk lengths:
- Large tree: 5 cm
- Medium tree: 4 cm
- Small tree: 3 cm
Attach each dowel securely to a round wooden base.
Allow the adhesive to cure fully according to the manufacturer’s instructions.
For a more rustic appearance, use natural wood slices with visible bark edges.
10. Prepare the Tree Supports
Insert a firm cardboard or plastic cone inside each crocheted tree body.
Alternatively, use polyester fiberfill with a sturdy internal support.
The cone should maintain the tapered silhouette without stretching the stitches.
Position the wooden trunk centrally beneath the cone.
Secure the trunk to the internal support and check that the tree stands upright.
11. Attach the Golden Stars
Position one golden crochet star at the top of each tree.
Use matching gold yarn to sew the star securely to the tip of the cone.
Ensure that the star stands upright and faces forward.
Adjust the points gently to create a neat five-point shape.
12. Final Assembly
- Check that each tree cone is securely supported.
- Arrange the branch skirts so they overlap evenly.
- Adjust the ivory scalloped edging.
- Secure all wooden beads.
- Attach the golden star toppers.
- Fix each tree onto its wooden trunk and base.
- Weave in all remaining yarn ends.
- Gently reshape the branches by hand.
- Display the three trees together, with the tallest tree on the left, medium tree in the center, and smallest tree on the right.
13. Blocking and Shaping
For crisp, professional-looking branches, block the individual skirts before attaching them.
- Lightly dampen each branch skirt.
- Lay it flat on a blocking mat.
- Arrange the scallops evenly.
- Pin the outer edges into a symmetrical circular shape.
- Allow the crochet to dry completely.
- Remove the pins before assembly.
Do not soak the completed trees once the wooden supports have been attached.
Advanced Crochet Tips
- Use consistent tension for all three cone structures.
- Choose cotton or cotton-blend yarn for defined branch textures.
- Use a smaller hook for the golden stars to create firm stitches.
- Block each skirt separately before assembly.
- Position the scallops carefully so they remain visible.
- Keep the wooden beads evenly distributed but not perfectly symmetrical.
- Use an internal support to prevent the larger trees from leaning.
- Test the stability of each wooden base before displaying the finished decoration.
Creative Color Variations
- Classic Woodland: Forest green, sage green, ivory, and gold.
- Snowy Winter: White, pale gray, and silver.
- Rustic Farmhouse: Olive green, oatmeal, and natural beige.
- Elegant Christmas: Emerald green, burgundy, and champagne gold.
- Scandinavian Style: Cream, muted green, and natural wood.
- Pastel Holiday: Dusty pink, sage, and warm ivory.
Frequently Asked Questions
Are these crochet Christmas trees beginner-friendly?
This is an advanced pattern because it combines tapered shaping, separate branch layers, decorative edging, star construction, and structured assembly.
Can I make the trees without wooden bases?
Yes. You can create flat crocheted bases and use weighted internal supports to help the trees stand upright.
What is the best yarn for these Christmas trees?
Worsted-weight cotton or cotton-blend yarn works well because it provides stitch definition and helps the layered branches maintain their shape.
Can I make the trees taller?
Yes. Add more cone rounds and additional branch skirts while maintaining the same gradual increase pattern.
Can I use different decorations?
Absolutely. Miniature bows, embroidered snowflakes, small crocheted berries, or decorative gold thread can be used instead of wooden beads.
How should I store the finished trees?
Store them upright in a dry box with protective tissue around the stars and branches to prevent crushing.
Can I wash the trees?
Spot-clean the finished trees with a slightly damp cloth. Avoid soaking the wooden bases and internal supports.
Final Thoughts
These Crochet Christmas Trees are a beautiful way to bring handmade warmth and rustic winter charm into your home.
With their layered evergreen branches, delicate ivory scallops, natural wooden ornaments, golden star toppers, and charming wooden bases, the finished trio makes a wonderful holiday centerpiece or mantel decoration.
Display them together for a coordinated woodland Christmas arrangement, or give them as thoughtful handmade gifts.
Save this free crochet Christmas tree pattern to Pinterest and share it with your crochet-loving friends!
Pattern note: This is an original, untested interpretation inspired by the reference image. The instructions and stitch counts have not been sample-crocheted or verified to reproduce the photographed trees exactly.

