Crochet Fall Owl Wreath Pattern – Cozy Autumn Door Decoration with Pumpkins and Leaves
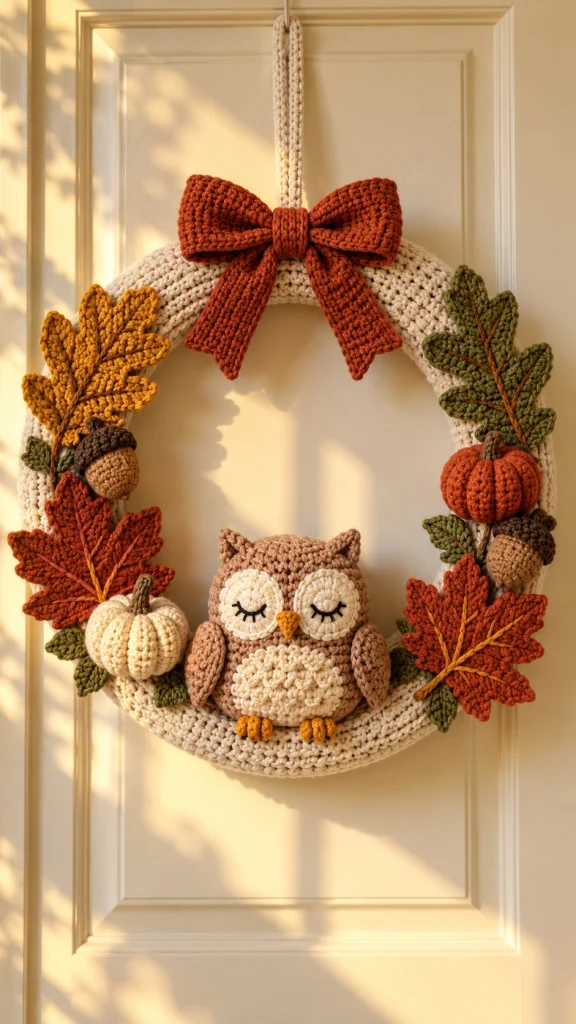
Bring the warmth and beauty of autumn into your home with this adorable crochet fall owl wreath! Featuring a sweet sleeping owl, colorful maple leaves, miniature pumpkins, rustic acorns, and a beautiful burnt-orange bow, this handmade decoration captures everything we love about the fall season.
The combination of warm cream, pumpkin orange, mustard yellow, olive green, and soft brown creates a charming cottagecore-inspired design. Whether you’re decorating your front door, celebrating the harvest season, or making a thoughtful handmade gift, this crochet wreath is a wonderful seasonal project.
In this tutorial, we’ll create a similar autumn wreath using a crocheted ring, a small amigurumi owl, dimensional leaves, pumpkins, acorns, and a decorative bow.
Pattern note: This is an original photo-inspired tutorial. The exact stitch counts and construction of the pictured decoration cannot be determined from the photograph alone. The instructions below provide a practical design for making a similar wreath.
Project Overview
- Project: Crochet Autumn Owl Door Wreath
- Skill Level: Intermediate
- Finished Diameter: Approximately 30–35 cm
- Style: Cottagecore, farmhouse, rustic autumn
- Technique: Amigurumi, basic crochet stitches, appliqué, assembly
- Hook Sizes: 3.5 mm and 4 mm
- Yarn: Worsted-weight cotton or acrylic yarn
- Estimated Time: 10–15 hours, depending on experience
Materials You’ll Need
- Cream yarn for the wreath covering
- Light brown yarn for the owl’s head and body
- Ivory yarn for the owl’s eyes and chest
- Mustard yellow yarn for the beak and feet
- Burnt-orange yarn for the decorative bow and pumpkins
- Rust-colored yarn for autumn maple leaves
- Golden yellow yarn for additional leaves
- Olive green yarn for leaves and accents
- Dark brown yarn for acorn caps and pumpkin stems
- Black embroidery thread for the sleeping eyelashes
- 3.5 mm and 4 mm crochet hooks
- Polyester fiberfill stuffing
- 30–35 cm wreath ring or foam wreath form
- Yarn needle and scissors
- Stitch markers
- Optional floral wire for positioning leaves
- Strong thread for attaching decorations
Crochet Abbreviations – US Terms
- MR: Magic ring
- ch: Chain
- sc: Single crochet
- hdc: Half double crochet
- dc: Double crochet
- tr: Treble crochet
- sl st: Slip stitch
- inc: Increase (2 sc in one stitch)
- dec: Invisible decrease
- FO: Fasten off
Part 1 – Crochet the Cream Wreath Cover
The soft cream wreath provides a beautiful neutral foundation that makes the autumn decorations stand out.
Step 1 – Measure the Wreath
Measure the circumference of the wreath form’s cross-section and its full circular length.
You’ll crochet a long rectangular strip that wraps around the wreath.
Step 2 – Foundation Chain
Using cream yarn and a 4 mm hook, make a foundation chain long enough to wrap around the thickness of the wreath form.
For many medium-sized foam wreaths, approximately 18–25 chains will be a useful starting point.
Step 3 – Crochet the Strip
Row 1: Starting in the second chain from the hook, work 1 sc into each chain.
Row 2: Ch 1, turn, work 1 sc in each stitch across.
Repeat Row 2 until the strip is long enough to wrap around the entire wreath.
Step 4 – Cover the Wreath
Wrap the crochet strip around the wreath form with the right side facing outward.
Using a yarn needle, sew the long edges together along the back of the wreath.
Join the two short ends neatly.
Keep the crochet fabric smooth and evenly distributed around the ring.
Part 2 – Crochet the Sleeping Amigurumi Owl
The adorable sleepy owl is the centerpiece of this autumn wreath. Its rounded body, soft brown wings, ivory belly, closed embroidered eyes, and tiny mustard-colored feet give it a sweet and peaceful expression.
Owl Body – Light Brown Yarn
Using a 3.5 mm hook:
- Round 1: 6 sc in MR (6)
- Round 2: inc around (12)
- Round 3: (1 sc, inc) × 6 (18)
- Round 4: (2 sc, inc) × 6 (24)
- Round 5: (3 sc, inc) × 6 (30)
- Round 6: (4 sc, inc) × 6 (36)
- Round 7: (5 sc, inc) × 6 (42)
- Rounds 8–17: sc around (42)
- Round 18: (5 sc, dec) × 6 (36)
- Round 19: (4 sc, dec) × 6 (30)
- Round 20: (3 sc, dec) × 6 (24)
Begin stuffing the body firmly but gently.
- Round 21: (2 sc, dec) × 6 (18)
- Round 22: (1 sc, dec) × 6 (12)
- Round 23: dec around (6)
Fasten off, close the opening, and weave in the yarn end.
Owl Ear Tufts – Make Two
Using light brown yarn:
- Round 1: 4 sc in MR (4)
- Round 2: (1 sc, inc) × 2 (6)
- Round 3: sc around (6)
- Round 4: (2 sc, inc) × 2 (8)
Fasten off, leaving a tail for sewing.
Flatten each piece slightly and attach to the upper corners of the owl’s head.
Owl Eyes – Make Two
Using ivory yarn:
- Round 1: 6 sc in MR (6)
- Round 2: inc around (12)
- Round 3: (1 sc, inc) × 6 (18)
Fasten off, leaving a sewing tail.
Attach both circular eye patches to the front of the owl, positioning them side by side.
Using black embroidery thread, stitch a gently curved closed eyelid across each eye patch.
Add three or four short downward eyelashes to create the sleepy expression.
Owl Beak
Using mustard yellow yarn:
- Round 1: 3 sc in MR (3)
- Round 2: inc around (6)
- Round 3: sc around (6)
Fasten off and lightly flatten into a small pointed shape.
Sew the beak between the two eye patches.
Owl Wings – Make Two
Using light brown yarn:
- Round 1: 6 sc in MR (6)
- Round 2: inc around (12)
- Round 3: (1 sc, inc) × 6 (18)
- Rounds 4–6: sc around (18)
- Round 7: (1 sc, dec) × 6 (12)
- Round 8: sc around (12)
Flatten the wings without stuffing them heavily.
Sew one wing to each side of the body.
Owl Chest – Ivory Yarn
For the textured cream belly, crochet an oval appliqué.
Ch 11.
Starting in the second chain, work 9 sc, 3 sc in the final chain, continue along the opposite side with 8 sc, then 2 sc in the last chain.
Join with a sl st.
Continue working oval rounds with increases at both ends until the chest covers the front lower half of the owl.
Sew the oval securely to the body.
For additional texture, use small puff stitches or surface crochet details.
Owl Feet – Make Two
Using mustard yellow yarn:
Ch 6.
Starting in the second chain, work 5 sc.
Repeat for two additional short toe strips.
Join the strips at one end to create three tiny toes.
Sew one foot beneath each side of the owl’s body.
Part 3 – Crochet the Autumn Maple Leaves
The colorful maple leaves bring movement and beautiful fall colors to the wreath.
Use mustard yellow, burnt orange, rust red, and olive green yarn.
Basic Maple Leaf Foundation
Ch 5 and join with a sl st to form a ring.
Round 1: Ch 3, work 11 dc into the ring, and join.
This creates the center of the leaf.
Create the Five Leaf Points
For each leaf point, work into the outer stitches:
Ch 5.
Starting in the second chain from the hook, work:
- 1 sc
- 1 hdc
- 1 dc
- 1 tr
Sl st into the next available foundation stitch.
Repeat to form five pointed lobes, distributing them evenly around the center.
Work additional sc stitches around the edges to refine the shape.
For a more realistic maple leaf, make the center lobe slightly longer than the two outer lobes.
Add the Leaf Veins
Using a contrasting yarn color, embroider a central vein and smaller branching veins.
This adds definition and makes the leaves look more dimensional.
Suggested Quantity: 5–7 large leaves and 3–4 smaller leaves.
Note: The leaf instructions are a simplified decorative approach. For sharply defined, symmetrical five-lobed maple leaves, use a dedicated stitch chart with individual lobe shaping.
Part 4 – Crochet the Miniature Pumpkins
Small crocheted pumpkins make the wreath feel extra cozy and festive.
Make one cream pumpkin and one burnt-orange pumpkin.
Pumpkin Body
Using a 3.5 mm hook:
- Round 1: 6 sc in MR (6)
- Round 2: inc around (12)
- Round 3: (1 sc, inc) × 6 (18)
- Round 4: (2 sc, inc) × 6 (24)
- Round 5: (3 sc, inc) × 6 (30)
- Rounds 6–10: sc around (30)
- Round 11: (3 sc, dec) × 6 (24)
- Round 12: (2 sc, dec) × 6 (18)
- Round 13: (1 sc, dec) × 6 (12)
Stuff firmly.
- Round 14: dec around (6)
Fasten off, leaving a long yarn tail.
Create the Pumpkin Ridges
Thread the long yarn tail through a yarn needle.
Insert the needle through the center of the pumpkin from bottom to top.
Wrap the yarn around the outside and pull gently to create a ridge.
Repeat five or six times around the pumpkin.
Secure the yarn at the bottom.
Pumpkin Stem
Using dark brown yarn:
Ch 6.
Starting in the second chain, work 5 sc.
Fasten off and sew to the top center.
Part 5 – Crochet the Rustic Acorns
The tiny brown acorns add a woodland-inspired detail to the wreath.
Acorn Body
Using beige yarn:
- Round 1: 6 sc in MR (6)
- Round 2: (1 sc, inc) × 3 (9)
- Round 3: (2 sc, inc) × 3 (12)
- Rounds 4–6: sc around (12)
- Round 7: (2 sc, dec) × 3 (9)
Stuff lightly.
Fasten off and close the opening.
Acorn Cap
Using dark brown yarn:
- Round 1: 6 sc in MR (6)
- Round 2: inc around (12)
- Rounds 3–4: sc around (12)
Fasten off and sew the cap over the upper part of the acorn.
Add a small crocheted stem if desired.
Make two or three acorns.
Part 6 – Crochet the Burnt-Orange Bow
The oversized burnt-orange bow gives the wreath its beautiful finishing touch.
Bow Loops
Using burnt-orange yarn and a 4 mm hook:
Ch 16.
Row 1: Starting in the second chain, work 15 sc.
Rows 2–14: Ch 1, turn, work 15 sc.
Fasten off.
Make two identical rectangles.
Bow Tails
Ch 12.
Row 1: Work 11 sc.
Rows 2–18: Ch 1, turn, work 11 sc.
For a pointed end, decrease one stitch at each side over the final few rows.
Make two tails.
Bow Center
Ch 7.
Work 6 sc across.
Continue for approximately 8 rows.
Fasten off.
Assemble the Bow
Fold the two rectangles into rounded loops.
Position the loops together at the center.
Place the two tails behind them.
Wrap the small center strip around all the pieces.
Sew securely at the back.
Attach the completed bow to the top of the wreath.
Part 7 – Create the Hanging Loop
Using cream yarn, ch approximately 60–80 stitches, depending on your desired hanging length.
Work one row of sc across the chain for extra strength.
Fold the cord in half and attach both ends securely to the top of the wreath.
Make sure the hanging loop is centered behind the bow.
Part 8 – Assemble the Autumn Owl Wreath
Before attaching the decorations permanently, arrange everything on the wreath to find a balanced composition.
Step 1 – Position the Owl
Place the sleeping owl at the bottom center of the wreath.
Use strong yarn or thread to attach it to the crocheted wreath cover.
Secure the owl at several points so it stays upright.
Step 2 – Add the Large Leaves
Position mustard yellow and rust-colored maple leaves along the left side.
Place olive green and burnt-orange leaves on the right.
Overlap the leaves slightly for a layered appearance.
Step 3 – Attach the Pumpkins
Place the cream pumpkin near the lower left side.
Attach the orange pumpkin to the middle-right section.
Sew each pumpkin securely through the back.
Step 4 – Add the Acorns
Position the crocheted acorns among the leaves.
One acorn can sit on the upper-left side and another on the right.
Step 5 – Attach the Bow
Center the large burnt-orange bow at the top of the wreath.
Secure it firmly so it maintains its shape.
Step 6 – Final Adjustments
Gently adjust the leaves, pumpkins, and acorns until the arrangement feels balanced.
Hide loose yarn ends behind the wreath.
Check that every decorative element is firmly attached.
Tips for Making Your Crochet Wreath Look Beautiful
- Use warm, earthy colors for an authentic autumn aesthetic.
- Keep the wreath covering neutral so the decorations stand out.
- Mix different leaf sizes to create natural movement.
- Position the owl at the bottom for a balanced design.
- Use embroidery for the sleeping eyes instead of plastic safety eyes.
- Add dimension by lightly stuffing the pumpkins and owl.
- Secure all decorations carefully before hanging.
- Keep the wreath indoors or in a well-protected, dry location.
Beautiful Autumn Color Combinations
Classic Harvest
Burnt orange, mustard yellow, rust red, cream, and olive green.
Neutral Farmhouse
Ivory, oatmeal, beige, caramel, and chocolate brown.
Woodland Cottagecore
Forest green, terracotta, golden yellow, and warm brown.
Soft Pastel Autumn
Dusty peach, sage green, pale mustard, and cream.
Rustic Vintage
Burgundy, dark olive, copper orange, and antique ivory.
Where to Display Your Crochet Fall Owl Wreath
Front Door
Hang the wreath on a sheltered front door to welcome guests with a cozy handmade autumn decoration.
Living Room
Display it above a console table or near a fireplace for a warm seasonal touch.
Bedroom
Hang it on a bedroom door or wall to create a charming cottagecore atmosphere.
Entryway
Pair it with miniature pumpkins, warm fairy lights, and natural wooden accessories.
Handmade Gift
Wrap it carefully and give it as a thoughtful seasonal gift for a friend, family member, or crochet lover.
Frequently Asked Questions
Is this crochet owl wreath beginner-friendly?
This project is best suited to intermediate crocheters, but confident beginners can complete it by working through each component separately.
What yarn works best for a crochet fall wreath?
Worsted-weight cotton or acrylic yarn works well. Cotton offers good stitch definition, while acrylic is lightweight and often more affordable.
Can I make the wreath smaller?
Yes. Choose a smaller wreath form and reduce the size or number of decorative elements.
Can I use different animals instead of an owl?
Absolutely! A fox, hedgehog, squirrel, or little woodland bunny would also look adorable.
How do I keep the wreath decorations secure?
Sew each piece to the wreath covering using strong yarn or thread. Use multiple attachment points for larger pieces.
Can I hang this wreath outdoors?
It’s best displayed indoors or in a dry, sheltered area. Rain, moisture, and prolonged sunlight can damage or fade the yarn.
Can I make this wreath for Halloween?
Yes! Add miniature crocheted bats, black stars, or a tiny witch hat to transform it into a cute Halloween decoration.
Can I use this design for Thanksgiving?
Definitely. The pumpkins, acorns, and autumn leaves make it a lovely Thanksgiving or harvest-season decoration.
Final Thoughts
This crochet fall owl wreath pattern combines everything wonderful about autumn: warm colors, woodland animals, cozy textures, and beautiful handmade details.
From the sweet sleeping owl and dimensional maple leaves to the miniature pumpkins, rustic acorns, and oversized burnt-orange bow, every element contributes to a charming seasonal decoration.
Whether you’re decorating your home, making gifts, or creating handmade items for your seasonal collection, this crochet wreath is a lovely project to enjoy throughout fall.
Gather your favorite autumn-colored yarn, prepare your crochet hooks, and create a cozy decoration that brings a little handmade magic to your home.
Happy crocheting and happy fall! 🍂🦉🧶

