Crochet Fall Pumpkin Door Hanger Pattern – Autumn Pumpkins, Maple Leaves & Rustic Bow
Beginner Friendly
Perfect for those just starting their crochet journey, with clear instructions and simple techniques
Single-Day Project
A satisfying project you can complete in a single afternoon or evening.
Handmade Gift
A beautiful keepsake — free forever. Read online or print at home.
About This Crochet Fall Pumpkin Door Hanger Pattern – Autumn Pumpkins, Maple Leaves & Rustic Bow
Crochet Fall Pumpkin Door Hanger Pattern – Rustic Autumn Decoration
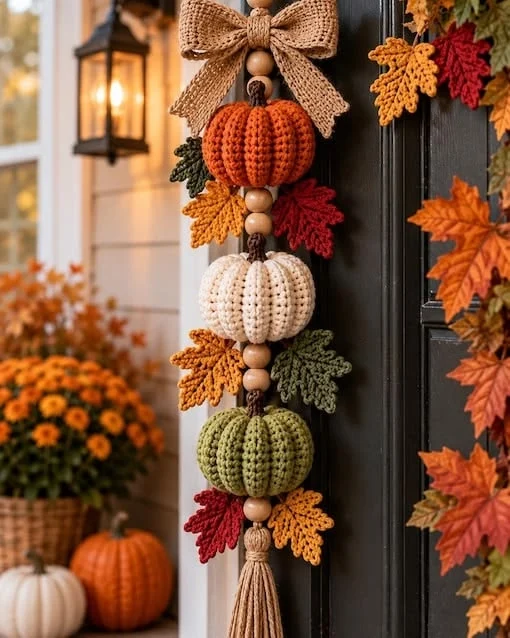
Welcome the cozy beauty of autumn into your home with this charming crochet fall pumpkin door hanger pattern! Featuring three adorable crocheted pumpkins in burnt orange, creamy ivory, and olive green, this handmade decoration captures everything we love about the fall season.
Decorated with colorful crochet maple leaves, natural wooden beads, a rustic burlap-style bow, and a beautiful yarn tassel, this vertical pumpkin hanging is perfect for decorating your front door, entryway, porch, or farmhouse-inspired living space.
If you love handmade seasonal decorations, this project is a wonderful way to combine amigurumi techniques with classic autumn colors and cozy cottage-style details.
In this tutorial, we’ll crochet each pumpkin, create textured autumn leaves, assemble the hanging cord, and finish the decoration with beautiful rustic accents.
Materials You’ll Need
- Burnt-orange cotton or acrylic yarn
- Ivory or cream-colored yarn
- Olive-green yarn
- Mustard-yellow yarn
- Burgundy yarn
- Dark-brown yarn for pumpkin stems
- Natural beige yarn for the tassel
- 3.5 mm crochet hook
- 4 mm crochet hook
- Polyester fiberfill stuffing
- 6–8 natural wooden beads with large holes
- Rustic burlap ribbon or crocheted beige bow
- Yarn needle
- Stitch markers
- Scissors
- Measuring tape
Skill Level: Intermediate
Estimated Time: 5–8 hours
Finished Length: Approximately 55–70 cm, depending on your pumpkin sizes and spacing
Crochet Abbreviations – US Terms
- MR – Magic ring
- ch – Chain
- sc – Single crochet
- hdc – Half double crochet
- dc – Double crochet
- tr – Treble crochet
- sl st – Slip stitch
- inc – Increase
- dec – Invisible decrease
- BLO – Back loop only
- FO – Fasten off
Pattern Note: This is an original, adaptable pattern inspired by the reference image, not an exact tested reproduction. Work in continuous rounds unless otherwise stated. Stitch counts are provided for the main pumpkin pieces, and decorative elements can be adjusted to your preferred size.
Part 1 – Crochet the Orange Pumpkin
Begin with burnt-orange yarn and a 3.5 mm crochet hook.
R1: 6 sc in MR. (6)
R2: Inc around. (12)
R3: (1 sc, inc) × 6. (18)
R4: (2 sc, inc) × 6. (24)
R5: (3 sc, inc) × 6. (30)
R6: (4 sc, inc) × 6. (36)
R7: (5 sc, inc) × 6. (42)
R8: (6 sc, inc) × 6. (48)
R9–R15: Sc around. (48)
R16: (6 sc, dec) × 6. (42)
R17: (5 sc, dec) × 6. (36)
R18: (4 sc, dec) × 6. (30)
R19: (3 sc, dec) × 6. (24)
R20: (2 sc, dec) × 6. (18)
Begin stuffing the pumpkin firmly but not excessively.
R21: (1 sc, dec) × 6. (12)
R22: Dec around. (6)
Fasten off, leaving a long yarn tail.
Part 2 – Shape the Pumpkin Ridges
Thread the long yarn tail through a yarn needle.
Insert the needle through the center of the pumpkin from bottom to top.
Wrap the yarn around the outside of the pumpkin and bring it back through the center.
Pull gently to create the first deep pumpkin groove.
Repeat around the pumpkin approximately six to eight times, spacing the grooves evenly.
Adjust the tension until the pumpkin develops a realistic ribbed appearance.
Secure the yarn underneath and weave in the end.
Part 3 – Crochet the Cream Pumpkin
Using ivory yarn, repeat the same pumpkin pattern from Part 1.
Work R1–R22 exactly as written.
Stuff the pumpkin evenly.
Use the long yarn tail to create six to eight vertical pumpkin ridges.
Keep the shape slightly flattened for a natural farmhouse pumpkin appearance.
Part 4 – Crochet the Olive-Green Pumpkin
Using olive-green yarn, repeat the pumpkin pattern once more.
Work R1–R22.
Stuff firmly and close the opening.
Create the pumpkin ridges using the same shaping technique.
For a slightly smaller green pumpkin, use a smaller crochet hook or thinner yarn.
Part 5 – Crochet the Pumpkin Stems
Using dark-brown yarn:
R1: 6 sc in MR. (6)
R2–R5: Sc around. (6)
Fasten off, leaving a long sewing tail.
Make three stems.
Attach one stem to the top center of each pumpkin.
Keep the stems short and slightly curved to create a natural handmade look.
Part 6 – Crochet the Autumn Maple Leaf Center
Using mustard-yellow yarn:
R1: Make a magic ring.
R2: Work 10 sc into the ring and join with a sl st.
R3: Ch 3, work 1 dc into each stitch around, and join.
This forms the center of your maple leaf.
Part 7 – Crochet the Maple Leaf Points
From the leaf center:
Ch 9.
Starting in the second chain from the hook, work:
1 sc, 1 hdc, 3 dc, 1 tr, 1 dc, 1 hdc.
Sl st into the next available stitch of the center.
Repeat to create five leaf points.
For the middle point, use ch 12 to make it slightly longer.
For the outer points, use ch 7 to make them shorter.
Fasten off, leaving a long sewing tail.
Part 8 – Add Decorative Leaf Edging
Join matching yarn along the outer edge of the maple leaf.
Work sc evenly around each point.
At the tip of each leaf point, work (sc, ch 2, sc).
Use sl st between points to emphasize the natural leaf shape.
Fasten off.
Part 9 – Create Raised Leaf Veins
Using a slightly darker shade of the same yarn:
Embroider one central vein from the leaf base toward the longest point.
Add smaller diagonal veins toward the side points.
Keep the embroidered lines slightly raised to highlight the crochet texture.
This gives the leaves a realistic autumn appearance.
Part 10 – Crochet Leaves in Different Fall Colors
Repeat the leaf pattern using the following colors:
- 3 mustard-yellow leaves
- 2 burnt-orange leaves
- 2 burgundy leaves
- 2 olive-green leaves
Vary the sizes slightly to make the arrangement look natural.
For smaller leaves, reduce the foundation chains used for the points.
Part 11 – Make the Main Hanging Cord
Using dark-brown yarn:
Ch approximately 150–180, depending on your preferred finished length.
Sl st back along the chain to strengthen it.
Alternatively, crochet a sturdy Romanian cord for a thicker, more decorative finish.
Leave enough extra length at the top to form a secure hanging loop.
Part 12 – Create the Top Hanging Loop
Fold approximately 10–12 cm of the cord into a loop.
Sew the folded section securely using matching yarn.
Reinforce the attachment with several stitches.
This loop will allow you to hang the decoration from a door hook or wall hanger.
Part 13 – Add the Wooden Beads
Thread natural wooden beads onto the hanging cord.
Arrange the beads so they separate the pumpkins vertically.
For a design similar to the reference image, place beads above and below each pumpkin.
Use large-hole wooden beads that fit the crochet cord comfortably.
Secure the bead positions with small knots if necessary.
Part 14 – Attach the Orange Pumpkin
Position the orange pumpkin near the upper section of the hanging cord.
Pass the cord through the center of the pumpkin from top to bottom using a large yarn needle.
Make sure the cord passes through the stuffed center rather than pulling against a single crochet stitch.
Secure the pumpkin with knots or hidden stitches.
Adjust the position so the pumpkin sits neatly beneath the top bow.
Part 15 – Attach the Cream Pumpkin
Thread the hanging cord through the cream pumpkin.
Position it beneath the orange pumpkin, leaving enough room for decorative leaves and wooden beads.
Secure it in place.
Make sure the cream pumpkin faces forward and its ridges remain clearly visible.
Part 16 – Attach the Olive-Green Pumpkin
Position the green pumpkin below the cream pumpkin.
Thread the hanging cord through its center.
Secure it firmly with hidden stitches or knots.
Leave enough cord beneath the pumpkin for the bottom wooden beads and tassel.
Part 17 – Arrange the Crochet Maple Leaves
Lay the completed pumpkin hanging flat on a table.
Position the maple leaves around the sides of each pumpkin.
For the orange pumpkin, combine mustard-yellow and burgundy leaves.
For the cream pumpkin, combine mustard-yellow and olive-green leaves.
For the green pumpkin, combine burgundy and mustard-yellow leaves.
Allow the leaf points to extend naturally outward.
Part 18 – Sew the Leaves in Place
Using a yarn needle and matching yarn, attach each leaf near the central hanging cord.
Sew only the base of each leaf to preserve its three-dimensional shape.
Overlap some leaves slightly to create a fuller arrangement.
Make sure the leaves do not hide the pumpkins.
Part 19 – Crochet the Rustic Bow
Using beige or jute-colored yarn and a 4 mm crochet hook:
Row 1: Ch 41.
Row 2: Starting in the second chain, work 40 sc.
Rows 3–10: Ch 1, turn, sc across. (40)
Fasten off.
Fold the strip into a bow shape with two equal loops.
Wrap beige yarn tightly around the center to secure the bow.
For the ribbon tails, crochet two narrow strips:
Ch 26, work 25 sc, turn and repeat for four rows.
Attach the tails behind the bow center.
Trim or shape the ends into a decorative V shape if desired.
Part 20 – Attach the Bow to the Top
Position the rustic bow directly beneath the hanging loop.
Sew it securely to the main cord.
Arrange the ribbon tails so they fall naturally on either side of the orange pumpkin.
Adjust the bow loops until they appear symmetrical and full.
Part 21 – Make the Bottom Tassel
Using natural beige yarn:
Cut approximately 25–35 strands of yarn, each measuring about 20 cm.
Fold the strands in half.
Tie them securely at the folded center.
Wrap another strand of yarn around the upper section to create a neat tassel head.
Trim the ends evenly.
For a fuller tassel, add more strands before tying.
Part 22 – Attach the Tassel
Position the tassel at the bottom of the hanging cord.
Thread the cord through the tassel’s upper loop.
Secure with a strong knot.
Add a wooden bead above the tassel if desired.
Allow the tassel strands to hang naturally.
Part 23 – Reinforce the Hanging Decoration
Check every pumpkin attachment point.
Make sure the wooden beads cannot slide out of position.
Reinforce the hanging loop and tassel connection.
Check that the leaves are securely attached.
Because the decoration hangs vertically, distribute the weight evenly along the cord.
Part 24 – Final Shaping and Finishing
Gently reshape the pumpkins.
Adjust the pumpkin ridges so they remain evenly spaced.
Spread the crochet maple leaves outward.
Fluff the rustic bow and straighten the tassel.
Weave in any remaining loose yarn ends.
Your beautiful handmade autumn pumpkin door hanger is complete!
Creative Autumn Color Variations
Classic Fall: Burnt orange, ivory, olive green, mustard yellow, and burgundy.
Rustic Farmhouse: Cream, taupe, sage green, and cinnamon brown.
Golden Harvest: Mustard yellow, amber, terracotta, and warm beige.
Neutral Cottage: Oatmeal, ivory, caramel, and muted sage.
Cozy Woodland: Rust orange, forest green, chocolate brown, and deep burgundy.
Where to Display Your Crochet Pumpkin Door Hanger
This handmade autumn decoration looks beautiful on a dark wooden or black front door, where the colorful pumpkins and leaves create a striking contrast.
You can also hang it on an entryway wall, farmhouse-style coat hook, interior door, or covered porch.
Pair it with a basket of chrysanthemums, small decorative pumpkins, and warm lantern lighting to create a welcoming fall atmosphere.
Tips for a Beautiful Handmade Finish
- Use cotton yarn for crisp stitch definition.
- Stuff the pumpkins evenly without overfilling.
- Keep the pumpkin grooves deep but symmetrical.
- Use contrasting leaf colors around each pumpkin.
- Choose natural wooden beads for a rustic appearance.
- Make the bow large enough to balance the vertical arrangement.
- Use a strong hanging cord to support the decoration.
Care Instructions
- Spot clean gently using a damp cloth.
- Avoid soaking the stuffed pumpkins.
- Keep away from direct rain and prolonged moisture.
- Protect from strong sunlight to reduce color fading.
- Store flat or loosely rolled between seasons.
- Reshape the leaves and bow after storage.
Frequently Asked Questions
Is this crochet pumpkin door hanger beginner-friendly?
This project is best suited to intermediate crocheters, although beginners familiar with basic amigurumi stitches can complete it with patience.
Can I make the pumpkins larger?
Yes! Use thicker yarn and a larger crochet hook to increase the pumpkin size. Remember to strengthen the hanging cord if you make the decoration heavier.
Can I use different pumpkin colors?
Absolutely! Cream, sage green, terracotta, mustard yellow, and dusty pink are beautiful alternatives for autumn decorations.
How many crochet leaves should I make?
Approximately eight to ten leaves create a full arrangement similar to the reference image. You can add or remove leaves depending on your preferred style.
Can I use real burlap ribbon instead of a crochet bow?
Yes! A natural burlap ribbon is a lovely alternative and gives the decoration a rustic farmhouse appearance.
Can I hang this decoration outside?
It is best suited to indoor doors or a protected, covered porch. Cotton and acrylic yarn can be damaged or discolored by prolonged exposure to rain and strong sunlight.
Can I make this as a handmade gift?
Definitely! This crochet pumpkin hanging makes a thoughtful seasonal gift for anyone who loves fall decorations, cozy homes, and handmade crafts.
Final Thoughts
This crochet fall pumpkin door hanger pattern is a beautiful way to celebrate autumn with handmade charm. From the textured mini pumpkins and colorful maple leaves to the rustic bow and natural wooden beads, every detail adds warmth and personality to this seasonal decoration.
Whether you’re decorating your own front door, creating a cozy farmhouse entryway, or making a thoughtful gift for someone special, this project is sure to bring a little extra autumn magic into your home.
Happy crocheting, and enjoy the cozy beauty of fall! 🍁🎃
The finished Crochet Fall Pumpkin Door Hanger Pattern – Autumn Pumpkins, Maple Leaves & Rustic Bow

