Crochet Fall Wreath Pattern
Beginner Friendly
Perfect for those just starting their crochet journey, with clear instructions and simple techniques
Single-Day Project
A satisfying project you can complete in a single afternoon or evening.
Handmade Gift
A beautiful keepsake — free forever. Read online or print at home.
About This Crochet Fall Wreath Pattern
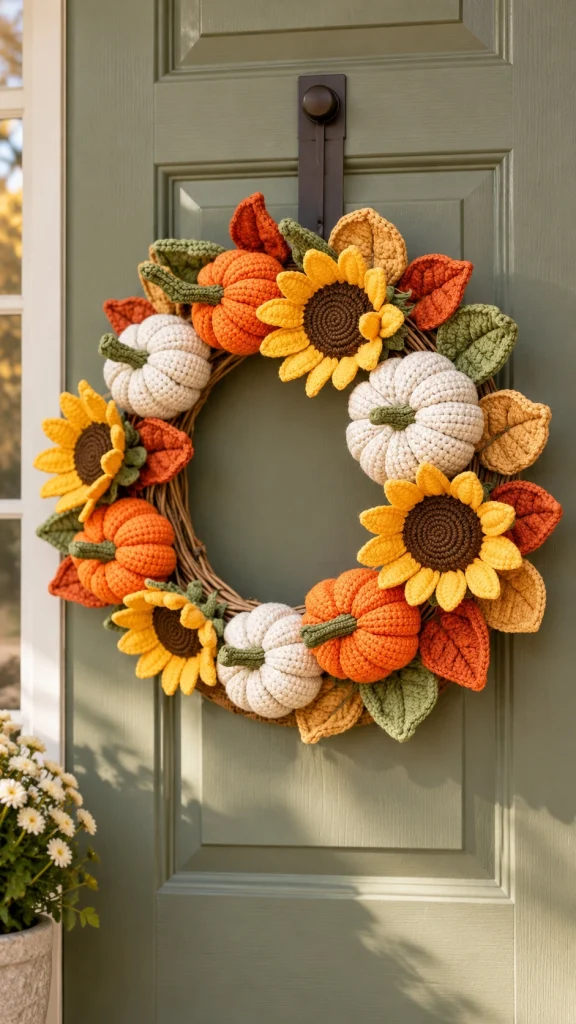
This crochet fall wreath pattern combines plump pumpkins, dimensional sunflowers and richly textured autumn leaves around a rustic wreath base. The combination of pumpkin orange, creamy ivory, golden yellow, sage green, rust and warm brown creates a cozy farmhouse-inspired decoration perfect for the entire autumn season.
The individual crochet pieces are made separately and then arranged around the wreath, leaving part of the rustic base visible through the center. This gives the finished piece a full, dimensional look without making it feel overcrowded.
Materials
- Orange worsted / aran yarn 150–200 g
- Cream / ivory yarn 120–160 g
- Golden yellow yarn 80–100 g
- Dark brown yarn 40–60 g
- Sage / olive green yarn 80–100 g
- Rust yarn 50–70 g
- Mustard yarn 30–50 g
- 4.0–5.0 mm crochet hook 1
- Polyester stuffing as needed
- 35–40 cm grapevine or wreath base 1
- Yarn needle 1
- Scissors 1 pair
- Floral wire optional
Abbreviations – US Terms
MRmagic ringchchainsl stslip stitchscsingle crochethdchalf double crochetdcdouble crochettrtreble crochetinc2 sc in same stitchdecsingle crochet decreaseBLOback loop onlyFOfasten offFinished Size & Suggested Pieces
The finished wreath measures approximately 40–45 cm / 16–18 in across.
For a full arrangement similar to the inspiration, make approximately:
- 3 orange pumpkins
- 3 cream pumpkins
- 4 sunflowers
- 12–16 large autumn leaves
- 8–12 smaller filler leaves
Part 1 – Large Crochet Pumpkin
Using orange or cream yarn:
Ch 26.
Row 1: hdc in 2nd ch from hook and across. (25)
Row 2: ch 1, turn, hdc BLO across. (25)
Rows 3–30: repeat Row 2.
Do not cut the yarn yet.
The BLO rows create the deep vertical ridges visible on the finished pumpkin.
Part 2 – Form the Pumpkin Body
Fold the rectangle in half so the first and last rows meet.
Sl st through both layers to create a tube.
FO, leaving a long yarn tail.
Thread the tail through the yarn needle.
Run the needle in and out around one open edge.
Pull tightly to close the bottom.
Secure with several stitches.
Part 3 – Stuff the Pumpkin
Turn the pumpkin right side out.
Fill firmly with polyester stuffing.
Keep the pumpkin plump but avoid overstuffing because the body still needs to be shaped into sections.
Thread another long yarn tail through the remaining opening.
Pull tightly to close.
Part 4 – Create the Pumpkin Ribs
Use a long strand of matching yarn.
Insert the needle through the center bottom and bring it out through the center top.
Wrap the yarn around the outside of the pumpkin.
Pull firmly.
Pass through the center again.
Repeat around the pumpkin approximately 6–8 times, spacing the sections evenly.
Each wrap creates one deep pumpkin groove.
Part 5 – Crochet the Pumpkin Stem
Using sage or olive green:
Round 1: 6 sc in MR. (6)
Rounds 2–7: sc around. (6)
FO, leaving a long sewing tail.
Lightly stuff the stem if desired.
Sew firmly into the center top of the pumpkin.
Part 6 – Small Pumpkin Variation
For the smaller pumpkins:
Ch 20.
Work 19 hdc BLO across each row.
Make approximately 24 rows.
Join, stuff and sculpt exactly as for the larger pumpkin.
This creates a smaller pumpkin that helps vary the dimensions of the wreath.
Part 7 – Crochet the Sunflower Center
Using dark brown yarn:
Round 1: 6 sc in MR. (6)
Round 2: inc around. (12)
Round 3: *1 sc, inc* around. (18)
Round 4: *2 sc, inc* around. (24)
Round 5: *3 sc, inc* around. (30)
Join with sl st.
Do not cut the yarn until the center lies flat.
Part 8 – Add Sunflower Texture
For the spiral-textured center, work one round of surface slip stitches over the brown center.
Begin near the middle and follow the rounds outward in a spiral.
Keep the surface stitches loose so the center remains flat.
FO and weave the tail into the back.
Part 9 – First Sunflower Petal
Join golden yellow yarn to any stitch around the brown center.
Ch 7.
Starting in 2nd ch from hook:
1 sc, 1 hdc, 2 dc, 1 hdc, 1 sc.
Sl st into the next available stitch of the brown center.
This forms one pointed sunflower petal.
Part 10 – Complete the Sunflower
Repeat the petal sequence evenly around the center.
Aim for approximately 12–14 petals.
Arrange the petals so they overlap slightly near their bases.
FO.
Use your fingers to curve the petals gently forward for a dimensional appearance.
Part 11 – Large Autumn Leaf
Using sage, rust, orange or mustard yarn:
Ch 13.
Starting in 2nd ch from hook:
sl st, sc, hdc, dc, tr, tr, dc, hdc, sc, sl st.
Work 3 sc into the final chain.
Continue along the opposite side of the foundation chain:
sl st, sc, hdc, dc, tr, tr, dc, hdc, sc, sl st.
Join at the base.
Part 12 – Leaf Border
Ch 1.
Work sc evenly around the leaf.
At the top point, work:
sc, ch 2, sc in the same stitch.
Continue sc down the opposite side.
Join at the base.
Part 13 – Leaf Vein
Work surface slip stitches from the bottom center toward the tip.
For a more detailed leaf, add two or three short diagonal surface-stitch veins on each side.
FO and weave the ends into the back.
Part 14 – Curved Autumn Leaf
For the slightly curled leaves visible around the wreath, make the standard leaf from Parts 11–13.
Then work several tighter slip stitches along one side of the leaf.
This naturally pulls the edge inward and gives the leaf a curved three-dimensional shape.
Part 15 – Small Filler Leaf
Ch 9.
Starting in 2nd ch:
sl st, sc, hdc, dc, dc, hdc, sc.
Work 3 sc in final chain.
Repeat the stitches along the opposite side.
Join and FO.
Make several in olive and sage green.
Part 16 – Prepare the Wreath Base
Use a grapevine wreath approximately 35–40 cm / 14–16 in in diameter.
Leave the natural brown base visible instead of completely covering it with yarn.
This creates the rustic woodland look seen in the finished wreath.
Part 17 – Plan the Pumpkin Placement
Place the wreath flat on a table.
Position the pumpkins first.
For a balanced arrangement, place:
- one orange pumpkin near the upper left
- one cream pumpkin near the upper right
- one orange pumpkin near the lower right
- one cream pumpkin near the lower center
- one smaller orange pumpkin along the left side
Adjust the placement until the colors feel evenly distributed.
Part 18 – Position the Sunflowers
Place the largest sunflower near the upper center beside the orange pumpkin.
Add another sunflower to the lower right.
Position the remaining flowers along the left and lower-left portions of the wreath.
Allow some petals to overlap the pumpkins slightly.
Part 19 – Add the Autumn Leaves
Slide large leaves behind the pumpkins and flowers.
Alternate sage green, olive, rust, burnt orange and mustard.
Point some leaves outward beyond the wreath base.
Angle others inward toward the center opening.
This creates the layered botanical appearance of the inspiration.
Part 20 – Secure the Large Pieces
Thread a yarn needle with strong brown or matching yarn.
Sew through the back of each pumpkin and around several sections of the wreath base.
Repeat several times.
Knot securely at the back.
Attach each sunflower through its brown center rather than through the petals.
Part 21 – Secure the Leaves
Sew each leaf near its base and along the center vein.
Leave the outer edges free.
This allows the leaf tips to lift naturally away from the wreath and preserves the dimensional appearance.
Part 22 – Fill Empty Spaces
Hang the wreath temporarily and look at it from several steps away.
Add small leaves wherever the grapevine base feels too exposed.
Do not completely hide the brown wreath.
A few visible sections help separate the crochet pieces and make the arrangement look more natural.
Part 23 – Final Shaping
Gently reshape each pumpkin with your hands.
Separate and curve the sunflower petals.
Bend some leaves forward and others slightly backward.
Rotate any element that appears too straight or crowded.
The finished wreath should look full while maintaining a clear open center.
Part 24 – Add the Hanging Loop
Using brown or green yarn, ch approximately 30–40.
Sl st back across the chain for strength.
Fold the cord in half.
Sew both ends securely to the upper back of the wreath.
Alternatively, hang the grapevine base directly from a wreath hook.
Color Palette
Pumpkin Orange: warm burnt orange.
Cream: soft natural ivory rather than bright white.
Sunflower: rich golden yellow with chocolate brown centers.
Green: muted sage and olive.
Autumn Leaves: rust, terracotta, mustard and warm tan.
Base: natural medium brown.
Alternative Color Ideas
Neutral Farmhouse: cream, oatmeal, camel, sage and brown.
Deep Autumn: burgundy, burnt orange, mustard and forest green.
Soft Fall: dusty orange, beige, muted yellow and eucalyptus green.
Thanksgiving: pumpkin orange, cream, cranberry, golden yellow and dark olive.
Where to Display Your Crochet Fall Wreath
- Front door
- Entryway wall
- Fireplace mantel
- Kitchen wall
- Covered porch
- Living room
- Thanksgiving dining area
- Farmhouse-style interior door
Care Instructions
Keep the wreath protected from heavy rain and prolonged direct moisture.
For outdoor display, use it on a covered porch or protected front door.
Remove surface dust gently with a soft brush.
If a crochet element becomes flattened, reshape it carefully with your fingers.
Store the wreath flat in a large box so the pumpkins and flowers are not compressed.
Frequently Asked Questions
The individual pieces use mostly basic crochet stitches, but the project is best suited to an advanced beginner or intermediate crocheter because it includes shaping, stuffing, sculpting and assembling several different motifs.
Yes. You can cover a foam wreath with a long crochet strip, but using a grapevine base creates the rustic natural look shown in this design.
Yes. Change the starting chain and number of rows while keeping the same ribbed rectangle construction. Mixing several pumpkin sizes makes the wreath look more dimensional.
Yes. Replace the sunflowers with additional pumpkins, maple leaves, acorns or smaller autumn flowers.
Sew each pumpkin to the wreath at several points on its back rather than attaching it with only one stitch. Heavier pumpkins may also be reinforced with hidden floral wire.
It is best used on a covered or protected door because yarn can absorb moisture. Avoid leaving the wreath exposed to rain or wet weather.
Layer additional leaves behind the pumpkins and flowers, allowing their pointed tips to extend beyond the outer edge of the wreath. This adds fullness without hiding the center opening.
The finished Crochet Fall Wreath Pattern

