Crochet Flower Tote Bag Pattern
Beginner Friendly
Perfect for those just starting their crochet journey, with clear instructions and simple techniques
Single-Day Project
A satisfying project you can complete in a single afternoon or evening.
Handmade Gift
A beautiful keepsake — free forever. Read online or print at home.
About This Crochet Flower Tote Bag Pattern
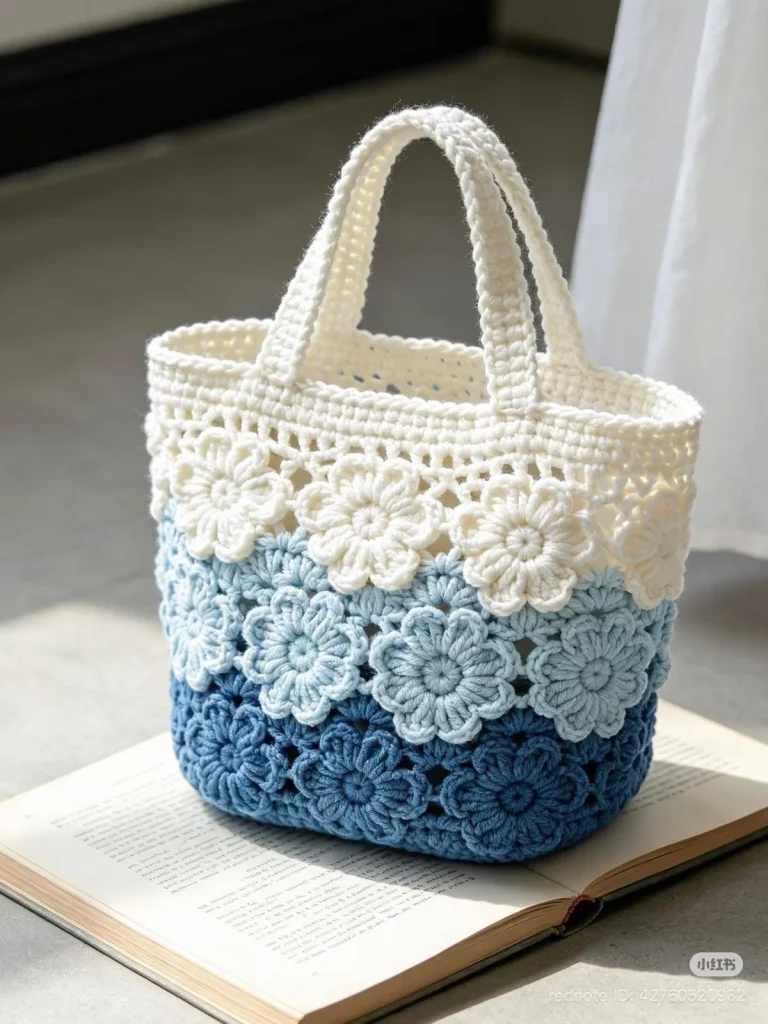
This crochet flower tote bag pattern creates a sweet structured handbag covered with dimensional crochet flowers. The three-color gradient moves from deep denim blue at the bottom to soft powder blue in the middle and creamy white at the top.
The floral motifs are joined together to form the main body, while a firm crochet base, reinforced upper border and two sturdy handles make the bag practical enough for everyday use.
Materials
- DK cotton yarn – cream / ivory 150 g
- DK cotton yarn – pale powder blue 120 g
- DK cotton yarn – medium denim blue 100 g
- DK cotton yarn – deep blue 100 g
- 3.0–3.5 mm crochet hook 1
- Yarn needle 1
- Scissors 1 pair
- Stitch markers optional
- Cotton fabric for lining optional
- Plastic canvas for base reinforcement optional
Abbreviations – US Terms
MRmagic ringchchainsl stslip stitchscsingle crochethdchalf double crochetdcdouble crochettrtreble crochetincincreasest(s)stitch(es)spspaceFOfasten offFinished Size
Approximately 30 cm wide × 25 cm tall × 10 cm deep / 12 × 10 × 4 in, excluding the handles.
Each flower motif measures approximately 7–8 cm / 2.75–3.25 in across after blocking.
Construction Overview
The bag is made in five main stages:
- Crochet individual dimensional flower motifs.
- Join the motifs into horizontal color bands.
- Create and attach the structured bottom.
- Crochet the upper border.
- Add two reinforced handles.
The flowers remain raised on the outside while the joining stitches sit behind them, giving the finished bag the layered floral texture shown in the inspiration.
Part 1 – Flower Center
Make a MR.
Round 1
Ch 1, work 12 sc into the ring.
Pull the ring tightly closed.
Sl st into the first sc to join.
12 sts.
Part 2 – First Petal Layer
Working around Round 1:
*Ch 3, 2 dc in same st, ch 3, sl st in same st, sl st in next st.*
Repeat around until you have 6 small petals.
Keep the petals slightly loose so they remain soft and dimensional.
Part 3 – Back Loops for Large Petals
Turn the flower slightly so you can work behind the first petal layer.
Insert the hook around the base between two petals.
*Ch 4, anchor with sc behind the next petal.*
Repeat around to create 6 chain-4 loops.
Part 4 – Large Petals
Into each ch-4 loop work:
sc, hdc, 3 dc, hdc, sc.
Repeat in every loop.
You should now have 6 rounded outer petals.
Sl st into the first stitch and FO.
Part 5 – Square Joining Foundation
Turn the flower to the back.
Join matching yarn behind one petal.
Round 1
*Ch 4, sc behind next petal.*
Repeat around.
Round 2
Work around the chain spaces, forming four corners:
3 dc, ch 2, 3 dc in each corner space.
Between corners, work enough dc or hdc stitches to create a flat square around the flower.
Keep the flower petals completely free on the front.
Part 6 – Flower Quantity
For a bag approximately the size shown, make around 24–30 flower motifs.
A useful color distribution is:
- 8–10 cream flowers
- 8–10 pale blue flowers
- 8–10 deep/medium blue flowers
Make extra motifs if you want a wider or taller tote.
Part 7 – Arrange the Gradient
Before joining, arrange all motifs on a flat surface.
Create three horizontal color sections:
Top: cream / ivory
Middle: pale powder blue
Bottom: medium and deep denim blue
Mix two nearby shades in the lowest row if you want a softer gradient.
Part 8 – Join the Flowers
Place two motifs with wrong sides together.
Using matching yarn, join along one square edge with slip stitches or single crochet.
Continue joining motifs into long horizontal strips.
Join the strips vertically until you have one large rectangular floral panel.
Part 9 – Form the Bag Body
Bring the two short ends of the completed floral panel together.
Join them with sl st or sc to form a tube.
Turn the seam toward the back of the bag.
Check that all flowers face outward before continuing.
Part 10 – Crochet the Bottom Base
With deep blue yarn, ch 36.
Round 1
Starting in second ch from hook, sc across.
Work 3 sc into the last chain.
Continue along the opposite side of the foundation chain.
Work 2 additional sc into the first chain.
Join with sl st.
Part 11 – Enlarge the Base
Round 2
Sc along each long side.
Work increases evenly around both curved ends.
Rounds 3–8
Continue in the same manner, increasing only around the curved ends.
Stop when the oval base matches the circumference of the floral body.
Part 12 – Strengthen the Base
Work 2 rounds of sc without increases.
This turns the edge upward and gives the bag a structured bottom.
For extra strength, cut a piece of plastic canvas slightly smaller than the finished base and place it inside before adding the lining.
Part 13 – Attach the Floral Body
Pin or mark the floral tube evenly around the crocheted base.
Using deep blue yarn, sc through both the base and lower edge of the floral body.
Work slowly around the entire bag.
Join with sl st.
FO and weave in securely.
Part 14 – Upper Openwork Row
Join cream yarn around the upper edge.
Round 1
Sc evenly around.
Round 2
*Dc, ch 1, skip 1 st.*
Repeat around.
This creates the delicate openwork line directly above the white flowers.
Part 15 – Firm Top Border
Round 3
Sc into every dc and ch-1 space.
Rounds 4–6
Sc in every stitch around.
Do not increase.
The finished border should be approximately 2.5–3.5 cm / 1–1.4 in high.
Part 16 – Handle Placement
Lay the bag flat.
Mark two handle positions on the front and two matching positions on the back.
Leave approximately 10–12 cm / 4–5 in between the attachment points of each handle.
Check that both handles are perfectly aligned before crocheting.
Part 17 – First Handle
Join cream yarn at the first marker.
Ch 65–75, depending on your preferred handle length.
Attach the chain at the second marker with sl st.
Turn.
Work sc back across the chain.
Part 18 – Reinforce the Handle
Work approximately 4–6 rows of sc along the handle.
Keep your tension firm and even.
At each end, work several stitches directly into the upper bag border so the handle attachment is strong.
FO securely.
Repeat for the second handle.
Part 19 – Handle Edging
For a polished finish, join yarn at one side of the handle.
Sl st or sc evenly around the entire outer edge.
Repeat along the opposite side.
This creates the firm rounded handles shown in the inspiration.
Part 20 – Optional Fabric Lining
Measure the finished interior.
Cut two rectangles of cotton fabric slightly larger than the bag body.
Sew the side and bottom seams.
Fold the upper raw edge inward.
Insert the lining into the bag and hand sew it just below the upper crochet border.
Part 21 – Optional Pocket
Before installing the lining, cut a small fabric rectangle.
Fold and stitch the raw edges.
Sew it onto the lining to create an interior pocket for keys, cards or a phone.
Part 22 – Final Flower Shaping
Use your fingers to gently separate every flower petal.
Pull the outer petals slightly forward.
Arrange the cream flowers so they overlap the pale blue section slightly.
Repeat between the pale and deep blue sections.
This overlapping effect makes the color transition look softer and fuller.
Part 23 – Blocking
Lightly mist the bag with water.
Stuff it with clean towels so it holds the desired shape.
Arrange the flowers carefully.
Allow the bag to dry completely before removing the towels.
Color Palette Ideas
Ocean: ivory, sky blue, denim and navy.
Blush Garden: cream, blush pink, dusty rose and burgundy.
Lavender: ivory, lilac, lavender and plum.
Autumn: cream, mustard, burnt orange and chocolate.
Christmas: cream, sage, forest green and deep red.
Neutral: ivory, beige, camel and warm brown.
Ways to Customize the Bag
- Add a magnetic snap closure.
- Add a zipper to the lining.
- Make the handles longer for a shoulder bag.
- Use four colors instead of three.
- Add small pearl beads to the flower centers.
- Use one solid color for a minimalist version.
- Add a removable crochet flower charm.
- Make a smaller version for a child.
- Use raffia yarn for a summer beach-bag look.
Care Instructions
Hand wash gently in cool water with mild detergent.
Do not twist or wring the bag.
Press excess water out with a towel.
Stuff the bag lightly and reshape the flowers while damp.
Dry flat and away from direct heat.
Frequently Asked Questions
Yes. Add additional flower motifs to each horizontal row and add another floral row for extra height. Adjust the base to match the new circumference.
Yes, but cotton is recommended because it stretches less and gives the bag more structure.
Use firm cotton yarn, tight stitches and several rows of single crochet. You can also sew cotton webbing or ribbon invisibly along the underside of each handle.
No, but a lining makes the bag more practical and prevents small items from slipping through the spaces between motifs.
Yes. Skip the first raised petal layer and work only the larger outer petals for a flatter motif.
Use firm cotton yarn, tight tension, a reinforced oval base and an optional plastic canvas insert. A fabric lining also adds structure.
The finished Crochet Flower Tote Bag Pattern