Crochet Gingerbread Christmas Door Hanger – Free Festive Decoration Pattern
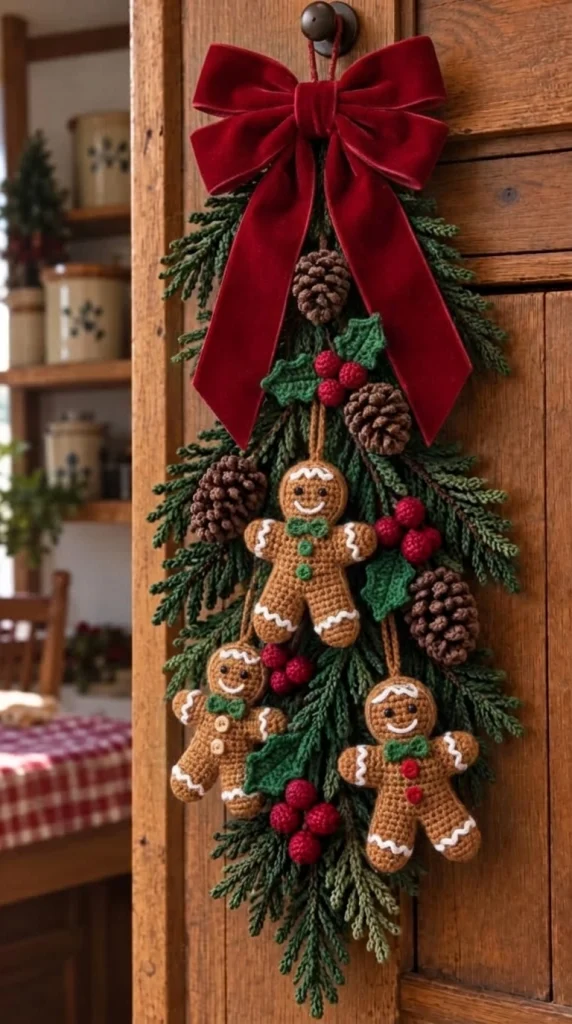
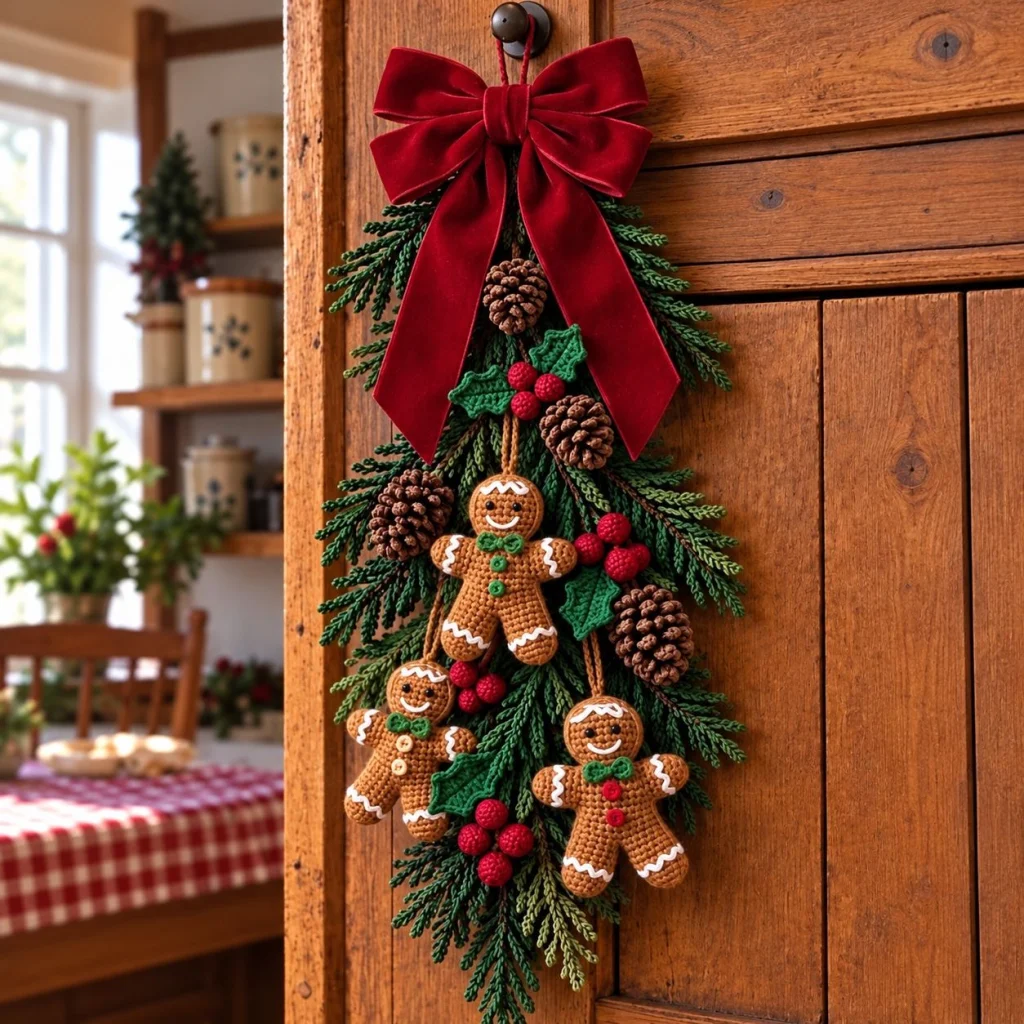
Bring a touch of handmade Christmas magic to your home with this beautiful crochet gingerbread Christmas door hanger. Featuring three adorable gingerbread men, lush evergreen branches, bright red holly berries, rustic pinecones, and a luxurious burgundy bow, this festive hanging decoration is perfect for creating a warm and welcoming holiday atmosphere.
The cascading design combines traditional Christmas colors with cozy crochet textures. Each gingerbread figure has sweet embroidered icing details, a smiling face, and a tiny green bow tie. The greenery and pinecones give the arrangement a natural woodland appearance, while the rich red bow creates an elegant finishing touch.
This free crochet pattern explains how to create the gingerbread ornaments, textured evergreen sprigs, holly leaves, berries, pinecones, and hanging arrangement so you can make your own festive door decoration.
Pattern Information
- Skill Level: Intermediate to Advanced
- Finished Length: Approximately 55–70 cm
- Finished Width: Approximately 22–28 cm
- Project Type: Christmas door or wall hanging
- Techniques: Amigurumi, appliqué, embroidery, shaping, and assembly
- Hook Sizes: 2.5 mm, 3 mm, and 3.5 mm
- Terminology: US crochet terms
The finished size will vary depending on your yarn, hook, tension, and the arrangement of the ornaments.
Materials Needed
- DK or light worsted-weight yarn in gingerbread brown
- White or ivory yarn for icing details
- Dark green yarn for evergreen branches and bow ties
- Bright red or burgundy yarn for holly berries
- Dark brown yarn for pinecones
- Black embroidery thread for facial details
- Optional red yarn for decorative buttons
- 2.5 mm, 3 mm, and 3.5 mm crochet hooks
- Polyester fiberfill stuffing
- Yarn needle
- Scissors
- Stitch markers
- Strong cotton cord or jute twine
- Wide burgundy velvet ribbon for the decorative bow
- Optional small buttons or beads
- Optional lightweight backing or hidden support cord
Crochet Abbreviations
- MR: Magic ring
- ch: Chain
- sc: Single crochet
- hdc: Half double crochet
- dc: Double crochet
- sl st: Slip stitch
- inc: Increase (2 sc in one stitch)
- dec: Invisible single crochet decrease
- BLO: Back loop only
- FO: Fasten off
Unless otherwise stated, amigurumi rounds are worked continuously. Use a stitch marker to identify the beginning of each round.
Part 1: Crochet the Gingerbread Men
Make three gingerbread figures: one larger ornament for the center and two smaller ornaments for the lower sides.
Each figure is made from two matching flat body panels, lightly stuffed and joined around the edges. This construction creates a recognizable gingerbread silhouette with rounded arms, legs, and head.
Step 1: Make the Gingerbread Head
Using gingerbread-brown yarn and a 3 mm hook:
- Round 1: MR, 6 sc. (6)
- Round 2: Inc around. (12)
- Round 3: (Sc, inc) repeat 6 times. (18)
- Round 4: (2 sc, inc) repeat 6 times. (24)
- Round 5: (3 sc, inc) repeat 6 times. (30)
- Round 6: Sc around. (30)
- FO, leaving a sewing tail.
Make two circles for each gingerbread head.
Step 2: Make the Body Panels
Using gingerbread-brown yarn:
- Row 1: Ch 13. Sc in the second chain from the hook and across. (12)
- Rows 2–10: Ch 1, turn, sc across. (12)
- Row 11: Ch 1, turn, dec, sc 8, dec. (10)
- Row 12: Sc across. (10)
- Row 13: Dec, sc 6, dec. (8)
- FO, leaving a long sewing tail.
Make two matching body panels per gingerbread figure.
Step 3: Crochet the Arms
Make four arm pieces for each gingerbread figure, two for the front and two for the back.
- Ch 10.
- Sc in the second chain and across. (9)
- Ch 1, turn, sc across for 4 additional rows.
- On the final row, work 3 sc into the outer corner to round the hand.
- FO, leaving a sewing tail.
Step 4: Crochet the Legs
Make four leg pieces for each figure.
- Ch 11.
- Sc in the second chain and across. (10)
- Ch 1, turn, sc across for 5 additional rows.
- Work 3 sc around the lower outer corner to create a rounded foot.
- FO, leaving a sewing tail.
Step 5: Assemble Each Gingerbread Figure
- Lay one body panel flat.
- Position the head at the top center, overlapping the body slightly.
- Attach one arm to each upper side of the body.
- Position the two legs at the bottom, leaving a small gap between them.
- Sew the pieces together to form the front silhouette.
- Repeat the process for the back silhouette.
- Place the front and back together with wrong sides facing.
- Join around the outer edge using single crochet.
- Before closing, add a small amount of fiberfill to the head, body, arms, and legs.
- Complete the edge and fasten off securely.
For the two smaller gingerbread men, use a 2.5 mm hook and slightly thinner yarn, or reduce the body and limb dimensions proportionally.
Part 2: Embroider the Gingerbread Icing
The white icing details make the gingerbread figures instantly recognizable.
Head Icing
Using white yarn and a yarn needle, embroider a gently curved zigzag line across the upper forehead.
Add a matching curved line near the lower edge of the head if desired.
Arm and Leg Icing
- Thread white yarn through a tapestry needle.
- Embroider short zigzag lines near the ends of both arms.
- Repeat around the lower sections of both legs.
- Keep the stitches evenly spaced for a neat piped-icing appearance.
Smiling Faces
Using black embroidery thread:
- Make two small embroidered eyes.
- Add a gently curved smile beneath them.
- Secure the embroidery thread on the back.
For a softer expression, position the eyes slightly above the center of the face and keep the smile small.
Part 3: Crochet the Tiny Green Bow Ties
Each gingerbread man wears a small dark-green bow tie.
Using dark-green yarn and a 2.5 mm hook:
- Ch 9.
- Sc in the second chain and across. (8)
- Ch 1, turn, sc across.
- Repeat for 3 more rows.
- FO, leaving a long yarn tail.
- Pinch the rectangle at the center.
- Wrap the yarn tail around the center several times.
- Secure the wrap on the back.
Make three bow ties and sew one beneath each gingerbread face.
Part 4: Add the Gingerbread Buttons
The central gingerbread figure features green buttons, while the two smaller figures may have red, cream, or natural wooden buttons.
For crocheted buttons:
- MR, 6 sc.
- Sl st into the first sc.
- FO, leaving a sewing tail.
Make two or three buttons for each gingerbread man.
Position the buttons vertically along the body and sew them securely in place.
Part 5: Crochet the Evergreen Branches
The evergreen foliage creates the lush cascading background of the decoration.
Using dark-green yarn and a 3.5 mm hook:
Main Branch
- Ch 46.
- Starting in the second chain from the hook, sl st into the next 4 chains.
- Ch 8, sl st back along the chain to create a side branch.
- Sl st into the next 3 stitches of the main chain.
- Ch 10, sl st back along the chain.
- Continue creating side branches along both sides of the central chain.
- Gradually shorten the side branches toward the tip.
- FO, leaving a long sewing tail.
Needle Texture
For a fuller evergreen appearance, work small chain loops or slip-stitch branches along the sides of the larger stems.
Make approximately 8–12 evergreen sprigs in varying lengths.
Arrange them in overlapping layers, with the longest branches extending downward and shorter branches near the top.
Part 6: Crochet the Holly Leaves
The deep-green holly leaves add traditional Christmas charm.
Using green yarn and a 3 mm hook:
- Ch 13.
- Sc in the second chain from the hook.
- Hdc in the next 2 chains.
- Dc in the next 6 chains.
- Hdc in the next 2 chains.
- Work 3 sc in the last chain.
- Continue along the opposite side of the foundation chain, mirroring the stitches.
- Sl st to close.
Create the Pointed Edges
Work around the leaf edge, alternating slip stitches with small chain-3 picots to create the characteristic holly points.
FO and weave in the ends.
Make 5–7 leaves, depending on the desired fullness.
Part 7: Crochet the Red Holly Berries
Small red berries bring bright color and dimension to the evergreen arrangement.
Using red yarn and a 2.5 mm hook:
- Round 1: MR, 6 sc. (6)
- Round 2: Inc around. (12)
- Rounds 3–4: Sc around. (12)
- Round 5: Dec around. (6)
- Add a small amount of stuffing.
- FO, leaving a long tail.
- Close the opening securely.
Make approximately 15–20 berries.
Arrange the berries into clusters of three or five and attach them between the evergreen branches and holly leaves.
Part 8: Crochet the Rustic Pinecones
The brown pinecones provide texture and a natural woodland touch.
Using dark-brown yarn and a 3 mm hook:
Pinecone Base
- Round 1: MR, 6 sc. (6)
- Round 2: Inc around. (12)
- Round 3: (Sc, inc) repeat 6 times. (18)
- Rounds 4–9: Sc around. (18)
- Round 10: (Sc, dec) repeat 6 times. (12)
- Round 11: Dec around. (6)
- Stuff lightly and close.
Pinecone Scales
To create the layered scales, attach dark-brown yarn to the surface of the base.
- Insert the hook into a surface stitch.
- Ch 3.
- Work 2 dc into the same attachment point.
- Ch 1 and sl st into a nearby surface stitch.
- Repeat around the base in staggered rows.
- Overlap the scales slightly as you move downward.
Make 4–5 pinecones in different sizes.
Shape the scales with your fingers to create a dimensional pinecone appearance.
Part 9: Make the Burgundy Velvet Bow
The large burgundy velvet bow gives the decoration its elegant Christmas character.
For the closest match to the reference image, use a wide burgundy velvet ribbon rather than crochet.
Bow Instructions
- Cut approximately 1.2–1.5 meters of wide velvet ribbon.
- Form two large upper loops.
- Create two additional lower loops for a full layered bow.
- Pinch the ribbon tightly at the center.
- Secure the center with strong thread or floral wire.
- Wrap a short piece of matching ribbon around the center.
- Leave two long ribbon tails hanging downward.
- Cut the ribbon ends into neat angled or V-shaped tips.
Position the bow at the top of the greenery arrangement, allowing the tails to frame the gingerbread ornaments.
Part 10: Prepare the Hanging Cords
The gingerbread figures hang from natural brown cords at different heights.
Prepare three sturdy cords:
- One shorter cord for the large central gingerbread figure
- One medium-length cord for the lower-left figure
- One longer cord for the lower-right figure
Attach the cords securely to the backs of the gingerbread ornaments.
Use reinforced stitches to prevent the figures from twisting or slipping.
Part 11: Assemble the Christmas Door Hanger
Arrange all components on a flat surface before attaching them permanently.
- Prepare a strong hanging loop using cotton cord or jute twine.
- Position the longest evergreen branches vertically to create the main cascading shape.
- Layer shorter evergreen sprigs over the upper and middle sections.
- Secure the branches to the main support cord using strong yarn or thread.
- Attach the large burgundy velvet bow near the top.
- Hang the largest gingerbread man in the upper-middle section.
- Position the smaller gingerbread figure toward the lower left.
- Hang the third gingerbread figure toward the lower right.
- Arrange the pinecones between the evergreen branches.
- Attach the holly leaves around the gingerbread figures.
- Add red berry clusters throughout the arrangement.
- Adjust the ribbon tails so they frame the decoration without covering the gingerbread faces.
- Reinforce every attachment point and check the balance of the finished hanger.
The finished arrangement should have a tapered silhouette, with the greenery spreading outward near the top and narrowing toward the bottom.
Part 12: Finishing Touches
- Weave in all loose yarn ends.
- Fluff and shape the evergreen branches.
- Adjust the pinecone scales for added dimension.
- Position the holly berries in balanced clusters.
- Straighten the hanging gingerbread figures.
- Make sure the embroidered faces remain visible.
- Shape the velvet bow loops and smooth the ribbon tails.
- Test the hanging loop before displaying the decoration.
Your handmade gingerbread Christmas door hanger is now complete!
Christmas Color Variations
Traditional Christmas
Use gingerbread brown, forest green, bright red, ivory, and burgundy for a classic festive appearance.
Elegant Woodland Christmas
Combine dark pine green, chocolate brown, antique gold, cream, and deep wine red.
Neutral Farmhouse Christmas
Try oatmeal, taupe, ivory, muted olive, and natural linen ribbon.
Candy Cane Christmas
Use bright red, white, gingerbread brown, and emerald green for a playful holiday design.
Helpful Crochet Tips
- Use a smaller hook for tighter amigurumi stitches and cleaner gingerbread shapes.
- Stuff the ornaments lightly so they remain relatively flat.
- Embroider the icing details before fully assembling the figures whenever possible.
- Use strong cotton cord for the main hanging structure.
- Vary the evergreen branch lengths to create a natural appearance.
- Cluster the berries in odd numbers for a balanced decorative look.
- Keep the pinecones lightweight to prevent the hanger from sagging.
- Use a hidden support cord behind the greenery for extra stability.
Frequently Asked Questions
Is this gingerbread Christmas door hanger beginner-friendly?
The individual stitches are relatively simple, but the full project is best suited to intermediate crocheters because it involves several decorative elements and careful assembly.
Can I make the gingerbread men larger?
Yes. Use thicker yarn and a larger hook, or increase the dimensions of the body panels, arms, legs, and head proportionally.
Can I crochet the bow instead of using velvet ribbon?
Absolutely. Crochet a wide rectangle, fold it into a bow shape, pinch the center, and secure it with a narrow crocheted band. Add two separate crocheted tails for a similar appearance.
Can I replace the pinecones with real pinecones?
Yes. Small, clean, dried pinecones can be attached securely to the arrangement for a natural rustic finish.
Can this decoration be displayed outdoors?
It is best displayed indoors or on a covered porch protected from rain, snow, and prolonged moisture.
How can I keep the hanger from twisting?
Use a strong central support cord and attach the gingerbread ornaments at multiple points where necessary. Distribute the heavier decorative elements evenly.
Care Instructions
- Spot-clean the crocheted pieces gently.
- Avoid soaking the velvet ribbon.
- Do not machine wash the assembled decoration.
- Allow any damp areas to air dry completely.
- Store the hanger flat or loosely arranged in a dry box.
- Reshape the bow and evergreen branches before displaying it again.
Final Thoughts
This crochet gingerbread Christmas door hanger combines the sweetness of handmade gingerbread ornaments with the timeless beauty of evergreen foliage, holly berries, pinecones, and an elegant burgundy bow.
Whether displayed on your front door, in a cozy entryway, or beside your Christmas tree, this festive crochet decoration adds warmth, texture, and a personal handmade touch to your holiday home.
It also makes a thoughtful Christmas gift for anyone who loves crochet, gingerbread decorations, and traditional holiday styling.
Love this free crochet pattern? Save it to Pinterest and share it with your crochet friends for more handmade Christmas inspiration!

