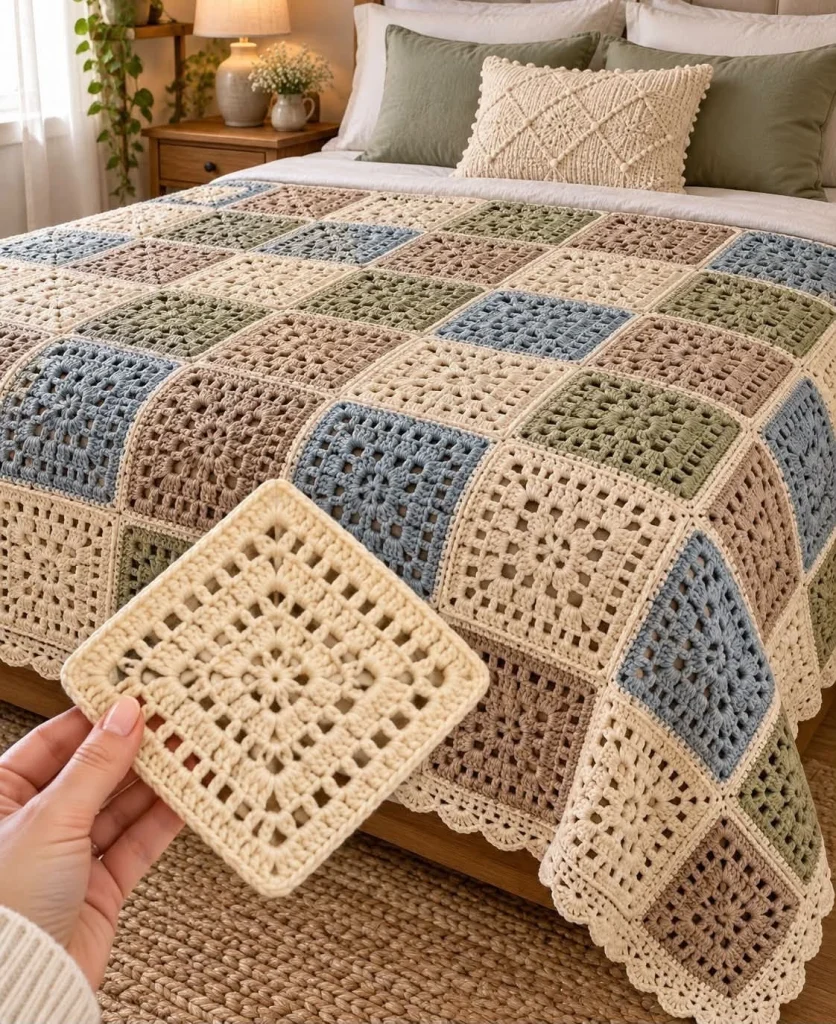
Crochet Granny Square Bedspread Pattern – Beautiful Vintage Floral Blanket for a Cozy Bedroom
There’s something incredibly special about a handmade crochet bedspread. The soft textures, delicate floral details, and carefully chosen colors can transform an ordinary bedroom into a warm, peaceful retreat.
This gorgeous crochet granny square bedspread features a dreamy combination of sage green, dusty blue, warm taupe, and creamy ivory. Each square showcases a beautiful floral-inspired crochet motif, creating a timeless patchwork design.
The squares are joined with soft cream borders, giving the blanket a polished, harmonious appearance. A delicate scalloped edging adds the perfect finishing touch.
Whether you love cottagecore interiors, vintage-inspired crochet, or elegant handmade home decor, this beautiful bedspread is a wonderful source of inspiration.
In this tutorial, you’ll learn how to create a similar floral granny square, join the motifs, and turn them into a stunning handmade bedspread.
Note: This is an original, simplified pattern inspired by the photograph, rather than the original designer’s exact pattern. The stitch construction cannot be fully verified from the image alone.
Why You’ll Love This Crochet Granny Square Bedspread
- Beautiful vintage-inspired floral granny square design
- Soft sage green, dusty blue, cream, and taupe colors
- Elegant patchwork arrangement
- Perfect for cozy cottage-style bedrooms
- Individual squares make the project easy to manage
- Lovely handmade gift for weddings or housewarmings
- Customizable for different bed sizes
- Timeless crochet texture and decorative scalloped edging
Project Overview
- Project: Floral Granny Square Crochet Bedspread
- Skill Level: Confident Beginner to Intermediate
- Technique: Granny squares, floral motifs, joining, edging
- Yarn Weight: DK or worsted weight
- Suggested Hook: 4 mm to 5 mm
- Colors: Cream, sage green, dusty blue, warm taupe
- Suggested Square Size: Approximately 15 × 15 cm after blocking
- Finished Size: Adjustable
- Style: Vintage, cottagecore, farmhouse, cozy
Materials You’ll Need
- DK or worsted-weight yarn in creamy ivory
- Sage green yarn
- Dusty blue yarn
- Warm taupe yarn
- 4 mm or 5 mm crochet hook
- Yarn needle
- Scissors
- Stitch markers
- Measuring tape
- Blocking mats and pins (optional)
The total amount of yarn depends on your bedspread size, yarn weight, stitch tension, and the number of squares.
Crochet Abbreviations – US Terms
- ch: Chain
- sc: Single crochet
- hdc: Half double crochet
- dc: Double crochet
- tr: Treble crochet
- sl st: Slip stitch
- st: Stitch
- sp: Space
- FO: Fasten off
- MR: Magic ring
Step 1 – Choose Your Color Palette
The beautiful color combination is one of the most charming features of this bedspread.
For a look inspired by the photograph, use four soft, muted colors:
- Cream: A warm neutral that brightens the entire design.
- Sage Green: A peaceful, nature-inspired shade.
- Dusty Blue: A gentle blue-gray that adds contrast.
- Warm Taupe: An earthy neutral that balances the palette.
Use cream yarn for the joining seams and outer border to tie the colors together.
Step 2 – Crochet the Floral Granny Square
This beginner-friendly floral granny square creates a small flower in the center, surrounded by traditional granny-square clusters.
Make a sample square first and measure it after blocking. Adjust your hook size or add rounds if you want larger motifs.
Round 1 – Create the Flower Center
Make a magic ring.
Ch 3 (counts as the first dc), then work 11 dc into the ring.
Pull the ring closed and join with a sl st to the top of the beginning ch-3.
You should have 12 dc.
Round 2 – Form the Flower Petals
Ch 1.
In the first stitch, work (sc, 3 dc, sc).
Skip the next stitch.
Repeat this sequence around to create six small flower petals.
Join with a sl st.
Round 3 – Create the Square Foundation
Attach your next color to the back of the flower between two petals.
Ch 3.
Work granny-style clusters of 3 dc into the spaces between the petals.
To establish four corners, distribute four corner groups evenly around the flower, using (3 dc, ch 2, 3 dc) at each corner.
Join with a sl st.
Construction note: Because the six-petal center does not provide four natural corner spaces, the corner placement must be adjusted during this transition. This round is a design guide rather than a fully tested stitch-count pattern.
Round 4 – Expand the Granny Square
Join yarn in any corner space.
Ch 3 and work 2 dc in the same space.
Ch 2 and work 3 dc into the same corner.
Along each side, work 3 dc clusters into the available spaces, separated by ch 1.
At each corner, work (3 dc, ch 2, 3 dc).
Continue around and join.
Round 5 – Add the Decorative Border
Using cream yarn, work one additional granny-square round.
Maintain the four corners and keep your stitch tension even.
FO and weave in the ends.
Repeat to create your desired number of squares.
Step 3 – Make Your Granny Square Collection
For a beautiful balanced design, make squares in all four colors.
Try distributing the colors evenly across the bedspread.
For example, a bedspread with 120 squares could contain:
- 30 cream squares
- 30 sage green squares
- 30 dusty blue squares
- 30 taupe squares
This creates a coordinated patchwork effect without making the design feel overly repetitive.
Step 4 – Plan Your Bedspread Layout
Before joining your squares, arrange them on a clean floor or large table.
Experiment with different color combinations until you find an arrangement you love.
Suggested Layout Ideas
- Alternating colors in a checkerboard arrangement
- Randomly distributed soft neutral squares
- Diagonal rows of matching colors
- Repeating four-color sequences
- A cream border surrounding a colorful center
The photograph features a softly varied patchwork layout with cream joining lines.
Step 5 – Join the Granny Squares
Once all your squares are complete, it’s time to assemble the bedspread.
One of the easiest methods is the slip stitch join.
Slip Stitch Joining Method
- Place two squares together with the right sides facing outward.
- Align their edges and corners.
- Insert your hook through corresponding stitches along both edges.
- Pull cream yarn through to create a slip stitch.
- Continue joining across the entire edge.
- Repeat until all squares are connected into rows.
- Join the rows together using the same method.
Keep your joins relaxed so the bedspread lies flat.
Step 6 – Crochet the Outer Border
A continuous cream border gives the bedspread a beautiful finished appearance.
Border Round 1
Attach cream yarn at any corner.
Work sc evenly around the entire blanket.
At each corner, work 3 sc to help the border turn smoothly.
Join with a sl st.
Border Round 2
Ch 3.
Work dc stitches evenly around the bedspread.
At each corner, work additional stitches as needed to keep the border flat.
Join with a sl st.
Step 7 – Add the Scalloped Crochet Edging
The soft scalloped edging is a lovely decorative detail.
To create a simple shell border:
- Attach cream yarn at the beginning of a straight edge.
- Skip 2 stitches.
- Work 5 dc into the next stitch.
- Skip 2 stitches.
- Work 1 sc into the next stitch.
- Repeat the shell pattern along the edge.
- Adjust the spacing near corners to prevent bunching.
FO and weave in all ends.
Step 8 – Block Your Finished Bedspread
Blocking helps the granny squares relax and gives the blanket a neater appearance.
Follow the care instructions for your yarn.
For suitable fibers, lightly dampen the bedspread and gently shape it to its intended dimensions.
Allow it to dry completely while lying flat.
Avoid overstretching the floral motifs or decorative edging.
How Many Granny Squares Do You Need?
The number of squares depends on your desired finished dimensions.
Here are approximate examples using 15 cm squares, before allowing for any additional joining width or border:
| Bedspread Size | Suggested Layout | Total Squares |
|---|---|---|
| Small Throw | 8 × 10 | 80 |
| Single Bed | 10 × 13 | 130 |
| Double Bed | 12 × 14 | 168 |
| Queen Bed | 14 × 16 | 224 |
| King Bed | 16 × 18 | 288 |
These layouts are illustrative. Always measure your bed, including the desired overhang, before deciding on your final square count.
Tips for a Beautiful Professional Finish
- Use the same yarn weight throughout the project.
- Keep your stitch tension consistent.
- Block your granny squares before joining.
- Arrange colors before sewing the blanket together.
- Use cream joining yarn for a cohesive appearance.
- Weave in ends securely.
- Check that all squares have matching dimensions.
- Work the final border with relaxed tension.
- Wash and dry according to the yarn label.
Beautiful Color Variations
Romantic Blush and Cream
Combine dusty pink, ivory, beige, and muted rose for a soft romantic bedroom.
Coastal Blue and White
Use pale blue, denim blue, cream, and sand for a calming coastal-inspired bedspread.
Autumn Cottage Palette
Try rust orange, mustard, olive green, and warm beige for a cozy seasonal look.
Vintage Lavender
Combine lavender, dusty lilac, cream, and soft gray for a delicate floral blanket.
Neutral Farmhouse
Use oatmeal, cream, taupe, and soft brown for a timeless farmhouse aesthetic.
How to Style Your Crochet Granny Square Bedspread
This handmade blanket looks especially beautiful in bedrooms with natural textures and soft neutral colors.
Pair it with:
- Sage green pillows
- Cream cotton bedding
- Natural wooden furniture
- Soft knitted cushions
- Warm bedside lamps
- Woven baskets
- Simple floral arrangements
- Cozy neutral rugs
The beautiful floral patchwork becomes the focal point of the room without overwhelming the decor.
Frequently Asked Questions
Is this crochet granny square bedspread suitable for beginners?
Confident beginners can work on this project if they understand basic crochet stitches and are comfortable joining motifs. The floral center and square transition require extra attention.
What yarn is best for a crochet bedspread?
Soft cotton, cotton blends, or easy-care acrylic yarn can all work well. Choose a yarn that feels comfortable and suits your preferred washing routine.
How long does it take to crochet a bedspread?
A large granny square bedspread may take several weeks or months, depending on the size, number of squares, and time spent crocheting.
Can I use different colors?
Absolutely! Granny square blankets are perfect for experimenting with beautiful color palettes.
Should I block the squares before joining?
Blocking is recommended because it helps the squares reach consistent dimensions and makes assembly easier.
Can I make a matching pillow cover?
Yes! Use the same floral granny squares to create matching cushion covers for a coordinated bedroom look.
How do I wash a handmade crochet bedspread?
Always follow your yarn’s care instructions. For large blankets, use gentle washing methods and avoid hanging the wet blanket in a way that could stretch the stitches.
Final Thoughts
This beautiful crochet granny square bedspread is a wonderful example of how traditional crochet techniques can create elegant, timeless home decor.
The combination of soft sage green, dusty blue, warm taupe, and creamy ivory creates a peaceful and inviting bedroom atmosphere.
Each handmade square adds texture, personality, and warmth, turning a simple blanket into something truly special.
Whether you’re creating a cozy throw, a full-size bedspread, or a matching bedroom set, this floral granny square project offers endless possibilities.
Save this crochet inspiration for your next handmade project and happy crocheting! 🧶🤍

