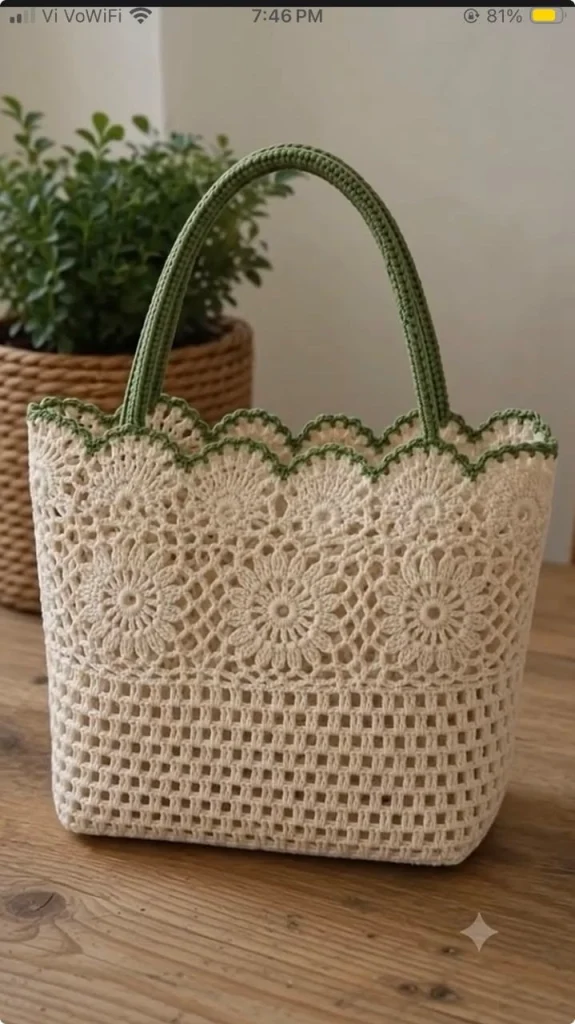
Crochet Lace Tote Bag Pattern – Beautiful Floral Bag with Sage Green Handles
Looking for a crochet bag that’s elegant, feminine, and perfect for everyday use? This beautiful crochet lace tote bag combines delicate floral patterns, an airy mesh texture, scalloped edges, and soft sage green handles for a timeless handmade look.
Inspired by vintage crochet lace and romantic cottagecore fashion, this bag is a lovely accessory for spring, summer, shopping trips, casual outings, or thoughtful handmade gifts.
The combination of creamy ivory yarn and subtle sage green accents gives this tote a fresh, natural appearance. Its detailed flower motifs create a delicate decorative upper section, while the open mesh body keeps the design light and breathable.
In this tutorial, you’ll learn how to create a similar floral crochet tote using simple mesh stitches, flower-inspired motifs, scalloped edging, and sturdy crocheted handles.
Pattern note: This is an original photo-inspired project, not an exact reconstruction of the photographed bag. The photograph does not provide enough information to verify its stitch counts or construction. The instructions below create a similar bag with a decorative floral panel.
Project Overview
- Project: Crochet Floral Lace Tote Bag
- Skill Level: Intermediate
- Finished Size: Approximately 32 cm wide × 29 cm tall
- Handle Drop: Approximately 23 cm
- Style: Vintage lace, cottagecore, romantic handmade
- Techniques: Chain stitches, double crochet, mesh crochet, floral appliqué, scalloped edging
- Hook Size: 3.5 mm or 4 mm
- Yarn: Cotton yarn, DK or light worsted weight
- Estimated Time: 8–12 hours
Materials You’ll Need
- Approximately 350–450 g cream or ivory cotton yarn
- Approximately 50–80 g sage green cotton yarn
- 3.5 mm or 4 mm crochet hook
- Yarn needle
- Stitch markers
- Sharp scissors
- Measuring tape
- Optional cotton fabric lining
- Optional magnetic snap closure
- Optional lightweight bag base insert
Tip: Cotton yarn is a great choice because it offers clear stitch definition and is generally less stretchy than many acrylic yarns.
Crochet Abbreviations – US Terms
- MR: Magic ring
- ch: Chain
- sc: Single crochet
- hdc: Half double crochet
- dc: Double crochet
- tr: Treble crochet
- sl st: Slip stitch
- sp: Space
- st: Stitch
- rep: Repeat
- FO: Fasten off
Part 1 – Crochet the Rectangular Bag Base
We’ll begin with a sturdy rectangular base to give the tote its practical shape.
Step 1 – Foundation Chain
Using cream yarn and a 3.5 mm hook, chain 46.
Step 2 – First Row
Starting in the second chain from the hook, work 1 sc in each chain across.
You should have 45 sc.
Step 3 – Continue the Base
Ch 1, turn.
Work 1 sc in each stitch across.
Repeat until the rectangle measures approximately 30 cm × 10 cm.
Adjust the number of rows according to your yarn and tension.
Step 4 – Work Around the Base
Without fastening off, work single crochet evenly around all four edges of the rectangle.
Place 3 sc into each corner to allow the border to turn neatly.
Join with a sl st.
This creates the foundation for the tote’s body.
Part 2 – Crochet the Lower Mesh Body
The lower half of the bag features an airy square mesh pattern that gives it a lightweight, delicate appearance.
Step 1 – Begin the Mesh
Ch 4 (counts as 1 dc and ch 1).
Skip the next stitch, dc in the following stitch, ch 1.
Continue repeating:
*Ch 1, skip 1 stitch, dc in next stitch.*
Adjust the final repeat if needed to fit the stitch count around the base.
Step 2 – Build the Mesh Rows
For each following round:
Work dc above the dc posts of the previous round, with ch-1 spaces between them.
Join each round neatly with a sl st.
Continue until the mesh section measures approximately 15–17 cm high.
Step 3 – Strengthen the Mesh
Work one round of sc along the top of the mesh section.
Place 1 sc into each dc and 1 sc into each ch-1 space.
This creates a stable edge for attaching the decorative floral section.
Part 3 – Crochet the Floral Lace Motifs
The most eye-catching feature of this bag is the beautiful row of flower-inspired crochet motifs.
Each motif features a delicate circular flower surrounded by decorative lace openings.
Step 1 – Flower Center
Using cream yarn, make a magic ring.
Round 1: Ch 3 (counts as first dc), work 11 dc into the ring.
Join with a sl st to the top of the beginning ch 3.
You should have 12 dc.
Step 2 – Create the Petal Foundation
Round 2: Ch 4, skip 1 stitch, sl st into the next stitch.
Repeat around to form 6 chain loops.
Step 3 – Crochet the Petals
Into each ch-4 loop, work:
- 1 sc
- 1 hdc
- 3 dc
- 1 hdc
- 1 sc
Repeat in all six loops.
Join with a sl st.
Your flower should now have six softly rounded petals.
Step 4 – Add the Lace Background
To turn the flower into a decorative motif, work behind the petals.
Attach yarn around a stitch between two petals.
Ch 5 and anchor with a sl st behind the next petal.
Repeat around the flower to create six larger loops.
Work a combination of sc, dc, and ch stitches into these loops to form an open lace border.
Keep the outer edge even and flat.
Step 5 – Create the Motif Border
Work additional chain spaces around the motif, using longer chains at the corners if creating a square shape.
Block each motif lightly to help the lace open evenly.
Make enough motifs to cover the front and back upper section of the tote.
For a bag approximately 32 cm wide, start with three motifs across each main face, adjusting their finished sizes as needed.
Construction note: This floral motif is decorative and the border instructions are intentionally flexible. For an exact repeatable square, a fully charted motif with fixed corner and side counts is required.
Part 4 – Join the Floral Motifs
Lay the completed motifs on a flat surface.
Arrange them into a continuous decorative band that will wrap around the upper portion of the tote.
Join neighboring motifs using slip stitches or a yarn needle.
Make sure the joins are neat and consistent.
Once all motifs are connected, attach the floral band to the upper edge of the mesh body.
Use evenly spaced single crochet stitches or careful hand sewing to secure the band.
The decorative band should sit smoothly without pulling or puckering.
Part 5 – Crochet the Scalloped Upper Edge
The soft scalloped edge adds a romantic finishing detail to the tote.
Step 1 – Prepare the Border
Using cream yarn, work a round of sc evenly around the top opening.
Step 2 – Create the Scallops
Work the following repeat:
*Skip 2 stitches, work 5 dc into the next stitch, skip 2 stitches, sl st into the next stitch.*
Repeat around the entire opening, adjusting the spacing slightly if necessary.
Step 3 – Add Sage Green Trim
Switch to sage green yarn.
Work a round of slip stitches or single crochet along the scalloped edge.
Keep the tension loose enough to preserve the rounded shape.
The subtle green edging highlights each scallop and beautifully complements the handles.
Part 6 – Crochet the Sage Green Handles
The long sage green handles make the tote comfortable to carry over your shoulder.
Step 1 – Foundation Chain
Using sage green yarn, chain approximately 100–120 stitches, depending on your desired handle length.
Step 2 – First Row
Starting in the second chain from the hook, work 1 sc in each chain.
Step 3 – Build the Handle Width
Ch 1, turn.
Work 1 sc in each stitch across.
Repeat for approximately 5–7 rows, or until the handle is 2.5–3 cm wide.
Step 4 – Reinforce the Handles
For stronger handles, fold each crocheted strip lengthwise and sew the long edges together.
You can also place a cotton cord inside the folded handle to reduce stretching.
Step 5 – Attach the Handles
Position one handle on the front and one on the back.
Measure carefully so both handles are symmetrical.
Sew each handle end securely to the upper bag structure, reinforcing the attachment with multiple passes of yarn.
Check the strength of the handles before using the tote.
Part 7 – Optional Fabric Lining
Because the bag features an open mesh body, adding a lining makes it more practical for carrying everyday items.
Step 1 – Measure the Bag
Measure the inside width, height, and depth.
Step 2 – Cut the Fabric
Cut cotton fabric pieces to match the interior dimensions, adding seam allowances.
Step 3 – Sew the Lining
Sew the side seams and bottom corners.
Fold the upper edge inward for a neat finish.
Step 4 – Attach the Lining
Insert the lining into the crochet bag.
Hand-sew it along the inside upper edge using small, discreet stitches.
Make sure the lining does not distort the decorative scallops.
Part 8 – Finishing Touches
Once the body, floral motifs, scalloped edging, and handles are complete, it’s time to finish your handmade tote.
- Weave in all loose yarn ends.
- Check that the floral motifs are securely attached.
- Adjust the scalloped edging so it lies evenly.
- Make sure both handles have the same length.
- Gently steam-block the lace if suitable for your yarn.
- Allow the bag to dry completely before use.
Beautiful Color Combinations for Your Crochet Tote
1. Cream and Sage Green
Soft, natural, and elegant. Perfect for a timeless cottagecore look.
2. Ivory and Dusty Rose
Romantic and feminine, ideal for spring and summer outfits.
3. Beige and Chocolate Brown
A warm neutral combination inspired by vintage handmade accessories.
4. White and Lavender
Fresh, delicate, and beautiful for a soft floral aesthetic.
5. Cream and Terracotta
A cozy earthy combination that works beautifully for autumn.
6. Natural Cotton and Olive Green
A relaxed botanical palette with a handmade farmhouse feel.
How to Style Your Crochet Lace Tote Bag
Casual Summer Outfit
Pair your tote with a linen dress, sandals, and simple gold jewelry.
Weekend Shopping
Carry it with jeans, a cotton blouse, and comfortable flats for a relaxed handmade look.
Beach Vacation
Use it as a lightweight accessory for sunglasses, a small book, and other essentials. Add a lining to keep smaller items secure.
Cottagecore Fashion
Combine the bag with floral dresses, soft cardigans, and neutral accessories.
Handmade Gift
Fill the tote with yarn, handmade soap, or a small gift for someone who loves crochet.
Tips for a Professional Handmade Finish
- Choose cotton yarn with consistent thickness.
- Use the same hook size throughout the decorative motifs.
- Block the floral motifs before joining them.
- Keep the mesh stitches even for a symmetrical bag.
- Reinforce the handle attachments carefully.
- Add a fabric lining if you plan to carry small objects.
- Use stitch markers to maintain even spacing.
- Test the bag with light items before everyday use.
Frequently Asked Questions
Is this crochet lace tote bag suitable for beginners?
The project is best for intermediate crocheters because it combines mesh crochet, floral motifs, shaping, and assembly. Beginners can practice each section separately before starting the full bag.
What is the best yarn for a crochet tote bag?
Cotton yarn is a popular choice because it provides clear stitch definition and tends to hold its shape well.
Can I make this bag larger?
Yes. Increase the size of the base and adjust the number of mesh stitches and floral motifs accordingly.
Will the mesh stretch when carrying items?
Open crochet mesh can stretch under weight. A fabric lining, reinforced handles, and a sturdy base can help the bag maintain its shape.
Can I wash my crochet tote?
Check the yarn label first. Many cotton yarns can be gently hand-washed in cool water and laid flat to dry.
Can I add a zipper?
Yes. A zipper can be sewn into a fabric lining for additional security.
Can I change the handle color?
Absolutely. Dusty rose, caramel, chocolate brown, olive green, or lavender would all complement the cream lace.
Can I use this bag for shopping?
Yes, for lightweight everyday items. Because of its open lace construction, avoid carrying heavy objects unless the bag has been properly reinforced.
Final Thoughts
This crochet lace tote bag pattern brings together delicate floral details, beautiful openwork texture, and practical handmade style.
The soft cream lace, airy mesh body, scalloped upper edge, and sage green handles create an elegant accessory that feels both vintage-inspired and modern.
Whether you’re making a tote for yourself, preparing a thoughtful gift, or exploring new crochet bag designs, this floral project is a wonderful way to practice decorative stitches and create something beautiful.
Choose your favorite yarn colors, enjoy the relaxing process, and make a handmade bag you’ll love carrying.
Happy crocheting! 🧶🌿🤍

