Crochet Maple Leaf Pattern – Easy Autumn Leaves
Beginner Friendly
Perfect for those just starting their crochet journey, with clear instructions and simple techniques
Single-Day Project
A satisfying project you can complete in a single afternoon or evening.
Handmade Gift
A beautiful keepsake — free forever. Read online or print at home.
About This Crochet Maple Leaf Pattern – Easy Autumn Leaves
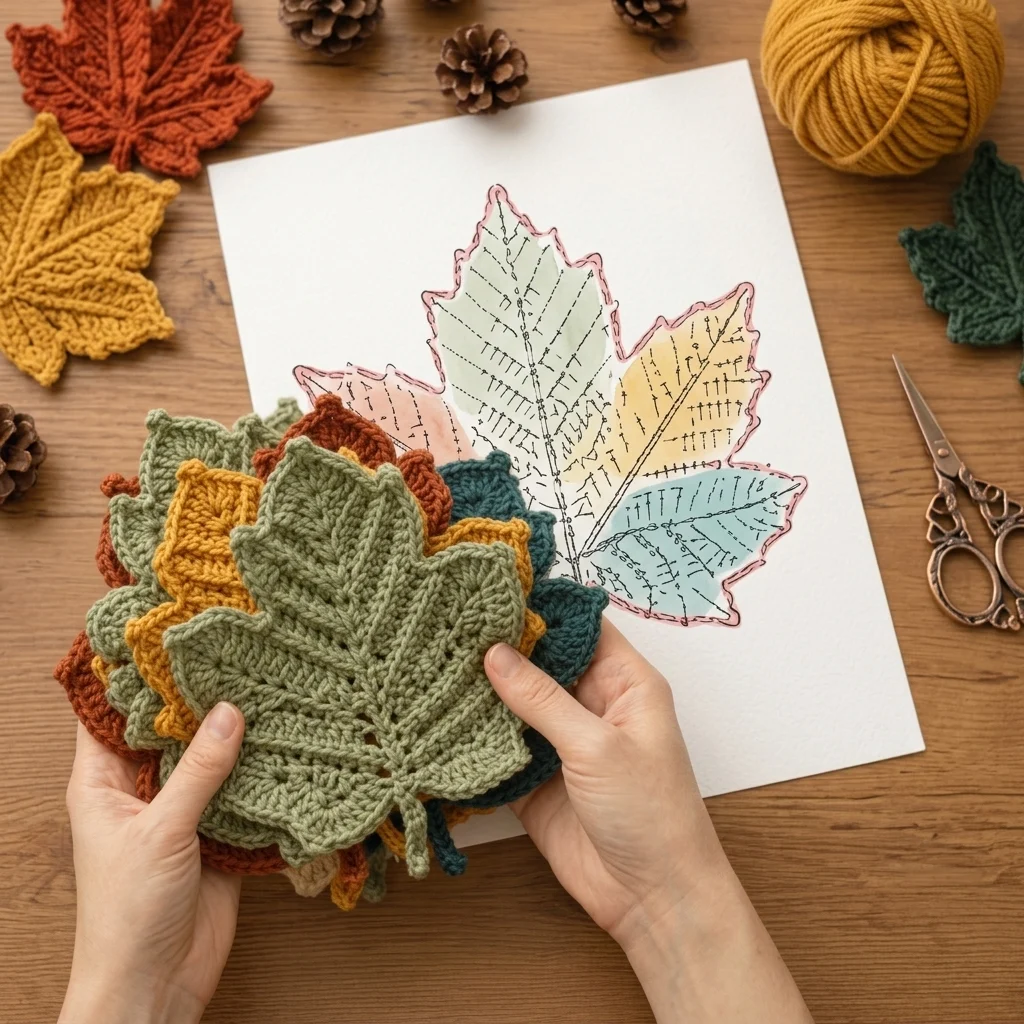
This crochet maple leaf pattern creates beautifully textured autumn leaves with defined points, raised veins and a small crocheted stem. Make them in rusty orange, mustard yellow, sage green, deep forest green, teal or warm brown to create a whole collection of handmade fall leaves.
These leaves are lovely on their own, but they can also be used for an autumn garland, fall wreath, table centerpiece, seasonal wall hanging, gift decoration, appliqué or cozy Thanksgiving décor.
Materials
- DK #3 or light worsted #4 yarn small amount per leaf
- 3.5–4 mm crochet hook 1
- Yarn needle 1
- Scissors 1 pair
- Blocking mat and pins recommended
Autumn Color Palette
- Sage green – soft muted leaf
- Mustard yellow – golden autumn leaf
- Rust orange – classic fall color
- Forest green – deep natural contrast
- Teal green – beautiful accent shade
- Warm brown – late-autumn variation
Abbreviations – US Terms
MRmagic ringchchainsl stslip stitchscsingle crochethdchalf double crochetdcdouble crochettrtreble crochetdtrdouble treble crochetststitchspspaceFOfasten offFinished Size
Using DK yarn and a 3.5 mm hook, one finished leaf measures approximately 15–17 cm / 6–6.7 in from the top point to the base, excluding the stem.
Using worsted yarn and a 4 mm hook will create a slightly larger leaf.
Center of the Leaf
With your chosen autumn color, make a magic ring.
Round 1: Ch 3, work 11 dc into the ring. Join with sl st to the top of the beginning ch-3.
Pull the magic ring firmly closed.
Round 2: Ch 1. Work 2 sc into each stitch around. Join with sl st.
You now have a sturdy circular center from which the five leaf sections will grow.
Mark the Five Leaf Sections
The maple leaf is formed from five lobes:
- one large center lobe
- two medium upper side lobes
- two smaller lower side lobes
Space the five working sections evenly around the center.
Center Lobe
Join yarn at the top of the center.
Row 1: Ch 1, sc in next 5 sts. Turn.
Row 2: Ch 1, sc, hdc, dc, hdc, sc. Turn.
Row 3: Ch 2, hdc in first st, dc in next 3 sts, hdc in last st. Turn.
Row 4: Ch 3, dc in first st, tr in next 3 sts, dc in last st. Turn.
Row 5: Ch 4, tr, dtr, tr, dc.
Finish the point with ch 3, sl st into first ch.
Work down the opposite side using dc, hdc and sc to create a symmetrical pointed lobe.
Upper Left Lobe
Join yarn beside the center lobe.
Row 1: Ch 1, sc in next 4 sts. Turn.
Row 2: Ch 2, hdc, dc in next 2 sts, hdc. Turn.
Row 3: Ch 3, dc, tr, dc.
Ch 3 and sl st into the first chain to create the pointed tip.
Work back down with dc, hdc and sc.
Upper Right Lobe
Repeat the instructions for the upper left lobe on the opposite side.
Keep both upper lobes approximately the same length so the leaf remains balanced.
Lower Left Lobe
Join yarn beside the upper left lobe.
Row 1: Ch 1, sc in next 3 sts. Turn.
Row 2: Ch 2, hdc, dc, hdc.
Ch 2 and sl st into first chain to create a small point.
Work back down with hdc and sc.
Lower Right Lobe
Repeat the lower-left-lobe instructions on the opposite side.
Do not fasten off yet.
Shape the Leaf Edge
Continue around the entire outside edge of the leaf.
Work approximately:
sc, hdc, dc while approaching each point.
At each main point work:
dc, ch 2, sl st into second ch from hook, dc.
Then work:
dc, hdc, sc while moving down toward the valley between lobes.
Place a sl st in the deepest part of each valley.
Repeat around all five lobes.
Crochet the Stem
When you reach the bottom center of the leaf:
Ch 12–16.
Beginning in the second chain from the hook, sl st back along every chain.
Sl st into the base of the leaf.
Fasten off and weave in the yarn tail.
Raised Center Vein
To recreate the strong textured vein visible on the leaf, use the same yarn color.
Insert the hook at the bottom center of the leaf.
Surface slip stitch in a straight line from the base toward the tip of the center lobe.
Keep the stitches relaxed so the leaf stays flat.
Fasten off at the tip.
Left Branching Veins
Join yarn to the center vein approximately one-third of the way up the leaf.
Surface slip stitch diagonally toward the tip of the lower-left lobe.
Fasten off.
Repeat from a slightly higher position toward the upper-left lobe.
Right Branching Veins
Repeat the same technique on the right side.
The finished leaf should have one strong vertical center vein with smaller diagonal veins extending toward each major lobe.
Optional Fine Veins
For extra texture, add shorter surface-slip-stitch lines branching from each main vein.
Keep these secondary lines subtle. They should emphasize the leaf shape without making the surface too bulky.
Blocking
- Lightly dampen the finished leaf.
- Place it on a blocking mat.
- Stretch the center point upward.
- Spread both upper lobes outward.
- Shape the two smaller lower lobes.
- Pin every pointed tip individually.
- Straighten the stem.
- Allow the leaf to dry completely.
Make the Mustard Leaf
Repeat the complete pattern using mustard or golden-yellow yarn.
This shade works beautifully beside sage and rust leaves for a warm harvest palette.
Make the Rust Leaf
Repeat the pattern in burnt orange or rust yarn.
For a deeper fall look, choose a warm brick or cinnamon shade rather than bright orange.
Make the Dark Green Leaf
Use forest, pine or bottle-green yarn for a rich contrasting leaf.
Mixing dark and light greens with orange and mustard gives the collection a natural early-autumn appearance.
Make a Smaller Leaf
For a smaller version, use sport-weight yarn with a 3 mm hook.
You can also shorten each lobe by one row and make the stem with only 8–10 chains.
Mixing two or three sizes makes garlands and wreaths look more natural.
Autumn Leaf Garland
Make approximately 8–14 leaves in several fall colors.
With neutral yarn, make a long chain to the desired garland length.
Attach each leaf by its stem, leaving approximately 8–12 cm / 3–5 in between leaves.
Alternate the colors rather than placing identical shades beside each other.
Autumn Wreath Idea
Make leaves in rust, mustard, sage, forest green and brown.
Arrange them around a wrapped wreath base, overlapping the leaves slightly.
Add small crochet acorns, berries or miniature pumpkins between the leaves for a fuller seasonal design.
Table Decoration Idea
Scatter individual crochet leaves along the center of a wooden table with pinecones and small pumpkins.
The leaves can also be placed beneath mugs, candles or small decorative bowls as handmade autumn accents.
Finishing
- Weave in all loose yarn ends.
- Check that the stem is secure.
- Shape each pointed lobe with your fingers.
- Steam or wet block if necessary.
- Allow the leaf to dry completely before using it in décor.
Suggested Color Sets
Classic Fall: rust + mustard + olive + dark brown
Soft Autumn: sage + terracotta + oatmeal + muted gold
Woodland: forest green + moss + brown + burnt orange
Vintage Harvest: dusty teal + mustard + brick + beige
Thanksgiving: pumpkin orange + burgundy + gold + olive
Frequently Asked Questions
Cotton and cotton-blend yarns give the clearest stitch definition and help the pointed leaf shape hold well. Acrylic also works and creates a softer leaf.
A little curling is normal before blocking. If it curls heavily, your tension may be too tight or the edge may need a few additional stitches around the larger lobes.
Use surface slip stitches along the center and toward each lobe. Keep them slightly loose so they sit visibly above the main crochet fabric without pulling it inward.
Yes. Cotton yarn is especially suitable for leaf coasters. For a flatter coaster, omit some of the raised secondary veins and block the finished leaf firmly.
Yes. Change the yarn weight and hook size or shorten the individual lobes. A mix of sizes looks especially attractive in garlands and wreaths.
Use them for fall garlands, wreaths, table décor, wall hangings, gift toppers, appliqués, Thanksgiving decorations or seasonal crochet arrangements.
The finished Crochet Maple Leaf Pattern – Easy Autumn Leaves

