Crochet Mushroom Trinket Box Pattern
Beginner Friendly
Perfect for those just starting their crochet journey, with clear instructions and simple techniques
Single-Day Project
A satisfying project you can complete in a single afternoon or evening.
Handmade Gift
A beautiful keepsake — free forever. Read online or print at home.
About This Crochet Mushroom Trinket Box Pattern
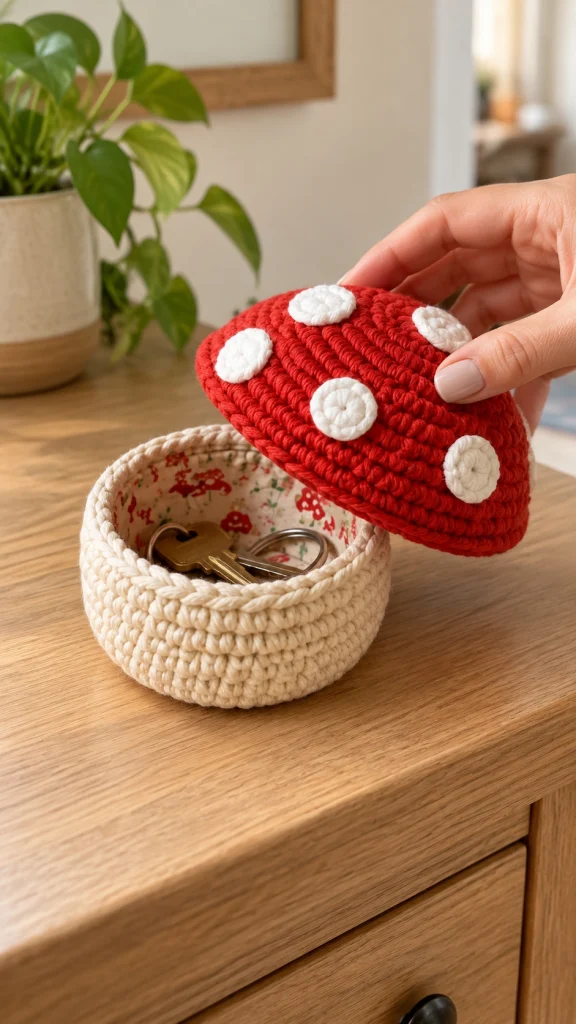
This crochet mushroom trinket box pattern turns a simple little storage basket into the sweetest cottage-inspired accessory. The creamy crochet base forms the mushroom stem while the removable bright-red cap becomes the lid, finished with raised white crochet spots.
Use the finished mushroom to hold keys, rings, earrings, stitch markers or other tiny treasures. It also makes an adorable handmade gift and a charming little piece of crochet decor.
Materials
- Worsted cotton yarn – cream / natural 70–90 g
- Worsted cotton yarn – bright red 50–70 g
- Worsted cotton yarn – white 10–15 g
- 3.5 mm crochet hook 1
- Yarn needle 1
- Scissors 1 pair
- Stitch marker 1
- Optional cotton fabric for lining small piece
- Optional flexible plastic canvas for extra structure small piece
Abbreviations – US Terms
MRmagic ringchchainsl stslip stitchscsingle crochethdchalf double crochetinc2 sc in same stitchdecsingle crochet decreaseBLOback loop onlyst(s)stitch(es)FOfasten offFinished Size
Approximately 13 cm / 5 in wide and 10 cm / 4 in high with the lid in place.
The exact measurements depend on yarn, hook size and tension.
Gauge
Exact gauge is not essential, but the stitches should be tight enough to create a sturdy container.
If your crochet feels floppy, move down to a 3.0 mm hook. If it feels extremely stiff or difficult to work, try a 4.0 mm hook.
Part 1 – Cream Mushroom Base
The base is worked continuously in a spiral. Do not join rounds unless instructed.
Place a stitch marker in the first stitch of every round.
Round 1
With cream yarn, make a MR.
Work 6 sc into the ring.
6 sts.
Round 2
Inc in every stitch around.
12 sts.
Round 3
Repeat [1 sc, inc] around.
18 sts.
Round 4
Repeat [2 sc, inc] around.
24 sts.
Round 5
Repeat [3 sc, inc] around.
30 sts.
Round 6
Repeat [4 sc, inc] around.
36 sts.
Round 7
Repeat [5 sc, inc] around.
42 sts.
Round 8
Repeat [6 sc, inc] around.
48 sts.
Part 2 – Turn the Base Into a Basket
Round 9
Working in BLO, sc in every stitch around.
48 sts.
This creates a clean fold between the bottom and the walls.
Rounds 10–18
Sc in every stitch around.
48 sts each round.
The sides should begin forming a compact rounded container.
Part 3 – Firm Upper Rim
Round 19
Sc in every stitch around.
Round 20
Sl st loosely in every stitch around.
FO and weave in the yarn tail.
This final slip-stitch round gives the opening a firmer, more finished edge.
Optional Fabric Lining
For the cozy lined appearance, cut a circle of lightweight cotton fabric slightly larger than the inside bottom.
Cut a rectangular strip long enough to wrap around the inner wall.
Sew the fabric pieces together first, then place the lining inside the crochet basket.
Turn the upper raw edge inward and hand stitch it discreetly beneath the crochet rim.
Keep the lining slightly loose so it does not distort the crochet walls.
Part 4 – Red Mushroom Cap
The cap is worked from the center outward with red yarn.
Round 1
Make a MR and work 6 sc into the ring.
6 sts.
Round 2
Inc around.
12 sts.
Round 3
Repeat [1 sc, inc] around.
18 sts.
Round 4
Repeat [2 sc, inc] around.
24 sts.
Round 5
Repeat [3 sc, inc] around.
30 sts.
Round 6
Repeat [4 sc, inc] around.
36 sts.
Round 7
Repeat [5 sc, inc] around.
42 sts.
Round 8
Repeat [6 sc, inc] around.
48 sts.
Round 9
Repeat [7 sc, inc] around.
54 sts.
Part 5 – Create the Rounded Cap Shape
Rounds 10–12
Sc in every stitch around.
54 sts.
Round 13
Repeat [7 sc, dec] around.
48 sts.
Round 14
Sc around in BLO.
48 sts.
Round 15
Sc in every stitch around.
Join with sl st and FO.
Part 6 – Optional Inner Lid Rim
For a lid that stays in place more securely, join red yarn to the unused front loops from Round 14.
Work 1 sc into each loop around.
Continue for 2 rounds without increasing.
FO.
This creates a small inner lip that sits just inside the cream basket opening.
Part 7 – White Mushroom Spots
Make approximately 6–8 spots in slightly different sizes for a natural handmade look.
Small Spot
With white yarn, make a MR.
Work 6 sc into the ring.
Join with sl st and FO, leaving a long sewing tail.
Medium Spot
Make a MR.
Work 6 sc into the ring.
Round 2: inc around.
12 sts.
Join and FO.
Part 8 – Attach the Spots
Place the white circles over the red mushroom cap before sewing.
Do not arrange them in perfectly even rows. A slightly irregular placement gives the mushroom more character.
Using the white yarn tails, sew around the outside of each spot.
Keep each circle flat against the red cap.
Weave the tails securely into the inside of the lid.
Part 9 – Add Structure
If you want the mushroom box to hold its shape particularly well, cut a circle of flexible plastic canvas slightly smaller than the crochet base.
Place it inside before adding the fabric lining.
A second flexible circle can be placed inside the red cap.
Do not use cardboard if you plan to wash the finished piece.
Assembly
- Weave in all remaining yarn ends.
- Shape the cream basket with your hands.
- Add the optional internal support.
- Add the optional fabric lining.
- Sew all white spots securely to the red cap.
- Shape the red cap into a soft rounded mushroom form.
- Place the lid over the basket and check that it opens smoothly.
What Can You Keep Inside?
This little mushroom box works beautifully for:
- Keys
- Rings and earrings
- Hair clips
- Stitch markers
- Buttons
- Small sewing supplies
- Wrapped sweets
- Tiny keepsakes
Color Variations
Classic Mushroom: bright red cap, white spots and creamy stem.
Autumn Mushroom: burnt orange cap, beige spots and warm oatmeal base.
Woodland: rust cap, ivory spots and taupe base.
Pastel Cottage: dusty pink cap, cream spots and pale beige base.
Christmas: deep cranberry cap, snowy white spots and ivory base.
Fairy Garden: sage-green cap with pale pink or cream spots.
Care Instructions
If the box has no cardboard or non-washable insert, gently hand wash it in cool water.
Press out excess water without twisting.
Reshape the basket and lid while damp and allow them to air dry completely.
If you added a fabric lining, check the fabric’s washing instructions before cleaning.
Frequently Asked Questions
Yes. Continue the increase sequence on both the cream base and red lid. Add one additional sc between increases on each new increase round.
Your lid may have tighter tension than the basket. Add another increase round or use a hook 0.5 mm larger for the cap.
Try a smaller hook, tighter tension or cotton yarn with more structure. Flexible plastic canvas can also be added inside for extra stability.
Yes. Mixing small and medium circles makes the mushroom cap look more playful and organic.
No. The lining is optional. A tightly crocheted cotton basket works perfectly well without it.
Yes. Fill it with stitch markers, jewelry, wrapped treats or another tiny handmade surprise for a cute gift-within-a-gift.
The finished Crochet Mushroom Trinket Box Pattern

